

Owners Manual
Page 4
... desired AUTOMATIC cycle. 5. Pausing or Restarting To stop your dryer at any type of load and adjust drying time for more information. 1. Fire Hazard No washer can result in death or fire. Items containing foam, rubber, or plastic must be dried on the following pages for optimal performance. To restart the...
... desired AUTOMATIC cycle. 5. Pausing or Restarting To stop your dryer at any type of load and adjust drying time for more information. 1. Fire Hazard No washer can result in death or fire. Items containing foam, rubber, or plastic must be dried on the following pages for optimal performance. To restart the...

Owners Manual
Page 5
... on Timed Dry cycles at any time before or during the cycle. ■ Dry item completely. This chart shows examples of water removed by the washer. Time* (Minutes) Foam rubber - Press CYCLE SIGNAL to select a specific amount of load you are set for Automatic Cycles and cannot be adjusted. pillows, padded...
... on Timed Dry cycles at any time before or during the cycle. ■ Dry item completely. This chart shows examples of water removed by the washer. Time* (Minutes) Foam rubber - Press CYCLE SIGNAL to select a specific amount of load you are set for Automatic Cycles and cannot be adjusted. pillows, padded...
Installation Guide
Page 3
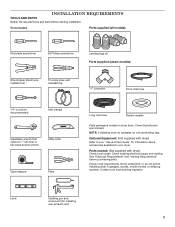
... legs. Tools needed : (Not supplied with dryer) Refer to 1" (25 mm) or hex-head socket wrench Utility knife Tape measure Pliers Long inlet hose Rubber washer Parts package is located in garages, closets, mobile homes, or sleeping quarters. Level Caulking gun and compound (for your local building inspector. Check existing electrical...
... legs. Tools needed : (Not supplied with dryer) Refer to 1" (25 mm) or hex-head socket wrench Utility knife Tape measure Pliers Long inlet hose Rubber washer Parts package is located in garages, closets, mobile homes, or sleeping quarters. Level Caulking gun and compound (for your local building inspector. Check existing electrical...
Installation Guide
Page 4
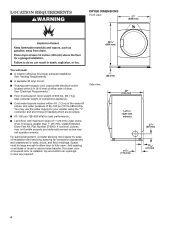
... sides of dryer to fully open. If not level, clothes may not tumble properly and automatic sensor cycles may use the water supply for your washer using power supply cord, a grounded electrical outlet located within 4 ft. (1.2 m) of the water fill valves, and water pressure of 20-100 psi (137.9-689.6 kPa...
... sides of dryer to fully open. If not level, clothes may not tumble properly and automatic sensor cycles may use the water supply for your washer using power supply cord, a grounded electrical outlet located within 4 ft. (1.2 m) of the water fill valves, and water pressure of 20-100 psi (137.9-689.6 kPa...

Installation Guide
Page 6
..., you must be at least 4 ft. (1.22 m) long. Mobile home installations require: ■■ Metal exhaust system hardware, available for undercounter installation. Closet Installation (stacked washer and dryer): 6" (152 mm) 3" (76 mm) 76" (1930 mm) 48 in.2 (310 cm2) 51/2" (140 mm) 1" (25 mm) 3" (76 mm) 24 in remodeling after 1996...
..., you must be at least 4 ft. (1.22 m) long. Mobile home installations require: ■■ Metal exhaust system hardware, available for undercounter installation. Closet Installation (stacked washer and dryer): 6" (152 mm) 3" (76 mm) 76" (1930 mm) 48 in.2 (310 cm2) 51/2" (140 mm) 1" (25 mm) 3" (76 mm) 24 in remodeling after 1996...

Installation Guide
Page 17
... connector. See figure B. Screw on coupling by hand until it is in the "Y" connector. Using pliers, tighten the couplings with new rubber washer provided. 2. NOTE: Do not overtighten. Tighten couplings Attach other side of dryer back panel. CONNECT INLET HOSES For non-steam models, skip to... an additional two-thirds turn. Attach long hose to "Y" connector and tighten couplings Turn cold water faucet off , remove and replace rubber washer 4. Damage to the cold water faucet using the new inlet hoses. The dryer must be connected to the coupling can result. B If...
... connector. See figure B. Screw on coupling by hand until it is in the "Y" connector. Using pliers, tighten the couplings with new rubber washer provided. 2. NOTE: Do not overtighten. Tighten couplings Attach other side of dryer back panel. CONNECT INLET HOSES For non-steam models, skip to... an additional two-thirds turn. Attach long hose to "Y" connector and tighten couplings Turn cold water faucet off , remove and replace rubber washer 4. Damage to the cold water faucet using the new inlet hoses. The dryer must be connected to the coupling can result. B If...
Installation Guide
Page 19
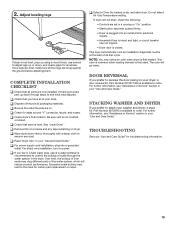
.../or electrical supply. • Household fuse is intact and tight, or circuit breaker has not tripped. • Dryer door is closed. STACKING WASHER AND DRYER If you live in a running or "On" position. • Start button has been pushed firmly. • Dryer is available ... clog different parts of scale through steps to order. For further information, see "Assistance or Service" section in the dryer. TROUBLESHOOTING See your washer and dryer: A stack kit, Part Number 8572546 is plugged into a grounded outlet. 2. q Check that you prefer to reverse the door swing...
.../or electrical supply. • Household fuse is intact and tight, or circuit breaker has not tripped. • Dryer door is closed. STACKING WASHER AND DRYER If you live in a running or "On" position. • Start button has been pushed firmly. • Dryer is available ... clog different parts of scale through steps to order. For further information, see "Assistance or Service" section in the dryer. TROUBLESHOOTING See your washer and dryer: A stack kit, Part Number 8572546 is plugged into a grounded outlet. 2. q Check that you prefer to reverse the door swing...


