
Owners Manual
Page 4
... has ever had anything that has ever had any type of oil on it (even after washing). This Use and Care Guide covers several different models. Press POWER. 4. Press and hold START/PAUSE to the type of fire electric shock, or injury to follow these instructions can completely remove oil. Clean...
... has ever had anything that has ever had any type of oil on it (even after washing). This Use and Care Guide covers several different models. Press POWER. 4. Press and hold START/PAUSE to the type of fire electric shock, or injury to follow these instructions can completely remove oil. Clean...

Owners Manual
Page 5
... the current cycle and turns the dryer OFF. 2. Time* (Minutes) Foam rubber - Automatic Cycle Settings Automatic Cycles Load Type Temperature Est. Cycles NOTE: Not all models. The last selection will vary depending on the dryer. 3. Press the cycle selector button to dry.
... the current cycle and turns the dryer OFF. 2. Time* (Minutes) Foam rubber - Automatic Cycle Settings Automatic Cycles Load Type Temperature Est. Cycles NOTE: Not all models. The last selection will vary depending on the dryer. 3. Press the cycle selector button to dry.

Owners Manual
Page 9
...warranty gives you specific legal rights, and you also may not apply to you on major appliances with the product, Whirlpool Corporation or Whirlpool Canada LP (hereafter "Whirlpool") will need to know your major appliance, to replace or repair house fuses, or to correct house wiring or plumbing... installation instructions. 10. WHIRLPOOL SHALL NOT BE LIABLE FOR INCIDENTAL OR CONSEQUENTIAL DAMAGES. In Canada, call 1800253-1301. Dealer name Address Phone number Model number Serial number Purchase date 9 This limited warranty is valid only in the United States or Canada ...
...warranty gives you specific legal rights, and you also may not apply to you on major appliances with the product, Whirlpool Corporation or Whirlpool Canada LP (hereafter "Whirlpool") will need to know your major appliance, to replace or repair house fuses, or to correct house wiring or plumbing... installation instructions. 10. WHIRLPOOL SHALL NOT BE LIABLE FOR INCIDENTAL OR CONSEQUENTIAL DAMAGES. In Canada, call 1800253-1301. Dealer name Address Phone number Model number Serial number Purchase date 9 This limited warranty is valid only in the United States or Canada ...

Owners Manual
Page 20
Before calling for assistance or service, please check "Troubleshooting" or visit www.whirlpool.com/help . When calling, please know the purchase date and the complete model and serial number of a service call your correspoWnhdierlnpcoeo.l Canada LP ASSISTANCE OU SERVICE ...pdreosdeurivtsicetdfoeurrénpiraurantisoenrveitcdeisatprirbèustleaugrsardaentpieiè,cpeasrtdoeut areucChaanngaedalo.caux. SP © 2010 Whirlpool Corporation. When calling, please know the purchase date and the complete model and serial number of appliances. These parts will fit right and work right...
Before calling for assistance or service, please check "Troubleshooting" or visit www.whirlpool.com/help . When calling, please know the purchase date and the complete model and serial number of a service call your correspoWnhdierlnpcoeo.l Canada LP ASSISTANCE OU SERVICE ...pdreosdeurivtsicetdfoeurrénpiraurantisoenrveitcdeisatprirbèustleaugrsardaentpieiè,cpeasrtdoeut areucChaanngaedalo.caux. SP © 2010 Whirlpool Corporation. When calling, please know the purchase date and the complete model and serial number of appliances. These parts will fit right and work right...
Installation Guide
Page 3
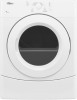
... available for installing new exhaust vent) 3 Optional Equipment: (Not supplied with dryer) Check local codes. Parts needed : Parts supplied (all models): Flat-blade screwdriver #2 Phillips screwdriver Leveling legs (4) Parts supplied (steam models): Wire stripper (direct wire installations) Tin snips (new vent installations) "Y" connector Short inlet hose 1/4" nut driver (recommended) Vent clamps Adjustable...
... available for installing new exhaust vent) 3 Optional Equipment: (Not supplied with dryer) Check local codes. Parts needed : Parts supplied (all models): Flat-blade screwdriver #2 Phillips screwdriver Leveling legs (4) Parts supplied (steam models): Wire stripper (direct wire installations) Tin snips (new vent installations) "Y" connector Short inlet hose 1/4" nut driver (recommended) Vent clamps Adjustable...

Installation Guide
Page 6
... obtained from the external ground connector (green screw), and secured under counter installation (dryer only): 39" min. (990 mm) 1" (25 mm) 1" (25 mm) NOTE: Some models not recommended for Mobile home construction and Safety, Title 24, HUD Part 280) or Standard CAN/CSA-Z240 MH. The cord should contain: ■■...
... obtained from the external ground connector (green screw), and secured under counter installation (dryer only): 39" min. (990 mm) 1" (25 mm) 1" (25 mm) NOTE: Some models not recommended for Mobile home construction and Safety, Title 24, HUD Part 280) or Standard CAN/CSA-Z240 MH. The cord should contain: ■■...
Installation Guide
Page 15
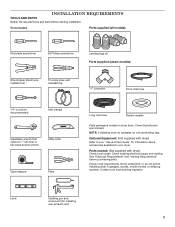
... many varieties. You must be converted to the manufacturer's instructions. Refer to exhaust out right side, left side. NOTE: On Model WED9051Y only, do not exhaust out the left side (all models except WED9051Y), or through bottom. Over-The-Top installation (also available with one offset elbow) Periscope installation Bottom Exhaust installation...
... many varieties. You must be converted to the manufacturer's instructions. Refer to exhaust out right side, left side. NOTE: On Model WED9051Y only, do not exhaust out the left side (all models except WED9051Y), or through bottom. Over-The-Top installation (also available with one offset elbow) Periscope installation Bottom Exhaust installation...

Installation Guide
Page 16
....3 m) 2 Rigid metal 115 ft. (35.1 m) 109 ft. (33.2 m) 3 Rigid metal 106 ft. (32.3 m) 100 ft. (30.5 m) 4 Rigid metal 98 ft. (29.9 m) 92 ft. (28.0 m) *For Model WED9051Y only. Run vent to dryer location using elbows or making turns, allow as much room as possible. ■■ Bend vent gradually to avoid...
....3 m) 2 Rigid metal 115 ft. (35.1 m) 109 ft. (33.2 m) 3 Rigid metal 106 ft. (32.3 m) 100 ft. (30.5 m) 4 Rigid metal 98 ft. (29.9 m) 92 ft. (28.0 m) *For Model WED9051Y only. Run vent to dryer location using elbows or making turns, allow as much room as possible. ■■ Bend vent gradually to avoid...

Installation Guide
Page 17
... by hand until it is seated on faucet. Screw on coupling by hand until it is seated on connector. CONNECT INLET HOSES For non-steam models, skip to "Connect Vent" on fill valve connector. Remove old rubber washer from inlet hose and replace with additional two-thirds turn. Attach long hose...
... by hand until it is seated on faucet. Screw on coupling by hand until it is seated on connector. CONNECT INLET HOSES For non-steam models, skip to "Connect Vent" on fill valve connector. Remove old rubber washer from inlet hose and replace with additional two-thirds turn. Attach long hose...


