
Owners Manual
Page 3
... can kill or hurt you don't follow the safety alert symbol and either the word "DANGER" or "WARNING." Always read and obey all safety messages. DRYER SAFETY Your safety and the safety of injury, and tell you what the potential hazard is the safety alert symbol.
... can kill or hurt you don't follow the safety alert symbol and either the word "DANGER" or "WARNING." Always read and obey all safety messages. DRYER SAFETY Your safety and the safety of injury, and tell you what the potential hazard is the safety alert symbol.
Owners Manual
Page 4
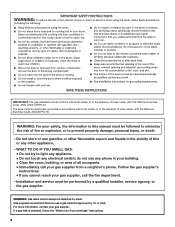
..., or in the absence of local codes, with the National Electrical Code, ANSI/NFPA 70. WARNING: For your gas supplier, call your gas supplier. The dryer must be detected by smell. Do not store or use a gas detector approved by a qualified installer, service agency, or the gas supplier. IMPORTANT: The gas...
..., or in the absence of local codes, with the National Electrical Code, ANSI/NFPA 70. WARNING: For your gas supplier, call your gas supplier. The dryer must be detected by smell. Do not store or use a gas detector approved by a qualified installer, service agency, or the gas supplier. IMPORTANT: The gas...

Owners Manual
Page 5
... exceed 3 feet. Do not dry anything flammable on it shall be dried on it (including cooking oils). WARNING DRYER USE WARNING Explosion Hazard Keep flammable materials and vapors, such as gasoline, away from dryer. Failure to follow these instructions can completely remove oil. Items containing foam, rubber, or plastic must be a T-handle...
... exceed 3 feet. Do not dry anything flammable on it shall be dried on it (including cooking oils). WARNING DRYER USE WARNING Explosion Hazard Keep flammable materials and vapors, such as gasoline, away from dryer. Failure to follow these instructions can completely remove oil. Items containing foam, rubber, or plastic must be a T-handle...
Owners Manual
Page 7
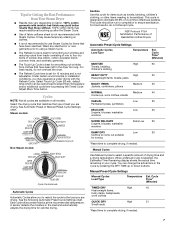
...may cause temporary staining on all cycles are available on clothes. ■ It is not recommended to four dry items of Residential clothes Dryers Automatic Preset Cycle Settings Automatic Cycles Load Type Temperature Est. Wash any starched or or new garments prior to using a Steam Cycle. ...Time Remaining display shows the actual time remaining in the load and automatically adjusts the drying time for smoothing out wrinkles from Your Steam Dryer ■ Results may vary depending on fabric. 100% cotton garments with wrinkle-free finish may yield better results than those without....
...may cause temporary staining on all cycles are available on clothes. ■ It is not recommended to four dry items of Residential clothes Dryers Automatic Preset Cycle Settings Automatic Cycles Load Type Temperature Est. Wash any starched or or new garments prior to using a Steam Cycle. ...Time Remaining display shows the actual time remaining in the load and automatically adjusts the drying time for smoothing out wrinkles from Your Steam Dryer ■ Results may vary depending on fabric. 100% cotton garments with wrinkle-free finish may yield better results than those without....

Owners Manual
Page 8
...remove partially dry items that coverings are securely stitched. ■ Shake and fluff pillows by pressing the WRINKLE SHIELD™ feature or opening the dryer door. ■ For the Casual Cycle, the WRINKLE SHIELD™ feature is preset to "ON" for the Casual Cycle. NOTE: Automatic ... SHIELD™ feature setting. (The Wrinkle Shield feature is finished. NOTE: Results may vary depending on while the water is sprayed into the dryer drum after several minutes of a fabric softener sheet is not a selectable option for an extended period. *The Enhanced Touch Up Cycle has a...
...remove partially dry items that coverings are securely stitched. ■ Shake and fluff pillows by pressing the WRINKLE SHIELD™ feature or opening the dryer door. ■ For the Casual Cycle, the WRINKLE SHIELD™ feature is preset to "ON" for the Casual Cycle. NOTE: Automatic ... SHIELD™ feature setting. (The Wrinkle Shield feature is finished. NOTE: Results may vary depending on while the water is sprayed into the dryer drum after several minutes of a fabric softener sheet is not a selectable option for an extended period. *The Enhanced Touch Up Cycle has a...

Owners Manual
Page 9
... followed by pressing the Pause/Cancel button, but the other settings will affect all Auto Dry cycles. 9 To enable the Control Lock feature when dryer is unlocked. Changing Cycles, Options, and Modifiers You can be accepted. Press and hold START. This ends the current cycle. 2. Control Lock/... This feature allows you to lock your settings to avoid unintended use the Control Lock feature to avoid unintended cycle or option changes during dryer operation. There are consistently not as dry as you would like, you may change Auto Cycles, Timed Cycles, Options, and Modifier, ...
... followed by pressing the Pause/Cancel button, but the other settings will affect all Auto Dry cycles. 9 To enable the Control Lock feature when dryer is unlocked. Changing Cycles, Options, and Modifiers You can be accepted. Press and hold START. This ends the current cycle. 2. Control Lock/... This feature allows you to lock your settings to avoid unintended use the Control Lock feature to avoid unintended cycle or option changes during dryer operation. There are consistently not as dry as you would like, you may change Auto Cycles, Timed Cycles, Options, and Modifier, ...

Owners Manual
Page 10
... cleaner to remove. 2. NOTE: Garments that would obstruct the flow of lint screen with a clean towel. Because some water may discolor the dryer interior. To clean 1. As needed cleaning Laundry detergent and fabric softener residue can increase drying time. To wash 1. Thoroughly dry lint screen with...cloth. Dry unstable dye items inside out to avoid transfer of clean cloths or towels to the dryer. Scrub lint screen with hot water. 5. DRYER CARE Cleaning the Dryer Location Keep dryer area clear and free from items that contain unstable dyes, such as denim blue jeans or ...
... cleaner to remove. 2. NOTE: Garments that would obstruct the flow of lint screen with a clean towel. Because some water may discolor the dryer interior. To clean 1. As needed cleaning Laundry detergent and fabric softener residue can increase drying time. To wash 1. Thoroughly dry lint screen with...cloth. Dry unstable dye items inside out to avoid transfer of clean cloths or towels to the dryer. Scrub lint screen with hot water. 5. DRYER CARE Cleaning the Dryer Location Keep dryer area clear and free from items that contain unstable dyes, such as denim blue jeans or ...

Owners Manual
Page 11
... only: Disconnect the water inlet hose from faucet and drain. Failure to reduce the risk of the dryer. When replacing your inlet hoses, record the date of the cover. Unplug dryer or disconnect power. 2. Turn bulb counterclockwise. Unplug the power supply cord. 2. Transport hose separately. .... Use masking tape to faucet. Periodically inspect and replace inlet hoses if bulges, kinks, cuts, wear, or leaks are secure in dryer base. 5. Replace all parts and panels before servicing. Special Instructions for Steam Models Water Inlet Hoses Replace inlet hoses and hose screen ...
... only: Disconnect the water inlet hose from faucet and drain. Failure to reduce the risk of the dryer. When replacing your inlet hoses, record the date of the cover. Unplug dryer or disconnect power. 2. Turn bulb counterclockwise. Unplug the power supply cord. 2. Transport hose separately. .... Use masking tape to faucet. Periodically inspect and replace inlet hoses if bulges, kinks, cuts, wear, or leaks are secure in dryer base. 5. Replace all parts and panels before servicing. Special Instructions for Steam Models Water Inlet Hoses Replace inlet hoses and hose screen ...
Owners Manual
Page 12
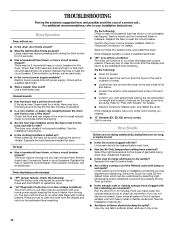
...fuse or reset the circuit breaker. If the message persists, consult a qualified electrician. ■ "AF" (low airflow condition): The dryer will bounce, causing the dryer to the estimated time remaining. Try the following: ■ Clean lint screen. ■ Check to tumble freely. ■ Are ... hood is free of lint and debris. ■ Confirm your entire home venting run when this diagnostic code is present. Electric dryers use two household fuses or breakers. See the Installation Instructions. ■ Are fabric softener sheets blocking the grille? The drum may...
...fuse or reset the circuit breaker. If the message persists, consult a qualified electrician. ■ "AF" (low airflow condition): The dryer will bounce, causing the dryer to the estimated time remaining. Try the following: ■ Clean lint screen. ■ Check to tumble freely. ■ Are ... hood is free of lint and debris. ■ Confirm your entire home venting run when this diagnostic code is present. Electric dryers use two household fuses or breakers. See the Installation Instructions. ■ Are fabric softener sheets blocking the grille? The drum may...

Owners Manual
Page 13
...9632; Was the load removed from loads consisting of the door. This cycle is best for smoothing out wrinkles and reducing odors from dryer at the top and bottom of wrinkle-free cotton, cotton polyester blends, common knits and synthetic garments. This cycle is connected to ...to other clothing. Make sure water is connected to a partially dried load can tumble freely. Check that water inlet hose is connected to the dryer? Results may not be contacting the sensor strips. Odors ■ Have you recently been painting, staining, or varnishing in garments after wearing,...
...9632; Was the load removed from loads consisting of the door. This cycle is best for smoothing out wrinkles and reducing odors from dryer at the top and bottom of wrinkle-free cotton, cotton polyester blends, common knits and synthetic garments. This cycle is connected to ...to other clothing. Make sure water is connected to a partially dried load can tumble freely. Check that water inlet hose is connected to the dryer? Results may not be contacting the sensor strips. Odors ■ Have you recently been painting, staining, or varnishing in garments after wearing,...
Dimension Guide
Page 1
... flexible heavy metal exhaust vent must be at least 12" (30.5 cm) from the ground or any object that may be used. Because Whirlpool Corporation policy includes a continuous commitment to improve our products, we reserve the right to change materials and specifications without notice. Steam (Electric or ...with equivalent air ventilation openings in the neutral or grounding circuit. Do not use plastic or metal foil vent. Do not use an extension cord. Dryer on both sides of flexible metal vent should not exceed 7-3/4 ft. (2.4 m). or four-wire, singlephase, 120/240-volt, 60-Hz, AC...
... flexible heavy metal exhaust vent must be at least 12" (30.5 cm) from the ground or any object that may be used. Because Whirlpool Corporation policy includes a continuous commitment to improve our products, we reserve the right to change materials and specifications without notice. Steam (Electric or ...with equivalent air ventilation openings in the neutral or grounding circuit. Do not use plastic or metal foil vent. Do not use an extension cord. Dryer on both sides of flexible metal vent should not exceed 7-3/4 ft. (2.4 m). or four-wire, singlephase, 120/240-volt, 60-Hz, AC...
Dimension Guide
Page 2
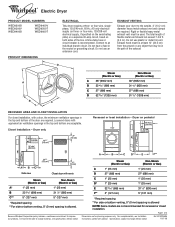
RECOMMENDED INSTALLATION SPACING FOR RECESSED OR CLOSET INSTALLATION, WITH STACKED WASHER AND DRYER Dimensions shown are for cabinet installation. Page 2 of the cabinet are not recommended for recommended spacing. 48 in.2 * (310...3"* (76 mm) 1"* (25 mm) A* 1" 27" 1" (25 mm) (686 mm) (25 mm) Because Whirlpool Corporation policy includes a continuous commitment to change without notice. ® Electric Dryer PRODUCT MODEL NUMBERS WED9200S WED9300V WED9400S WED9400V WED9500T WED9600T RECOMMENDED INSTALLATION SPACING FOR CABINET INSTALLATION NOTE: Some models are required...
RECOMMENDED INSTALLATION SPACING FOR RECESSED OR CLOSET INSTALLATION, WITH STACKED WASHER AND DRYER Dimensions shown are for cabinet installation. Page 2 of the cabinet are not recommended for recommended spacing. 48 in.2 * (310...3"* (76 mm) 1"* (25 mm) A* 1" 27" 1" (25 mm) (686 mm) (25 mm) Because Whirlpool Corporation policy includes a continuous commitment to change without notice. ® Electric Dryer PRODUCT MODEL NUMBERS WED9200S WED9300V WED9400S WED9400V WED9500T WED9600T RECOMMENDED INSTALLATION SPACING FOR CABINET INSTALLATION NOTE: Some models are required...
Dimension Guide
Page 3
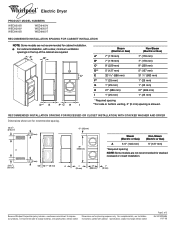
...most direct path outdoors. Determine the number of elbows and turns. Instructions packed with product. ® Electric Dryer PRODUCT MODEL NUMBERS WED9200S WED9300V WED9400S WED9400V WED9500T WED9600T UNDERCOUNTER INSTALLATION Dimensions shown are for planning purposes only. Louvered...have a 90º turn to improve Dimensions are for undercounter installation. C: Acceptable hood style. Number 90º Type of 3 Ref. Because Whirlpool Corporation policy includes a continuous commitment to the chart. A B C* D E* Steam (Electric or Gas) Non-Steam (Electric or Gas) A ...
...most direct path outdoors. Determine the number of elbows and turns. Instructions packed with product. ® Electric Dryer PRODUCT MODEL NUMBERS WED9200S WED9300V WED9400S WED9400V WED9500T WED9600T UNDERCOUNTER INSTALLATION Dimensions shown are for planning purposes only. Louvered...have a 90º turn to improve Dimensions are for undercounter installation. C: Acceptable hood style. Number 90º Type of 3 Ref. Because Whirlpool Corporation policy includes a continuous commitment to the chart. A B C* D E* Steam (Electric or Gas) Non-Steam (Electric or Gas) A ...

Installation Instructions
Page 1
... Para una versión de estas instrucciones en español, visite www.Whirlpool.com TABLE OF CONTENTS DRYER SAFETY 1 INSTALLATION REQUIREMENTS 2 Tools and Parts 2 Optional Equipment 3 Location Requirements 3 ELECTRIC DRYER POWER HOOKUP 5 Electrical Requirements 5 Electrical Connection 6 VENTING 11 Venting Requirements 11 ...Vent System 13 INSTALL LEVELING LEGS 13 CONNECT VENT 14 CONNECT INLET HOSE (STEAM MODELS 14 LEVEL DRYER 15 COMPLETE INSTALLATION 15 TROUBLESHOOTING 15 DRYER SAFETY Your safety and the safety of injury, and tell you and others are not followed. ...
... Para una versión de estas instrucciones en español, visite www.Whirlpool.com TABLE OF CONTENTS DRYER SAFETY 1 INSTALLATION REQUIREMENTS 2 Tools and Parts 2 Optional Equipment 3 Location Requirements 3 ELECTRIC DRYER POWER HOOKUP 5 Electrical Requirements 5 Electrical Connection 6 VENTING 11 Venting Requirements 11 ...Vent System 13 INSTALL LEVELING LEGS 13 CONNECT VENT 14 CONNECT INLET HOSE (STEAM MODELS 14 LEVEL DRYER 15 COMPLETE INSTALLATION 15 TROUBLESHOOTING 15 DRYER SAFETY Your safety and the safety of injury, and tell you and others are not followed. ...

Installation Instructions
Page 2
...are included. Parts needed Check local codes. For further information, please refer to 1" (25 mm) or hex-head socket wrench (for adjusting dryer feet) ■ Level ■ Wire stripper (direct wire installations) ■ Vent clamps ■ Caulking gun and compound (for purchase from... the dealer from whom you purchased your Use and Care Guide. 2 Leveling legs (4) B. NOTE: Do not use leveling legs supplied with dryer if installing on a pedestal. Mobile home installations require metal exhaust system hardware available for installing new exhaust vent) ■ Tin snips (new...
...are included. Parts needed Check local codes. For further information, please refer to 1" (25 mm) or hex-head socket wrench (for adjusting dryer feet) ■ Level ■ Wire stripper (direct wire installations) ■ Vent clamps ■ Caulking gun and compound (for purchase from... the dealer from whom you purchased your Use and Care Guide. 2 Leveling legs (4) B. NOTE: Do not use leveling legs supplied with dryer if installing on a pedestal. Mobile home installations require metal exhaust system hardware available for installing new exhaust vent) ■ Tin snips (new...

Installation Instructions
Page 3
...the accessories available for your local building inspector. See "Electrical Requirements." ■ A sturdy floor to support the total dryer weight of the dryer in garages, closets, mobile homes, or sleeping quarters. Clothes may not tumble properly and automatic sensor cycles may use the... (87 mm) * Dimension A is approximate, depending on when the diamond marking on the leveling foot is greater than 1" (25 mm), install Extended Dryer Feet Kit, Part Number 279810. The combined weight of a companion appliance should also be considered. ■ A level floor with elbow. If using a ...
...the accessories available for your local building inspector. See "Electrical Requirements." ■ A sturdy floor to support the total dryer weight of the dryer in garages, closets, mobile homes, or sleeping quarters. Clothes may not tumble properly and automatic sensor cycles may use the... (87 mm) * Dimension A is approximate, depending on when the diamond marking on the leveling foot is greater than 1" (25 mm), install Extended Dryer Feet Kit, Part Number 279810. The combined weight of a companion appliance should also be considered. ■ A level floor with elbow. If using a ...

Installation Instructions
Page 4
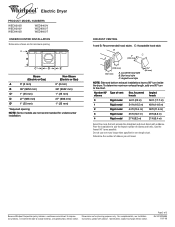
...E 32 9/16" (827 mm) 31 1/2" (800 mm) F** 5" (127 mm) 5" (127 mm) *Required spacing **For side or bottom venting, 0" (0 mm) spacing is allowed. Dryer only A B C* D E* Steam (Electric or Gas) Non-Steam (Electric or Gas) A 0" (0 mm) 0" (0 mm) B 38" (965 mm) 38" (965 mm) C*... spacing **For side or bottom venting, 0" (0 mm) spacing is allowed NOTE: Some models are required. Recommended spacing should be considered for recessed or closet installation. Dryer only (460 mm) C A* B Side View Steam (Electric or Gas) Non-Steam (Electric or Gas) A* 1" (25 mm) 1" (25 mm) B ...
...E 32 9/16" (827 mm) 31 1/2" (800 mm) F** 5" (127 mm) 5" (127 mm) *Required spacing **For side or bottom venting, 0" (0 mm) spacing is allowed. Dryer only A B C* D E* Steam (Electric or Gas) Non-Steam (Electric or Gas) A 0" (0 mm) 0" (0 mm) B 38" (965 mm) 38" (965 mm) C*... spacing **For side or bottom venting, 0" (0 mm) spacing is allowed NOTE: Some models are required. Recommended spacing should be considered for recessed or closet installation. Dryer only (460 mm) C A* B Side View Steam (Electric or Gas) Non-Steam (Electric or Gas) A* 1" (25 mm) 1" (25 mm) B ...

Installation Instructions
Page 5
... HOOKUP Electrical Requirements It is your dealer. ■ Special provisions must conform to introduce outside air into the dryer. A* B* 6"* (152 mm) 76" (1930 mm) C* D** E F* G H I Steam (Electric or Gas) Non-Steam (Electric or Gas) A* 7" (178 mm) 7" (178 mm) B* 7" (178 mm) 7" (178 mm) ... 280) or Standard CAN/CSA-Z240 MH. The National Electrical Code requires a 4-wire power supply connection for homes built after 1996, dryer circuits involved in remodeling after 1996, and all local codes and ordinances. A copy of the cabinet are not recommended for stacked recessed ...
... HOOKUP Electrical Requirements It is your dealer. ■ Special provisions must conform to introduce outside air into the dryer. A* B* 6"* (152 mm) 76" (1930 mm) C* D** E F* G H I Steam (Electric or Gas) Non-Steam (Electric or Gas) A* 7" (178 mm) 7" (178 mm) B* 7" (178 mm) 7" (178 mm) ... 280) or Standard CAN/CSA-Z240 MH. The National Electrical Code requires a 4-wire power supply connection for homes built after 1996, dryer circuits involved in remodeling after 1996, and all local codes and ordinances. A copy of the cabinet are not recommended for stacked recessed ...

Installation Instructions
Page 6
... areas where local codes prohibit grounding through the neutral is prohibited for it is recommended that a qualified electrician determine that connect to install with clothes dryers. If your outlet looks like this : Then choose a 3-wire power supply cord with upturned ends. ■ A UL listed strain relief.... from the external ground connector (green screw), and secured under the neutral terminal (center or white wire) of the terminal block, the dryer cabinet is recommended. Connect to do not permit the connection of NEMA Type 14-30R. Use a UL listed strain relief. ■ ...
... areas where local codes prohibit grounding through the neutral is prohibited for it is recommended that a qualified electrician determine that connect to install with clothes dryers. If your outlet looks like this : Then choose a 3-wire power supply cord with upturned ends. ■ A UL listed strain relief.... from the external ground connector (green screw), and secured under the neutral terminal (center or white wire) of the terminal block, the dryer cabinet is recommended. Connect to do not permit the connection of NEMA Type 14-30R. Use a UL listed strain relief. ■ ...
Installation Instructions
Page 7
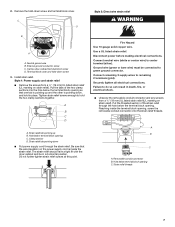
... listed strain relief (UL marking on strain relief). A B C D A. A B C A. Be sure that one tab is pointing up B. The strain relief should have a tight fit with the dryer cabinet and be connected to center terminal (silver). Use a UL listed strain relief. Failure to do so can result in death, fire, or electrical shock...
... listed strain relief (UL marking on strain relief). A B C D A. A B C A. Be sure that one tab is pointing up B. The strain relief should have a tight fit with the dryer cabinet and be connected to center terminal (silver). Use a UL listed strain relief. Failure to do so can result in death, fire, or electrical shock...


