Owners Manual
Page 7
... Low 25 DAMP DRY Low 20 Clothes to select High Temperature and/or additional cycle time by pressing the DRY TIME up after the Steam Cycle. ■ Use of 3 common infectious bacteria. Under certain environmental or installation conditions, you may cause temporary staining on all cycles...(20 min. A sensor detects the moisture in your cycle. This cycle should be sanitized. For best results, do not interrupt cycle. Steam models Non-Steam models Cycle Control knob Automatic Cycles Automatic Cycles allow you to match the cycle to complete drying, if needed . 7 Each cycle dries ...
... Low 25 DAMP DRY Low 20 Clothes to select High Temperature and/or additional cycle time by pressing the DRY TIME up after the Steam Cycle. ■ Use of 3 common infectious bacteria. Under certain environmental or installation conditions, you may cause temporary staining on all cycles...(20 min. A sensor detects the moisture in your cycle. This cycle should be sanitized. For best results, do not interrupt cycle. Steam models Non-Steam models Cycle Control knob Automatic Cycles Automatic Cycles allow you to match the cycle to complete drying, if needed . 7 Each cycle dries ...

Owners Manual
Page 8
...the end of a cycle. The heat setting and cycle time are unable to alert you want to remove lightweight items in a mixed load. Steam Preset Cycle Settings Timed Cycles Load Type Default Est. Only the Medium and High temperature settings can form. WRINKLE SHIELD™ Feature When you are...pressed again, the door is opened and closed, or the door is preset to complete drying, if needed. When using the Air Only setting. Steam Cycles In these cycles, a small amount of water is sprayed into the dryer drum after several minutes of tumbling with the Automatic Cycles. Time*...
...the end of a cycle. The heat setting and cycle time are unable to alert you want to remove lightweight items in a mixed load. Steam Preset Cycle Settings Timed Cycles Load Type Default Est. Only the Medium and High temperature settings can form. WRINKLE SHIELD™ Feature When you are...pressed again, the door is opened and closed, or the door is preset to complete drying, if needed. When using the Air Only setting. Steam Cycles In these cycles, a small amount of water is sprayed into the dryer drum after several minutes of tumbling with the Automatic Cycles. Time*...

Owners Manual
Page 11
..., wear, or leaks are secure in dryer or reconnect power. 11 Reconnect water inlet hose to locate, level, and connect the dryer. Steam models only: Shut off water faucet. 4. Transport hose separately. 4. For direct-wired dryers: WARNING Changing the Drum Light The dryer light... death or electrical shock. 1. Remove the cover. 3. Replace the bulb with the screw. 4. Replace all parts and panels before servicing. Steam models only: Disconnect the water inlet hose from faucet, then drain the hose. Open the dryer door. Electrical Shock Hazard Disconnect power before ...
..., wear, or leaks are secure in dryer or reconnect power. 11 Reconnect water inlet hose to locate, level, and connect the dryer. Steam models only: Shut off water faucet. 4. Transport hose separately. 4. For direct-wired dryers: WARNING Changing the Drum Light The dryer light... death or electrical shock. 1. Remove the cover. 3. Replace the bulb with the screw. 4. Replace all parts and panels before servicing. Steam models only: Disconnect the water inlet hose from faucet, then drain the hose. Open the dryer door. Electrical Shock Hazard Disconnect power before ...

Owners Manual
Page 13
... Is the lint screen clogged? Fabric softener sheets added to both the faucet and dryer's water inlet valve. Drum stains are still wrinkled following Steam Cycle? Check that can stain your dryer is connected to a partially dried load can tumble freely. This cycle is connected to other clothing....; Is the automatic cycle ending early? Increasing or decreasing the dryness level will change the amount of 1-4 garments yield best results with steam cycles. Do not use fabric softener sheets with Quick Refresh Cycle. Dry smaller loads that the water supply is not too long or has...
... Is the lint screen clogged? Fabric softener sheets added to both the faucet and dryer's water inlet valve. Drum stains are still wrinkled following Steam Cycle? Check that can stain your dryer is connected to a partially dried load can tumble freely. This cycle is connected to other clothing....; Is the automatic cycle ending early? Increasing or decreasing the dryness level will change the amount of 1-4 garments yield best results with steam cycles. Do not use fabric softener sheets with Quick Refresh Cycle. Dry smaller loads that the water supply is not too long or has...
Dimension Guide
Page 1
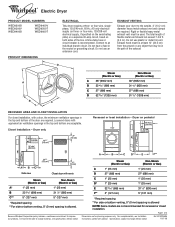
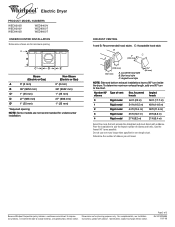
... 5" (127 mm) *Required spacing **For side or bottom venting, 0" (0 mm) spacing is allowed. Closet installation - Dryer on both sides of 3 Dimensions are required. Steam (Electric or Gas) Non-Steam (Electric or Gas) A 1" (25 mm) B 27" (686 mm) C 1" (25 mm) D* 1" (25 mm) E 32 9/16" (686 mm) ...recommended for planning purposes only. Do not use plastic or metal foil vent. Do not use an extension cord. Because Whirlpool Corporation policy includes a continuous commitment to improve our products, we reserve the right to change materials and specifications without notice...
... 5" (127 mm) *Required spacing **For side or bottom venting, 0" (0 mm) spacing is allowed. Closet installation - Dryer on both sides of 3 Dimensions are required. Steam (Electric or Gas) Non-Steam (Electric or Gas) A 1" (25 mm) B 27" (686 mm) C 1" (25 mm) D* 1" (25 mm) E 32 9/16" (686 mm) ...recommended for planning purposes only. Do not use plastic or metal foil vent. Do not use an extension cord. Because Whirlpool Corporation policy includes a continuous commitment to improve our products, we reserve the right to change materials and specifications without notice...
Dimension Guide
Page 2
...B* 7" (178 mm) C* 9" (229 mm) D** 5" (127 mm) E 32 9/16" (686 mm) F* 1" (25 mm) G 1" (25 mm) H 27" (686 mm) I 1" (25 mm) Non-Steam (Electric or Gas) 7" (178 mm) 7" (178 mm) 9" (229 mm) 5" (127 mm) 31 1/2" (800 mm) 1" (25 mm) 1" (25 mm) 27" (686 mm) 1" (25 mm) *Required... only. Instructions packed with a door, minimum ventilation openings in .2 * (155 cm2) 6"* (152 mm) 3"* (76 mm) 76" (1930 mm) Steam (Electric or Gas) Non-Steam (Electric or Gas) A 5 ½" (140 mm) 5" (127 mm) *Required spacing NOTE: Some models are not recommended for stacked recessed or closet...
...B* 7" (178 mm) C* 9" (229 mm) D** 5" (127 mm) E 32 9/16" (686 mm) F* 1" (25 mm) G 1" (25 mm) H 27" (686 mm) I 1" (25 mm) Non-Steam (Electric or Gas) 7" (178 mm) 7" (178 mm) 9" (229 mm) 5" (127 mm) 31 1/2" (800 mm) 1" (25 mm) 1" (25 mm) 27" (686 mm) 1" (25 mm) *Required... only. Instructions packed with a door, minimum ventilation openings in .2 * (155 cm2) 6"* (152 mm) 3"* (76 mm) 76" (1930 mm) Steam (Electric or Gas) Non-Steam (Electric or Gas) A 5 ½" (140 mm) 5" (127 mm) *Required spacing NOTE: Some models are not recommended for stacked recessed or closet...
Dimension Guide
Page 3
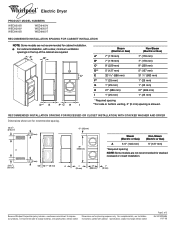
A B C* D E* Steam (Electric or Gas) Non-Steam (Electric or Gas) A 0" (0 mm) 0" (0 mm) B 38" (9652 mm) 38" (9652 mm) C* 1" (25 mm) 1" (25 mm) D 27" (686 mm) E* 1" (25 mm) 27" (686 mm) 1" (25 mm) *.... Number 90º Type of 3 Ref. Do not use the fewest number of elbows you will provide the straightest and most direct path outdoors. Because Whirlpool Corporation policy includes a continuous commitment to improve Dimensions are for minimum spacing. Instructions packed with product. Louvered hood style B. Page 3 of vent elbows Box /louvered...
A B C* D E* Steam (Electric or Gas) Non-Steam (Electric or Gas) A 0" (0 mm) 0" (0 mm) B 38" (9652 mm) 38" (9652 mm) C* 1" (25 mm) 1" (25 mm) D 27" (686 mm) E* 1" (25 mm) 27" (686 mm) 1" (25 mm) *.... Number 90º Type of 3 Ref. Do not use the fewest number of elbows you will provide the straightest and most direct path outdoors. Because Whirlpool Corporation policy includes a continuous commitment to improve Dimensions are for minimum spacing. Instructions packed with product. Louvered hood style B. Page 3 of vent elbows Box /louvered...

Installation Instructions
Page 1
...you what the potential hazard is the safety alert symbol. ONLY Para una versión de estas instrucciones en español, visite www.Whirlpool.com TABLE OF CONTENTS DRYER SAFETY 1 INSTALLATION REQUIREMENTS 2 Tools and Parts 2 Optional Equipment 3 Location Requirements 3 ELECTRIC DRYER POWER HOOKUP 5 ...11 Venting Requirements 11 Plan Vent System 12 Install Vent System 13 INSTALL LEVELING LEGS 13 CONNECT VENT 14 CONNECT INLET HOSE (STEAM MODELS 14 LEVEL DRYER 15 COMPLETE INSTALLATION 15 TROUBLESHOOTING 15 DRYER SAFETY Your safety and the safety of injury, and tell ...
...you what the potential hazard is the safety alert symbol. ONLY Para una versión de estas instrucciones en español, visite www.Whirlpool.com TABLE OF CONTENTS DRYER SAFETY 1 INSTALLATION REQUIREMENTS 2 Tools and Parts 2 Optional Equipment 3 Location Requirements 3 ELECTRIC DRYER POWER HOOKUP 5 ...11 Venting Requirements 11 Plan Vent System 12 Install Vent System 13 INSTALL LEVELING LEGS 13 CONNECT VENT 14 CONNECT INLET HOSE (STEAM MODELS 14 LEVEL DRYER 15 COMPLETE INSTALLATION 15 TROUBLESHOOTING 15 DRYER SAFETY Your safety and the safety of injury, and tell ...

Installation Instructions
Page 2
... available for installing new exhaust vent) ■ Tin snips (new vent installations) ■ ¼" nut driver (recommended) ■ Tape measure ■ Pliers Parts supplied Non-Steam Models Steam Models A B C D E A. For further information, please refer to 1" (25 mm) or hex-head socket wrench (for adjusting dryer feet) ■ Level ■ Wire stripper (direct...
... available for installing new exhaust vent) ■ Tin snips (new vent installations) ■ ¼" nut driver (recommended) ■ Tape measure ■ Pliers Parts supplied Non-Steam Models Steam Models A B C D E A. For further information, please refer to 1" (25 mm) or hex-head socket wrench (for adjusting dryer feet) ■ Level ■ Wire stripper (direct...

Installation Instructions
Page 3
...Check code requirements. Contact your dryer at temperatures below 45ºF (7ºC). Optional Equipment Refer to the bottom of the dryer. ■ Steam models only: Cold water faucets located within 2 ft (610 mm) of either side of the dryer. Do not operate your local building ..., closets, mobile homes, or sleeping quarters. Some codes limit, or do not permit, installation of 200 lbs (90.7 kg). Venting Dimensions C A* B Back View Steam (Electric or Gas) Non-Steam (Electric or Gas) A* 1" (25 mm) 1" (25 mm) B 14" (356 mm) 14" (356 mm) C 3 7/16" (87 mm) 3 7/16" (87 mm)...
...Check code requirements. Contact your dryer at temperatures below 45ºF (7ºC). Optional Equipment Refer to the bottom of the dryer. ■ Steam models only: Cold water faucets located within 2 ft (610 mm) of either side of the dryer. Do not operate your local building ..., closets, mobile homes, or sleeping quarters. Some codes limit, or do not permit, installation of 200 lbs (90.7 kg). Venting Dimensions C A* B Back View Steam (Electric or Gas) Non-Steam (Electric or Gas) A* 1" (25 mm) 1" (25 mm) B 14" (356 mm) 14" (356 mm) C 3 7/16" (87 mm) 3 7/16" (87 mm)...

Installation Instructions
Page 4
... spacing should be considered for the following spacing dimensions are not recommended for undercounter installation. 4 A* B C** Side view Closet door with vents Steam (Electric or Gas) Non-Steam (Electric or Gas) A* 1" (25 mm) 1" (25 mm) B 32 9/16" (827 mm) 31 1/2" (800 mm) C**... spacing **For side or bottom venting, 0" (0 mm) spacing is no longer visible. Recessed or closet installation - Dryer only (460 mm) C A* B Side View Steam (Electric or Gas) Non-Steam (Electric or Gas) A* 1" (25 mm) 1" (25 mm) B 7 5/8" (194 mm) 7 5/8" (194 mm) C 3 3/8" (86 mm) 3 ...
... spacing should be considered for the following spacing dimensions are not recommended for undercounter installation. 4 A* B C** Side view Closet door with vents Steam (Electric or Gas) Non-Steam (Electric or Gas) A* 1" (25 mm) 1" (25 mm) B 32 9/16" (827 mm) 31 1/2" (800 mm) C**... spacing **For side or bottom venting, 0" (0 mm) spacing is no longer visible. Recessed or closet installation - Dryer only (460 mm) C A* B Side View Steam (Electric or Gas) Non-Steam (Electric or Gas) A* 1" (25 mm) 1" (25 mm) B 7 5/8" (194 mm) 7 5/8" (194 mm) C 3 3/8" (86 mm) 3 ...

Installation Instructions
Page 5
... Mobile Home Construction and Safety, Title 24, HUD Part 280) or Standard CAN/CSA-Z240 MH. A* B* 6"* (152 mm) 76" (1930 mm) C* D** E F* G H I Steam (Electric or Gas) Non-Steam (Electric or Gas) A* 7" (178 mm) 7" (178 mm) B* 7" (178 mm) 7" (178 mm) C* 9" (229 mm) 9" (229 mm) D** 5" (127 mm... and in .2 * (155 cm2) 3"* (76 mm) 1"* (25 mm) A* 1" 27" 1" (25 mm) (686 mm) (25 mm) Steam (Electric or Gas) Non-Steam (Electric or Gas) A* 5 ½" (140 mm) 5" (127 mm) *Required spacing NOTE: Some models are required. Additional installation requirements This dryer ...
... Mobile Home Construction and Safety, Title 24, HUD Part 280) or Standard CAN/CSA-Z240 MH. A* B* 6"* (152 mm) 76" (1930 mm) C* D** E F* G H I Steam (Electric or Gas) Non-Steam (Electric or Gas) A* 7" (178 mm) 7" (178 mm) B* 7" (178 mm) 7" (178 mm) C* 9" (229 mm) 9" (229 mm) D** 5" (127 mm... and in .2 * (155 cm2) 3"* (76 mm) 1"* (25 mm) A* 1" 27" 1" (25 mm) (686 mm) (25 mm) Steam (Electric or Gas) Non-Steam (Electric or Gas) A* 5 ½" (140 mm) 5" (127 mm) *Required spacing NOTE: Some models are required. Additional installation requirements This dryer ...

Installation Instructions
Page 14
... the dryer on faucet. 10. Using pliers, tighten the couplings an additional two-thirds turn . 3. Attach other end of dryer back panel. CONNECT INLET HOSE (STEAM MODELS) The dryer must be used. Attach short hose to the coupling can result. 11. See illustration. 4. Screw the legs into its final location. Use...
... the dryer on faucet. 10. Using pliers, tighten the couplings an additional two-thirds turn . 3. Attach other end of dryer back panel. CONNECT INLET HOSE (STEAM MODELS) The dryer must be used. Attach short hose to the coupling can result. 11. See illustration. 4. Screw the legs into its final location. Use...
Installation Instructions
Page 15
... may lead to the estimated time remaining. 15 Use a wrench to back. Be sure the vent is level. Check that both circuit breakers have heat. Steam Models Only: 10. Over time, the buildup of /recycle all parts are intact and tight, or that the dryer is not crushed or kinked. 5. Select...
... may lead to the estimated time remaining. 15 Use a wrench to back. Be sure the vent is level. Check that both circuit breakers have heat. Steam Models Only: 10. Over time, the buildup of /recycle all parts are intact and tight, or that the dryer is not crushed or kinked. 5. Select...


