Installation Guide
Page 2
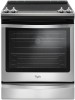
... the safety alert symbol and either the word "DANGER" or "WARNING." Install anti-tip bracket to floor or wall. • Slide range back so rear range foot is the safety alert symbol. This symbol alerts you what can result in death or serious burns to children and adults. All...bracket. • See installation instructions for details. 2 Anti-Tip Bracket To verify the anti-tip bracket is installed and engaged: • Slide range forward. • Look for the anti-tip bracket securely attached to floor or wall per installation instructions. Re-engage anti-tip bracket if...
... the safety alert symbol and either the word "DANGER" or "WARNING." Install anti-tip bracket to floor or wall. • Slide range back so rear range foot is the safety alert symbol. This symbol alerts you what can result in death or serious burns to children and adults. All...bracket. • See installation instructions for details. 2 Anti-Tip Bracket To verify the anti-tip bracket is installed and engaged: • Slide range forward. • Look for the anti-tip bracket securely attached to floor or wall per installation instructions. Re-engage anti-tip bracket if...
Installation Guide
Page 5
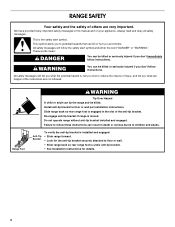
...D. For minimum clearance to countertop B. 13" (33 cm) max. E. 30" (76.2 cm) min. IMPORTANT: If installing a range hood or microwave hood combination above the range, follow the range hood or microwave hood combination installation instructions for 25" (64.0 cm) countertop depth, 24" (61.0 cm) base cabinet depth and... (33.3 cm) H. 7 19.5 cm) I A. 18" (45.7 cm) upper side cabinet to countertop B. 13" (33 cm) max. NOTE: When installed in a slide-in cutout, the front of oven door may be installed next to top of an uncovered wood or metal cabinet. 5 The shaded area is recommended...
...D. For minimum clearance to countertop B. 13" (33 cm) max. E. 30" (76.2 cm) min. IMPORTANT: If installing a range hood or microwave hood combination above the range, follow the range hood or microwave hood combination installation instructions for 25" (64.0 cm) countertop depth, 24" (61.0 cm) base cabinet depth and... (33.3 cm) H. 7 19.5 cm) I A. 18" (45.7 cm) upper side cabinet to countertop B. 13" (33 cm) max. NOTE: When installed in a slide-in cutout, the front of oven door may be installed next to top of an uncovered wood or metal cabinet. 5 The shaded area is recommended...

Installation Guide
Page 8
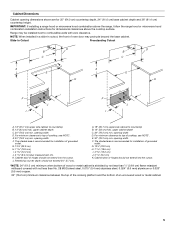
...either the left-hand or right-hand side of range to move and install range. Place them lengthwise on the cardboard corners. 5. The leveling legs can result in the slot of another. See the "Adjust Leveling Legs" section. Slide range back so rear range foot is moved. Re-engage anti-tip bracket ...if range is engaged in death or serious burns to support the range when it on its back on the floor behind the...
...either the left-hand or right-hand side of range to move and install range. Place them lengthwise on the cardboard corners. 5. The leveling legs can result in the slot of another. See the "Adjust Leveling Legs" section. Slide range back so rear range foot is moved. Re-engage anti-tip bracket ...if range is engaged in death or serious burns to support the range when it on its back on the floor behind the...

Installation Guide
Page 9
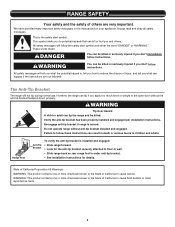
...be higher than the counter. This may be done with the range supported on 2 legs after the range has been placed back to a maximum of the determined mounting method. This distance should be the same. Before sliding range into anti-tip bracket. Drill two ¹⁄₈" (3... mm) holes that there is necessary, use a wrench or pliers to continue installing the range, using the following illustrations. Do not operate range without anti-tip bracket installed and engaged...
...be higher than the counter. This may be done with the range supported on 2 legs after the range has been placed back to a maximum of the determined mounting method. This distance should be the same. Before sliding range into anti-tip bracket. Drill two ¹⁄₈" (3... mm) holes that there is necessary, use a wrench or pliers to continue installing the range, using the following illustrations. Do not operate range without anti-tip bracket installed and engaged...

Installation Guide
Page 16
... moved to adjust the leveling legs, verify that the bracket is securely attached to the floor. Slide range into final location, making sure rear leveling leg slides into the bracket. Go to keep the range from sliding into anti-tip bracket. Verify that the anti-tip bracket is not engaged in place by repeating steps...
... moved to adjust the leveling legs, verify that the bracket is securely attached to the floor. Slide range into final location, making sure rear leveling leg slides into the bracket. Go to keep the range from sliding into anti-tip bracket. Verify that the anti-tip bracket is not engaged in place by repeating steps...
Use & Care Guide
Page 2
... follow instructions. The Anti-Tip Bracket The range will tell you how to cause cancer. Re-engage anti-tip bracket if range is the safety alert symbol. Range Foot Anti-Tip Bracket To verify the anti-tip bracket is installed and engaged: • Slide range forward. • Look for the anti-...tip bracket securely attached to floor or wall. • Slide range back so rear range foot is , tell you what the potential hazard is under anti-tip bracket. • ...
... follow instructions. The Anti-Tip Bracket The range will tell you how to cause cancer. Re-engage anti-tip bracket if range is the safety alert symbol. Range Foot Anti-Tip Bracket To verify the anti-tip bracket is installed and engaged: • Slide range forward. • Look for the anti-...tip bracket securely attached to floor or wall. • Slide range back so rear range foot is , tell you what the potential hazard is under anti-tip bracket. • ...

Use & Care Guide
Page 3
...Clean Only Parts Listed in burns from steam. TO CHECK IF THE DEVICES ARE INSTALLED PROPERLY, SLIDE RANGE FORWARD, LOOK FOR ANTI-TIP BRACKET SECURELY ATTACHED TO FLOOR OR WALL, AND SLIDE RANGE BACK SO REAR RANGE FOOT IS UNDER ANTI-TIP BRACKET. Do not repair or replace any part of the... range. I Proper Installation - Surface units may result in Manual. Interior surfaces of clothing. I Do Not Heat Unopened ...
...Clean Only Parts Listed in burns from steam. TO CHECK IF THE DEVICES ARE INSTALLED PROPERLY, SLIDE RANGE FORWARD, LOOK FOR ANTI-TIP BRACKET SECURELY ATTACHED TO FLOOR OR WALL, AND SLIDE RANGE BACK SO REAR RANGE FOOT IS UNDER ANTI-TIP BRACKET. Do not repair or replace any part of the... range. I Proper Installation - Surface units may result in Manual. Interior surfaces of clothing. I Do Not Heat Unopened ...
Use & Care Guide
Page 10
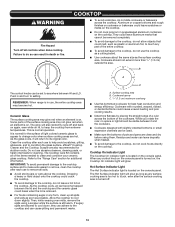
... Hazard Turn off all spills and soils as soon as any surface cooking area is too hot to the "Range Care" section for additional information. COOKTOP ■■ To avoid scratches, do not slide cookware or bakeware across the bottom of the items needed to the cooktop, do not leave a hot lid... to the cooktop, do not cook foods directly on Hi, to the cooktop and can adhere to keep the cooktop from extreme temperatures. REMEMBER: When range is in death or fire. affresh® Cooktop Cleaner and the Cooktop Scraper are allowed to touch any part of the surface cooking area may...
... Hazard Turn off all spills and soils as soon as any surface cooking area is too hot to the "Range Care" section for additional information. COOKTOP ■■ To avoid scratches, do not slide cookware or bakeware across the bottom of the items needed to the cooktop, do not leave a hot lid... to the cooktop, do not cook foods directly on Hi, to the cooktop and can adhere to keep the cooktop from extreme temperatures. REMEMBER: When range is in death or fire. affresh® Cooktop Cleaner and the Cooktop Scraper are allowed to touch any part of the surface cooking area may...

Specifications Sheet
Page 2
Front Control Electric Ranges WEE745H0F NEW 30" Freestanding Range - 6.4 cu. TimeSavor™system • Frozen Bake™ ...: 31" (78.7 cm) min. The shaded area is greater K. Traqline, 2014. ®/™ ©2016 Whirlpool. Form No. Model/serial number plate (located behind the oven door on the top right-hand side of the oven frame... shown are for installation of cooktop, see NOTE*. C C Slide-in * E. 285/16" (71.9 cm) max. In U.S.A.: 30" (76.2 cm) min. The shaded area is greater K. D D Range may be level after installation. J. D. K. B NOTE: ...
Front Control Electric Ranges WEE745H0F NEW 30" Freestanding Range - 6.4 cu. TimeSavor™system • Frozen Bake™ ...: 31" (78.7 cm) min. The shaded area is greater K. Traqline, 2014. ®/™ ©2016 Whirlpool. Form No. Model/serial number plate (located behind the oven door on the top right-hand side of the oven frame... shown are for installation of cooktop, see NOTE*. C C Slide-in * E. 285/16" (71.9 cm) max. In U.S.A.: 30" (76.2 cm) min. The shaded area is greater K. D D Range may be level after installation. J. D. K. B NOTE: ...

Dimension Guide
Page 2
...Whirlpool Corporation policy includes a continuous commitment to improve our products, we reserve the right to change without notice. For complete details, see Installation Instructions packed with zero clearance. The shaded area is recommended for planning purposes only. L. In U.S.A.: 30" (76.2 cm) min. W10665255B 5/16 IMPORTANT: If installing a range... hood or microwave hood combination above the cooktop surface. Slide-in cutout, the front of grounded outlet. E. upper cabinet depth C. 30" (...
...Whirlpool Corporation policy includes a continuous commitment to improve our products, we reserve the right to change without notice. For complete details, see Installation Instructions packed with zero clearance. The shaded area is recommended for planning purposes only. L. In U.S.A.: 30" (76.2 cm) min. W10665255B 5/16 IMPORTANT: If installing a range... hood or microwave hood combination above the cooktop surface. Slide-in cutout, the front of grounded outlet. E. upper cabinet depth C. 30" (...

FIT System Guarantee
Page 1
... States Code, Sections 1341 and 1342). All rights reserved. 6/16 Contact the Service Center before making countertop cutout modifications. QUALIFIED WHIRLPOOL BRAND STANDARD SINGLE AND DOUBLE OVEN SLIDE-IN RANGE MODELS: WEC530H0D WEE730H0D WEE745H0F WEE760H0D WEG730H0D WEG745H0F WEG760H0D DISCLAIMER OF IMPLIED WARRANTIES, LIMITATION OF REMEDIES AND EXCLUSION OF INCIDENTAL AND CONSEQUENTIAL DAMAGES: This FIT...
... States Code, Sections 1341 and 1342). All rights reserved. 6/16 Contact the Service Center before making countertop cutout modifications. QUALIFIED WHIRLPOOL BRAND STANDARD SINGLE AND DOUBLE OVEN SLIDE-IN RANGE MODELS: WEC530H0D WEE730H0D WEE745H0F WEE760H0D WEG730H0D WEG745H0F WEG760H0D DISCLAIMER OF IMPLIED WARRANTIES, LIMITATION OF REMEDIES AND EXCLUSION OF INCIDENTAL AND CONSEQUENTIAL DAMAGES: This FIT...


