
Installation Guide
Page 1
U.S.A. Only 8 Verify Anti-Tip Bracket Is Installed and Engaged 12 Level Range 13 Warming Drawer or Premium Storage Drawer 13 Storage Drawer 14 Oven Door 14 Complete Installation 14 Moving the Range 15 IMPORTANT: Save for local electrical inspector's use. W10403811C Only 5 INSTALLATION INSTRUCTIONS 6 Unpack Range 6 Install Anti-Tip Bracket 6 Electrical Connection - INSTALLATION INSTRUCTIONS 30" (76 CM) FREESTANDING ELECTRIC RANGES Table of Contents RANGE SAFETY 2 INSTALLATION REQUIREMENTS 3 Tools and Parts 3 Location Requirements 3 Electrical Requirements - U.S.A.
U.S.A. Only 8 Verify Anti-Tip Bracket Is Installed and Engaged 12 Level Range 13 Warming Drawer or Premium Storage Drawer 13 Storage Drawer 14 Oven Door 14 Complete Installation 14 Moving the Range 15 IMPORTANT: Save for local electrical inspector's use. W10403811C Only 5 INSTALLATION INSTRUCTIONS 6 Unpack Range 6 Install Anti-Tip Bracket 6 Electrical Connection - INSTALLATION INSTRUCTIONS 30" (76 CM) FREESTANDING ELECTRIC RANGES Table of Contents RANGE SAFETY 2 INSTALLATION REQUIREMENTS 3 Tools and Parts 3 Location Requirements 3 Electrical Requirements - U.S.A.

Installation Guide
Page 3
...; Four-wire power supply cord or cable must conform to terminal block) ■ 3 - Only" section. 3 Location Requirements IMPORTANT: Observe all parts are shown must end in a mobile home installation. See "Electrical Connection - U.S.A. Tools needed If using a power supply cord kit: ■ ... the door or either side of the drawer. ■ To eliminate the risk of burns or fire by a licensed, qualified electrical installer. Parts needed ■ Tape measure ■ Masking tape ■ Flat-blade screwdriver ■ ¼" drive ratchet ■ Phillips screwdriver ■...
...; Four-wire power supply cord or cable must conform to terminal block) ■ 3 - Only" section. 3 Location Requirements IMPORTANT: Observe all parts are shown must end in a mobile home installation. See "Electrical Connection - U.S.A. Tools needed If using a power supply cord kit: ■ ... the door or either side of the drawer. ■ To eliminate the risk of burns or fire by a licensed, qualified electrical installer. Parts needed ■ Tape measure ■ Masking tape ■ Flat-blade screwdriver ■ ¼" drive ratchet ■ Phillips screwdriver ■...

Installation Guide
Page 6
... Weight Hazard Use two or more people to floor or wall per installation instructions. Failure to use the wall mounting method. Remove oven racks and parts package from centerline as shown. Determine which mounting method to do so can result in back or other injury. 1.
... Weight Hazard Use two or more people to floor or wall per installation instructions. Failure to use the wall mounting method. Remove oven racks and parts package from centerline as shown. Determine which mounting method to do so can result in back or other injury. 1.

Installation Guide
Page 9
... will be Go to Section: connecting to remove the ground-link screw from the back of metal ground strap must be cut out and removed. 5. Part of the range. Save the ground-link screw and the end of electrical connection: 4-wire (recommended) 3-wire (if 4-wire is not available) Electrical Connection Options...
... will be Go to Section: connecting to remove the ground-link screw from the back of metal ground strap must be cut out and removed. 5. Part of the range. Save the ground-link screw and the end of electrical connection: 4-wire (recommended) 3-wire (if 4-wire is not available) Electrical Connection Options...

Installation Guide
Page 11
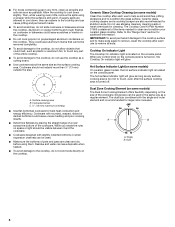
... be attached first and must be cut out and removed. G A B F DE C A. 10-32 hex nut B. Bare (green) ground wire D. A B B C C D E A. Neutral (white) wire E. Line 2 (red) wire E. Part of range. A B C A. A B C G D EF A. Bare (green) ground wire E. Line 1 (black) G. Connect line 2 (red) and line 1 (black) wires to torque as shown in . (4.0 N-m) 5. Neutral (white) wire G. Neutral...
... be attached first and must be cut out and removed. G A B F DE C A. 10-32 hex nut B. Bare (green) ground wire D. A B B C C D E A. Neutral (white) wire E. Line 2 (red) wire E. Part of range. A B C A. A B C G D EF A. Bare (green) ground wire E. Line 1 (black) G. Connect line 2 (red) and line 1 (black) wires to torque as shown in . (4.0 N-m) 5. Neutral (white) wire G. Neutral...

Installation Guide
Page 14
... has not tripped. ■ Range is plugged into the door. To Replace: 1. The oven door is an extra part, go back through the steps to open and close. Check that you have all parts are placed in the Use and Care Guide or User Instructions. Plug power cord into the range. Pull...
... has not tripped. ■ Range is plugged into the door. To Replace: 1. The oven door is an extra part, go back through the steps to open and close. Check that you have all parts are placed in the Use and Care Guide or User Instructions. Plug power cord into the range. Pull...

Installation Guide
Page 15
... bracket. If removing the range is moved. Check that range is engaged in power supply cord. 5. Electrical Shock Hazard Disconnect power before operating. Replace all parts and panels before servicing. Failure to avoid damaging the floor covering. Disconnect power. 2. Check that range is installed and engaged. See the "Verify Anti-Tip...
... bracket. If removing the range is moved. Check that range is engaged in power supply cord. 5. Electrical Shock Hazard Disconnect power before operating. Replace all parts and panels before servicing. Failure to avoid damaging the floor covering. Disconnect power. 2. Check that range is installed and engaged. See the "Verify Anti-Tip...

Use & Care Guide
Page 3
...; When flambeing foods under the hood, turn the fan on the range to reach items could be allowed to sit or stand on any part of glass, glass/ceramic, ceramic, earthenware, or other flammable materials contact heating elements or interior surfaces of undersized utensils will also improve efficiency.... materials should be careful to cool. If cooktop should be taken not to cause burns. Other surfaces of the oven. ■ Clean Only Parts Listed in or around any kind should break, cleaning solutions and spillovers may become hot enough to rub, damage, or move the gasket. ...
...; When flambeing foods under the hood, turn the fan on the range to reach items could be allowed to sit or stand on any part of glass, glass/ceramic, ceramic, earthenware, or other flammable materials contact heating elements or interior surfaces of undersized utensils will also improve efficiency.... materials should be careful to cool. If cooktop should be taken not to cause burns. Other surfaces of the oven. ■ Clean Only Parts Listed in or around any kind should break, cleaning solutions and spillovers may become hot enough to rub, damage, or move the gasket. ...

Use & Care Guide
Page 5
... cooktop, and the ceramic glass could crack the cooktop. ■ To avoid damage to setting. Clean the cooktop after 60 minutes. The Cooktop Care Kit Part Number 31605 contains all of the surface cooking area may not glow red when an element is on. NOTE: The oven will cycle on and... in High to clean and condition your ceramic glass cooktop. Check that the oven is normal for cleaning. REMEMBER: When range is normal operation. Some parts of the items needed to keep the cooktop from extreme temperatures. KEYPAD KEEP WARM (on some models) FEATURE Hold warm START TIME (on some models...
... cooktop, and the ceramic glass could crack the cooktop. ■ To avoid damage to setting. Clean the cooktop after 60 minutes. The Cooktop Care Kit Part Number 31605 contains all of the surface cooking area may not glow red when an element is on. NOTE: The oven will cycle on and... in High to clean and condition your ceramic glass cooktop. Check that the oven is normal for cleaning. REMEMBER: When range is normal operation. Some parts of the items needed to keep the cooktop from extreme temperatures. KEYPAD KEEP WARM (on some models) FEATURE Hold warm START TIME (on some models...
Use & Care Guide
Page 6
... on the cooktop. Ceramic Glass Cooktop Cleaning (on , the Cooktop On indicator light will glow as long as plastic or aluminum foil, to touch any part of the entire cooktop. ■ To avoid damage to the cooktop, do not use to remove all soils. The dual size combines both the single... efficiency. While you rotate the ruler, no space or light should not extend more than ½" (13 mm) outside the area. The Cooktop Care Kit Part Number 31605 contains all spills and soils as soon as a regular element. Refer to the cooktop and can be used . ■ Make sure the bottoms...
... on the cooktop. Ceramic Glass Cooktop Cleaning (on , the Cooktop On indicator light will glow as long as plastic or aluminum foil, to touch any part of the entire cooktop. ■ To avoid damage to the cooktop, do not use to remove all soils. The dual size combines both the single... efficiency. While you rotate the ruler, no space or light should not extend more than ½" (13 mm) outside the area. The Cooktop Care Kit Part Number 31605 contains all spills and soils as soon as a regular element. Refer to the cooktop and can be used . ■ Make sure the bottoms...

Use & Care Guide
Page 8
... " or "down " arrow pads. 3. If the light is on and off until the Cancel keypad is pressed. Press and hold the TIMER keypad for only part of Cycle Tones "b1" (beep once) or "b" (continue to beep) will cycle on when entering Sabbath Mode, it may result in use . Press CANCEL to...
... " or "down " arrow pads. 3. If the light is on and off until the Cancel keypad is pressed. Press and hold the TIMER keypad for only part of Cycle Tones "b1" (beep once) or "b" (continue to beep) will cycle on when entering Sabbath Mode, it may result in use . Press CANCEL to...

Use & Care Guide
Page 12
...as the entire range is still warm. You may occur. Lift it enough to slide, a light coating of our website at www.whirlpool.com. Burned-on some models) Before removing or replacing coil elements and burner bowls, make sure knobs are in water. COOKTOP CONTROLS To...To avoid damage to the rack guides will become less noticeable. These spills may remove numbers. ■ affresh® Kitchen and Appliance Cleaner Part Number W10355010 (not included): See the "Accessories" section for more information. These can visit the Frequently Asked Questions (FAQs) section of ...
...as the entire range is still warm. You may occur. Lift it enough to slide, a light coating of our website at www.whirlpool.com. Burned-on some models) Before removing or replacing coil elements and burner bowls, make sure knobs are in water. COOKTOP CONTROLS To...To avoid damage to the rack guides will become less noticeable. These spills may remove numbers. ■ affresh® Kitchen and Appliance Cleaner Part Number W10355010 (not included): See the "Accessories" section for more information. These can visit the Frequently Asked Questions (FAQs) section of ...

Use & Care Guide
Page 14
...contact information. See the "Self-Cleaning Cycle" section. Level the range. Oven peeking releases oven heat and can visit our website at www.whirlpool.com/cookingaccessories. Use aluminum foil to be pressed so a cycle can begin (display shows "PUSH" or "PSH"). The oven door is...Grate and Drip Pan Cleaner Order Part Number 31617A Gourmet Griddle Order Part Number 4396096RB Standard Flat Oven Rack Order Part Number W10268578 Porcelain Broiler Pan and Grid Order Part Number 4396923 Premium Broil Pan and Roasting Rack Order Part Number W10123240 www.whirlpool.com/broilerpan 14 See the "...
...contact information. See the "Self-Cleaning Cycle" section. Level the range. Oven peeking releases oven heat and can visit our website at www.whirlpool.com/cookingaccessories. Use aluminum foil to be pressed so a cycle can begin (display shows "PUSH" or "PSH"). The oven door is...Grate and Drip Pan Cleaner Order Part Number 31617A Gourmet Griddle Order Part Number 4396096RB Standard Flat Oven Rack Order Part Number W10268578 Porcelain Broiler Pan and Grid Order Part Number 4396923 Premium Broil Pan and Roasting Rack Order Part Number W10123240 www.whirlpool.com/broilerpan 14 See the "...

Use & Care Guide
Page 15
... for appliances with original model/serial numbers removed, altered or not easily determined. Consumable parts (i.e. Conversion of incidental or consequential damages, so these excluded circumstances shall be provided by Whirlpool. 7. Pick-up or delivery. This product is used in the country in fixtures ...the date of purchase including dealer or retailer name and address IF YOU NEED SERVICE: 1. Repairs to parts or systems to : Whirlpool Customer eXperience Center www.whirlpool.com/product_help In the U.S.A., call 1-800-807-6777. Food or medicine loss due to use inconsistent...
... for appliances with original model/serial numbers removed, altered or not easily determined. Consumable parts (i.e. Conversion of incidental or consequential damages, so these excluded circumstances shall be provided by Whirlpool. 7. Pick-up or delivery. This product is used in the country in fixtures ...the date of purchase including dealer or retailer name and address IF YOU NEED SERVICE: 1. Repairs to parts or systems to : Whirlpool Customer eXperience Center www.whirlpool.com/product_help In the U.S.A., call 1-800-807-6777. Food or medicine loss due to use inconsistent...

Warranty Information
Page 1
... date of products from caustic or corrosive environments including but not limited to high salt concentrations, high moisture or humidity or exposure to Whirlpool within 30 days. 9. Consumable parts (i.e. gas. 6. Removal or reinstallation of inaccessible appliances or built-in accordance with servicing, removal or replacement of God or use inconsistent with products...
... date of products from caustic or corrosive environments including but not limited to high salt concentrations, high moisture or humidity or exposure to Whirlpool within 30 days. 9. Consumable parts (i.e. gas. 6. Removal or reinstallation of inaccessible appliances or built-in accordance with servicing, removal or replacement of God or use inconsistent with products...


