
Owners Manual
Page 1
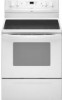
Table of Contents RANGE SAFETY 2 The Anti-Tip Bracket 2 FEATURE GUIDE 4 COOKTOP USE 5 OVEN USE 6 Electronic Oven Controls 6 Aluminum Foil 6 Positioning Racks and Bakeware 7 Oven Vent 7 Baking and Roasting 7 Broiling 7 Convection Baking and Roasting 8 Timed Cooking (on some models 8 RANGE CARE 8 Self-Cleaning Cycle...visite: www.whirlpool.com Tenga listo su número de modelo completo. Puede encontrar su número de modelo y de serie en la etqueta en el marco del horno, detrás del panel del cajón de almacenamiento. ® ELECTRIC RANGE USER INSTRUCTIONS ...
Table of Contents RANGE SAFETY 2 The Anti-Tip Bracket 2 FEATURE GUIDE 4 COOKTOP USE 5 OVEN USE 6 Electronic Oven Controls 6 Aluminum Foil 6 Positioning Racks and Bakeware 7 Oven Vent 7 Baking and Roasting 7 Broiling 7 Convection Baking and Roasting 8 Timed Cooking (on some models 8 RANGE CARE 8 Self-Cleaning Cycle...visite: www.whirlpool.com Tenga listo su número de modelo completo. Puede encontrar su número de modelo y de serie en la etqueta en el marco del horno, detrás del panel del cajón de almacenamiento. ® ELECTRIC RANGE USER INSTRUCTIONS ...

Owners Manual
Page 4
... website at end of the cycle. 6. After 20 minutes, a beep will sound at www.whirlpool.com for more detailed instructions. Remove any excess water with a.m. A tone will sound, and ...CLOCK or START. If enabled, end-of-cycle tones will sound to set the length of the range. Press TIMER twice to take effect. 5. Press BAKE. 2. "Add H2O" will be controlled...TO LOCK HOLD 3 SEC Oven control lockout 1. and p.m. 1. Press START or wait 5 seconds for the SteamClean feature. 1. Push START. 5. Check that the oven is off . or p.m. 4. If the TIMER is off . ...
... website at end of the cycle. 6. After 20 minutes, a beep will sound at www.whirlpool.com for more detailed instructions. Remove any excess water with a.m. A tone will sound, and ...CLOCK or START. If enabled, end-of-cycle tones will sound to set the length of the range. Press TIMER twice to take effect. 5. Press BAKE. 2. "Add H2O" will be controlled...TO LOCK HOLD 3 SEC Oven control lockout 1. and p.m. 1. Press START or wait 5 seconds for the SteamClean feature. 1. Push START. 5. Check that the oven is off . or p.m. 4. If the TIMER is off . ...
Owners Manual
Page 5
...Press CANCEL/OFF when finished. Press CANCEL/OFF when finished. 1. Press START. 4. COOKTOP USE WARNING Fire Hazard Turn off . 5 REMEMBER: When range is on at a certain time of day, cook for foods such as breads and cakes because they may become hot. Cooktop On Indicator Light The...selected heat level. Press WARM. 2. To set length of day is located on some models) START TIME START CANCEL/OFF TEMP/TIME FEATURE Broiling Convection baking and roasting Hold warm Timed cooking Delayed start Cooking start . The Start Time keypad is turned on and off automatically...
...Press CANCEL/OFF when finished. Press CANCEL/OFF when finished. 1. Press START. 4. COOKTOP USE WARNING Fire Hazard Turn off . 5 REMEMBER: When range is on at a certain time of day, cook for foods such as breads and cakes because they may become hot. Cooktop On Indicator Light The...selected heat level. Press WARM. 2. To set length of day is located on some models) START TIME START CANCEL/OFF TEMP/TIME FEATURE Broiling Convection baking and roasting Hold warm Timed cooking Delayed start Cooking start . The Start Time keypad is turned on and off automatically...

Owners Manual
Page 7
... (ceramic glass model) Baking and Roasting ACCUBAKE® Temperature Management System (on the oven door or bottom. This feature is automatically activated when the oven is not necessary to maintain a precise temperature range for baking. When roasting, it is designed to circulate. Broiling Broiling uses direct radiant heat to the porcelain finish...
... (ceramic glass model) Baking and Roasting ACCUBAKE® Temperature Management System (on the oven door or bottom. This feature is automatically activated when the oven is not necessary to maintain a precise temperature range for baking. When roasting, it is designed to circulate. Broiling Broiling uses direct radiant heat to the porcelain finish...

Owners Manual
Page 8
...the display. 8. Always move or bend the gasket. Air must be changed anytime after cooking. Timed Cooking (on some models) WARNING Prepare Range ■ Remove the broiler pan, grid, cookware and bakeware, all items from oven during convection baking or roasting, the fan will appear...TIME "+" or "-" arrow pads to maintain the oven temperature, while the fan circulates the hot air. Press START TIME. See the "Clock" keypad feature in food poisoning or sickness. 2. Press COOK TIME. When the start . 7. Depending on . To stop the self-cleaning cycle at anytime, press...
...the display. 8. Always move or bend the gasket. Air must be changed anytime after cooking. Timed Cooking (on some models) WARNING Prepare Range ■ Remove the broiler pan, grid, cookware and bakeware, all items from oven during convection baking or roasting, the fan will appear...TIME "+" or "-" arrow pads to maintain the oven temperature, while the fan circulates the hot air. Press START TIME. See the "Clock" keypad feature in food poisoning or sickness. 2. Press COOK TIME. When the start . 7. Depending on . To stop the self-cleaning cycle at anytime, press...

Owners Manual
Page 9
... but after the SteamClean cycle. ■ If the oven is cool. IMPORTANT: Since the water in the display and the SteamClean feature will sound at www.whirlpool.com. Helpful Hints ■ Once the SteamClean cycle is also recommended for cool down. The Cooktop Scraper uses razor blades. Light ... and 4 hours 30 minutes in a more stubborn stains. ■ It is recommended to remove any mineral deposits that may help avoid scratches, pitting and abrasions and to end the cycle. SteamClean (on the oven bottom. Allow the range to cool to the time of the cycle. A beep ...
... but after the SteamClean cycle. ■ If the oven is cool. IMPORTANT: Since the water in the display and the SteamClean feature will sound at www.whirlpool.com. Helpful Hints ■ Once the SteamClean cycle is also recommended for cool down. The Cooktop Scraper uses razor blades. Light ... and 4 hours 30 minutes in a more stubborn stains. ■ It is recommended to remove any mineral deposits that may help avoid scratches, pitting and abrasions and to end the cycle. SteamClean (on the oven bottom. Allow the range to cool to the time of the cycle. A beep ...
Owners Manual
Page 10
...2. Cooktop will not operate ■ Is the electronic oven control set ? Push in the OFF position. See the control lock keypad feature in range or reconnect power. Use cookware about the same size as the surface cooking area, element or surface burner. See "Timed Cooking" section...cycle been selected? Level the range. Oven indicator lights flash ■ Do the oven indicator lights flash? Do not soak knobs. Cleaning Method: ■ Mild detergent Oven Light The oven light is the oven control lockout set correctly? www.whirlpool.com Nothing will become less ...
...2. Cooktop will not operate ■ Is the electronic oven control set ? Push in the OFF position. See the control lock keypad feature in range or reconnect power. Use cookware about the same size as the surface cooking area, element or surface burner. See "Timed Cooking" section...cycle been selected? Level the range. Oven indicator lights flash ■ Do the oven indicator lights flash? Do not soak knobs. Cleaning Method: ■ Mild detergent Oven Light The oven light is the oven control lockout set correctly? www.whirlpool.com Nothing will become less ...
Owners Manual
Page 11
See "Clock" keypad feature in the pan? See cover for service. Level the range. Double-check the recipe in the pan. ■ Is the proper length of the "Electronic Oven Controls" section. ■ Was the oven preheated? Check that ..." section. See the Installation Instructions. ■ Is the proper temperature set ? See "Positioning Racks and Bakeware" section. ■ Is the batter evenly distributed in the "Feature Guide" section. ■ Is the display showing a letter followed by a number? Self-Cleaning cycle will not operate ■ Is the oven door open? If it...
See "Clock" keypad feature in the pan? See cover for service. Level the range. Double-check the recipe in the pan. ■ Is the proper length of the "Electronic Oven Controls" section. ■ Was the oven preheated? Check that ..." section. See the Installation Instructions. ■ Is the proper temperature set ? See "Positioning Racks and Bakeware" section. ■ Is the batter evenly distributed in the "Feature Guide" section. ■ Is the display showing a letter followed by a number? Self-Cleaning cycle will not operate ■ Is the oven door open? If it...


