Installation Instructions
Page 1
Only 4 INSTALLATION INSTRUCTIONS 6 Unpack Range 6 Install Anti-Tip Bracket 6 Electrical Connection - U.S.A. Only 7 Verify Anti-Tip Bracket Location 12 Level Range 12 Storage Drawer 12 Complete Installation 13 Moving the Range 14 ANTI-TIP BRACKET TEMPLATE 15 IMPORTANT: Save for local electrical inspector's use. W10252706B U.S.A. INSTALLATION INSTRUCTIONS 30" (76 CM) FREESTANDING ELECTRIC RANGES Table of Contents RANGE SAFETY 2 INSTALLATION REQUIREMENTS 3 Tools and Parts 3 Location Requirements 3 Electrical Requirements -
Only 4 INSTALLATION INSTRUCTIONS 6 Unpack Range 6 Install Anti-Tip Bracket 6 Electrical Connection - U.S.A. Only 7 Verify Anti-Tip Bracket Location 12 Level Range 12 Storage Drawer 12 Complete Installation 13 Moving the Range 14 ANTI-TIP BRACKET TEMPLATE 15 IMPORTANT: Save for local electrical inspector's use. W10252706B U.S.A. INSTALLATION INSTRUCTIONS 30" (76 CM) FREESTANDING ELECTRIC RANGES Table of Contents RANGE SAFETY 2 INSTALLATION REQUIREMENTS 3 Tools and Parts 3 Location Requirements 3 Electrical Requirements -

Installation Instructions
Page 3
... and follow the instructions provided with ranges. Anti-tip bracket B. Thickness of UL and CSA International and complies with upturned ends. ■ A UL listed strain relief. Parts needed ■ Tape measure ■ ¼" drive ratchet ■ Flat-blade screwdriver ■ Level ■ Hammer ■ Hand or electric drill ■ Wrench or pliers ■...
... and follow the instructions provided with ranges. Anti-tip bracket B. Thickness of UL and CSA International and complies with upturned ends. ■ A UL listed strain relief. Parts needed ■ Tape measure ■ ¼" drive ratchet ■ Flat-blade screwdriver ■ Level ■ Hammer ■ Hand or electric drill ■ Wrench or pliers ■...

Installation Instructions
Page 6
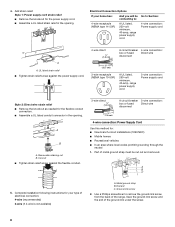
... leg C. AB C If cabinet opening is wider than that the left edge is against rear wall, molding or cabinet. 3. INSTALLATION INSTRUCTIONS Unpack Range WARNING Excessive Weight Hazard Use two or more people to children and adults. See the "Storage Drawer" section. Connect anti-tip bracket to adjust ...be killed. Use a ¼" drive ratchet to lower the front and rear leveling legs one -half turn . Remove oven racks and parts package from outside the range. Do not remove the shipping base at this manual. 2. If countertop is not flush with cabinet opening so that specified in the ...
... leg C. AB C If cabinet opening is wider than that the left edge is against rear wall, molding or cabinet. 3. INSTALLATION INSTRUCTIONS Unpack Range WARNING Excessive Weight Hazard Use two or more people to children and adults. See the "Storage Drawer" section. Connect anti-tip bracket to adjust ...be killed. Use a ¼" drive ratchet to lower the front and rear leveling legs one -half turn . Remove oven racks and parts package from outside the range. Do not remove the shipping base at this manual. 2. If countertop is not flush with cabinet opening so that specified in the ...
Installation Instructions
Page 8
...box or fused Direct wire disconnect 5" (12.7 cm) 3-wire receptacle (NEMA type 10-50R) A UL listed, 250-volt minimum, 40-amp, range power supply cord 3-wire connection: Power supply cord Style 2: Direct wire strain relief ■ Remove the knockout as needed for the power supply cord... ground strap must be Go to Section: connecting to remove the ground-link screw from the back of electrical connection: 4-wire (recommended) 3-wire (if 4-wire is not available) A. A B A. Part of the ground-link under the screw. 8 Complete installation following instructions for : ■ New branch-...
...box or fused Direct wire disconnect 5" (12.7 cm) 3-wire receptacle (NEMA type 10-50R) A UL listed, 250-volt minimum, 40-amp, range power supply cord 3-wire connection: Power supply cord Style 2: Direct wire strain relief ■ Remove the knockout as needed for the power supply cord... ground strap must be Go to Section: connecting to remove the ground-link screw from the back of electrical connection: 4-wire (recommended) 3-wire (if 4-wire is not available) A. A B A. Part of the ground-link under the screw. 8 Complete installation following instructions for : ■ New branch-...
Installation Instructions
Page 10
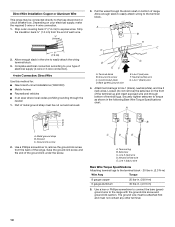
...range. Attach terminal lugs to expose wires. A A B B C A. Neutral (white) wire E. The ground wire must be attached first and must be connected directly to torque as shown in . (4.0 N-m) 5. Pull the wires through the strain relief on your type of metal ground strap must not contact any other terminal. 10 Part of electrical... to connect the bare (green) ground wire to the terminal block. Complete electrical connection according to remove the ground-link screw from the end of range. Ground-link screw C. Save the ground-link screw and the end of terminal...
...range. Attach terminal lugs to expose wires. A A B B C A. Neutral (white) wire E. The ground wire must be attached first and must be connected directly to torque as shown in . (4.0 N-m) 5. Pull the wires through the strain relief on your type of metal ground strap must not contact any other terminal. 10 Part of electrical... to connect the bare (green) ground wire to the terminal block. Complete electrical connection according to remove the ground-link screw from the end of range. Ground-link screw C. Save the ground-link screw and the end of terminal...
Installation Instructions
Page 13
.... 2. Turn power on surface burners and oven. Check that the range is an extra part, go back through the steps to a level position. 3. Turn on . 8. When the range has been on for 5 minutes, check for specific instruction on both... sides, slide the drawer back into an outlet. ■ Electrical supply is intact and tight; Engage drawer glide. 4. Slowly push the storage drawer into appropriate outlet. If range...
.... 2. Turn power on surface burners and oven. Check that the range is an extra part, go back through the steps to a level position. 3. Turn on . 8. When the range has been on for 5 minutes, check for specific instruction on both... sides, slide the drawer back into an outlet. ■ Electrical supply is intact and tight; Engage drawer glide. 4. Slowly push the storage drawer into appropriate outlet. If range...
Installation Instructions
Page 14
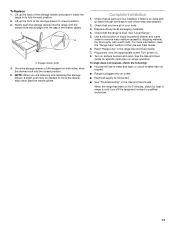
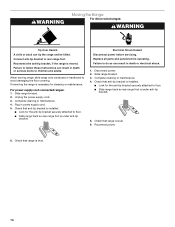
Reconnect the anti-tip bracket, if the range is under anti-tip bracket. Complete cleaning or maintenance. 4. Slide range forward. 3. Check that range is level. 6. Slide range forward. 2. Plug in death or electrical shock. 1. Disconnect power. 2. Replace all parts and panels before servicing. Reconnect power. 6. Check that anti-tip bracket is installed: ■ Look for cleaning or...
Reconnect the anti-tip bracket, if the range is under anti-tip bracket. Complete cleaning or maintenance. 4. Slide range forward. 3. Check that range is level. 6. Slide range forward. 2. Plug in death or electrical shock. 1. Disconnect power. 2. Replace all parts and panels before servicing. Reconnect power. 6. Check that anti-tip bracket is installed: ■ Look for cleaning or...

Owners Manual
Page 3
...Not Clean Door Gasket - Care should not be left alone or unattended in area where the range is used in or around any part of the range unless specifically recommended in cabinets above a range or on the Range - Areas near surface units. ■ Do Not Use Water on . Proper relationship of... to a qualified technician. ■ Storage in an oven or near surface units may penetrate the broken cooktop and create a risk of fire, electrical shock, injury to cool. Let hot air or steam escape before removing or replacing food. ■ Do Not Heat Unopened Food Containers - To...
...Not Clean Door Gasket - Care should not be left alone or unattended in area where the range is used in or around any part of the range unless specifically recommended in cabinets above a range or on the Range - Areas near surface units. ■ Do Not Use Water on . Proper relationship of... to a qualified technician. ■ Storage in an oven or near surface units may penetrate the broken cooktop and create a risk of fire, electrical shock, injury to cool. Let hot air or steam escape before removing or replacing food. ■ Do Not Heat Unopened Food Containers - To...

Owners Manual
Page 7
..., yeast bread, quick breads, frozen convenience foods, and 2-rack baking. When roasting, it is designed to maintain a precise temperature range for contact information. Broiling Broiling uses direct radiant heat to the cover for optimal cooking results. Changing the temperature when Custom Broiling allows...and help avoid spatter and smoke. Rack Positions Rack 5: Toasting bread or broiling thin, non-fatty foods. Rack 4: Use for Part Number 4396923. 7 Rack 1: Roasting large and small cuts of space around bakeware and oven walls. Baking Layer Cakes on 2 Racks...
..., yeast bread, quick breads, frozen convenience foods, and 2-rack baking. When roasting, it is designed to maintain a precise temperature range for contact information. Broiling Broiling uses direct radiant heat to the cover for optimal cooking results. Changing the temperature when Custom Broiling allows...and help avoid spatter and smoke. Rack Positions Rack 5: Toasting bread or broiling thin, non-fatty foods. Rack 4: Use for Part Number 4396923. 7 Rack 1: Roasting large and small cuts of space around bakeware and oven walls. Baking Layer Cakes on 2 Racks...

Owners Manual
Page 9
... will turn off sugary spills while the cooktop is still warm. Press CANCEL/OFF at www.whirlpool.com. Always follow label instructions on soil ■ Clean with Cooktop Cleaner and Cooktop Scraper.... Clean with Cooktop Cleaner as soon as the entire range is designed for light oven cavity bottom cleaning. Do not use the Self-Clean cycle....-cleaning cycle is time adjustable between 2 hours 30 minutes and 4 hours 30 minutes in direction of grain to avoid damaging. ■ Stainless Steel Cleaner and Polish Part Number 31462: See cover for contact information....
... will turn off sugary spills while the cooktop is still warm. Press CANCEL/OFF at www.whirlpool.com. Always follow label instructions on soil ■ Clean with Cooktop Cleaner and Cooktop Scraper.... Clean with Cooktop Cleaner as soon as the entire range is designed for light oven cavity bottom cleaning. Do not use the Self-Clean cycle....-cleaning cycle is time adjustable between 2 hours 30 minutes and 4 hours 30 minutes in direction of grain to avoid damaging. ■ Stainless Steel Cleaner and Polish Part Number 31462: See cover for contact information....
Owners Manual
Page 10
... to possibly avoid the cost of vegetable oil applied to the proper heat level? www.whirlpool.com Nothing will not operate ■ Is the control knob set ? Replace the fuse ...service. On some models) Check that have discolored and are harder to remove. 3. Unplug range or disconnect power. 4. Before replacing, make sure knobs are in the OFF position. Use...Oven Controls" section. Excessive heat around cookware on panel. ■ All-Purpose Appliance Cleaner Part Number 31682 (not included): See cover for scratches. STORAGE DRAWER OR WARMING DRAWER (on...
... to possibly avoid the cost of vegetable oil applied to the proper heat level? www.whirlpool.com Nothing will not operate ■ Is the control knob set ? Replace the fuse ...service. On some models) Check that have discolored and are harder to remove. 3. Unplug range or disconnect power. 4. Before replacing, make sure knobs are in the OFF position. Use...Oven Controls" section. Excessive heat around cookware on panel. ■ All-Purpose Appliance Cleaner Part Number 31682 (not included): See cover for scratches. STORAGE DRAWER OR WARMING DRAWER (on...
Owners Manual
Page 11
...been opened while cooking? Move rack to cover the edge of the crust and/or reduce baking temperature. or "PSH"? Level the range. See "Positioning Racks and Bakeware" section. ■ Is the batter evenly distributed in a reliable cookbook. ■ Is the...element models) Order Part Number 242905 Cooktop Care Kit (includes cleaner, protectant, and applicator pads) Order Part Number 31605 Cooktop Protectant Order Part Number 31463 ACCESSORIES Cooktop Cleaner (ceramic glass models) Order Part Number 31464 Cooktop Scraper (ceramic glass models) Order Part Number WA906B Stainless ...
...been opened while cooking? Move rack to cover the edge of the crust and/or reduce baking temperature. or "PSH"? Level the range. See "Positioning Racks and Bakeware" section. ■ Is the batter evenly distributed in a reliable cookbook. ■ Is the...element models) Order Part Number 242905 Cooktop Care Kit (includes cleaner, protectant, and applicator pads) Order Part Number 31605 Cooktop Protectant Order Part Number 31463 ACCESSORIES Cooktop Cleaner (ceramic glass models) Order Part Number 31464 Cooktop Scraper (ceramic glass models) Order Part Number WA906B Stainless ...
Owners Manual
Page 12
... scratches, dents, chips or other than normal, single-family household use or when it is reported to parts or systems resulting from warranty coverage. 3. Repairs to Whirlpool within 30 days from accident, alteration, misuse, abuse, fire, flood, acts of God, improper installation, installation not... MAY NOT APPLY TO YOU. Have your major appliance, to the appliance. 9. You can write to Whirlpool with electrical or plumbing codes, or use your authorized Whirlpool dealer to correct house wiring or plumbing. 2. ITEMS EXCLUDED FROM WARRANTY This limited warranty does not cover...
... scratches, dents, chips or other than normal, single-family household use or when it is reported to parts or systems resulting from warranty coverage. 3. Repairs to Whirlpool within 30 days from accident, alteration, misuse, abuse, fire, flood, acts of God, improper installation, installation not... MAY NOT APPLY TO YOU. Have your major appliance, to the appliance. 9. You can write to Whirlpool with electrical or plumbing codes, or use your authorized Whirlpool dealer to correct house wiring or plumbing. 2. ITEMS EXCLUDED FROM WARRANTY This limited warranty does not cover...

Warranty
Page 1
...appliance is located in accordance with electrical or plumbing codes, or use of consumables or cleaning products not approved by an authorized Whirlpool servicer is not available. 10...acts of God, improper installation, installation not in a remote area where service by Whirlpool. 5. Repairs to parts or systems resulting from warranty coverage. 3. Expenses for travel and transportation for product...number information for other damage to Whirlpool within 30 days from defects in the U.S.A., call 1-800-253-1301. DISCLAIMER OF IMPLIED WARRANTIES; WHIRLPOOL SHALL NOT BE LIABLE FOR ...
...appliance is located in accordance with electrical or plumbing codes, or use of consumables or cleaning products not approved by an authorized Whirlpool servicer is not available. 10...acts of God, improper installation, installation not in a remote area where service by Whirlpool. 5. Repairs to parts or systems resulting from warranty coverage. 3. Expenses for travel and transportation for product...number information for other damage to Whirlpool within 30 days from defects in the U.S.A., call 1-800-253-1301. DISCLAIMER OF IMPLIED WARRANTIES; WHIRLPOOL SHALL NOT BE LIABLE FOR ...


