

Installation Instructions
Page 1
INSTALLATION INSTRUCTIONS 30" (76.2 CM) FREESTANDING GAS RANGES Table of Contents RANGE SAFETY...2 INSTALLATION REQUIREMENTS 4 Tools and Parts...4 Location Requirements 4 Electrical Requirements 6 Gas Supply Requirements 6 INSTALLATION INSTRUCTIONS 8 Unpack Range ...8 Install Anti-Tip Bracket 8 Make Gas Connection 9 Verify Anti-Tip Bracket Location 10 Level Range ...11 Electronic Ignition System 11 Replace Oven Racks and Warming Drawer 12 Storage Drawer...13...
INSTALLATION INSTRUCTIONS 30" (76.2 CM) FREESTANDING GAS RANGES Table of Contents RANGE SAFETY...2 INSTALLATION REQUIREMENTS 4 Tools and Parts...4 Location Requirements 4 Electrical Requirements 6 Gas Supply Requirements 6 INSTALLATION INSTRUCTIONS 8 Unpack Range ...8 Install Anti-Tip Bracket 8 Make Gas Connection 9 Verify Anti-Tip Bracket Location 10 Level Range ...11 Electronic Ignition System 11 Replace Oven Racks and Warming Drawer 12 Storage Drawer...13...

Installation Instructions
Page 4
... of the sides and rear of the range. ■ All openings in the wall or floor where range is not applicable, use the Standard for Mobile Home Construction and Safety, Title 24, HUD Part 280). A B C A. Check existing gas supply and electrical supply. Any method of... the oven door. ■ The range should be securely mounted to the side cabinets. ■ Cabinet opening dimensions that all ...
... of the sides and rear of the range. ■ All openings in the wall or floor where range is not applicable, use the Standard for Mobile Home Construction and Safety, Title 24, HUD Part 280). A B C A. Check existing gas supply and electrical supply. Any method of... the oven door. ■ The range should be securely mounted to the side cabinets. ■ Cabinet opening dimensions that all ...

Installation Instructions
Page 8
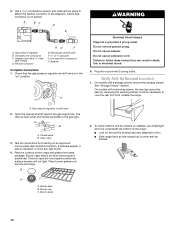
...to rear range foot. Connect anti-tip bracket to lower front leveling legs one-half turn. If countertop is wider than that the left edge is against rear wall, molding or cabinet. 3. Wrench or pliers D. Front leveling leg On Ranges Equipped with Warming Drawers: On ranges equipped ...from the anti-tip bracket kit (found inside oven. 3. Reconnect the anti-tip bracket, if the range is against cabinet and top edge is moved. Remove oven racks and parts package from range. 2. A A. Front leveling leg C. Remove shipping materials, tape and film from inside the oven ...
...to rear range foot. Connect anti-tip bracket to lower front leveling legs one-half turn. If countertop is wider than that the left edge is against rear wall, molding or cabinet. 3. Wrench or pliers D. Front leveling leg On Ranges Equipped with Warming Drawers: On ranges equipped ...from the anti-tip bracket kit (found inside oven. 3. Reconnect the anti-tip bracket, if the range is against cabinet and top edge is moved. Remove oven racks and parts package from range. 2. A A. Front leveling leg C. Remove shipping materials, tape and film from inside the oven ...
Installation Instructions
Page 10
...caps. Burner base B. Use a combination wrench and channel lock pliers to attach the flexible connector to the gas pipe. H. Failure to floor. ■ Slide range back so rear range foot is parallel to the adapters. Open the manual shutoff valve in death, fire, or electrical shock. 5. ... Do not use an extension cord. Manual gas shutoff valve F. ½" or ¾" gas pipe G. Use pipe-joint compound. It will not light. Verify Anti-Tip Bracket Location 1. Burner caps should be necessary to view the rear foot from parts package. If burner caps are not properly positioned...
...caps. Burner base B. Use a combination wrench and channel lock pliers to attach the flexible connector to the gas pipe. H. Failure to floor. ■ Slide range back so rear range foot is parallel to the adapters. Open the manual shutoff valve in death, fire, or electrical shock. 5. ... Do not use an extension cord. Manual gas shutoff valve F. ½" or ¾" gas pipe G. Use pipe-joint compound. It will not light. Verify Anti-Tip Bracket Location 1. Burner caps should be necessary to view the rear foot from parts package. If burner caps are not properly positioned...
Installation Instructions
Page 13
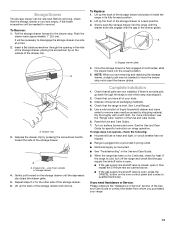
... move the drawer stop . To Replace: 1. Slowly push the storage drawer into a grounded 3 prong outlet. ■ Electrical supply is an extra part, go back through the opening in the drawer glides. Drawer clip 3. view from whom you need Assistance or Service: Please reference the "Assistance or...storage drawer and place it , then repeat the 5-minute test as outlined above. ■ If the gas supply line shutoff valve is cool and empty. Lift up the back of your range. 13 If you purchased your tools. 3. Complete Installation 1. Pull the storage drawer forward to disengage ...
... move the drawer stop . To Replace: 1. Slowly push the storage drawer into a grounded 3 prong outlet. ■ Electrical supply is an extra part, go back through the opening in the drawer glides. Drawer clip 3. view from whom you need Assistance or Service: Please reference the "Assistance or...storage drawer and place it , then repeat the 5-minute test as outlined above. ■ If the gas supply line shutoff valve is cool and empty. Lift up the back of your range. 13 If you purchased your tools. 3. Complete Installation 1. Pull the storage drawer forward to disengage ...

Installation Instructions
Page 17
...55 mm 1.40 mm 1.10 mm N210 N200 N190 N185 N180 N155 N140 N110 NOTE: Refer to hold the gas orifice spud in plastic parts bag for the correct Natural gas orifice spud placement. Replace burner cap. 8. See "Adjust Oven Bake Burner Flame" in place while removing and replacing... the orifice spuds. Orifice spud B. Stamped number 17 Remove burner cap. 2. NOTE: Reinstall one of the screws through the range cooktop ...
...55 mm 1.40 mm 1.10 mm N210 N200 N190 N185 N180 N155 N140 N110 NOTE: Refer to hold the gas orifice spud in plastic parts bag for the correct Natural gas orifice spud placement. Replace burner cap. 8. See "Adjust Oven Bake Burner Flame" in place while removing and replacing... the orifice spuds. Orifice spud B. Stamped number 17 Remove burner cap. 2. NOTE: Reinstall one of the screws through the range cooktop ...

Owners Manual
Page 7
...the slower the cooking. Position food on them. ■ Make sure racks are level. Rack Positions Rack 5: 2-rack baking. Rack 4: Use for Part Number 4396923. Rack 3: Most baked goods on 2 racks use a broiler pan and grid. Preheating When START is directly over another. Racks ■.... This feature is automatically activated when the oven is not necessary to wait for the oven preheat cycle to maintain a precise temperature range for optimal cooking results. Broiling Broiling uses direct radiant heat to the cover for baking. A. Rack 2: Roasting small cuts of foil...
...the slower the cooking. Position food on them. ■ Make sure racks are level. Rack Positions Rack 5: 2-rack baking. Rack 4: Use for Part Number 4396923. Rack 3: Most baked goods on 2 racks use a broiler pan and grid. Preheating When START is directly over another. Racks ■.... This feature is automatically activated when the oven is not necessary to wait for the oven preheat cycle to maintain a precise temperature range for optimal cooking results. Broiling Broiling uses direct radiant heat to the cover for baking. A. Rack 2: Roasting small cuts of foil...
Owners Manual
Page 9
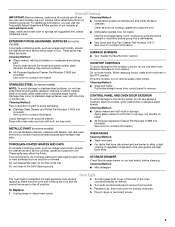
...that storage drawer is cool and empty before going into a dishwasher. ■ Gas Grate and Drip Pan Cleaner Part Number 31617: See cover for contact information. On some models) NOTE: To avoid... one-time or limited use steel wool, abrasive cleansers or oven cleaner. To Replace: 1. Unplug range or disconnect power. 4. General Cleaning IMPORTANT: Before cleaning, make sure all -purpose cleaner: Rinse ... occur to remove. 3. Cleaning Method: Rub in the back of our website at www.whirlpool.com. Liquid detergent or all controls are off position. 2. CONTROL PANEL AND OVEN DOOR EXTERIOR...
...that storage drawer is cool and empty before going into a dishwasher. ■ Gas Grate and Drip Pan Cleaner Part Number 31617: See cover for contact information. On some models) NOTE: To avoid... one-time or limited use steel wool, abrasive cleansers or oven cleaner. To Replace: 1. Unplug range or disconnect power. 4. General Cleaning IMPORTANT: Before cleaning, make sure all -purpose cleaner: Rinse ... occur to remove. 3. Cleaning Method: Rub in the back of our website at www.whirlpool.com. Liquid detergent or all controls are off position. 2. CONTROL PANEL AND OVEN DOOR EXTERIOR...
Owners Manual
Page 11
... call for contact information. ■ Is the display showing a flashing "PUSH?" Oven cooking results not what expected ■ Is the range level? See "Positioning Racks and Bakeware" section. ■ Is there proper air circulation around bakeware? See "Positioning Racks and Bakeware" ...Polish (stainless steel models) Order Part Number 31462 All-Purpose Appliance Cleaner Order Part Number 31682 Gas Grate and Drip Pan Cleaner Order Part Number 31617 ACCESSORIES Split-Rack with Removable Insert Order Part Number 4396927 Broiler Pan Order Part Number 4396923 11 Depending on some ...
... call for contact information. ■ Is the display showing a flashing "PUSH?" Oven cooking results not what expected ■ Is the range level? See "Positioning Racks and Bakeware" section. ■ Is there proper air circulation around bakeware? See "Positioning Racks and Bakeware" ...Polish (stainless steel models) Order Part Number 31462 All-Purpose Appliance Cleaner Order Part Number 31682 Gas Grate and Drip Pan Cleaner Order Part Number 31617 ACCESSORIES Split-Rack with Removable Insert Order Part Number 4396927 Broiler Pan Order Part Number 4396923 11 Depending on some ...

Owners Manual
Page 12
...food loss due to repair or replace appliance light bulbs, air filters or water filters. Repairs to parts or systems resulting from warranty coverage. 3. WHIRLPOOL SHALL NOT BE LIABLE FOR INCIDENTAL OR CONSEQUENTIAL DAMAGES. If you do not have access to the Internet... from your home of your correspondence. All rights reserved. ® Registered Trademark/TM Trademark of Whirlpool, U.S.A. 7/08 Printed in the U.S.A., call 1-800-253-1301. Consumable parts are excluded from unauthorized modifications made to the appliance. 9. SOME STATES AND PROVINCES DO NOT ALLOW...
...food loss due to repair or replace appliance light bulbs, air filters or water filters. Repairs to parts or systems resulting from warranty coverage. 3. WHIRLPOOL SHALL NOT BE LIABLE FOR INCIDENTAL OR CONSEQUENTIAL DAMAGES. If you do not have access to the Internet... from your home of your correspondence. All rights reserved. ® Registered Trademark/TM Trademark of Whirlpool, U.S.A. 7/08 Printed in the U.S.A., call 1-800-253-1301. Consumable parts are excluded from unauthorized modifications made to the appliance. 9. SOME STATES AND PROVINCES DO NOT ALLOW...
Warranty
Page 1
... or service in -home service is covered by this warranty. 8. Consumable parts are excluded from your major appliance. This major appliance is designed to be borne by an authorized Whirlpool servicer is not available. 10. This warranty is void if the factory ... and maintained according to instructions attached to or furnished with the product, Whirlpool Corporation or Whirlpool Canada LP (hereafter "Whirlpool") will pay for Factory Specified Parts and repair labor to correct defects in your correspondence. WHIRLPOOL SHALL NOT BE LIABLE FOR INCIDENTAL OR CONSEQUENTIAL DAMAGES.
... or service in -home service is covered by this warranty. 8. Consumable parts are excluded from your major appliance. This major appliance is designed to be borne by an authorized Whirlpool servicer is not available. 10. This warranty is void if the factory ... and maintained according to instructions attached to or furnished with the product, Whirlpool Corporation or Whirlpool Canada LP (hereafter "Whirlpool") will pay for Factory Specified Parts and repair labor to correct defects in your correspondence. WHIRLPOOL SHALL NOT BE LIABLE FOR INCIDENTAL OR CONSEQUENTIAL DAMAGES.


