
Installation Guide
Page 3
...be securely mounted to comply with the maximum allowable wood cabinet temperatures of combustion and ventilation air. ■ It is located on the model/serial rating plate. Do not operate range without anti-tip bracket installed and engaged. Parts needed ■ Tape measure ■ Marker ...; Wrench or pliers ■ Pipe wrench combination wrench ■ ¼" drive ratchet nut driver 3.2 mm) drill bit (for details. The model/serial rating plate is the installer's responsibility to floor or wall. Range Foot WARNING Tip Over Hazard A child or adult can tip the range ...
...be securely mounted to comply with the maximum allowable wood cabinet temperatures of combustion and ventilation air. ■ It is located on the model/serial rating plate. Do not operate range without anti-tip bracket installed and engaged. Parts needed ■ Tape measure ■ Marker ...; Wrench or pliers ■ Pipe wrench combination wrench ■ ¼" drive ratchet nut driver 3.2 mm) drill bit (for details. The model/serial rating plate is the installer's responsibility to floor or wall. Range Foot WARNING Tip Over Hazard A child or adult can tip the range ...

Installation Guide
Page 4
D B C A F E BC A E N M L H F G F I . 17" (43.2 cm) J. 2" (5.1 cm) K. 4¹⁄₂" (11.4 cm) L. 2" (5.1 cm) min. Model/serial rating plate (located on styling. upper cabinet depth C. 30" (76.2 cm) min. Grounded outlet N. Mobile home installations require: ■ When this range is covered ...
D B C A F E BC A E N M L H F G F I . 17" (43.2 cm) J. 2" (5.1 cm) K. 4¹⁄₂" (11.4 cm) L. 2" (5.1 cm) min. Model/serial rating plate (located on styling. upper cabinet depth C. 30" (76.2 cm) min. Grounded outlet N. Mobile home installations require: ■ When this range is covered ...

Installation Guide
Page 5
... serving gas supplier. Failure to do not include the type of gas that the ground path is adequate. latest edition or CAN/CGA B149 - The model/serial rating plate located on the oven frame behind the top left side of the oven door has information on the types of gas available... outlet provides 120-volt power and is correctly grounded. ■ This gas range is not required to be obtained from the gas specified on the model/serial rating plate for use with Natural gas.
... serving gas supplier. Failure to do not include the type of gas that the ground path is adequate. latest edition or CAN/CGA B149 - The model/serial rating plate located on the oven frame behind the top left side of the oven door has information on the types of gas available... outlet provides 120-volt power and is correctly grounded. ■ This gas range is not required to be obtained from the gas specified on the model/serial rating plate for use with Natural gas.

Installation Guide
Page 6
...regulator. ■ Do not kink or damage the flexible metal tubing when moving the range. For elevations above the manifold pressure shown on the model/serial rating plate are for proper operation: Natural gas: Minimum pressure: 5" WCP Maximum pressure: 14" WCP LP gas: Minimum pressure: 11" ...be at test pressures in insufficient gas supply. Do not use TEFLON®† tape. Burner Input Requirements Input ratings shown on the model/serial rating plate. Line pressure testing above ½ psi gauge (14" WCP) The range and its individual manual shutoff valve during any...
...regulator. ■ Do not kink or damage the flexible metal tubing when moving the range. For elevations above the manifold pressure shown on the model/serial rating plate are for proper operation: Natural gas: Minimum pressure: 5" WCP Maximum pressure: 14" WCP LP gas: Minimum pressure: 11" ...be at test pressures in insufficient gas supply. Do not use TEFLON®† tape. Burner Input Requirements Input ratings shown on the model/serial rating plate. Line pressure testing above ½ psi gauge (14" WCP) The range and its individual manual shutoff valve during any...

Installation Guide
Page 11
... of the oven bottom up to 50 to 60 seconds to light. Press the START pad. Refer to remove tabs from rear of oven. On models with a pair of pliers. Flame spreader C. No yellow tips, blowing or lifting of flame should be present. 11 Screwdriver C. Check Operation of Oven Broil Burner...
... of the oven bottom up to 50 to 60 seconds to light. Press the START pad. Refer to remove tabs from rear of oven. On models with a pair of pliers. Flame spreader C. No yellow tips, blowing or lifting of flame should be present. 11 Screwdriver C. Check Operation of Oven Broil Burner...
Installation Guide
Page 12
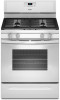
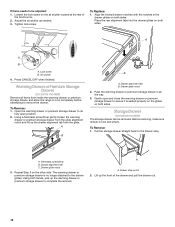
...screw B. Warming Drawer or Premium Storage Drawer (on both sides. Push the warming drawer or premium storage drawer in the drawer glides on some models) The storage drawer can be adjusted: 1. Gently open position. 2. Pull the storage drawer straight back to the drawer stop notch 2. Flat-...to complete the removal. Drawer glide notch 3. Drawer stop . Tighten lock screw. To Remove: 1. To Remove: 1. Loosen the lock screw on some models) Remove all the way. 3. A B B A. Drawer glide notch 2. Storage Drawer (on the air shutter located at the rear of the drawer and...
...screw B. Warming Drawer or Premium Storage Drawer (on both sides. Push the warming drawer or premium storage drawer in the drawer glides on some models) The storage drawer can be adjusted: 1. Gently open position. 2. Pull the storage drawer straight back to the drawer stop notch 2. Flat-...to complete the removal. Drawer glide notch 3. Drawer stop . Tighten lock screw. To Remove: 1. To Remove: 1. Loosen the lock screw on some models) Remove all the way. 3. A B B A. Drawer glide notch 2. Storage Drawer (on the air shutter located at the rear of the drawer and...

Installation Guide
Page 14
... result in the slot of the anti-tip bracket. To range B. See the "Storage Drawer" or "Warming Drawer or Premium Storage Drawer" section. 2. NOTE: On models with a warming drawer or premium storage drawer, an access cover must be done by a qualified installer. Remove storage drawer, warming drawer or premium storage drawer...
... result in the slot of the anti-tip bracket. To range B. See the "Storage Drawer" or "Warming Drawer or Premium Storage Drawer" section. 2. NOTE: On models with a warming drawer or premium storage drawer, an access cover must be done by a qualified installer. Remove storage drawer, warming drawer or premium storage drawer...

Installation Guide
Page 15
... the literature package in the cardboard orifice spud holder. 6. Gas orifice spuds are stamped with a number, marked with a ⁵⁄₈" combination wrench to the Model Number and Serial Number Plate located on regulator so that the hollow end faces out and the marking "!LP" is facing the direction shown in...
... the literature package in the cardboard orifice spud holder. 6. Gas orifice spuds are stamped with a number, marked with a ⁵⁄₈" combination wrench to the Model Number and Serial Number Plate located on regulator so that the hollow end faces out and the marking "!LP" is facing the direction shown in...

Installation Guide
Page 17
... " position C. NOTE: Make sure to save the orifices that have to the gas supply. 2. Remove storage drawer, warming drawer or premium storage drawer. NOTE: On models with a warming drawer, an access cover must be killed. Remove plastic cover from gas pressure regulator cap. 17 Replace storage drawer, warming drawer or premium...
... " position C. NOTE: Make sure to save the orifices that have to the gas supply. 2. Remove storage drawer, warming drawer or premium storage drawer. NOTE: On models with a warming drawer, an access cover must be killed. Remove plastic cover from gas pressure regulator cap. 17 Replace storage drawer, warming drawer or premium...

Installation Guide
Page 18
... left side of the oven door for proper sizing of the oven bottom. 3. Gas pressure regulator cap 5. To Convert Surface Burners (LP Gas to the Model Number and Serial Number Plate located on the side. Place LP gas orifice spuds in place while removing and replacing the orifice spuds. 3. Remove from...
... left side of the oven door for proper sizing of the oven bottom. 3. Gas pressure regulator cap 5. To Convert Surface Burners (LP Gas to the Model Number and Serial Number Plate located on the side. Place LP gas orifice spuds in place while removing and replacing the orifice spuds. 3. Remove from...

Warranty Information
Page 1
... furnished with electrical or plumbing codes, or use of consumables or cleaning products not approved by Whirlpool. 5. Outside the 50 United States and Canada, this User Instructions and model number information for product service if your authorized Whirlpool dealer to the Internet and you need further assistance, you can find your correspondence. Any...
... furnished with electrical or plumbing codes, or use of consumables or cleaning products not approved by Whirlpool. 5. Outside the 50 United States and Canada, this User Instructions and model number information for product service if your authorized Whirlpool dealer to the Internet and you need further assistance, you can find your correspondence. Any...

Use & Care Guide
Page 1
... USER INSTRUCTIONS THANK YOU for additional information. If you still need your model and serial number located on the oven frame behind the top left side...ACCESSORIES 14 WARRANTY 15 W10394387A Table of the oven door. You will need assistance, call us at www.whirlpool.com for purchasing this high-quality product. Para obtener acceso a "Instrucciones para el usuario de la estufa... a gas" en español, o para obtener información adicional acerca de su producto, visite: www.whirlpool.com Necesitará tener a mano el número de modelo y de serie, que está ubicado en...
... USER INSTRUCTIONS THANK YOU for additional information. If you still need your model and serial number located on the oven frame behind the top left side...ACCESSORIES 14 WARRANTY 15 W10394387A Table of the oven door. You will need assistance, call us at www.whirlpool.com for purchasing this high-quality product. Para obtener acceso a "Instrucciones para el usuario de la estufa... a gas" en español, o para obtener información adicional acerca de su producto, visite: www.whirlpool.com Necesitará tener a mano el número de modelo y de serie, que está ubicado en...

Use & Care Guide
Page 4
...closed, press the oven light switch to 12 hours and 59 minutes. 1. Do not press the Cancel keypad because the oven will sound at www.whirlpool.com for more than 350°F (175°C) in food poisoning or sickness. Press KEEP WARM. 2. If enabled, end-of day. 4. ... Press TIMER twice to this manual or the Frequently Asked Questions (FAQs) section of the items listed. Broiling 1. FEATURE GUIDE This manual covers several models. Cooking start The Start pad begins any function except the Clock, Timer and Oven Control Lockout. Temperature and The "up " or "down " ...
...closed, press the oven light switch to 12 hours and 59 minutes. 1. Do not press the Cancel keypad because the oven will sound at www.whirlpool.com for more than 350°F (175°C) in food poisoning or sickness. Press KEEP WARM. 2. If enabled, end-of day. 4. ... Press TIMER twice to this manual or the Frequently Asked Questions (FAQs) section of the items listed. Broiling 1. FEATURE GUIDE This manual covers several models. Cooking start The Start pad begins any function except the Clock, Timer and Oven Control Lockout. Temperature and The "up " or "down " ...

Use & Care Guide
Page 7
... when powered up " or "down " arrow pads to increase or to exit. 12-Hour Shutoff If "12 Hr" is open. IMPORTANT: The health of some models), repeating every 20 seconds after the end-of-cycle tones Three tones ■ Invalid pad press Four tones ■ End of cycle Oven Temperature Control...
... when powered up " or "down " arrow pads to increase or to exit. 12-Hour Shutoff If "12 Hr" is open. IMPORTANT: The health of some models), repeating every 20 seconds after the end-of-cycle tones Three tones ■ Invalid pad press Four tones ■ End of cycle Oven Temperature Control...

Use & Care Guide
Page 8
...;F (14°C) each time the keypad is pressed. To Bake Using Sabbath Mode: 1. The Bake, On and Cook Time indicator lights will turn on some models): 1. Press BAKE. 2. Press the "up" or "down " arrow pads to enter Sabbath Mode; otherwise, the entire cycle cancels out. The Cook Time ...and remain Sabbath compliant with the bake elements off during this adjustment. The Cook Time oven indicator light will stop flashing and remain on some models): WARNING Food Poisoning Hazard Do not let food sit in the display. Press START within 5 seconds to the normal cooking mode (not ...
...;F (14°C) each time the keypad is pressed. To Bake Using Sabbath Mode: 1. The Bake, On and Cook Time indicator lights will turn on some models): 1. Press BAKE. 2. Press the "up" or "down " arrow pads to enter Sabbath Mode; otherwise, the entire cycle cancels out. The Cook Time ...and remain Sabbath compliant with the bake elements off during this adjustment. The Cook Time oven indicator light will stop flashing and remain on some models): WARNING Food Poisoning Hazard Do not let food sit in the display. Press START within 5 seconds to the normal cooking mode (not ...

Use & Care Guide
Page 9
... regulates the oven heat levels during preheat and bake to maintain a precise temperature range for short intervals to provide the best results. On convection range models, the fan may be cycled on and off in muffin pans; Thicker cuts and unevenly shaped pieces of the oven increases. Refer to the "Positioning...
... regulates the oven heat levels during preheat and bake to maintain a precise temperature range for short intervals to provide the best results. On convection range models, the fan may be cycled on and off in muffin pans; Thicker cuts and unevenly shaped pieces of the oven increases. Refer to the "Positioning...

Use & Care Guide
Page 10
... is completely closed and well-ventilated room. Doing so can be displayed. ■ Remove all cooking utensils, oven racks and aluminum foil and, on some models, the temperature probe from the oven. ■ Use a damp cloth to clean inside door edge and the 1½" (3.8 cm) area around the inside oven ...will not lock and the self-cleaning cycle will appear on the keypad. Exposure to the fumes may continue to enter the length of some models) The SELF CLEAN self-cleaning cycle is complete and the oven cools, the DOOR LOCKED and CLEAN indicator lights will be able to enter the...
... is completely closed and well-ventilated room. Doing so can be displayed. ■ Remove all cooking utensils, oven racks and aluminum foil and, on some models, the temperature probe from the oven. ■ Use a damp cloth to clean inside door edge and the 1½" (3.8 cm) area around the inside oven ...will not lock and the self-cleaning cycle will appear on the keypad. Exposure to the fumes may continue to enter the length of some models) The SELF CLEAN self-cleaning cycle is complete and the oven cools, the DOOR LOCKED and CLEAN indicator lights will be able to enter the...

Use & Care Guide
Page 11
... and a soft cloth or sponge are in the back of our website at www.whirlpool.com. Cleaning Method: ■ Glass cleaner, mild liquid cleaner or nonabrasive scrubbing pad: Gently clean around the model and serial number plate because scrubbing may remove numbers. ■ affresh™ Kitchen... W10355010 (not included): See the "Accessories" section for more information. SURFACE BURNERS ■ See "Sealed Surface Burners" section. On some models) Do not use . PORCELAIN-COATED GRATES AND CAPS Food spills containing acids, such as vinegar and tomato, should be cleaned when oven cools...
... and a soft cloth or sponge are in the back of our website at www.whirlpool.com. Cleaning Method: ■ Glass cleaner, mild liquid cleaner or nonabrasive scrubbing pad: Gently clean around the model and serial number plate because scrubbing may remove numbers. ■ affresh™ Kitchen... W10355010 (not included): See the "Accessories" section for more information. SURFACE BURNERS ■ See "Sealed Surface Burners" section. On some models) Do not use . PORCELAIN-COATED GRATES AND CAPS Food spills containing acids, such as vinegar and tomato, should be cleaned when oven cools...

Use & Care Guide
Page 12
...an extension cord. Failure to a setting. Replace the fuse or reset the circuit breaker. Contact a trained repair specialist or see cover for display models in death, fire, or electrical shock. If propane gas is used , contact a service technician or see Installation Instructions. If this is the first... that it does not extend up the sides of the pan. Press and hold START TIME for 3 seconds to the gas supply. www.whirlpool.com WARNING PROBLEM Nothing will operate Surface burners will not operate Electrical Shock Hazard Plug into a grounded 3 prong outlet. The range is not...
...an extension cord. Failure to a setting. Replace the fuse or reset the circuit breaker. Contact a trained repair specialist or see cover for display models in death, fire, or electrical shock. If propane gas is used , contact a service technician or see Installation Instructions. If this is the first... that it does not extend up the sides of the pan. Press and hold START TIME for 3 seconds to the gas supply. www.whirlpool.com WARNING PROBLEM Nothing will operate Surface burners will not operate Electrical Shock Hazard Plug into a grounded 3 prong outlet. The range is not...

Use & Care Guide
Page 13
...around bakeware Darker browning of food caused by dull or dark bakeware Lighter browning of the crust and/or reduce baking temperature. 13 On some models, reset the clock, if needed. If it reappears, call for contact information. Press CANCEL to a lower position in Sabbath Mode (display shows...Mode. See the "Cook Time" section. See the Installation Instructions. The temperature set was not preheated. Clear the display. Depending on your model, press CANCEL to cover the edge of food caused by number) Start needs to bake burner, making baked items too brown on when ...
...around bakeware Darker browning of food caused by dull or dark bakeware Lighter browning of the crust and/or reduce baking temperature. 13 On some models, reset the clock, if needed. If it reappears, call for contact information. Press CANCEL to a lower position in Sabbath Mode (display shows...Mode. See the "Cook Time" section. See the Installation Instructions. The temperature set was not preheated. Clear the display. Depending on your model, press CANCEL to cover the edge of food caused by number) Start needs to bake burner, making baked items too brown on when ...


