
Use and Care Guide
Page 3
... and others are not followed. 3 WARNING You can happen if the instructions are very important. This symbol alerts you to reduce the chance of others . DRYER SAFETY Your safety and the safety of injury, and tell you don't immediately follow instructions. Always read and obey all safety messages. All safety messages...
... and others are not followed. 3 WARNING You can happen if the instructions are very important. This symbol alerts you to reduce the chance of others . DRYER SAFETY Your safety and the safety of injury, and tell you don't immediately follow instructions. Always read and obey all safety messages. All safety messages...

Use and Care Guide
Page 4
... property damage, personal injury, or death. - IMPORTANT: The gas installation must conform with local codes, or in the absence of local codes, with the National Electrical Code, ANSI/NFPA 70 or Canadian Electrical Code, CSA C22.1. The dryer must be electrically grounded in accordance with local codes, or in... the absence of local codes, with the National Fuel Gas Code, ANSI Z223.1/NFPA 54 or the Canadian Natural...
... property damage, personal injury, or death. - IMPORTANT: The gas installation must conform with local codes, or in the absence of local codes, with the National Electrical Code, ANSI/NFPA 70 or Canadian Electrical Code, CSA C22.1. The dryer must be electrically grounded in accordance with local codes, or in... the absence of local codes, with the National Fuel Gas Code, ANSI Z223.1/NFPA 54 or the Canadian Natural...

Use and Care Guide
Page 5
... installation. Read and follow the "What to 1" (25 mm) or hex- For information on ordering, please refer to LP gas head socket wrench (for adjusting dryer feet) ■ Caulking gun and compound (for Part Number 346764. ■ Metal exhaust system hardware. Long inlet hose E. ... Level vent) ■ Pliers Parts needed: Check local codes and consult gas supplier. Rubber washer You will need ■ A location that ■ Pipe-joint compound opens to do if you purchased your dryer. ■ Mobile home installation kit. INSTALLATION INSTRUCTIONS Tools and Parts Gather ...
... installation. Read and follow the "What to 1" (25 mm) or hex- For information on ordering, please refer to LP gas head socket wrench (for adjusting dryer feet) ■ Caulking gun and compound (for Part Number 346764. ■ Metal exhaust system hardware. Long inlet hose E. ... Level vent) ■ Pliers Parts needed: Check local codes and consult gas supplier. Rubber washer You will need ■ A location that ■ Pipe-joint compound opens to do if you purchased your dryer. ■ Mobile home installation kit. INSTALLATION INSTRUCTIONS Tools and Parts Gather ...

Use and Care Guide
Page 6
... 48 in.2* (310 cm2) 24 in.2* (155 cm2) 1" (25 mm) 29" (737 mm) 1" (25 mm) 291/4" (743 mm) 5" (127 mm) A B C A. The dryer must conform to the Manufactured Home Construction and Safety Standard, Title 24 CFR, Part 3280 (formerly the Federal Standard for wall, door, and floor moldings...these instructions can result in death, fire, or electrical shock. ■ 120 Volt, 60 Hz., AC only, 15- Check code requirements. This dryer has been tested for purchase from your local building inspector. Recessed area B. Side view - Closet door with a door, minimum ventilation openings in garages...
... 48 in.2* (310 cm2) 24 in.2* (155 cm2) 1" (25 mm) 29" (737 mm) 1" (25 mm) 291/4" (743 mm) 5" (127 mm) A B C A. The dryer must conform to the Manufactured Home Construction and Safety Standard, Title 24 CFR, Part 3280 (formerly the Federal Standard for wall, door, and floor moldings...these instructions can result in death, fire, or electrical shock. ■ 120 Volt, 60 Hz., AC only, 15- Check code requirements. This dryer has been tested for purchase from your local building inspector. Recessed area B. Side view - Closet door with a door, minimum ventilation openings in garages...

Use and Care Guide
Page 7
...doubt as needed to convert the appliance from the gas specified on the front page of a qualified person include: licensed heating personnel, authorized gas company personnel, and authorized service personnel. Gas Type Natural Gas: This dryer is recommended that an individual manual shutoff valve be... electrician. If the total length of the dryer. Do not use copper tubing. ■ 3/8" flare x 3/8" NPT adapter fitting between the flexible gas connector and the dryer gas pipe, as to the gas supply line with a listed flexible gas connector that a separate circuit serving only this...
...doubt as needed to convert the appliance from the gas specified on the front page of a qualified person include: licensed heating personnel, authorized gas company personnel, and authorized service personnel. Gas Type Natural Gas: This dryer is recommended that an individual manual shutoff valve be... electrician. If the total length of the dryer. Do not use copper tubing. ■ 3/8" flare x 3/8" NPT adapter fitting between the flexible gas connector and the dryer gas pipe, as to the gas supply line with a listed flexible gas connector that a separate circuit serving only this...

Use and Care Guide
Page 8
...; vent products can result in enclosed walls, ceilings, or floors. ■ The total length of your dealer or by calling Whirlpool Parts and Accessories. Modify existing vent system if necessary to seal all governing codes and ordinances. Do not use a metal foil vent...048 m): ■ When installed above 10,000 ft (3,048 m) a 4% reduction of a building. Gas Supply Pressure Testing ■ The dryer must be fully extended and supported when the dryer is recommended to avoid crushing and kinking. Failure to avoid sagging and kinking that extend into any plastic ...
...; vent products can result in enclosed walls, ceilings, or floors. ■ The total length of your dealer or by calling Whirlpool Parts and Accessories. Modify existing vent system if necessary to seal all governing codes and ordinances. Do not use a metal foil vent...048 m): ■ When installed above 10,000 ft (3,048 m) a 4% reduction of a building. Gas Supply Pressure Testing ■ The dryer must be fully extended and supported when the dryer is recommended to avoid crushing and kinking. Failure to avoid sagging and kinking that extend into any plastic ...

Use and Care Guide
Page 9
...) from the rear of the exhaust (such as flowers, rocks, or bushes, snow line, etc.). ■ Do not use with a magnetic latch. Dryer B. Wall D. Vent length necessary to woodwork, furniture, paint, wallpaper, carpets, etc. Rear exhaust installation to left or right side NOTE: The following kits...see the "Assistance or Service" section to order. ■ Over-the-Top Installation: Part Number 4396028 ■ Periscope Installation (For use an exhaust hood with dryer vent to wall vent mismatch): Part Number 4396037 - 0" (0 mm) to 18" (457 mm) mismatch Part Number 4396011 - 18" (457 mm) to...
...) from the rear of the exhaust (such as flowers, rocks, or bushes, snow line, etc.). ■ Do not use with a magnetic latch. Dryer B. Wall D. Vent length necessary to woodwork, furniture, paint, wallpaper, carpets, etc. Rear exhaust installation to left or right side NOTE: The following kits...see the "Assistance or Service" section to order. ■ Over-the-Top Installation: Part Number 4396028 ■ Periscope Installation (For use an exhaust hood with dryer vent to wall vent mismatch): Part Number 4396037 - 0" (0 mm) to 18" (457 mm) mismatch Part Number 4396011 - 18" (457 mm) to...

Use and Care Guide
Page 10
... Legs WARNING Excessive Weight Hazard Use two or more people to the dryer. Failure to either side of LP gas. To avoid damaging the floor, use pipe-joint compound resistant to the action of the dryer is close to the floor. Firmly grasp the body of vent Box...illustration. 3. Find the diamond marking. 4. Slide the dryer on the threads of cardboard from the gas pipe. 2. Make Gas Connection 1. Remove the red cap from the dryer carton. Using a wrench to tighten, connect the gas supply to move and install dryer. Use pipe-joint compound on the corner posts until the...
... Legs WARNING Excessive Weight Hazard Use two or more people to the dryer. Failure to either side of LP gas. To avoid damaging the floor, use pipe-joint compound resistant to the action of the dryer is close to the floor. Firmly grasp the body of vent Box...illustration. 3. Find the diamond marking. 4. Slide the dryer on the threads of cardboard from the gas pipe. 2. Make Gas Connection 1. Remove the red cap from the dryer carton. Using a wrench to tighten, connect the gas supply to move and install dryer. Use pipe-joint compound on the corner posts until the...

Use and Care Guide
Page 11
... outlet and inside the coupling. If space permits, attach the brass female end of small hose. Damage to the existing gas line. D A C B A. 3/8" flexible gas connector B. 3/8" dryer pipe C. 3/8" to 3/8" pipe elbow D. 3/8" pipe-to the "Y" connector. 7. Attach this end to -flare adapter fitting 3. Check for leaks around "Y"...the cold water faucet, the short hose must be used to connect the dryer to the coupling can result. 11. Attach other end of "Y" connector. Open the shutoff valve in the flexible gas line. 4. Damage to the cold water faucet using the new inlet hoses...
... outlet and inside the coupling. If space permits, attach the brass female end of small hose. Damage to the existing gas line. D A C B A. 3/8" flexible gas connector B. 3/8" dryer pipe C. 3/8" to 3/8" pipe elbow D. 3/8" pipe-to the "Y" connector. 7. Attach this end to -flare adapter fitting 3. Check for leaks around "Y"...the cold water faucet, the short hose must be used to connect the dryer to the coupling can result. 11. Attach other end of "Y" connector. Open the shutoff valve in the flexible gas line. 4. Damage to the cold water faucet using the new inlet hoses...

Use and Care Guide
Page 12
... screws from a right-side opening to adjust the legs up the dryer using a wood block. Remove the 4 plastic plugs located outside the dryer door opening , if desired. 1. Install 4 plastic plugs into screw holes in the dryer left where the hinges were removed in the crease on the side of...from front to avoid damaging the surface. A B Then, by lifting upward on top of the dryer and the dryer cabinet, check the levelness from each of the dryer. 6. A B A. Remove these screws. Remove the dryer door and the hinges by placing a level in Step 4. 12 Place a towel or soft ...
... screws from a right-side opening to adjust the legs up the dryer using a wood block. Remove the 4 plastic plugs located outside the dryer door opening , if desired. 1. Install 4 plastic plugs into screw holes in the dryer left where the hinges were removed in the crease on the side of...from front to avoid damaging the surface. A B Then, by lifting upward on top of the dryer and the dryer cabinet, check the levelness from each of the dryer. 6. A B A. Remove these screws. Remove the dryer door and the hinges by placing a level in Step 4. 12 Place a towel or soft ...

Use and Care Guide
Page 13
...the door 1. Tighten all parts are on. 5. Remove the 4 screws from where they were removed. Close door to the front panel. 13 Check the dryer's final location. A B 5. Install screws in the top hinge holes in the same holes. A. Install these screws first. 6. Use the non-slotted ...side of screw exposed. Check for leaks around "Y" connector, faucet, and hoses. 6. Door strike B. Remove the 4 screws and 2 hinges from the dryer door opening . Be sure the water faucets are now installed. Install the 2 hinges to see which step was skipped. 2. Remove the door strike ...
...the door 1. Tighten all parts are on. 5. Remove the 4 screws from where they were removed. Close door to the front panel. 13 Check the dryer's final location. A B 5. Install screws in the top hinge holes in the same holes. A. Install these screws first. 6. Use the non-slotted ...side of screw exposed. Check for leaks around "Y" connector, faucet, and hoses. 6. Door strike B. Remove the 4 screws and 2 hinges from the dryer door opening . Be sure the water faucets are now installed. Install the 2 hinges to see which step was skipped. 2. Remove the door strike ...

Use and Care Guide
Page 14
..., the buildup of scale through the water system in the dryer. Read "Dryer Use." 11. Test dryer operation by selecting a Timed Dry heated cycle and starting the dryer. For this test, do not feel heat, turn off the dryer and check that the gas supply line shutoff valve is open. ■ If the...connected. ■ Household fuse is intact and tight, or circuit breaker has not tripped. ■ Dryer door is closed , open it, then repeat the 5-minute test as outlined above. ■ If the gas supply line shutoff valve is closed . 14. If you feel for certain part replacement or repair....
..., the buildup of scale through the water system in the dryer. Read "Dryer Use." 11. Test dryer operation by selecting a Timed Dry heated cycle and starting the dryer. For this test, do not feel heat, turn off the dryer and check that the gas supply line shutoff valve is open. ■ If the...connected. ■ Household fuse is intact and tight, or circuit breaker has not tripped. ■ Dryer door is closed , open it, then repeat the 5-minute test as outlined above. ■ If the gas supply line shutoff valve is closed . 14. If you feel for certain part replacement or repair....

Use and Care Guide
Page 15
...oil. Items containing foam, rubber, or plastic must be changed without stopping the cycle. ■ Select the desired Options. Place laundry into dryer and shut door. 3. The default dryness setting is Normal when an Automatic Cycle is selected. Selecting More, Less, or Damp automatically adjusts the... or Damp. Please refer to adjust how dry you want the load. The preset settings for the selected dryness level. DRYER USE WARNING Starting Your Dryer WARNING Explosion Hazard Keep flammable materials and vapors, such as gasoline, away from the default time based on the size and ...
...oil. Items containing foam, rubber, or plastic must be changed without stopping the cycle. ■ Select the desired Options. Place laundry into dryer and shut door. 3. The default dryness setting is Normal when an Automatic Cycle is selected. Selecting More, Less, or Damp automatically adjusts the... or Damp. Please refer to adjust how dry you want the load. The preset settings for the selected dryness level. DRYER USE WARNING Starting Your Dryer WARNING Explosion Hazard Keep flammable materials and vapors, such as gasoline, away from the default time based on the size and ...

Use and Care Guide
Page 16
...Down makes the loads easier to cancel a cycle. The length of all cycles. NOTE: Dryness selections can change by 5-minute intervals. To use a Steam Cycle (Quick Refresh and Enhanced Touch Up) ■ Press POWER. ■ Turn the knob to alert you do not press Start within 5 ...be used only with lighter fabrics. NOTE: Drying will change by 5-minute intervals. This could cause overdrying of selecting the cycle, the dryer automatically shuts off . Only the Medium and High temperature settings can be made only while using Automatic Cycles. Open the door or press...
...Down makes the loads easier to cancel a cycle. The length of all cycles. NOTE: Dryness selections can change by 5-minute intervals. To use a Steam Cycle (Quick Refresh and Enhanced Touch Up) ■ Press POWER. ■ Turn the knob to alert you do not press Start within 5 ...be used only with lighter fabrics. NOTE: Drying will change by 5-minute intervals. This could cause overdrying of selecting the cycle, the dryer automatically shuts off . Only the Medium and High temperature settings can be made only while using Automatic Cycles. Open the door or press...

Use and Care Guide
Page 17
.... Sensing ■ In an Automatic Cycle, the Sensing light illuminates until the desired temperature is approximately 80% dry. See the Automatic, Steam, or Timed Preset Cycle Settings Charts. Casual Use this option is finished. The damp light will continue to the load you are preset...to run for heavyweight mixed loads, cottons, and jeans. This indicator stays on your dryer with Timed Cycles. The dryer will not illuminate. ■ In the Enhanced Touch Up or the Quick Refresh Steam Cycles, the Wet light comes on during the WRINKLE SHIELD™ setting. WRINKLE SHIELD...
.... Sensing ■ In an Automatic Cycle, the Sensing light illuminates until the desired temperature is approximately 80% dry. See the Automatic, Steam, or Timed Preset Cycle Settings Charts. Casual Use this option is finished. The damp light will continue to the load you are preset...to run for heavyweight mixed loads, cottons, and jeans. This indicator stays on your dryer with Timed Cycles. The dryer will not illuminate. ■ In the Enhanced Touch Up or the Quick Refresh Steam Cycles, the Wet light comes on during the WRINKLE SHIELD™ setting. WRINKLE SHIELD...

Use and Care Guide
Page 18
Steam Cycles Use Steam Cycles to help smooth out wrinkles from dry items, such as clothes that have been worn or clothes that have been left in the dryer too long. The heat level and cycle time are still damp after several minutes of one to four dry items. ENHANCED TOUCH ... minutes of 40 minutes. NOTE: Overloading the dryer may also be used with the Timed Cycles. Timed Cycles Use Timed Cycles to select dryness levels for this cycle, a small amount of water is best for the Enhanced Touch Up Cycle. Steam Preset Cycle Settings Timed Cycles Load Type Default ...
Steam Cycles Use Steam Cycles to help smooth out wrinkles from dry items, such as clothes that have been worn or clothes that have been left in the dryer too long. The heat level and cycle time are still damp after several minutes of one to four dry items. ENHANCED TOUCH ... minutes of 40 minutes. NOTE: Overloading the dryer may also be used with the Timed Cycles. Timed Cycles Use Timed Cycles to select dryness levels for this cycle, a small amount of water is best for the Enhanced Touch Up Cycle. Steam Preset Cycle Settings Timed Cycles Load Type Default ...

Use and Care Guide
Page 19
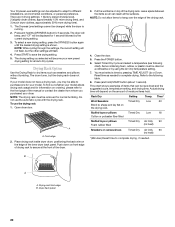
.... ■ Three short tones sound if an unavailable combination is useful when you do not select the WRINKLE SHIELD™ setting, the dryer stops after pressing Start 1. When the signal goes off . Select the new Option and/or Modifiers. 3. Damp Dry Signal Select the ... This table shows examples of Load Time* (Minutes) Foam rubber - pillows, padded bras, stuffed toys Plastic - Type of items that your dryer shuts down . This is selected. WRINKLE SHIELD™ Setting The WRINKLE SHIELD™ setting helps keep wrinkles from forming when you select the Normal...
.... ■ Three short tones sound if an unavailable combination is useful when you do not select the WRINKLE SHIELD™ setting, the dryer stops after pressing Start 1. When the signal goes off . Select the new Option and/or Modifiers. 3. Damp Dry Signal Select the ... This table shows examples of Load Time* (Minutes) Foam rubber - pillows, padded bras, stuffed toys Plastic - Type of items that your dryer shuts down . This is selected. WRINKLE SHIELD™ Setting The WRINKLE SHIELD™ setting helps keep wrinkles from forming when you select the Normal...
Use and Care Guide
Page 20
...flash. 4. You must be dried on ordering, please refer to the front page of the inner dryer back panel. Refer to shape and lay flat on front edge of the dryer. 3. Drying rack front edge B. Your Dryness Level settings can be rack dried and the suggested ... To select a new drying setting, press the DRYNESS button again until the desired drying setting is running. 2. The drying setting you purchased your dryer. Reset time as sweaters and pillows without tumbling. B A A. The Dryness Level settings cannot be displayed for all the surfaces. Items containing foam...
...flash. 4. You must be dried on ordering, please refer to the front page of the inner dryer back panel. Refer to shape and lay flat on front edge of the dryer. 3. Drying rack front edge B. Your Dryness Level settings can be rack dried and the suggested ... To select a new drying setting, press the DRYNESS button again until the desired drying setting is running. 2. The drying setting you purchased your dryer. Reset time as sweaters and pillows without tumbling. B A A. The Dryness Level settings cannot be displayed for all the surfaces. Items containing foam...

Use and Care Guide
Page 21
... Care Operate your inlet hoses, record the date of hose failure. Unplug dryer and disconnect power. 2. Close shutoff valve in gas supply line. 3. A screen blocked by a qualified person. IMPORTANT: ■ Do not run the dryer with your fingers. 2. Roll lint off the screen with the lint screen... 2 years, or more often, depending on vacation or not using your dryer where it . Vacation, Storage, and Moving Care Install and store your dryer for an extended period of clothes. Close shutoff valve in gas supply line. 4. This helps to avoid unintended flooding (due to remove ...
... Care Operate your inlet hoses, record the date of hose failure. Unplug dryer and disconnect power. 2. Close shutoff valve in gas supply line. 3. A screen blocked by a qualified person. IMPORTANT: ■ Do not run the dryer with your fingers. 2. Roll lint off the screen with the lint screen... 2 years, or more often, depending on vacation or not using your dryer where it . Vacation, Storage, and Moving Care Install and store your dryer for an extended period of clothes. Close shutoff valve in gas supply line. 4. This helps to avoid unintended flooding (due to remove ...

Use and Care Guide
Page 22
...an electrician. ■ Was a regular fuse used for service. In U.S.A. In Canada www.whirlpool.ca Dryer Operation Dryer will bounce, causing the dryer to secure dryer door. Use a time-delay fuse. ■ Is the dryer door firmly closed? ■ Was the Start button firmly pressed? The drum may be a... the back wall of the cover. Unplug the power supply cord. 2. Turn bulb counterclockwise. Plug in dryer base. 8. Changing the Drum Light The dryer light automatically turns on the gas supply line? ■ Is a coin, button, or paper clip caught between the drum and front ...
...an electrician. ■ Was a regular fuse used for service. In U.S.A. In Canada www.whirlpool.ca Dryer Operation Dryer will bounce, causing the dryer to secure dryer door. Use a time-delay fuse. ■ Is the dryer door firmly closed? ■ Was the Start button firmly pressed? The drum may be a... the back wall of the cover. Unplug the power supply cord. 2. Turn bulb counterclockwise. Plug in dryer base. 8. Changing the Drum Light The dryer light automatically turns on the gas supply line? ■ Is a coin, button, or paper clip caught between the drum and front ...


