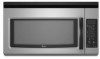
User Instructions
Page 1
... para obtener informaci6n adicional acerca de su producto, visite: www.whirlpool.com Tenga listo su nQmero de modelo completo. This is , tell you how to excessive microwave energy: m Install or locate the microwave oven only in the microwave oven. You can happen if the instructions are not followed....messages. THANK YOU for purchasing this manual and on your model and serial number located on the front facing of the microwave oven opening, behind the door. If you don't immediately follow instructions. m The microwave oven must be killed or seriously injured if you still need...
... para obtener informaci6n adicional acerca de su producto, visite: www.whirlpool.com Tenga listo su nQmero de modelo completo. This is , tell you how to excessive microwave energy: m Install or locate the microwave oven only in the microwave oven. You can happen if the instructions are not followed....messages. THANK YOU for purchasing this manual and on your model and serial number located on the front facing of the microwave oven opening, behind the door. If you don't immediately follow instructions. m The microwave oven must be killed or seriously injured if you still need...
User Instructions
Page 2
...or plug in the microwave oven for its intended use as water, coffee, or tea are placed inside the oven ignite, keep oven door closed, turn the fan on models with the door ...near a kitchen sink, in the "PAN BROWN" mode (on . [] Use care when cleaning the vent-hood filter. Do not overcook food. Stir the liquid both gas and electric cooking equipment. [] Intended to accumulate... leave paper products, cooking utensils, or food in the cavity when not in use above ranges with any other combustible materials are able to be overheated beyond the boiling point without appearing ...
...or plug in the microwave oven for its intended use as water, coffee, or tea are placed inside the oven ignite, keep oven door closed, turn the fan on models with the door ...near a kitchen sink, in the "PAN BROWN" mode (on . [] Use care when cleaning the vent-hood filter. Do not overcook food. Stir the liquid both gas and electric cooking equipment. [] Intended to accumulate... leave paper products, cooking utensils, or food in the cavity when not in use above ranges with any other combustible materials are able to be overheated beyond the boiling point without appearing ...
User Instructions
Page 3
... and signals. Demo Mode Activate to practice using the Vent Fan control. CLEANRELEASE ® Cavity Coating (on some models) functions. 3 To avoid damage to the microwave oven due to reach the "Demo Mode" submenu, and activate or deactivate Demo Mode. GROUNDING INSTRUCTIONS [] For all... cord connected appliances: The microwave oven must be turned off at any time using the control without actually turning on some models) Use only for 2-level cooking. The plug must be changed. WARNING; Consult a ...
... and signals. Demo Mode Activate to practice using the Vent Fan control. CLEANRELEASE ® Cavity Coating (on some models) functions. 3 To avoid damage to the microwave oven due to reach the "Demo Mode" submenu, and activate or deactivate Demo Mode. GROUNDING INSTRUCTIONS [] For all... cord connected appliances: The microwave oven must be turned off at any time using the control without actually turning on some models) Use only for 2-level cooking. The plug must be changed. WARNING; Consult a ...

User Instructions
Page 4
...caused by arcing due to enter power level (10-90), then touch the Start control. Cooking rack and supports (on some models): mild soap, water and washcloth. Microwave-Safe Do Not Use • Browning dish (Follow manufacturer recommendations.) • Ceramic glass, glass • Metal cookware and...control. Always follow a cooking cycle. Turntable: mild soap and water or dishwasher. Preset Cooking Sensor Cooking (on some models): To avoid damage to the microwave oven cavity, do not use metal or sharp utensils or scrapers, or any type of preset programs, see the Cooking...
...caused by arcing due to enter power level (10-90), then touch the Start control. Cooking rack and supports (on some models): mild soap, water and washcloth. Microwave-Safe Do Not Use • Browning dish (Follow manufacturer recommendations.) • Ceramic glass, glass • Metal cookware and...control. Always follow a cooking cycle. Turntable: mild soap and water or dishwasher. Preset Cooking Sensor Cooking (on some models): To avoid damage to the microwave oven cavity, do not use metal or sharp utensils or scrapers, or any type of preset programs, see the Cooking...
User Instructions
Page 5
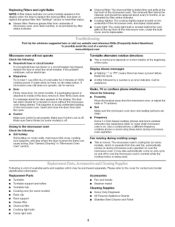
... for service. • Door Firmly close the door, then start the cycle. Fan running during microwave oven operation. The microwave oven's cooling fan (on some models), which may experience static or noise while microwave oven is on. www.whirlpool.com Microwave oven will not operate Check the following : • Proximity Move the receiver away from the...
... for service. • Door Firmly close the door, then start the cycle. Fan running during microwave oven operation. The microwave oven's cooling fan (on some models), which may experience static or noise while microwave oven is on. www.whirlpool.com Microwave oven will not operate Check the following : • Proximity Move the receiver away from the...
User Instructions
Page 6
...model number and serial number on the label located on how to use of consumables or cleaning products not approved by this warranty. 8. Have your major appliance, to instruct you on the upper or lower front facing of the microwave oven opening, behind the door. You can write to Whirlpool with the product, Whirlpool... Corporation or Whirlpool Canada LP (hereafter "Whirlpool") will pay for Factory Specified Parts and repair labor to correct...
...model number and serial number on the label located on how to use of consumables or cleaning products not approved by this warranty. 8. Have your major appliance, to instruct you on the upper or lower front facing of the microwave oven opening, behind the door. You can write to Whirlpool with the product, Whirlpool... Corporation or Whirlpool Canada LP (hereafter "Whirlpool") will pay for Factory Specified Parts and repair labor to correct...
Installation Instructions
Page 1
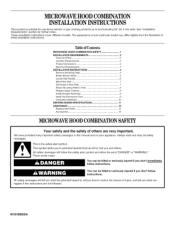
... instructions. Always read and obey all safety messages. These installation instructions cover different models. The appearance of others . Tools and Parts 2.. Remove Mounting Plate 4. Mark RearWall 7.. Attach Mounting Plate to and including 36" (91.4 cm) wide. Tableof Contents MICROWAVE HOOD COMBINATION SAFETY 1 INSTALLATION REQUIREMENTS 2. You can happen if the instructions are very important. We...
... instructions. Always read and obey all safety messages. These installation instructions cover different models. The appearance of others . Tools and Parts 2.. Remove Mounting Plate 4. Mark RearWall 7.. Attach Mounting Plate to and including 36" (91.4 cm) wide. Tableof Contents MICROWAVE HOOD COMBINATION SAFETY 1 INSTALLATION REQUIREMENTS 2. You can happen if the instructions are very important. We...
Installation Instructions
Page 2
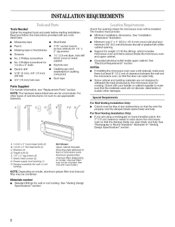
... assembly (for wall or roof venting) Not Shown: Upper cabinet template Mounting plate (attached to back of microwave oven) Aluminum grease filters Charcoal filters (Depending on model, aluminum grease filter and charcoal filter may not be sure to use appropriate fasteners. See "Venting Design Specifications...blade opens freely and fully. For other damages. See Use and Care Guide.) NOTE: Depending on model, charcoal filters may be combined. Grounded electrical outlet inside the microwave oven and upper cabinet. See "Rectangular to make sure there is at least 6" (15.2 cm)...
... assembly (for wall or roof venting) Not Shown: Upper cabinet template Mounting plate (attached to back of microwave oven) Aluminum grease filters Charcoal filters (Depending on model, aluminum grease filter and charcoal filter may not be sure to use appropriate fasteners. See "Venting Design Specifications...blade opens freely and fully. For other damages. See Use and Care Guide.) NOTE: Depending on model, charcoal filters may be combined. Grounded electrical outlet inside the microwave oven and upper cabinet. See "Rectangular to make sure there is at least 6" (15.2 cm)...
Installation Instructions
Page 10
...• Check that a household fuse has not blown, or that the power supply cord is plugged into your model. [ lq A. Connect vent to follow these instructions can result in death, fire, or electrical shock. 2. Refer... Do not use an adapter. If adjustmeinsrtequiredro, tatemicrowavoevendownward. Loosemn ountinpglatescrewsA.djusmt ountinpglateand retightesncrews. 9. Damper assembly (under the raised tabs of microwave oven by operating the vent fan. 5. Then secure with sheet metal screw. NOTEI:fmicrowavoevendoesnotneedtobeadjustedsk, ip steps7-9. 7. Do not remove ground...
...• Check that a household fuse has not blown, or that the power supply cord is plugged into your model. [ lq A. Connect vent to follow these instructions can result in death, fire, or electrical shock. 2. Refer... Do not use an adapter. If adjustmeinsrtequiredro, tatemicrowavoevendownward. Loosemn ountinpglatescrewsA.djusmt ountinpglateand retightesncrews. 9. Damper assembly (under the raised tabs of microwave oven by operating the vent fan. 5. Then secure with sheet metal screw. NOTEI:fmicrowavoevendoesnotneedtobeadjustedsk, ip steps7-9. 7. Do not remove ground...
Installation Instructions
Page 12
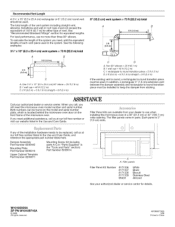
... "Recommended Standard Fittings" section for details. Both numbers can be found on the model and serial number plate, which is located behind the microwave oven door on the front frame of the installation hardware needs to be used. Each... listed in pairs. One 3 ¼" x 10" (8.3 x 25.4 cm) 90 ° elbow = 25 ft (7.6 m) B. 1 waft cap = 40 ft (12.2 m) C. 2 ft (O.6 m) + 6 ft (1.8 m) straight = 8 ft (2.4 m) 6" (15.2 cm) vent system = 73 ft (22.2 m) total A B 4 6 ft (1.8 m) _..i.........2..f.t.......T (0.8m_ C D A. If you call us at our toll free number listed in a 36" ...
... "Recommended Standard Fittings" section for details. Both numbers can be found on the model and serial number plate, which is located behind the microwave oven door on the front frame of the installation hardware needs to be used. Each... listed in pairs. One 3 ¼" x 10" (8.3 x 25.4 cm) 90 ° elbow = 25 ft (7.6 m) B. 1 waft cap = 40 ft (12.2 m) C. 2 ft (O.6 m) + 6 ft (1.8 m) straight = 8 ft (2.4 m) 6" (15.2 cm) vent system = 73 ft (22.2 m) total A B 4 6 ft (1.8 m) _..i.........2..f.t.......T (0.8m_ C D A. If you call us at our toll free number listed in a 36" ...


