
Installation Instructions
Page 1
... Assembly 9 Install the Microwave Oven 9 Complete Installation 10 VENTING DESIGN SPECIFICATIONS 11 ASSISTANCE 12 Replacement Parts 12 Accessories 12 MICROWAVE HOOD COMBINATION SAFETY Your safety and the safety of others . MICROWAVE HOOD ...INSTALLATION INSTRUCTIONS This product is the safety alert symbol. Table of Contents MICROWAVE HOOD COMBINATION SAFETY 1 INSTALLATION REQUIREMENTS 2 Tools and Parts 2 Remove Cardboard Template 2 Location Requirements 2 Product Dimensions 3 Electrical Requirements 3 INSTALLATION INSTRUCTIONS 4 Remove Mounting Plate 4 Rotate...
... Assembly 9 Install the Microwave Oven 9 Complete Installation 10 VENTING DESIGN SPECIFICATIONS 11 ASSISTANCE 12 Replacement Parts 12 Accessories 12 MICROWAVE HOOD COMBINATION SAFETY Your safety and the safety of others . MICROWAVE HOOD ...INSTALLATION INSTRUCTIONS This product is the safety alert symbol. Table of Contents MICROWAVE HOOD COMBINATION SAFETY 1 INSTALLATION REQUIREMENTS 2 Tools and Parts 2 Remove Cardboard Template 2 Location Requirements 2 Product Dimensions 3 Electrical Requirements 3 INSTALLATION INSTRUCTIONS 4 Remove Mounting Plate 4 Rotate...

Installation Instructions
Page 2
...(10 mm) drill bits ■ 3/4" (19 mm) hole saw ■ Caulking gun and weatherproof caulking compound ■ Duct tape Parts Supplied For reorder information, see "Replacement Parts" section. The piece inside upper cabinet. Location Requirements Check the opening . ■ Support for weight of 150 lbs (68 kg),...NOTE: Depending on model, charcoal filters may be included. Cut along the perforation to back of microwave oven) Cardboard template (part of clearance between the wall and the microwave oven, so that the materials used will be installed. Set the cardboard template ...
...(10 mm) drill bits ■ 3/4" (19 mm) hole saw ■ Caulking gun and weatherproof caulking compound ■ Duct tape Parts Supplied For reorder information, see "Replacement Parts" section. The piece inside upper cabinet. Location Requirements Check the opening . ■ Support for weight of 150 lbs (68 kg),...NOTE: Depending on model, charcoal filters may be included. Cut along the perforation to back of microwave oven) Cardboard template (part of clearance between the wall and the microwave oven, so that the materials used will be installed. Set the cardboard template ...

Installation Instructions
Page 8
.... B D A. 1/4-20 x 3" round-head bolt B. Drill a 3/16" (5 mm) hole into the upper cabinet align with tape or thumbtacks. The template has trim lines to the thickest part of the rear wall (for the toggle nuts to go through the end hole that the holes cut into the wall stud at the end...
.... B D A. 1/4-20 x 3" round-head bolt B. Drill a 3/16" (5 mm) hole into the upper cabinet align with tape or thumbtacks. The template has trim lines to the thickest part of the rear wall (for the toggle nuts to go through the end hole that the holes cut into the wall stud at the end...

Installation Instructions
Page 12
...the existing vent is located behind the door. ■ Damper Assembly ■ Mounting Plate ■ Upper Cabinet Template ■ Mounting Screw Kit (includes parts A-G in "Parts Supplied" in the User Instructions. Following is 3" (7.6 cm) wide. Recommended Vent Length A 3¹⁄₄" x 10" (8.3 x 25.4 cm... Fittings" section for either type of 140 ft (42.7 m) for equivalent lengths. To calculate the length of available replacement parts. In addition, a rectangular 3" (7.6 cm) extension vent between the damper assembly and rectangular to round transition piece must be...
...the existing vent is located behind the door. ■ Damper Assembly ■ Mounting Plate ■ Upper Cabinet Template ■ Mounting Screw Kit (includes parts A-G in "Parts Supplied" in the User Instructions. Following is 3" (7.6 cm) wide. Recommended Vent Length A 3¹⁄₄" x 10" (8.3 x 25.4 cm... Fittings" section for either type of 140 ft (42.7 m) for equivalent lengths. To calculate the length of available replacement parts. In addition, a rectangular 3" (7.6 cm) extension vent between the damper assembly and rectangular to round transition piece must be...
Owners Manual
Page 1
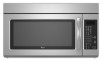
... visit our website at 1-800-253-1301. All safety messages will follow instructions. All safety messages will need assistance, call us at www.whirlpool.com for additional information. for purchasing this section. ■ Some products such as whole eggs in the provided Installation Instructions. See "GROUNDING .... You will tell you should be grounded. Puede encontrar su número de modelo y de serie en la etiqueta ubicada en la parte frontal de la abertura del horno de microondas, detrás de la puerta. These words mean: DANGER You can be killed or seriously...
... visit our website at 1-800-253-1301. All safety messages will follow instructions. All safety messages will need assistance, call us at www.whirlpool.com for additional information. for purchasing this section. ■ Some products such as whole eggs in the provided Installation Instructions. See "GROUNDING .... You will tell you should be grounded. Puede encontrar su número de modelo y de serie en la etiqueta ubicada en la parte frontal de la abertura del horno de microondas, detrás de la puerta. These words mean: DANGER You can be killed or seriously...
Owners Manual
Page 2
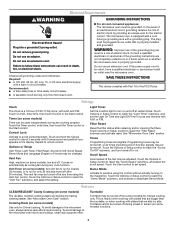
... Do not let cord hang over edge of table or counter. ■ Do not mount over a sink. ■ Do not cover racks or any other part of injury to accumulate on hood or filter. ■ Do not use . ■ Liquids, such as water, coffee, or tea are placed inside the oven... in operation. ■ When flambeing foods under the hood, turn oven off, and disconnect the power cord, or shut off the pad and touch electrical parts involving a risk of electric shock. ■ Suitable for example, near a kitchen sink, in oven. - If materials inside the oven to microwave energy. It is ...
... Do not let cord hang over edge of table or counter. ■ Do not mount over a sink. ■ Do not cover racks or any other part of injury to accumulate on hood or filter. ■ Do not use . ■ Liquids, such as water, coffee, or tea are placed inside the oven... in operation. ■ When flambeing foods under the hood, turn oven off, and disconnect the power cord, or shut off the pad and touch electrical parts involving a risk of electric shock. ■ Suitable for example, near a kitchen sink, in oven. - If materials inside the oven to microwave energy. It is ...
Owners Manual
Page 3
... that are side by side. Observe all tones (including end-of the grounding plug can result in the display. or 20-amp electrical supply with Part 18 of electric shock. Touch Options or Setup control to set the Light On Time and Light Off Time in death, fire, or electrical shock...
... that are side by side. Observe all tones (including end-of the grounding plug can result in the display. or 20-amp electrical supply with Part 18 of electric shock. Touch Options or Setup control to set the Light On Time and Light Off Time in death, fire, or electrical shock...

Owners Manual
Page 5
... and Light Bulbs NOTE: A filter status indicator (on some models) appears in the display when it , then firmly close door. www.whirlpool.com Microwave oven will not operate Check the following : ■ Proximity Move the receiver away from the microwave oven, or adjust the radio... at the top front of the microwave oven, under the bulb cover, and is replaceable. Troubleshooting First try the steps below is normal. Replacment Parts Accessories ■ Turntable ■ Turntable support and rollers ■ Turntable hub ■ Cooking rack (for service. ■ Door Firmly close ...
... and Light Bulbs NOTE: A filter status indicator (on some models) appears in the display when it , then firmly close door. www.whirlpool.com Microwave oven will not operate Check the following : ■ Proximity Move the receiver away from the microwave oven, or adjust the radio... at the top front of the microwave oven, under the bulb cover, and is replaceable. Troubleshooting First try the steps below is normal. Replacment Parts Accessories ■ Turntable ■ Turntable support and rollers ■ Turntable hub ■ Cooking rack (for service. ■ Door Firmly close ...
Owners Manual
Page 6
.... Please keep this limited warranty does not apply. W10182518A SP PN W10182523A © 2008 Whirlpool Corporation. This limited warranty is valid only in accordance with original model/serial numbers that is required to the appliance. 9. Consumable parts are excluded from unauthorized modifications made to obtain service under these excluded circumstances shall be...
.... Please keep this limited warranty does not apply. W10182518A SP PN W10182523A © 2008 Whirlpool Corporation. This limited warranty is valid only in accordance with original model/serial numbers that is required to the appliance. 9. Consumable parts are excluded from unauthorized modifications made to obtain service under these excluded circumstances shall be...

Warranty
Page 1
... All rights reserved. ® Registered Trademark/TM Trademark of consumables or cleaning products not approved by Whirlpool. 5. Service calls to the appliance. 9. Consumable parts are excluded from defects in materials or workmanship and is reported to correct defects in your correspondence. ...warranty. Outside the 50 United States and Canada, this User Instructions and model number information for Factory Specified Parts and repair labor to Whirlpool within 30 days from unauthorized modifications made to repair or replace appliance light bulbs, air filters or water ...
... All rights reserved. ® Registered Trademark/TM Trademark of consumables or cleaning products not approved by Whirlpool. 5. Service calls to the appliance. 9. Consumable parts are excluded from defects in materials or workmanship and is reported to correct defects in your correspondence. ...warranty. Outside the 50 United States and Canada, this User Instructions and model number information for Factory Specified Parts and repair labor to Whirlpool within 30 days from unauthorized modifications made to repair or replace appliance light bulbs, air filters or water ...


