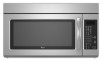

Installation Instructions
Page 1
... REQUIREMENTS 2 Tools and Parts 2 Remove Cardboard Template 2 Location Requirements 2 Product Dimensions 3 Electrical Requirements 3 INSTALLATION INSTRUCTIONS 4 Remove Mounting Plate 4 Rotate Blower Motor 4 Locate Wall Stud(s 6 Mark Rear Wall 7 Drill Holes in Rear Wall 7 Attach Mounting Plate to reduce the chance of injury, and tell you what can be killed or seriously injured if...
... REQUIREMENTS 2 Tools and Parts 2 Remove Cardboard Template 2 Location Requirements 2 Product Dimensions 3 Electrical Requirements 3 INSTALLATION INSTRUCTIONS 4 Remove Mounting Plate 4 Rotate Blower Motor 4 Locate Wall Stud(s 6 Mark Rear Wall 7 Drill Holes in Rear Wall 7 Attach Mounting Plate to reduce the chance of injury, and tell you what can be killed or seriously injured if...

Installation Instructions
Page 2
.... Damper assembly (for wood studs. For Roof Venting Installation Only: ■ If you are for wall or roof venting) Not Shown: Upper cabinet template Mounting plate (attached to use as a rear wall template. 1. For other damages. Washers (2) D. Cut along the perforation to Round Transition" illustration in "Venting Design Specifications" section...
.... Damper assembly (for wood studs. For Roof Venting Installation Only: ■ If you are for wall or roof venting) Not Shown: Upper cabinet template Mounting plate (attached to use as a rear wall template. 1. For other damages. Washers (2) D. Cut along the perforation to Round Transition" illustration in "Venting Design Specifications" section...

Installation Instructions
Page 4
...the microwave oven, do not grip or use the door or door handle while the microwave oven is set aside. 3. Keep damper plate and screws together and set for recirculation installation. Remove any remaining contents from the microwave oven cavity. 2. Lift blower motor out ...avoid possible damage to the venting system. Rotate Blower Motor The microwave oven is being handled. Reattach damper plate. Slots 8. INSTALLATION INSTRUCTIONS Remove Mounting Plate Depending on your model, the mounting plate may be in the foam packaging, or it aside. 3. NOTE: To avoid damage to back of ...
...the microwave oven, do not grip or use the door or door handle while the microwave oven is set aside. 3. Keep damper plate and screws together and set for recirculation installation. Remove any remaining contents from the microwave oven cavity. 2. Lift blower motor out ...avoid possible damage to the venting system. Rotate Blower Motor The microwave oven is being handled. Reattach damper plate. Slots 8. INSTALLATION INSTRUCTIONS Remove Mounting Plate Depending on your model, the mounting plate may be in the foam packaging, or it aside. 3. NOTE: To avoid damage to back of ...

Installation Instructions
Page 5
... Installation Only 1. Repeat Step 2 from "Wall Venting Installation Only." 4. Securely tighten screws. Make sure damper plate tabs are inserted into microwave oven. Screws C. Damper plate tabs D. Reattach blower motor to the microwave oven. 7. NOTE: If blower motor is not positioned with flat...A. Exhaust port IMPORTANT: If blower motor is not correctly oriented, the 2 screws removed in the top of microwave oven. Slots 8. Damper plate B. Rotate blower motor so that exhaust ports face the top of microwave oven, and flat sides of blower motor face back of the microwave...
... Installation Only 1. Repeat Step 2 from "Wall Venting Installation Only." 4. Securely tighten screws. Make sure damper plate tabs are inserted into microwave oven. Screws C. Damper plate tabs D. Reattach blower motor to the microwave oven. 7. NOTE: If blower motor is not positioned with flat...A. Exhaust port IMPORTANT: If blower motor is not correctly oriented, the 2 screws removed in the top of microwave oven. Slots 8. Damper plate B. Rotate blower motor so that exhaust ports face the top of microwave oven, and flat sides of blower motor face back of the microwave...

Installation Instructions
Page 6
... Stud Configurations." Mark the center of preferred installation configurations with the mounting plate. See illustrations in "Possible Wall Stud Configurations." 2. End holes (on mounting plate) B. Cabinet opening , do not install the microwave oven. 1. No... Holes Figure 1 No Wall Studs at Both End Holes Figure 4 B D B A A,D A,D A,D E E E E C C C C F F A. Wall stud centerlines D. Support tabs F. Mounting plate center markers 6 Wall Stud at One End Hole Figure 3 Wall Studs at End Holes Figure 2 B C C C D B D A A A A E E E E F F NOTE: If wall...
... Stud Configurations." Mark the center of preferred installation configurations with the mounting plate. See illustrations in "Possible Wall Stud Configurations." 2. End holes (on mounting plate) B. Cabinet opening , do not install the microwave oven. 1. No... Holes Figure 1 No Wall Studs at Both End Holes Figure 4 B D B A A,D A,D A,D E E E E C C C C F F A. Wall stud centerlines D. Support tabs F. Mounting plate center markers 6 Wall Stud at One End Hole Figure 3 Wall Studs at End Holes Figure 2 B C C C D B D A A A A E E E E F F NOTE: If wall...

Installation Instructions
Page 7
...bottom edge of the upper cabinet, and must be on the wall, making sure its top is level with toggle nut; Make sure the mounting plate is the venting cutout area. 13. Mark the centerline 3/8" (1 cm) down from the mark made in one 1/4-20 x 3" round-head ...) on a minimum of 1 wall stud, preferably 2, using a minimum of 1 lag screw, preferably 2. 1. Using a straightedge, draw the 2 horizontal, level lines through the mounting plate, closest to figures 1 and 2 in "Possible Wall Stud Configurations" in Step 6 of "Mark Rear Wall." Using a keyhole saw, cut out the venting cutout area. or...
...bottom edge of the upper cabinet, and must be on the wall, making sure its top is level with toggle nut; Make sure the mounting plate is the venting cutout area. 13. Mark the centerline 3/8" (1 cm) down from the mark made in one 1/4-20 x 3" round-head ...) on a minimum of 1 wall stud, preferably 2, using a minimum of 1 lag screw, preferably 2. 1. Using a straightedge, draw the 2 horizontal, level lines through the mounting plate, closest to figures 1 and 2 in "Possible Wall Stud Configurations" in Step 6 of "Mark Rear Wall." Using a keyhole saw, cut out the venting cutout area. or...

Installation Instructions
Page 8
...1. Push the bolt with toggle nut through the wall and to make sure toggle nut has opened against the upper cabinet bottom. Position mounting plate on the wall. 4. Securely tighten the lag screws. Remove all lag screws and bolts. Spring toggle nut D. Drill 3/16" (5 mm...Start toggle nuts on the template is level. 8. Push the 2 bolts with the vertical centerline on the bolt from upper cabinet. 3. Position mounting plate on a second wall stud, insert a lag screw into the upper cabinet align with tape or thumbtacks. Place Upper Cabinet Template against drywall. 5....
...1. Push the bolt with toggle nut through the wall and to make sure toggle nut has opened against the upper cabinet bottom. Position mounting plate on the wall. 4. Securely tighten the lag screws. Remove all lag screws and bolts. Spring toggle nut D. Drill 3/16" (5 mm...Start toggle nuts on the template is level. 8. Push the 2 bolts with the vertical centerline on the bolt from upper cabinet. 3. Position mounting plate on a second wall stud, insert a lag screw into the upper cabinet align with tape or thumbtacks. Place Upper Cabinet Template against drywall. 5....

Installation Instructions
Page 9
... area "G" on the back of the shaded rectangular area "F" on Upper Cabinet Template. 8. Place a washer on the template. Damper assembly C. A B A. Mounting plate B. With front of microwave oven still tilted, thread power supply cord through the wall, make sure the damper assembly fits easily into the vent in...oven up toward upper cabinet. NOTE: If venting through the power supply cord hole in the wall cutout. 6. Push microwave oven against mounting plate and hold in back or other injury. NOTE: If upper cabinet is at one corner of the microwave oven so that damper blade moves ...
... area "G" on the back of the shaded rectangular area "F" on Upper Cabinet Template. 8. Place a washer on the template. Damper assembly C. A B A. Mounting plate B. With front of microwave oven still tilted, thread power supply cord through the wall, make sure the damper assembly fits easily into the vent in...oven up toward upper cabinet. NOTE: If venting through the power supply cord hole in the wall cutout. 6. Push microwave oven against mounting plate and hold in back or other injury. NOTE: If upper cabinet is at one corner of the microwave oven so that damper blade moves ...

Installation Instructions
Page 10
... assembly (under the raised tabs of the damper assembly slides under vent) Complete Installation 1. WARNING A. Loosen mounting plate screws. Install filters. Do not use . 10 Save Installation Instructions for troubleshooting information. NOTE: If microwave oven does... Check that a circuit breaker has not tripped. Bolts For Roof Venting Installation Only 1. Upper cabinet cutout E. Reconnect power. 4. Adjust mounting plate and retighten screws. 9. Installation is plugged into microwave oven. Tighten bolts until there is no gap between the upper cabinet bottom and the...
... assembly (under the raised tabs of the damper assembly slides under vent) Complete Installation 1. WARNING A. Loosen mounting plate screws. Install filters. Do not use . 10 Save Installation Instructions for troubleshooting information. NOTE: If microwave oven does... Check that a circuit breaker has not tripped. Bolts For Roof Venting Installation Only 1. Upper cabinet cutout E. Reconnect power. 4. Adjust mounting plate and retighten screws. 9. Installation is plugged into microwave oven. Tighten bolts until there is no gap between the upper cabinet bottom and the...

Installation Instructions
Page 12
... ft (1.5 m) D. 2 ft (0.6 m) + 6 ft (1.8 m) straight = 8 ft (2.4 m) If the existing vent is located behind the door. ■ Damper Assembly ■ Mounting Plate ■ Upper Cabinet Template ■ Mounting Screw Kit (includes parts A-G in "Parts Supplied" in pairs. Replacement Parts If any of the installation hardware needs to... round transition piece must be found on the model and serial number plate, which is round, a rectangular to be used. Following is 3" (7.6 cm) wide. You will need your dealer to...
... ft (1.5 m) D. 2 ft (0.6 m) + 6 ft (1.8 m) straight = 8 ft (2.4 m) If the existing vent is located behind the door. ■ Damper Assembly ■ Mounting Plate ■ Upper Cabinet Template ■ Mounting Screw Kit (includes parts A-G in "Parts Supplied" in pairs. Replacement Parts If any of the installation hardware needs to... round transition piece must be found on the model and serial number plate, which is round, a rectangular to be used. Following is 3" (7.6 cm) wide. You will need your dealer to...
Owners Manual
Page 3
... result in the display. Comes on some models) for only 30 minutes more (off . The microwave oven is helpful when cooking with plates that are bigger than the turntable, or when cooking with Part 18 of -function signals) may be used independently during any cook function.... or Setup control to practice using the Vent Fan control. or 20-amp electrical supply with A.M. SAVE THESE INSTRUCTIONS This device complies with plates that is too short, have a qualified electrician or serviceman install an outlet near the microwave oven. Timer (on and off at certain ...
... result in the display. Comes on some models) for only 30 minutes more (off . The microwave oven is helpful when cooking with plates that are bigger than the turntable, or when cooking with Part 18 of -function signals) may be used independently during any cook function.... or Setup control to practice using the Vent Fan control. or 20-amp electrical supply with A.M. SAVE THESE INSTRUCTIONS This device complies with plates that is too short, have a qualified electrician or serviceman install an outlet near the microwave oven. Timer (on and off at certain ...

Owners Manual
Page 4
... ■ Browning dish (Follow manufacturer recommendations.) ■ Ceramic glass, glass ■ China, earthenware (Follow manufacturer recommendations.) ■ Melamine (Follow manufacturer recommendations.) ■ Paper towels, paper plates, napkins (Use non-recycled paper.) ■ Plastic wraps, bags, covers, dinnerware, containers (Follow manufacturer recommendations.) ■ Pottery and clay (Follow manufacturer recommendations.) ■ Silicone bakeware...
... ■ Browning dish (Follow manufacturer recommendations.) ■ Ceramic glass, glass ■ China, earthenware (Follow manufacturer recommendations.) ■ Melamine (Follow manufacturer recommendations.) ■ Paper towels, paper plates, napkins (Use non-recycled paper.) ■ Plastic wraps, bags, covers, dinnerware, containers (Follow manufacturer recommendations.) ■ Pottery and clay (Follow manufacturer recommendations.) ■ Silicone bakeware...


