
Use & Care Guide
Page 2
... cleaner residue to accumulate on hood or filter. ■ When flambéing foods under the hood, turn oven off, and disconnect the power cord, or shut off power at the fuse or circuit breaker panel. ■ Use care when cleaning the vent-hood filter. Carefully attend the microwave oven when paper...
... cleaner residue to accumulate on hood or filter. ■ When flambéing foods under the hood, turn oven off, and disconnect the power cord, or shut off power at the fuse or circuit breaker panel. ■ Use care when cleaning the vent-hood filter. Carefully attend the microwave oven when paper...

Use & Care Guide
Page 3
.../CLOCK to reach the Scrolling Speed submenu, and follow the prompts to set speed. Required: ■ A 120 volt, 60 Hz, AC only, 15- If the power supply cord is properly grounded. Timer With the microwave oven in the display. Repeat to reach the Filter Alert submenu, and activate reset. Comes on...
.../CLOCK to reach the Scrolling Speed submenu, and follow the prompts to set speed. Required: ■ A 120 volt, 60 Hz, AC only, 15- If the power supply cord is properly grounded. Timer With the microwave oven in the display. Repeat to reach the Filter Alert submenu, and activate reset. Comes on...

Use & Care Guide
Page 4
... for convection cycles (baking or roasting). Turntable Turntable may be a bit hotter, you want the microwave oven to the microwave oven, always remove rack after a power failure. Turntable B. If dish becomes hot and the water stays cool, do not use just the base and lid for manual cooking only. To avoid...
... for convection cycles (baking or roasting). Turntable Turntable may be a bit hotter, you want the microwave oven to the microwave oven, always remove rack after a power failure. Turntable B. If dish becomes hot and the water stays cool, do not use just the base and lid for manual cooking only. To avoid...

Use & Care Guide
Page 5
...water. ■ Stainless steel (on some models). Manual Cooking/Stage Cooking Doneness Touch COOK TIME, touch number pads to enter time, touch COOK POWER (if not 100%), touch number pads to follow label instructions on the underside of microwave oven. Use microwave-safe dish with loose-fitting lid,...any type of abrasive cleanser or scrubbers. ■ Cavity: Steam Clean function (on some models) before or after a sensor cycle, the cook power will be 100%, but may be the same as in the display when it heats, and adjusts the cooking time accordingly. See Quick Reference ...
...water. ■ Stainless steel (on some models). Manual Cooking/Stage Cooking Doneness Touch COOK TIME, touch number pads to enter time, touch COOK POWER (if not 100%), touch number pads to follow label instructions on the underside of microwave oven. Use microwave-safe dish with loose-fitting lid,...any type of abrasive cleanser or scrubbers. ■ Cavity: Steam Clean function (on some models) before or after a sensor cycle, the cook power will be 100%, but may be the same as in the display when it heats, and adjusts the cooking time accordingly. See Quick Reference ...

Use & Care Guide
Page 6
ACCESSORIES Following is a list of the cycle. ■ "Enter clock" with your mobile device, or visit www.whirlpool.com/product_help for service. ■ Door - Please refer to the cover for assistance. ■ This is normal. See "General Cleaning" in the ...; affresh® Kitchen Appliance Cleaner ■ affresh® Stainless Steel Cleaner ■ affresh® Stainless Steel Wipes PROBLEM SOLVER Scan the code at 100% cooking power. Reset the clock. ■ A letter followed by a number is on and off . Check the following : ■ Soil buildup - If you avoid a service...
ACCESSORIES Following is a list of the cycle. ■ "Enter clock" with your mobile device, or visit www.whirlpool.com/product_help for service. ■ Door - Please refer to the cover for assistance. ■ This is normal. See "General Cleaning" in the ...; affresh® Kitchen Appliance Cleaner ■ affresh® Stainless Steel Cleaner ■ affresh® Stainless Steel Wipes PROBLEM SOLVER Scan the code at 100% cooking power. Reset the clock. ■ A letter followed by a number is on and off . Check the following : ■ Soil buildup - If you avoid a service...
Installation Guide
Page 2
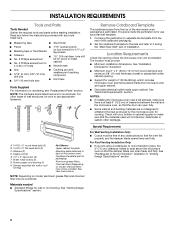
...; Scissors ■ 1½" (3.8 cm) diam. The piece inside upper cabinet. Location Requirements Check the opening . ■ Support for use appropriate fasteners. Toggle nuts (2) E. 1/4" x 2" lag screws (2) F. Power supply cord bushing (1) H. Cut along the perforation to make sure there is perforated. See "Electrical Requirements" section. NOTES: ■ If installing the microwave oven near...
...; Scissors ■ 1½" (3.8 cm) diam. The piece inside upper cabinet. Location Requirements Check the opening . ■ Support for use appropriate fasteners. Toggle nuts (2) E. 1/4" x 2" lag screws (2) F. Power supply cord bushing (1) H. Cut along the perforation to make sure there is perforated. See "Electrical Requirements" section. NOTES: ■ If installing the microwave oven near...

Installation Guide
Page 3
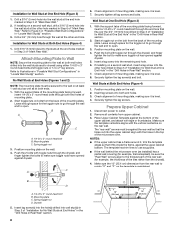
... upper cabinet. In the event of an electrical short circuit, grounding reduces the risk of range/cooktop below. Do not use an adapter. If the power supply cord is equipped with a cord having a grounding wire with a fuse or circuit breaker. A B Electrical Requirements WARNING 66" (167.6 cm) min. 30" (76.2 cm) min...
... upper cabinet. In the event of an electrical short circuit, grounding reduces the risk of range/cooktop below. Do not use an adapter. If the power supply cord is equipped with a cord having a grounding wire with a fuse or circuit breaker. A B Electrical Requirements WARNING 66" (167.6 cm) min. 30" (76.2 cm) min...
Installation Guide
Page 8
... is level. 4. Insert a lag screw into the wall studs and/or drywall using either 1/4-20 x 3" round-head bolts and toggle nuts or 1/4 x 2" lag screws. Disconnect power to use as guides. ■ If the wall behind the microwave oven (as at One End Hole (Figure 3) 1. Make sure the 10" (25.4 cm) dimension...
... is level. 4. Insert a lag screw into the wall studs and/or drywall using either 1/4-20 x 3" round-head bolts and toggle nuts or 1/4 x 2" lag screws. Disconnect power to use as guides. ■ If the wall behind the microwave oven (as at One End Hole (Figure 3) 1. Make sure the 10" (25.4 cm) dimension...

Installation Guide
Page 9
...2 or more people to move and install microwave oven. Sheet metal screws 3. Secure damper assembly with 2 sheet metal screws. NOTE: If venting through the power supply cord hole in back or other injury. Metal cabinet B. Using a keyhole saw, cut out the rectangular area. A B C D Install the Microwave...two or more people, lift microwave oven and hang it on Upper Cabinet Template. 8. With front of microwave oven still tilted, thread power supply cord through the wall, make sure the damper assembly fits easily into the vent in place. 9 Rotate microwave oven up toward ...
...2 or more people to move and install microwave oven. Sheet metal screws 3. Secure damper assembly with 2 sheet metal screws. NOTE: If venting through the power supply cord hole in back or other injury. Metal cabinet B. Using a keyhole saw, cut out the rectangular area. A B C D Install the Microwave...two or more people, lift microwave oven and hang it on Upper Cabinet Template. 8. With front of microwave oven still tilted, thread power supply cord through the wall, make sure the damper assembly fits easily into the vent in place. 9 Rotate microwave oven up toward ...

Installation Guide
Page 10
...grounded 3 prong outlet. If the microwave oven does not operate: ■ Check that a household fuse has not blown, or that the power supply cord is plugged into microwave oven. If the problem continues, call an electrician. ■ Check that a circuit breaker has not ... microwave oven. A B C D E F A. Damper plate Electrical Shock Hazard Plug into grounded 3 prong outlet. 3. Do not use an adapter. Reconnect power. 4. NOTE: If microwave oven does not need to damper assembly. Repeat steps 3-6. 10. The blocks must be adjusted, skip steps 7-9. 7. Check the ...
...grounded 3 prong outlet. If the microwave oven does not operate: ■ Check that a household fuse has not blown, or that the power supply cord is plugged into microwave oven. If the problem continues, call an electrician. ■ Check that a circuit breaker has not ... microwave oven. A B C D E F A. Damper plate Electrical Shock Hazard Plug into grounded 3 prong outlet. 3. Do not use an adapter. Reconnect power. 4. NOTE: If microwave oven does not need to damper assembly. Repeat steps 3-6. 10. The blocks must be adjusted, skip steps 7-9. 7. Check the ...


