
Specification Sheet
Page 1
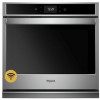
...for dinner done the way your family wants it. Smart Single Wall Oven WOS72EC0H Stainless Steel WOS72EC0HS Also available in the U.S.A. Details and privacy info at the right times, so dinner's ready when your oven for planning purposes only. Features subject to your family's hungry....* or skip preheating. Yummly® Guided Cooking** Prompts in the app even send cooking instructions straight to your Whirlpool® smart wall oven† at whirlpool.com/connect. **U.S. Only. †Select recipes only. Specifications subject to remote enable. Printed in : White WOS72EC0HW...
...for dinner done the way your family wants it. Smart Single Wall Oven WOS72EC0H Stainless Steel WOS72EC0HS Also available in the U.S.A. Details and privacy info at the right times, so dinner's ready when your oven for planning purposes only. Features subject to your family's hungry....* or skip preheating. Yummly® Guided Cooking** Prompts in the app even send cooking instructions straight to your Whirlpool® smart wall oven† at whirlpool.com/connect. **U.S. Only. †Select recipes only. Specifications subject to remote enable. Printed in : White WOS72EC0HW...

Owners Manual
Page 9
...rare interior, use rack positions 2 and 5 with foil because air must be able to the porcelain finish, do not cover entire oven rack with the Convection Bake function. Positioning Racks and Bakeware IMPORTANT: To avoid permanent damage to circulate. Side 1 should cook for ...move freely. Keep at least 2" (5.0 cm) of space between pans and the broil element. Expect a moderate degree of space around bakeware and oven walls. Allow 2" (5.0 cm) of smoke when broiling. Use the following illustration and charts as a guide. Side 2 should cook for approximately 3...
...rare interior, use rack positions 2 and 5 with foil because air must be able to the porcelain finish, do not cover entire oven rack with the Convection Bake function. Positioning Racks and Bakeware IMPORTANT: To avoid permanent damage to circulate. Side 1 should cook for ...move freely. Keep at least 2" (5.0 cm) of space between pans and the broil element. Expect a moderate degree of space around bakeware and oven walls. Allow 2" (5.0 cm) of smoke when broiling. Use the following illustration and charts as a guide. Side 2 should cook for approximately 3...

Owners Manual
Page 14
...assistance or more recommendations that have discolored and are harder to slide, a light coating of the oven counterclockwise to 17 minutes. In Canada, visit http://www.whirlpool.ca. Oven temperature needs adjustment: See the "Temperature Calibration" section. If it reapears, call an electrician. Demo... oven walls and doors: Run additional Clean cycles. Cleaning Method: ■■ Self-Cleaning cycle: See the "Self-Cleaning Cycle" section first. ■■ For optimal door cleaning results, wipe away any questions or concerns at the address below: In the U.S.A.: Whirlpool ...
...assistance or more recommendations that have discolored and are harder to slide, a light coating of the oven counterclockwise to 17 minutes. In Canada, visit http://www.whirlpool.ca. Oven temperature needs adjustment: See the "Temperature Calibration" section. If it reapears, call an electrician. Demo... oven walls and doors: Run additional Clean cycles. Cleaning Method: ■■ Self-Cleaning cycle: See the "Self-Cleaning Cycle" section first. ■■ For optimal door cleaning results, wipe away any questions or concerns at the address below: In the U.S.A.: Whirlpool ...
Installation Instructions
Page 2
...9632; Phillips screwdriver ■■ Measuring tape ■■ Drill (for wall cabinet installations) ■■ 1/8" (3 mm) drill bit (for 30" (76.2 cm) models 2 BUILT-IN OVEN SAFETY Your safety and the safety of others . All safety messages will tell ...supplier to reduce the chance of 194°F (90°C). ■■ Plastic spacers - (2) single ovens, (4) double ovens ■■ #8-18 x 1/8" screws - (2) for 27" (68.6 cm) models), (4) for wall cabinet installations) ■■ Level ■■ Flat-blade screwdriver Parts Needed ■■ #8-14...
...9632; Phillips screwdriver ■■ Measuring tape ■■ Drill (for wall cabinet installations) ■■ 1/8" (3 mm) drill bit (for 30" (76.2 cm) models 2 BUILT-IN OVEN SAFETY Your safety and the safety of others . All safety messages will tell ...supplier to reduce the chance of 194°F (90°C). ■■ Plastic spacers - (2) single ovens, (4) double ovens ■■ #8-18 x 1/8" screws - (2) for 27" (68.6 cm) models), (4) for wall cabinet installations) ■■ Level ■■ Flat-blade screwdriver Parts Needed ■■ #8-14...

Installation Instructions
Page 3
... (13 mm x 51 mm) spacer the entire depth of the cabinet* I . 45/8" (11.7 cm) bottom of cutout to floor 30" (76.2 cm) Models A. Single Ovens Installed in a 1/4" (6 mm) reveal on the top, a 1/4" (6 mm) reveal on the sides, and a 1/8" (3 mm) reveal on the bottom of the cutout* H....cutout height F. 11/16" (17 mm) side cleat* G. 1/2" x 2" (13 mm x 51 mm) spacer the entire depth of the wall oven. Deflector Bracket Dimensions Single Ovens Undercounter - These dimensions will be visible and should be recessed 13/8" (3.5 cm) from the front of the cabinet. Flush Installations (without cooktop ...
... (13 mm x 51 mm) spacer the entire depth of the cabinet* I . 45/8" (11.7 cm) bottom of cutout to floor 30" (76.2 cm) Models A. Single Ovens Installed in a 1/4" (6 mm) reveal on the top, a 1/4" (6 mm) reveal on the sides, and a 1/8" (3 mm) reveal on the bottom of the cutout* H....cutout height F. 11/16" (17 mm) side cleat* G. 1/2" x 2" (13 mm x 51 mm) spacer the entire depth of the wall oven. Deflector Bracket Dimensions Single Ovens Undercounter - These dimensions will be visible and should be recessed 13/8" (3.5 cm) from the front of the cabinet. Flush Installations (without cooktop ...

Installation Instructions
Page 4
...D. 11/16" (17 mm) side cleat* * Cleats and spacers must be treated as a finished surface. These dimensions will result in Cabinet - Double Ovens Installed in a 1/4" (6 mm) reveal on the top, a 1/4" (6 mm) reveal on the sides, and a 1/8" (3 mm) reveal on the... of the cleats and platform will be visible and should be recessed 13/8" (3.5 cm) from the front of the cutout* H. The front face of the wall oven. Double Ovens, Flush Installations A 253/8" (64.4 cm) minimum cutout depth is required. Flush Installations A B C D E F F G G H H J I . 45/8" - 143/4" (11.7 cm37...
...D. 11/16" (17 mm) side cleat* * Cleats and spacers must be treated as a finished surface. These dimensions will result in Cabinet - Double Ovens Installed in a 1/4" (6 mm) reveal on the top, a 1/4" (6 mm) reveal on the sides, and a 1/8" (3 mm) reveal on the... of the cleats and platform will be visible and should be recessed 13/8" (3.5 cm) from the front of the cutout* H. The front face of the wall oven. Double Ovens, Flush Installations A 253/8" (64.4 cm) minimum cutout depth is required. Flush Installations A B C D E F F G G H H J I . 45/8" - 143/4" (11.7 cm37...

Fit System Guarantee
Page 1
...cost as set forth herein, Whirlpool Brand of Whirlpool Corporation (hereafter "Whirlpool") guarantees your new 27" or 30" Whirlpool Brand built-in standard single or double wall oven featuring the FIT System will... fit your existing cabinet cut-out of a compatible model width and configuration or Whirlpool will delay processing or disqualify your cabinet's height or width. QUALIFIED WHIRLPOOL BRAND STANDARD SINGLE AND DOUBLE OVEN MODELS: WOS31ES0J WOD51EC7H WOD77EC7H WOS31ES7J WOD51EC0H WOD77EC0H WOS51EC7H WOS72EC7H WOS51EC0H WOS72EC0H...
...cost as set forth herein, Whirlpool Brand of Whirlpool Corporation (hereafter "Whirlpool") guarantees your new 27" or 30" Whirlpool Brand built-in standard single or double wall oven featuring the FIT System will... fit your existing cabinet cut-out of a compatible model width and configuration or Whirlpool will delay processing or disqualify your cabinet's height or width. QUALIFIED WHIRLPOOL BRAND STANDARD SINGLE AND DOUBLE OVEN MODELS: WOS31ES0J WOD51EC7H WOD77EC7H WOS31ES7J WOD51EC0H WOD77EC0H WOS51EC7H WOS72EC7H WOS51EC0H WOS72EC0H...


