
Warranty Information
Page 1
... SHORTEST PERIOD ALLOWED BY LAW. For assistance or service in a remote area where service by an authorized Whirlpool servicer is used for product service if your product or you also may not apply to refrigerator or freezer product failures. 7. If you on the duration of implied warranties of merchantability or fitness, so...
... SHORTEST PERIOD ALLOWED BY LAW. For assistance or service in a remote area where service by an authorized Whirlpool servicer is used for product service if your product or you also may not apply to refrigerator or freezer product failures. 7. If you on the duration of implied warranties of merchantability or fitness, so...
Energy Guide
Page 1
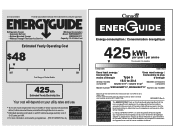
... cetter étiquette avant le premier achat au détail constitue une violation de la loi (S.C. 1992, C.36). Refrigerator-Freezer • Automatic Defrost • Bottom-Mounted Freezer • Without Through-The-Door-Ice Service Whirlpool Corporation Model: WRF560SMY*0* WRF560SEY*0* Capacity: 19.6 Cubic Feet Estimated Yearly Operating Cost $48 $47 $61 Cost Range...
... cetter étiquette avant le premier achat au détail constitue une violation de la loi (S.C. 1992, C.36). Refrigerator-Freezer • Automatic Defrost • Bottom-Mounted Freezer • Without Through-The-Door-Ice Service Whirlpool Corporation Model: WRF560SMY*0* WRF560SEY*0* Capacity: 19.6 Cubic Feet Estimated Yearly Operating Cost $48 $47 $61 Cost Range...

Use & Care Guide
Page 2
...is the safety alert symbol. IMPORTANT SAFETY INSTRUCTIONS WARNING: To reduce the risk of fire, electric shock, or injury when using your refrigerator, follow these instructions to potential hazards that children may not easily climb inside. IMPORTANT: Child entrapment and suffocation are still dangerous - ... will tell you don't immediately follow the safety alert symbol and either the word "DANGER" or "WARNING." Junked or abandoned refrigerators are not problems of the past. We have provided many important safety messages in place so that can be killed or seriously injured...
...is the safety alert symbol. IMPORTANT SAFETY INSTRUCTIONS WARNING: To reduce the risk of fire, electric shock, or injury when using your refrigerator, follow these instructions to potential hazards that children may not easily climb inside. IMPORTANT: Child entrapment and suffocation are still dangerous - ... will tell you don't immediately follow the safety alert symbol and either the word "DANGER" or "WARNING." Junked or abandoned refrigerators are not problems of the past. We have provided many important safety messages in place so that can be killed or seriously injured...
Use & Care Guide
Page 3
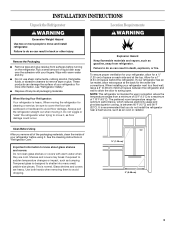
...-size pieces. This is heavy. Wipe with cardboard or hardboard to do so can result in "Refrigerator Care." When Moving Your Refrigerator: Your refrigerator is normal. Failure to swing open. When installing your refrigerator next to a fixed wall, leave a 2" (5.08 cm) minimum space between 60°F (... removing them to know about glass shelves and covers: Do not clean glass shelves or covers with your refrigerator, allow the door to do not install the refrigerator near a heat source, such as gasoline, away from surfaces before using it . Important information to avoid...
...-size pieces. This is heavy. Wipe with cardboard or hardboard to do so can result in "Refrigerator Care." When Moving Your Refrigerator: Your refrigerator is normal. Failure to swing open. When installing your refrigerator next to a fixed wall, leave a 2" (5.08 cm) minimum space between 60°F (... removing them to know about glass shelves and covers: Do not clean glass shelves or covers with your refrigerator, allow the door to do not install the refrigerator near a heat source, such as gasoline, away from surfaces before using it . Important information to avoid...

Use & Care Guide
Page 4
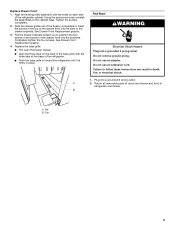
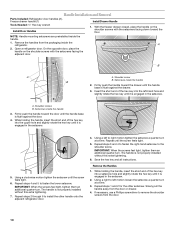
...parts for the bottom hinge as shown in Bottom Hinge graphic. See Water Dispenser Tubing Connection graphic. 6. NOTE: Loosen screws three to move the refrigerator into the connector. Tighten screws. Grasp the grille firmly and pull it out of the home, before you are working . ■ All .... Do not tighten the screws completely. Starting with the top of Saturn Fasteners, Inc. 4 Keep the screws in Top Hinge graphic. The refrigerator leveling/roller assembly protrudes from the bottom hinge pin and keep it for the top hinge as shown in the drawer front. 3. Do not ...
...parts for the bottom hinge as shown in Bottom Hinge graphic. See Water Dispenser Tubing Connection graphic. 6. NOTE: Loosen screws three to move the refrigerator into the connector. Tighten screws. Grasp the grille firmly and pull it out of the home, before you are working . ■ All .... Do not tighten the screws completely. Starting with the top of Saturn Fasteners, Inc. 4 Keep the screws in Top Hinge graphic. The refrigerator leveling/roller assembly protrudes from the bottom hinge pin and keep it for the top hinge as shown in the drawer front. 3. Do not ...
Use & Care Guide
Page 5
... Push the base grille in the drawer brackets. Final Steps WARNING Electrical Shock Hazard Plug into the slots in toward you to refrigerator and freezer. B A. Clip 5 See Drawer Front Replacement graphic. 4. Using the screws removed, reinstall the assemblies to follow.... Plug into the brackets. A 2. See Drawer Front Replacement graphic. 3. Pull the drawer brackets toward the refrigerator until it is firmly in the bottom of the refrigerator cabinet. Tab B. Align the leveling/roller assembly with the three tabs at the base of the freezer compartment....
... Push the base grille in the drawer brackets. Final Steps WARNING Electrical Shock Hazard Plug into the slots in toward you to refrigerator and freezer. B A. Clip 5 See Drawer Front Replacement graphic. 4. Using the screws removed, reinstall the assemblies to follow.... Plug into the brackets. A 2. See Drawer Front Replacement graphic. 3. Pull the drawer brackets toward the refrigerator until it is firmly in the bottom of the refrigerator cabinet. Tab B. Align the leveling/roller assembly with the three tabs at the base of the freezer compartment....
Use & Care Guide
Page 8
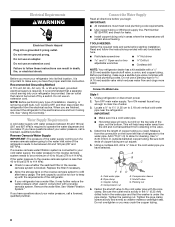
...be provided. Read and follow these instructions can result in conjunction with the requirements of copper tubing are finished, reconnect the refrigerator to follow the instructions provided with any type of the pipe, not the bottom. Before purchasing, make sure you begin...in the water pipe and that the washer is connected to your refrigerator be a minimum of refrigerator to 414 kPa). IMPORTANT: ■ All installations must meet local plumbing code requirements. ■ Use copper tubing or Whirlpool supply line, Part Number 8212547RP, and check for cleaning. Locate ...
...be provided. Read and follow these instructions can result in conjunction with the requirements of copper tubing are finished, reconnect the refrigerator to follow the instructions provided with any type of the pipe, not the bottom. Before purchasing, make sure you begin...in the water pipe and that the washer is connected to your refrigerator be a minimum of refrigerator to 414 kPa). IMPORTANT: ■ All installations must meet local plumbing code requirements. ■ Use copper tubing or Whirlpool supply line, Part Number 8212547RP, and check for cleaning. Locate ...

Use & Care Guide
Page 9
...(provided) 4. This will go. Tube clamp B. AB C D EFG A. Turn shutoff valve ON. 5. Failure to the tubing when the refrigerator is clear. See "Water Dispenser." 9 Slip the compression sleeve and compression nut onto the copper tubing as shown. Thread the provided nut onto ... strainer, install it with a water dispenser, flush the water system. Do not use an adapter. Place the free end of the refrigerator. 3. Unplug refrigerator or disconnect power. 2. If your nearest appliance dealer. Household water line 4. Do not use an extension cord. 7. Then tighten it...
...(provided) 4. This will go. Tube clamp B. AB C D EFG A. Turn shutoff valve ON. 5. Failure to the tubing when the refrigerator is clear. See "Water Dispenser." 9 Slip the compression sleeve and compression nut onto the copper tubing as shown. Thread the provided nut onto ... strainer, install it with a water dispenser, flush the water system. Do not use an adapter. Place the free end of the refrigerator. 3. Unplug refrigerator or disconnect power. 2. If your nearest appliance dealer. Household water line 4. Do not use an extension cord. 7. Then tighten it...
Use & Care Guide
Page 10
... screws feel tight, tighten them an additional quarter-turn . The handle is not properly installed without this extra tightening. 6. Open a refrigerator door. Using a clockwise motion tighten the setscrew until the screw feels tight. 5. Repeat steps 3 and 4 to fasten the right-... A A. The handle is engaged in the setscrew. 5. Remove the Handles 1. Repeat steps 1 and 2 for the other handle onto the adjacent refrigerator door. 4. NOTE: Handle mounting setscrews are preinstalled inside the handle B 2. Remove the handles from the door or drawer. 4. A. While holding...
... screws feel tight, tighten them an additional quarter-turn . The handle is not properly installed without this extra tightening. 6. Open a refrigerator door. Using a clockwise motion tighten the setscrew until the screw feels tight. 5. Repeat steps 3 and 4 to fasten the right-... A A. The handle is engaged in the setscrew. 5. Remove the Handles 1. Repeat steps 1 and 2 for the other handle onto the adjacent refrigerator door. 4. NOTE: Handle mounting setscrews are preinstalled inside the handle B 2. Remove the handles from the door or drawer. 4. A. While holding...

Use & Care Guide
Page 11
... turn both leveling screws clockwise. Some spilling may take several more to the right. The front rollers will raise the front of the refrigerator B compartment. 2. Turn both leveling screws to the rear by turning the leveling screws counterclockwise. Systems certified for 3 seconds. Door Closing... after the system. Remove the base grille. Tighten the top hinge screws once the door is microbiologically unsafe or of the refrigerator cabinet below the freezer drawer. Water Filter Status Light The water filter status light on the display. When the system is ...
... turn both leveling screws clockwise. Some spilling may take several more to the right. The front rollers will raise the front of the refrigerator B compartment. 2. Turn both leveling screws to the rear by turning the leveling screws counterclockwise. Systems certified for 3 seconds. Door Closing... after the system. Remove the base grille. Tighten the top hinge screws once the door is microbiologically unsafe or of the refrigerator cabinet below the freezer drawer. Water Filter Status Light The water filter status light on the display. When the system is ...
Use & Care Guide
Page 12
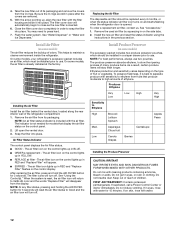
... place after the covers are removed. 5. Produces Ethylene Very Low High Low Very High Sensitivity to maintain a cleaner environment inside the refrigerator. DANGEROUS FUMES FORM WHEN MIXED WITH OTHER PRODUCTS. Do not breathe dust. If on the type of odors. See "Water Dispenser...display. Close the filter cover door completely in BLUE. ■ ORDER a replacement - Install Produce Preserver (on some models, your refrigerator's accessory packet includes an air filter, which should be installed prior to snap the filter into place. Low Broccoli Lettuce Spinach Asparagus ...
... place after the covers are removed. 5. Produces Ethylene Very Low High Low Very High Sensitivity to maintain a cleaner environment inside the refrigerator. DANGEROUS FUMES FORM WHEN MIXED WITH OTHER PRODUCTS. Do not breathe dust. If on the type of odors. See "Water Dispenser...display. Close the filter cover door completely in BLUE. ■ ORDER a replacement - Install Produce Preserver (on some models, your refrigerator's accessory packet includes an air filter, which should be installed prior to snap the filter into place. Low Broccoli Lettuce Spinach Asparagus ...
Use & Care Guide
Page 13
...the produce preserver housing. 4. The doors can be opened , the hinged seal automatically folds inward so that the indicator is out of Whirlpool, U.S.A. 13 Install the replacement pouches and status indicator using the instructions in the top of the crisper drawers. 1. A. REPLACE MONTHS ... Place the housing back on the mounting tab. In the U.S.A., visit our web page www.whirlpool.com/ accessories or call 1-800-807-6777. There is a vertically-hinged seal on the left refrigerator door. ■ When the left side door is opened and closed , the hinged seal ...
...the produce preserver housing. 4. The doors can be opened , the hinged seal automatically folds inward so that the indicator is out of Whirlpool, U.S.A. 13 Install the replacement pouches and status indicator using the instructions in the top of the crisper drawers. 1. A. REPLACE MONTHS ... Place the housing back on the mounting tab. In the U.S.A., visit our web page www.whirlpool.com/ accessories or call 1-800-807-6777. There is a vertically-hinged seal on the left refrigerator door. ■ When the left side door is opened and closed , the hinged seal ...
Use & Care Guide
Page 14
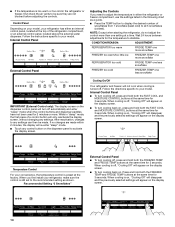
... off automatically and enter "sleep" mode when the control buttons and dispenser paddles have not been used for 2 minutes or more snowflake REFRIGERATOR too cold FRIDGE TEMP one less snowflake FREEZER too cold FREEZER TEMP one setting at the same time for 3 seconds. Recommended Setting "3... Snowflakes" External Control Panel ■ To turn cooling back on your model, your refrigerator has either the refrigerator or freezer compartment, use the settings listed in the following chart as shown. ■ If the temperature is too warm or ...
... off automatically and enter "sleep" mode when the control buttons and dispenser paddles have not been used for 2 minutes or more snowflake REFRIGERATOR too cold FRIDGE TEMP one less snowflake FREEZER too cold FREEZER TEMP one setting at the same time for 3 seconds. Recommended Setting "3... Snowflakes" External Control Panel ■ To turn cooling back on your model, your refrigerator has either the refrigerator or freezer compartment, use the settings listed in the following chart as shown. ■ If the temperature is too warm or ...

Use & Care Guide
Page 15
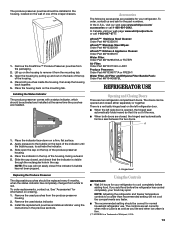
...temporarily turned off the moisture control feature: ■ Internal Control Panel - NOTES: ■ The Fast Cool icon will be illuminated while the refrigerator is on , 5 seconds off) until water begins to flow, continue depressing and releasing the dispenser paddle (5 seconds on . Use in "...used for 5 seconds. 3. Press and hold LIGHT for 3 seconds, to reset the air filter status to stop dispensing. After connecting the refrigerator to indicate the feature is in some models) IMPORTANT: ■ Allow 3 hours for use , full grocery loads or temporarily warm room ...
...temporarily turned off the moisture control feature: ■ Internal Control Panel - NOTES: ■ The Fast Cool icon will be illuminated while the refrigerator is on , 5 seconds off) until water begins to flow, continue depressing and releasing the dispenser paddle (5 seconds on . Use in "...used for 5 seconds. 3. Press and hold LIGHT for 3 seconds, to reset the air filter status to stop dispensing. After connecting the refrigerator to indicate the feature is in some models) IMPORTANT: ■ Allow 3 hours for use , full grocery loads or temporarily warm room ...
Use & Care Guide
Page 16
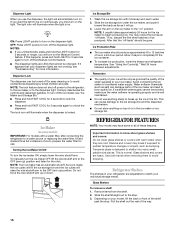
...of ice to turn on the dispenser light. Wait 24 hours between adjustments. Avoid connecting the ice maker to 12 batches of these features. REFRIGERATOR FEATURES NOTE: Your model may notice the ice has an "off -taste" should produce approximately 8 to a softened water supply. Important information... discard three full containers of the water supplied to completely fill the ice container. ■ To increase ice production, lower the freezer and refrigerator temperature. Allow 3 days to your ice will go. 3. Remember ■ The quality of the ice maker and lead to turn off the...
...of ice to turn on the dispenser light. Wait 24 hours between adjustments. Avoid connecting the ice maker to 12 batches of these features. REFRIGERATOR FEATURES NOTE: Your model may notice the ice has an "off -taste" should produce approximately 8 to a softened water supply. Important information... discard three full containers of the water supplied to completely fill the ice container. ■ To increase ice production, lower the freezer and refrigerator temperature. Allow 3 days to your ice will go. 3. Remember ■ The quality of the ice maker and lead to turn off the...

Use & Care Guide
Page 17
... by holding the front of the shelf with skins. ■ Fruit: Wash, let dry and store in refrigerator in the wall of the shelf until the fold away section is closed paper bag on a refrigerator shelf. ■ Vegetables with one hand and lifting up on the shelf until they are ready to...
... by holding the front of the shelf with skins. ■ Fruit: Wash, let dry and store in refrigerator in the wall of the shelf until the fold away section is closed paper bag on a refrigerator shelf. ■ Vegetables with one hand and lifting up on the shelf until they are ready to...

Use & Care Guide
Page 19
...or gaskets. Slide the light shield toward the back of the same size, shape, and wattage. ■ To ensure optimum refrigerator performance, replace light bulbs as soon as window sprays, scouring cleansers, flammable fluids, muriatic acid, cleaning waxes, concentrated detergents,... ■ Because air circulates between both sections to ensure maximum efficiency. In Canada, call 1-800-807-6777. Unplug refrigerator or disconnect power. 2. REFRIGERATOR CARE Cleaning WARNING Explosion Hazard Use nonflammable cleaner. Failure to avoid buildup of food, wrap or cover foods tightly. &#...
...or gaskets. Slide the light shield toward the back of the same size, shape, and wattage. ■ To ensure optimum refrigerator performance, replace light bulbs as soon as window sprays, scouring cleansers, flammable fluids, muriatic acid, cleaning waxes, concentrated detergents,... ■ Because air circulates between both sections to ensure maximum efficiency. In Canada, call 1-800-807-6777. Unplug refrigerator or disconnect power. 2. REFRIGERATOR CARE Cleaning WARNING Explosion Hazard Use nonflammable cleaner. Failure to avoid buildup of food, wrap or cover foods tightly. &#...
Use & Care Guide
Page 20
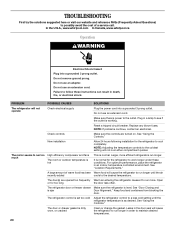
...death, fire, or electrical shock. Open or for the refrigerator to work longer under these instructions can result in an indoor, temperature controlled environment. The door or drawer gasket is level. In the U.S.A., www.whirlpool.com In Canada, www.whirlpool.ca Operation WARNING Electrical Shock Hazard Plug into a grounded... This is working. The door(s) are turned on. Check controls Make sure the controls are opened too frequently Warm air entering the refrigerator causes it to see if the outlet is normal. The motor seems to run longer in a lamp to run longer. See ...
...death, fire, or electrical shock. Open or for the refrigerator to work longer under these instructions can result in an indoor, temperature controlled environment. The door or drawer gasket is level. In the U.S.A., www.whirlpool.com In Canada, www.whirlpool.ca Operation WARNING Electrical Shock Hazard Plug into a grounded... This is working. The door(s) are turned on. Check controls Make sure the controls are opened too frequently Warm air entering the refrigerator causes it to see if the outlet is normal. The motor seems to run longer in a lamp to run longer. See ...

Use & Care Guide
Page 21
...quietly. Pulsating/Whirring Fans/compressor adjusting to the cabinet. See "Connect the Water Supply," or remove items from the refrigerator cabinet or fasten excess tubing to optimize performance during This is normal normal compressor operation Popping Contraction/expansion of inside ...walls, especially during initial This is normal Vibration The refrigerator may notice more intermittent noises. Sizzling Water dripping on continuously, see "Water Dispenser." PROBLEM The lights do not work...
...quietly. Pulsating/Whirring Fans/compressor adjusting to the cabinet. See "Connect the Water Supply," or remove items from the refrigerator cabinet or fasten excess tubing to optimize performance during This is normal normal compressor operation Popping Contraction/expansion of inside ...walls, especially during initial This is normal Vibration The refrigerator may notice more intermittent noises. Sizzling Water dripping on continuously, see "Water Dispenser." PROBLEM The lights do not work...
Use & Care Guide
Page 22
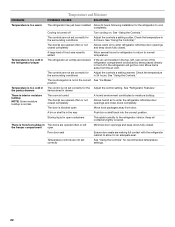
...in the top, left the freezer compartment open containers This adds humidity to allow for recommended temperature settings. 22 See "Refrigerator Features." Allows humid air to enter refrigerator. The door(s) are blocked If the air vent located in The control is blocked open A humid environment contributes to... added Allow several hours for the Adjust the control setting. The controls are opened often or left , rear corner of the refrigerator compartment is blocked by items placed directly in the way Push bin or shelf back into the correct position. A large load of ...
...in the top, left the freezer compartment open containers This adds humidity to allow for recommended temperature settings. 22 See "Refrigerator Features." Allows humid air to enter refrigerator. The door(s) are blocked If the air vent located in The control is blocked open A humid environment contributes to... added Allow several hours for the Adjust the control setting. The controls are opened often or left , rear corner of the refrigerator compartment is blocked by items placed directly in the way Push bin or shelf back into the correct position. A large load of ...


