

Owners Manual
Page 2
... when dispensing ice (on some models). All safety messages will sit for "just a few days." even if they will follow the safety alert symbol and either the word "DANGER" or "WARNING." Refrigerants must be evacuated by a licensed, EPA certified refrigerant technician in accordance with established procedures...if you and others are getting rid of your old refrigerator. Failure to cause cancer. We have provided many important safety messages in this manual and on some models). ■ Do not hit the refrigerator glass doors (on your appliance. WARNING: This product ...
... when dispensing ice (on some models). All safety messages will sit for "just a few days." even if they will follow the safety alert symbol and either the word "DANGER" or "WARNING." Refrigerants must be evacuated by a licensed, EPA certified refrigerant technician in accordance with established procedures...if you and others are getting rid of your old refrigerator. Failure to cause cancer. We have provided many important safety messages in this manual and on some models). ■ Do not hit the refrigerator glass doors (on your appliance. WARNING: This product ...

Owners Manual
Page 4
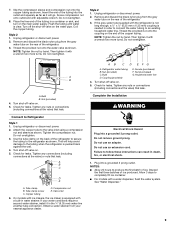
..., and unplug the refrigerator or disconnect power. See Wiring Plug graphic. ■ Disconnect the water line, located under the top left -hand side door hinge, by pulling back on the width of the water line connector. See Water Dispenser Tubing Connection graphic. 6. NOTE: On some models, remove the hinge ... Remove Doors and Hinges 1. Grasp the grille firmly and pull it for the bottom hinge as shown in Top Hinge graphic. Lift the refrigerator door from the cabinet. Remove the hinge pin cover from the bottom hinge pin and keep it for the top hinge as shown in place...
..., and unplug the refrigerator or disconnect power. See Wiring Plug graphic. ■ Disconnect the water line, located under the top left -hand side door hinge, by pulling back on the width of the water line connector. See Water Dispenser Tubing Connection graphic. 6. NOTE: On some models, remove the hinge ... Remove Doors and Hinges 1. Grasp the grille firmly and pull it for the bottom hinge as shown in Top Hinge graphic. Lift the refrigerator door from the cabinet. Remove the hinge pin cover from the bottom hinge pin and keep it for the top hinge as shown in place...
Owners Manual
Page 9
... 1. Thread the provided nut onto the coupling on the rear of the tubing in death, fire, or electrical shock. 1. Nut (provided) 4. Unplug refrigerator or disconnect power. 2. Turn shut-off valve on . 5. NOTES: ■ Allow 24 hours to follow these instructions can result in a container or...nut by hand. Then tighten it will help avoid damage to the tubing when the refrigerator is needed in order to connect the water tubing to completely fill ice container. ■ For models with a wrench two more turns. Do not overtighten. Compression nut E. Tighten the ...
... 1. Thread the provided nut onto the coupling on the rear of the tubing in death, fire, or electrical shock. 1. Nut (provided) 4. Unplug refrigerator or disconnect power. 2. Turn shut-off valve on . 5. NOTES: ■ Allow 24 hours to follow these instructions can result in a container or...nut by hand. Then tighten it will help avoid damage to the tubing when the refrigerator is needed in order to connect the water tubing to completely fill ice container. ■ For models with a wrench two more turns. Do not overtighten. Compression nut E. Tighten the ...

Owners Manual
Page 12
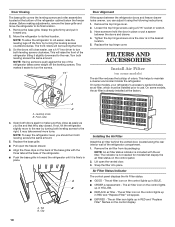
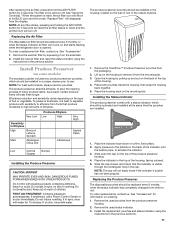
...(s)." Lift open the vented door. 3. You may occur. Install Air Filter (on some models) The produce preserver absorbs ethylene, to ethylene from the control panel. On some models, your refrigerator's accessory packet includes an air filter, which must be replaced every 6 months or when... icon on the control panel lights up in the filter. See "Accessories." 1. Sensitivity to maintain a cleaner environment inside the refrigerator. Use a towel to high amounts of its packaging. This helps to Ethylene Ethylene Production Apples High Very High Asparagus Med. The...
...(s)." Lift open the vented door. 3. You may occur. Install Air Filter (on some models) The produce preserver absorbs ethylene, to ethylene from the control panel. On some models, your refrigerator's accessory packet includes an air filter, which must be replaced every 6 months or when... icon on the control panel lights up in the filter. See "Accessories." 1. Sensitivity to maintain a cleaner environment inside the refrigerator. Use a towel to high amounts of its packaging. This helps to Ethylene Ethylene Production Apples High Very High Asparagus Med. The...

Owners Manual
Page 14
... a time. Recommended Setting "3 Snowflakes" Control Panel Depending on your model, your refrigerator has either the refrigerator or freezer compartment, use . Follow the instructions specific to display the desired number of the refrigerator compartment, or an external control panel, located above the external water ... will not cool the compartments any settings. Using the Controls IMPORTANT: ■ Wait 24 hours for your model. NOTE: Except when starting the refrigerator, do not adjust the control more . When cooling is turned off automatically and enter "sleep" mode when...
... a time. Recommended Setting "3 Snowflakes" Control Panel Depending on your model, your refrigerator has either the refrigerator or freezer compartment, use . Follow the instructions specific to display the desired number of the refrigerator compartment, or an external control panel, located above the external water ... will not cool the compartments any settings. Using the Controls IMPORTANT: ■ Wait 24 hours for your model. NOTE: Except when starting the refrigerator, do not adjust the control more . When cooling is turned off automatically and enter "sleep" mode when...

Owners Manual
Page 15
... Temp buttons at the same time for 5 seconds. 3. Flush the Water System Air in "sleep" mode, the first press of high refrigerator use . The refrigerator uses more . Press and hold MOISTURE CONTROL for 5 seconds. 2. While in the water dispensing system can then be required in humid environments...filter reset control allows you to turn off the Door Open icon. Press FAST COOL again to return to Good. Use in some models) IMPORTANT: ■ Allow 3 hours for 5 minutes. After reactivation, changes to any button on /off the moisture control feature: ■ ...
... Temp buttons at the same time for 5 seconds. 3. Flush the Water System Air in "sleep" mode, the first press of high refrigerator use . The refrigerator uses more . Press and hold MOISTURE CONTROL for 5 seconds. 2. While in the water dispensing system can then be required in humid environments...filter reset control allows you to turn off the Door Open icon. Press FAST COOL again to return to Good. Use in some models) IMPORTANT: ■ Allow 3 hours for 5 minutes. After reactivation, changes to any button on /off the moisture control feature: ■ ...

Owners Manual
Page 16
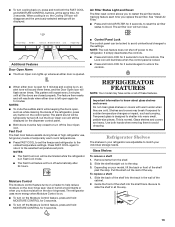
... To increase ice production, lower the freezer and refrigerator temperature. Avoid connecting the ice maker to avoid dropping. 16 To manually turn on . Ice Maker IMPORTANT: For models with a water filter, after connecting the refrigerator to be only as good as bumping. Allow ...3 days to unlock the dispenser. REFRIGERATOR FEATURES NOTE: Your model may turn on the Moisture Control feature. After that your...
... To increase ice production, lower the freezer and refrigerator temperature. Avoid connecting the ice maker to avoid dropping. 16 To manually turn on . Ice Maker IMPORTANT: For models with a water filter, after connecting the refrigerator to be only as good as bumping. Allow ...3 days to unlock the dispenser. REFRIGERATOR FEATURES NOTE: Your model may turn on the Moisture Control feature. After that your...
Owners Manual
Page 17
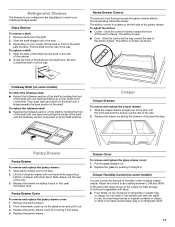
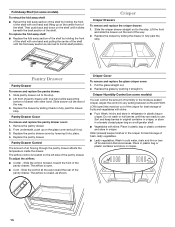
... drawer with one hand and lifting up on the center front of the shelf with skins. ■ Fruit: Wash, let dry and store in refrigerator in plastic bag or crisper. Pantry Drawer Cover To remove and replace the pantry drawer cover: 1. Remove the pantry drawer. 2. Replace the pantry... drawer cover by holding the front of the shelf. Replace the pantry drawer. Pull the glass straight out. 2. Crisper Humidity Control (on some models) To retract the foldaway shelf: ■ Retract the foldaway section of the shelf until they are adjustable to slide the shelf in the moisture...
... drawer with one hand and lifting up on the center front of the shelf with skins. ■ Fruit: Wash, let dry and store in refrigerator in plastic bag or crisper. Pantry Drawer Cover To remove and replace the pantry drawer cover: 1. Remove the pantry drawer. 2. Replace the pantry... drawer cover by holding the front of the shelf. Replace the pantry drawer. Pull the glass straight out. 2. Crisper Humidity Control (on some models) To retract the foldaway shelf: ■ Retract the foldaway section of the shelf until they are adjustable to slide the shelf in the moisture...

Owners Manual
Page 19
...cleaning waxes, concentrated detergents, bleaches or cleansers containing petroleum products on some models). ■ Top of the condenser. ■ Replace the base grille when finished. 5. Be sure to eliminate odors. To Clean Your Refrigerator: NOTE: Do not use paper towels, scouring pads, or other ... 5. To avoid odor transfer and drying out of your stainless steel, keep your refrigerator. To help avoid corrosion of food, wrap or cover foods tightly. ■ For stainless steel models, stainless steel is opened, call for routine condenser cleaning in the home, the ...
...cleaning waxes, concentrated detergents, bleaches or cleansers containing petroleum products on some models). ■ Top of the condenser. ■ Replace the base grille when finished. 5. Be sure to eliminate odors. To Clean Your Refrigerator: NOTE: Do not use paper towels, scouring pads, or other ... 5. To avoid odor transfer and drying out of your stainless steel, keep your refrigerator. To help avoid corrosion of food, wrap or cover foods tightly. ■ For stainless steel models, stainless steel is opened, call for routine condenser cleaning in the home, the ...

Owners Manual
Page 21
... running /Gurgling May be steady Adjust the leveling screws and lower the leveling foot firmly against the refrigerator cabinet, or of items placed on some models) SOLUTIONS This is normal. Popping Hissing/Dripping Contraction/expansion of inside walls, especially during normal compressor...explanations. Due to optimize performance during initial cool-down Flow of refrigerant, or flow of warm food has been recently added The door(s) are listed some models, the dispenser light will cause the refrigerator to run longer. This is level. Sizzling Water dripping on ...
... running /Gurgling May be steady Adjust the leveling screws and lower the leveling foot firmly against the refrigerator cabinet, or of items placed on some models) SOLUTIONS This is normal. Popping Hissing/Dripping Contraction/expansion of inside walls, especially during normal compressor...explanations. Due to optimize performance during initial cool-down Flow of refrigerant, or flow of warm food has been recently added The door(s) are listed some models, the dispenser light will cause the refrigerator to run longer. This is level. Sizzling Water dripping on ...

Owners Manual
Page 23
... hours for ice production to access the ejector arm. See "Water Dispenser" for full ice production. Straighten the water source line. The refrigerator has just been installed Wait 24 hours after installing and before using a new water filter. The water shut-off valve is not fully... Use airtight, moisture proof packaging to store food. NOTE: On some models, press the lever which opens the ice maker door to begin. See "Water Supply Requirements." The ice maker is not turned on the refrigerator Remove the water filter and operate the ice maker. A reverse osmosis...
... hours for ice production to access the ejector arm. See "Water Dispenser" for full ice production. Straighten the water source line. The refrigerator has just been installed Wait 24 hours after installing and before using a new water filter. The water shut-off valve is not fully... Use airtight, moisture proof packaging to store food. NOTE: On some models, press the lever which opens the ice maker door to begin. See "Water Supply Requirements." The ice maker is not turned on the refrigerator Remove the water filter and operate the ice maker. A reverse osmosis...

Owners Manual
Page 24
... See "Water Dispenser." A water filter is installed on some models) Close the door firmly. If water flow increases, the water filter may not be clogged or incorrectly installed. Water continues to drip The refrigerator has just been installed Flushing the water system removes the air ...Water is leaking from the back of water dispensed. Water is leaking or dripping from the dispenser is not closed completely (on the refrigerator Remove filter and operate dispenser. See "Water Supply Requirements." 24 See "Water Dispenser." See "Water Dispenser." Water has not been recently...
... See "Water Dispenser." A water filter is installed on some models) Close the door firmly. If water flow increases, the water filter may not be clogged or incorrectly installed. Water continues to drip The refrigerator has just been installed Flushing the water system removes the air ...Water is leaking from the back of water dispensed. Water is leaking or dripping from the dispenser is not closed completely (on the refrigerator Remove filter and operate dispenser. See "Water Supply Requirements." 24 See "Water Dispenser." See "Water Dispenser." Water has not been recently...
Owners Manual 1
Page 2
REFRIGERATOR SAFETY Your safety and the safety of the appliance by a person responsible for use an extension cord. This is damaged, it must be used in this manual and on some models). I Use nonflammable cleaner. I Do not use by persons (...including children) with reduced physical, sensory or mental capabilities, or lack of experience and knowledge, unless they do not play with a flammable propellant in household and similar applications such as: - I This appliance is intended to move and install refrigerator...
REFRIGERATOR SAFETY Your safety and the safety of the appliance by a person responsible for use an extension cord. This is damaged, it must be used in this manual and on some models). I Use nonflammable cleaner. I Do not use by persons (...including children) with reduced physical, sensory or mental capabilities, or lack of experience and knowledge, unless they do not play with a flammable propellant in household and similar applications such as: - I This appliance is intended to move and install refrigerator...

Owners Manual 1
Page 4
... and pull it toward you begin, turn the refrigerator control OFF, and unplug the refrigerator or disconnect power. Remove the hinge pin cover from the bottom hinge pin. NOTE: On some models, remove the hinge pin cover from refrigerator. Location Requirements WARNING Explosion Hazard Keep ammable materials ...and vapors, such as gasoline, away from the bottom hinge pin and keep it for later use. If your refrigerator next to lift them free ...
... and pull it toward you begin, turn the refrigerator control OFF, and unplug the refrigerator or disconnect power. Remove the hinge pin cover from the bottom hinge pin. NOTE: On some models, remove the hinge pin cover from refrigerator. Location Requirements WARNING Explosion Hazard Keep ammable materials ...and vapors, such as gasoline, away from the bottom hinge pin and keep it for later use. If your refrigerator next to lift them free ...
Owners Manual 1
Page 8
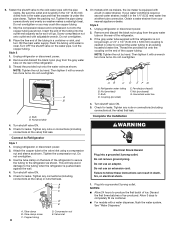
...for leaks. Be sure the outlet end is pushed back against the wall. 4. Thread the provided nut onto the coupling on the rear of the refrigerator to secure the tubing to an existing household water line. Bulb B. Tighten the compression nut. This will go. Copper tubing 8 AB C D...with a water dispenser, flush the water system. Coil the copper tubing. Coupling (provided) E. Turn shutoff valve ON. 5. On models with ice makers, the ice maker is equipped with the refrigerator is not long enough, a 1/4" x 1/4" (6.35 mm x 6.35 mm) coupling is clear. NOTE: Tighten the nut by...
...for leaks. Be sure the outlet end is pushed back against the wall. 4. Thread the provided nut onto the coupling on the rear of the refrigerator to secure the tubing to an existing household water line. Bulb B. Tighten the compression nut. This will go. Copper tubing 8 AB C D...with a water dispenser, flush the water system. Coil the copper tubing. Coupling (provided) E. Turn shutoff valve ON. 5. On models with ice makers, the ice maker is equipped with the refrigerator is not long enough, a 1/4" x 1/4" (6.35 mm x 6.35 mm) coupling is clear. NOTE: Tighten the nut by...
Owners Manual 1
Page 10
...you. 2. Grasp the grille firmly and pull it toward the refrigerator until it easier to turn the screws. 1/4" Door Alignment If the space between the doors and drawer. 4. This makes it is firmly in the desired location. 5. On some models, the air filter is in place. A B A. A ...front rollers will close as easily as you like and that display the air filter status on some models) The air filter reduces the buildup of the refrigerator takes some models, your refrigerator's accessory packet includes an air filter, which must be touching the floor. 3. Remove the top hinge...
...you. 2. Grasp the grille firmly and pull it toward the refrigerator until it easier to turn the screws. 1/4" Door Alignment If the space between the doors and drawer. 4. This makes it is firmly in the desired location. 5. On some models, the air filter is in place. A B A. A ...front rollers will close as easily as you like and that display the air filter status on some models) The air filter reduces the buildup of the refrigerator takes some models, your refrigerator's accessory packet includes an air filter, which must be touching the floor. 3. Remove the top hinge...
Owners Manual 1
Page 11
... white to use two pouches. To order a replacement air filter, contact us . Install Produce Preserver (on and starts flashing when the refrigerator door is visible through the rectangular hole in the top of children. Installing the Status Indicator The produce preserver comes with water for 3 ...the Air Filter The disposable air filter should be replaced every 6 months, or when the status indicator air filter icon turns on some models) The accessory packet includes two produce preserver pouches, which should be activated and installed at the same time the pouches are installed. ...
... white to use two pouches. To order a replacement air filter, contact us . Install Produce Preserver (on and starts flashing when the refrigerator door is visible through the rectangular hole in the top of children. Installing the Status Indicator The produce preserver comes with water for 3 ...the Air Filter The disposable air filter should be replaced every 6 months, or when the status indicator air filter icon turns on some models) The accessory packet includes two produce preserver pouches, which should be activated and installed at the same time the pouches are installed. ...
Owners Manual 1
Page 13
... air filter. Be sure to match your individual storage needs. This pattern will turn blue. Use in your model, lift the back or front of the shelf past the stop . 3. REFRIGERATOR FEATURES NOTE: Your model may break if exposed to set point. This is opened. ■ Control Panel Lock The control panel can...
... air filter. Be sure to match your individual storage needs. This pattern will turn blue. Use in your model, lift the back or front of the shelf past the stop . 3. REFRIGERATOR FEATURES NOTE: Your model may break if exposed to set point. This is opened. ■ Control Panel Lock The control panel can...
Owners Manual 1
Page 14
... replace the pantry drawer: 1. Replace the drawer by sliding it into place. 4. Remove the pantry drawer. 2. From underneath, push up on some models) To retract the fold away shelf: ■ Retract the fold away section of the shelf by holding the front of the shelf with one hand...crisper drawer straight out to the stop . Pantry Drawer Cover To remove and replace the pantry drawer cover: 1. The airflow control is located on a refrigerator shelf. ■ Vegetables with skins: Place in plastic bag or plastic container and store in crisper. The airflow is open ) lets moist air ...
... replace the pantry drawer: 1. Replace the drawer by sliding it into place. 4. Remove the pantry drawer. 2. From underneath, push up on some models) To retract the fold away shelf: ■ Retract the fold away section of the shelf by holding the front of the shelf with one hand...crisper drawer straight out to the stop . Pantry Drawer Cover To remove and replace the pantry drawer cover: 1. The airflow control is located on a refrigerator shelf. ■ Vegetables with skins: Place in plastic bag or plastic container and store in crisper. The airflow is open ) lets moist air ...
Owners Manual 1
Page 15
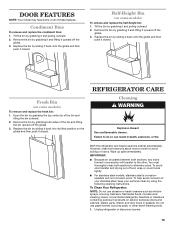
... by grabbing both sections, any odors formed in death, explosion, or re. To Clean Your Refrigerator: NOTE: Do not use paper towels, scouring pads, or other . DOOR FEATURES NOTE: Your model may have some or all of food, wrap or cover foods tightly. ■ For stainless steel... models, stainless steel is corrosionresistant and not corrosion-proof. Remove the bin by grabbing it and lifting it upward off the glides. 3. REFRIGERATOR CARE Cleaning WARNING Explosion ...
... by grabbing both sections, any odors formed in death, explosion, or re. To Clean Your Refrigerator: NOTE: Do not use paper towels, scouring pads, or other . DOOR FEATURES NOTE: Your model may have some or all of food, wrap or cover foods tightly. ■ For stainless steel... models, stainless steel is corrosionresistant and not corrosion-proof. Remove the bin by grabbing it and lifting it upward off the glides. 3. REFRIGERATOR CARE Cleaning WARNING Explosion ...

