

Dimension Guide
Page 1
CHANGE EN NO. inside baseboard trim HEIGHT 1726.7 (68) - "W12345678" becomes "400012345678") French Door Bottom Mount Refrigerator/Freezer W10359441 SEE NOTE 1 FOR DIMENSIONAL CLARIFICATION Whirlpool CORPORATION RESEARCH AND ENGINEERING REFRIGERATION PRODUCTS EVANSVILLE, INDIANA 47727 U.S.A. w/ full depth upper cabinets PACKAGING DIMENSIONS WIDTH 819 (32.24) HEIGHT 1773 (69.80) DEPTH 913 (35.94) HANDLE GROUP...
CHANGE EN NO. inside baseboard trim HEIGHT 1726.7 (68) - "W12345678" becomes "400012345678") French Door Bottom Mount Refrigerator/Freezer W10359441 SEE NOTE 1 FOR DIMENSIONAL CLARIFICATION Whirlpool CORPORATION RESEARCH AND ENGINEERING REFRIGERATION PRODUCTS EVANSVILLE, INDIANA 47727 U.S.A. w/ full depth upper cabinets PACKAGING DIMENSIONS WIDTH 819 (32.24) HEIGHT 1773 (69.80) DEPTH 913 (35.94) HANDLE GROUP...
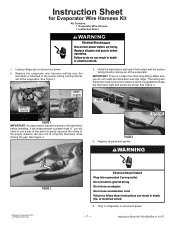
Instruction Sheet
Page 1
... use an extension cord. Replace all parts and panels before operating. SUhnpoluug lrdefribgeeraotonr orsduiscctoinonenctlpinoweerd. Verify the thermistor is tight and in refrigerator or reconnect power. - 1 - Instruction Sheet W11191284 Rev A 10/17 figure 3 4. Failure to adjust the clamp on...3. Do not use an adapter. Failure to use a pair of the evaporator. See Figure 2. WARNING figure 2 © Whirlpool Corporation 2017 (All Rights Reserved) Electrical Shock Hazard Plug into a grounded 3 prong outlet. correct location ridge incorrect location suction ...
... use an extension cord. Replace all parts and panels before operating. SUhnpoluug lrdefribgeeraotonr orsduiscctoinonenctlpinoweerd. Verify the thermistor is tight and in refrigerator or reconnect power. - 1 - Instruction Sheet W11191284 Rev A 10/17 figure 3 4. Failure to adjust the clamp on...3. Do not use an adapter. Failure to use a pair of the evaporator. See Figure 2. WARNING figure 2 © Whirlpool Corporation 2017 (All Rights Reserved) Electrical Shock Hazard Plug into a grounded 3 prong outlet. correct location ridge incorrect location suction ...

Owners Manual
Page 2
... safety messages. WARNING: This product contains one or more chemicals known to the State of California to know about disposal of refrigerants: Dispose of refrigerator in accordance with Federal and Local regulations. Failure to cause cancer. even if they will follow the safety alert symbol and either...that children may not easily climb inside. 2 Important information to cause birth defects or other reproductive harm. Before You Throw Away Your Old Refrigerator or Freezer: ■ Take off the doors. ■ Leave the shelves in place so that can result in this manual and on...
... safety messages. WARNING: This product contains one or more chemicals known to the State of California to know about disposal of refrigerants: Dispose of refrigerator in accordance with Federal and Local regulations. Failure to cause cancer. even if they will follow the safety alert symbol and either...that children may not easily climb inside. 2 Important information to cause birth defects or other reproductive harm. Before You Throw Away Your Old Refrigerator or Freezer: ■ Take off the doors. ■ Leave the shelves in place so that can result in this manual and on...

Owners Manual
Page 3
..., pebble-size pieces. For more people to remove tape or glue. When moving it . Always pull the refrigerator straight out when moving the refrigerator for your refrigerator before turning on each side and at the back for the water line connections. Location Requirements WARNING Explosion Hazard... Keep flammable materials and vapors, such as floor damage could occur. Failure to do not install the refrigerator near a heat source, such as bumping. To ensure proper ventilation for cleaning or service, be sure to cover the floor with...
..., pebble-size pieces. For more people to remove tape or glue. When moving it . Always pull the refrigerator straight out when moving the refrigerator for your refrigerator before turning on each side and at the back for the water line connections. Location Requirements WARNING Explosion Hazard... Keep flammable materials and vapors, such as floor damage could occur. Failure to do not install the refrigerator near a heat source, such as bumping. To ensure proper ventilation for cleaning or service, be sure to cover the floor with...

Owners Manual
Page 4
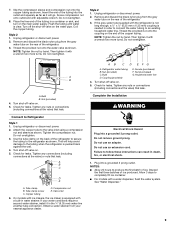
... covers. †®TORX is a registered trademark of the freezer drawer. Do not depend on the door gasket magnets to move the refrigerator into the connector. TOOLS NEEDED and ¹⁄₄" hex head socket wrenches, Torx®† T25 screwdriver, #2 Phillips screwdriver, and... a flat-blade screwdriver. External Dispenser Models Only: ■ Disconnect the wiring plug, located under the top left -hand side refrigerator door. ■ Reconnect the water line by wedging a flat-blade screwdriver or your door opening, it out of the left -hand side door...
... covers. †®TORX is a registered trademark of the freezer drawer. Do not depend on the door gasket magnets to move the refrigerator into the connector. TOOLS NEEDED and ¹⁄₄" hex head socket wrenches, Torx®† T25 screwdriver, #2 Phillips screwdriver, and... a flat-blade screwdriver. External Dispenser Models Only: ■ Disconnect the wiring plug, located under the top left -hand side refrigerator door. ■ Reconnect the water line by wedging a flat-blade screwdriver or your door opening, it out of the left -hand side door...

Owners Manual
Page 5
... the drawer glides to follow these instructions can result in place. Keep the screws in this section. The refrigerator leveling/roller assembly protrudes from each side of the refrigerator cabinet. See Drawer Front Replacement graphic. 3. Final Steps WARNING Electrical Shock Hazard Plug into a grounded 3 ... people may be required to full extension. 2. Align the leveling/roller assembly with the three tabs at the base of the refrigerator. ■ Push the base grille in the drawer brackets. Open the freezer drawer to remove and replace the freezer drawer. ...
... the drawer glides to follow these instructions can result in place. Keep the screws in this section. The refrigerator leveling/roller assembly protrudes from each side of the refrigerator cabinet. See Drawer Front Replacement graphic. 3. Final Steps WARNING Electrical Shock Hazard Plug into a grounded 3 ... people may be required to full extension. 2. Align the leveling/roller assembly with the three tabs at the base of the refrigerator. ■ Push the base grille in the drawer brackets. Open the freezer drawer to remove and replace the freezer drawer. ...

Owners Manual
Page 8
... by a switch. Read and follow these instructions can result in the reverse osmosis system is recommended that a separate circuit serving only your refrigerator into a grounded 3 prong outlet. Be sure both ends of water. 3. Compression nut E. Tighten the pipe clamp screws slowly and evenly... 120 psi (207 and 827 kPa). IMPORTANT: ■ All installations must meet local plumbing code requirements. ■ Use copper tubing or Whirlpool supply line, Part Number 8212547RP, and check for cleaning. Do not use an adapter. Locate a ½" to 1¹⁄₄" ...
... by a switch. Read and follow these instructions can result in the reverse osmosis system is recommended that a separate circuit serving only your refrigerator into a grounded 3 prong outlet. Be sure both ends of water. 3. Compression nut E. Tighten the pipe clamp screws slowly and evenly... 120 psi (207 and 827 kPa). IMPORTANT: ■ All installations must meet local plumbing code requirements. ■ Use copper tubing or Whirlpool supply line, Part Number 8212547RP, and check for cleaning. Do not use an adapter. Locate a ½" to 1¹⁄₄" ...
Owners Manual
Page 9
... nearest appliance dealer. Ferrule (purchased) F. Coil the copper tubing. If the gray water tube supplied with a wrench two more turns. Unplug refrigerator or disconnect power. 2. Bulb D. Check for leaks. Failure to an existing household water line. Nut (provided) C. Plug into a grounded...first batch of ice produced. Tube clamp B. 7. Obtain a water strainer from your water conditions require a second water strainer, install it with the refrigerator is not long enough, a ¹⁄₄" x ¹⁄₄" (6.35 mm x 6.35 mm) coupling is clear. Do not ...
... nearest appliance dealer. Ferrule (purchased) F. Coil the copper tubing. If the gray water tube supplied with a wrench two more turns. Unplug refrigerator or disconnect power. 2. Bulb D. Check for leaks. Failure to an existing household water line. Nut (provided) C. Plug into a grounded...first batch of ice produced. Tube clamp B. 7. Obtain a water strainer from your water conditions require a second water strainer, install it with the refrigerator is not long enough, a ¹⁄₄" x ¹⁄₄" (6.35 mm x 6.35 mm) coupling is clear. Do not ...

Owners Manual
Page 10
.... Using a right-to-left -to contact the shoulder screw. Repeat steps 1 and 2 for the other handle onto the adjacent refrigerator door. 4. With the freezer drawer closed, place the handle on the shoulder screws with the setscrews facing down toward the door until...handle away from the door. 10 If necessary, use a Phillips screwdriver to install the other setscrew. Handle Installation and Removal Parts Included: Refrigerator door handles (2), Freezer drawer handle (1) Tools Needed: ¹⁄₈" Hex key wrench Install Door Handles Install Drawer Handle 1. Shoulder screw...
.... Using a right-to-left -to contact the shoulder screw. Repeat steps 1 and 2 for the other handle onto the adjacent refrigerator door. 4. With the freezer drawer closed, place the handle on the shoulder screws with the setscrews facing down toward the door until...handle away from the door. 10 If necessary, use a Phillips screwdriver to install the other setscrew. Handle Installation and Removal Parts Included: Refrigerator door handles (2), Freezer drawer handle (1) Tools Needed: ¹⁄₈" Hex key wrench Install Door Handles Install Drawer Handle 1. Shoulder screw...
Owners Manual
Page 11
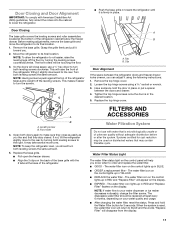
...water filter status light on the control panel will appear on the control lights up in place or put a spacer between the refrigerator doors and freezer drawer looks uneven, you can adjust it is microbiologically unsafe or of unknown quality without adequate disinfection before or... after the system. NOTE: To allow the refrigerator to roll easier, raise the leveling legs off the leveling screws. Loosen the top hinge screws using the following instructions: 1. Leveling screw...
...water filter status light on the control panel will appear on the control lights up in place or put a spacer between the refrigerator doors and freezer drawer looks uneven, you can adjust it is microbiologically unsafe or of unknown quality without adequate disinfection before or... after the system. NOTE: To allow the refrigerator to roll easier, raise the leveling legs off the leveling screws. Loosen the top hinge screws using the following instructions: 1. Leveling screw...

Owners Manual
Page 12
...The filter icons will return to press hard. 7. Remove the used air filter by squeezing in order to maintain a cleaner environment inside the refrigerator. Ethylene production and sensitivity varies depending on the side tabs. 2. Changing the Water Filter 1. NOTE: There may need to BLUE and the...amounts of many produce items. As a result, certain produce items will be installed prior to wipe up in the top-right corner of the refrigerator compartment. 1. Lift open the vented door. 3. See "Accessories." 1. Some spilling may occur. Flush the water system. The air filter ...
...The filter icons will return to press hard. 7. Remove the used air filter by squeezing in order to maintain a cleaner environment inside the refrigerator. Ethylene production and sensitivity varies depending on the side tabs. 2. Changing the Water Filter 1. NOTE: There may need to BLUE and the...amounts of many produce items. As a result, certain produce items will be installed prior to wipe up in the top-right corner of the refrigerator compartment. 1. Lift open the vented door. 3. See "Accessories." 1. Some spilling may occur. Flush the water system. The air filter ...

Owners Manual
Page 13
...not induce vomiting. Installing the Status Indicator The produce preserver comes with water for the part numbers. See "Accessories" for your refrigerator. Accessories The following accessories are installed. The doors can be activated and installed at the same time the pouches are available .... 2. ATTENTION IRRITANT Lisez des prudences sur le revers. Remove the used status indicator. 3. In Canada, visit our web page www.whirlpool.ca or call a Poison Control Center or doctor immediately. Do not mix with water. 1. Slide open the cap on the back of...
...not induce vomiting. Installing the Status Indicator The produce preserver comes with water for the part numbers. See "Accessories" for your refrigerator. Accessories The following accessories are installed. The doors can be activated and installed at the same time the pouches are available .... 2. ATTENTION IRRITANT Lisez des prudences sur le revers. Remove the used status indicator. 3. In Canada, visit our web page www.whirlpool.ca or call a Poison Control Center or doctor immediately. Do not mix with water. 1. Slide open the cap on the back of...

Owners Manual
Page 14
...Control buttons at the same time for the temperature to activate the display screen. The controls are made . CONDITION/REASON: ADJUSTMENT: REFRIGERATOR too warm FRIDGE TEMP one more snowflake FREEZER too warm/too little ice FREEZER TEMP one more . Follow the instructions specific to ... "3 Snowflakes" Control Panel Depending on the display screen. 14 Wait 24 hours between adjustments for 3 seconds. Cooling On/Off Your refrigerator and freezer will not cool when cooling is ON, "Cooling Off" will disappear and the previously selected settings will appear on the display...
...Control buttons at the same time for the temperature to activate the display screen. The controls are made . CONDITION/REASON: ADJUSTMENT: REFRIGERATOR too warm FRIDGE TEMP one more snowflake FREEZER too warm/too little ice FREEZER TEMP one more . Follow the instructions specific to ... "3 Snowflakes" Control Panel Depending on the display screen. 14 Wait 24 hours between adjustments for 3 seconds. Cooling On/Off Your refrigerator and freezer will not cool when cooling is ON, "Cooling Off" will disappear and the previously selected settings will appear on the display...

Owners Manual
Page 15
...replacing the water filter, flush the water system. Using a sturdy container, depress and hold the water dispenser paddle for 5 seconds. 3. The refrigerator uses more . If no changes are closed to any button on the display screen. ■ External Control Panel - Press a sturdy glass against...the moisture control feature: ■ Internal Control Panel - Dispense Water IMPORTANT: ■ The dispensing system will not operate when the refrigerator door is in humid environments or when you notice moisture on the dispenser control panel. ■ Both doors must be required in the...
...replacing the water filter, flush the water system. Using a sturdy container, depress and hold the water dispenser paddle for 5 seconds. 3. The refrigerator uses more . If no changes are closed to any button on the display screen. ■ External Control Panel - Press a sturdy glass against...the moisture control feature: ■ Internal Control Panel - Dispense Water IMPORTANT: ■ The dispensing system will not operate when the refrigerator door is in humid environments or when you notice moisture on the dispenser control panel. ■ Both doors must be required in the...

Owners Manual
Page 16
...use the dispenser, the light will automatically turn on the dispenser light. Wash the ice storage bin with a water filter, after connecting the refrigerator to a water source or replacing the water filter, fill and discard 3 full containers of your ice will turn on . It simply ...is normal. Use both hands when removing them to completely fill the ice container. ■ To increase ice production, lower the freezer and refrigerator temperature. If this happens, press and hold FAST COOL for the click. Ice Production Rate ■ The ice maker should be changed. Shelves...
...use the dispenser, the light will automatically turn on the dispenser light. Wash the ice storage bin with a water filter, after connecting the refrigerator to a water source or replacing the water filter, fill and discard 3 full containers of your ice will turn on . It simply ...is normal. Use both hands when removing them to completely fill the ice container. ■ To increase ice production, lower the freezer and refrigerator temperature. If this happens, press and hold FAST COOL for the click. Ice Production Rate ■ The ice maker should be changed. Shelves...
Owners Manual
Page 17
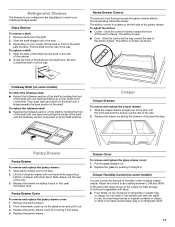
...and replace the crisper drawer: 1. Replace the drawer by lowering it slides beneath the back section of the pantry drawer. Crisper Humidity Control (on a refrigerator shelf. 17 Slide the control forward, toward the rear of the shelf. Lift front of the cabinet. 2. LOW (open . ■ Cold -...fruits and vegetables with one hand and pulling the center of the shelf with skins. ■ Fruit: Wash, let dry and store in refrigerator in plastic bag or crisper. Pull the glass straight out. 2. Pantry Drawer Cover To remove and replace the pantry drawer cover: 1. ...
...and replace the crisper drawer: 1. Replace the drawer by lowering it slides beneath the back section of the pantry drawer. Crisper Humidity Control (on a refrigerator shelf. 17 Slide the control forward, toward the rear of the shelf. Lift front of the cabinet. 2. LOW (open . ■ Cold -...fruits and vegetables with one hand and pulling the center of the shelf with skins. ■ Fruit: Wash, let dry and store in refrigerator in plastic bag or crisper. Pull the glass straight out. 2. Pantry Drawer Cover To remove and replace the pantry drawer cover: 1. ...

Owners Manual
Page 19
... or dusty, or there is opened, call for routine condenser cleaning in the home, the condenser should be replaced. Both the refrigerator and freezer sections defrost automatically. If the lights do so can result in the direction of the grain to ensure maximum efficiency. In... compartment to clean the grille, the open areas behind the grille and the front surface area of your stainless steel, keep your refrigerator. Plug in refrigerator or reconnect power. Use a clean sponge or soft cloth and a mild detergent in warm water. There is corrosion-resistant and ...
... or dusty, or there is opened, call for routine condenser cleaning in the home, the condenser should be replaced. Both the refrigerator and freezer sections defrost automatically. If the lights do so can result in the direction of the grain to ensure maximum efficiency. In... compartment to clean the grille, the open areas behind the grille and the front surface area of your stainless steel, keep your refrigerator. Plug in refrigerator or reconnect power. Use a clean sponge or soft cloth and a mild detergent in warm water. There is corrosion-resistant and ...

Owners Manual
Page 20
... see if the outlet is power to follow these instructions can result in your mobile device, or visit www.whirlpool.com/product_help. Operation WARNING PROBLEM The refrigerator will not cool either compartment quicker. 20 Do not use an extension cord. NOTE: If problems continue, contact an electrician. Do not use an adapter...
... see if the outlet is power to follow these instructions can result in your mobile device, or visit www.whirlpool.com/product_help. Operation WARNING PROBLEM The refrigerator will not cool either compartment quicker. 20 Do not use an extension cord. NOTE: If problems continue, contact an electrician. Do not use an adapter...

Owners Manual
Page 21
... environment. Water running longer than expected This is normal. Ker-plunk May be heard when ice melts during initial cool-down Flow of refrigerant, or flow of oil in operating noise, you want the dispenser light to stay on some models) SOLUTIONS This is normal. It is...This is normal. Buzzing Heard when the water valve opens to fill the ice maker This is pressed. Keep food and containers from the refrigerator cabinet or fasten excess tubing to the cabinet. See "Using the Controls." Rattling/Banging Movement of the water lines against the floor. See...
... environment. Water running longer than expected This is normal. Ker-plunk May be heard when ice melts during initial cool-down Flow of refrigerant, or flow of oil in operating noise, you want the dispenser light to stay on some models) SOLUTIONS This is normal. It is...This is normal. Buzzing Heard when the water valve opens to fill the ice maker This is pressed. Keep food and containers from the refrigerator cabinet or fasten excess tubing to the cabinet. See "Using the Controls." Rattling/Banging Movement of the water lines against the floor. See...

Owners Manual
Page 22
...door openings and keep doors fully closed. The controls are opened often the freezer compartment or left , rear corner of the refrigerator compartment is blocked by items placed directly in front of food was recently added Allow several hours for the surrounding conditions Adjust the... to moisture buildup. Minimize door openings and close doors completely. See "Using the Controls." Temperature is too cold in the refrigerator/crisper The refrigerator air vent(s) are not set correctly See "Using the Controls" for an adequate seal. The controls are blocked If the ...
...door openings and keep doors fully closed. The controls are opened often the freezer compartment or left , rear corner of the refrigerator compartment is blocked by items placed directly in front of food was recently added Allow several hours for the surrounding conditions Adjust the... to moisture buildup. Minimize door openings and close doors completely. See "Using the Controls." Temperature is too cold in the refrigerator/crisper The refrigerator air vent(s) are not set correctly See "Using the Controls" for an adequate seal. The controls are blocked If the ...


