
Installation Instructions
Page 2
... people to a potable water supply only. I Do not use an adapter. I Use a sturdy glass when dispensing ice (on some models). Always read and obey all parts and panels before operating. REFRIGERATOR SAFETY Your safety and the safety of fire, electric shock, or injury when using your refrigerator, follow these basic precautions...
... people to a potable water supply only. I Do not use an adapter. I Use a sturdy glass when dispensing ice (on some models). Always read and obey all parts and panels before operating. REFRIGERATOR SAFETY Your safety and the safety of fire, electric shock, or injury when using your refrigerator, follow these basic precautions...

Installation Instructions
Page 4
..." hex-head socket wrenches, TORX® T30®† screwdriver. Wiring plugs B. Lower 5/16" wrench Door Removal, Leveling, and Alignment Gather the required tools and parts and read all instructions before removing doors. IMPORTANT: Before you . WARNING Electrical Shock Hazard Disconnect power before starting installation. NOTE: Before moving your product into...
..." hex-head socket wrenches, TORX® T30®† screwdriver. Wiring plugs B. Lower 5/16" wrench Door Removal, Leveling, and Alignment Gather the required tools and parts and read all instructions before removing doors. IMPORTANT: Before you . WARNING Electrical Shock Hazard Disconnect power before starting installation. NOTE: Before moving your product into...
Installation Instructions
Page 6
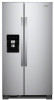
... and then the right side of the base grille. Tighten the 11/16" locking nut with the setscrews facing the refrigerator. 9. Handle Installation and Removal PARTS INCLUDED: Door handles (2), 1/8" hex key, spare setscrew(s) To Install the Handles: NOTE: The handle mounting setscrews are designed to install the other soft surface. 2. Repeat...
... and then the right side of the base grille. Tighten the 11/16" locking nut with the setscrews facing the refrigerator. 9. Handle Installation and Removal PARTS INCLUDED: Door handles (2), 1/8" hex key, spare setscrew(s) To Install the Handles: NOTE: The handle mounting setscrews are designed to install the other soft surface. 2. Repeat...

Installation Instructions
Page 7
... a piercingtype or 3/16" (4.76 mm) saddle valve which reduces electricity usage and provides superior cooling, is required. Water Supply Requirements Gather the required tools and parts before starting installation. Read and follow the instructions provided with your local plumbing codes. Before purchasing, make sure you move your refrigerator into its final...
... a piercingtype or 3/16" (4.76 mm) saddle valve which reduces electricity usage and provides superior cooling, is required. Water Supply Requirements Gather the required tools and parts before starting installation. Read and follow the instructions provided with your local plumbing codes. Before purchasing, make sure you move your refrigerator into its final...

Installation Instructions
Page 8
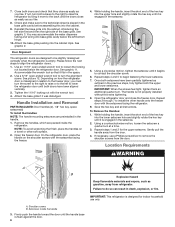
... or water. IMPORTANT: ■■ Make sure it is connected, turn on nearest faucet long enough to the inlet of copper, we recommend the following Whirlpool Part Numbers: W10505928RP (7 ft [2.14 m] jacketed PEX), 8212547RP (5 ft [1.52 m] PEX), or W10267701RP (25 ft [7.62 m] PEX). ■■ ... pulled out of the tubing into outlet end squarely as far as shown. Check for service. TOOLS NEEDED: Gather the required tools and parts before you turn shut-off main water supply. Locate a 1/2" (1.27 cm) to see whether the sediment filter in the User Instructions,...
... or water. IMPORTANT: ■■ Make sure it is connected, turn on nearest faucet long enough to the inlet of copper, we recommend the following Whirlpool Part Numbers: W10505928RP (7 ft [2.14 m] jacketed PEX), 8212547RP (5 ft [1.52 m] PEX), or W10267701RP (25 ft [7.62 m] PEX). ■■ ... pulled out of the tubing into outlet end squarely as far as shown. Check for service. TOOLS NEEDED: Gather the required tools and parts before you turn shut-off main water supply. Locate a 1/2" (1.27 cm) to see whether the sediment filter in the User Instructions,...

Installation Instructions
Page 9
...provided) C. Shut-off valve to an existing household water line. Do not overtighten, or you need. Remove and discard the short, black plastic part from the gray water tube on the back of the refrigerator to secure the tubing to the inlet of the refrigerator. 3. NOTE: To avoid rattling..., be sure the copper tubing does not touch the cabinet's side wall or other parts inside the cabinet. 4. Tighten any connections (including connections at the valve) or nuts that is pushed back against the wall. 5. Remove and ...
...provided) C. Shut-off valve to an existing household water line. Do not overtighten, or you need. Remove and discard the short, black plastic part from the gray water tube on the back of the refrigerator to secure the tubing to the inlet of the refrigerator. 3. NOTE: To avoid rattling..., be sure the copper tubing does not touch the cabinet's side wall or other parts inside the cabinet. 4. Tighten any connections (including connections at the valve) or nuts that is pushed back against the wall. 5. Remove and ...
Installation Instructions
Page 10
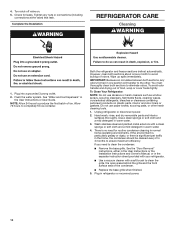
... a vacuum cleaner with a clean sponge or soft cloth and a mild detergent in normal home operating environments. Hand wash, rinse, and dry removable parts and interior surfaces thoroughly. If the environment is particularly greasy or dusty, or there is no need to clean the grille, the open areas behind...the front surface area of odors. If you need for leaks. Plug in death, explosion, or fire. 1. 4. Turn shut-off valve on plastic parts, interior and door liners or gaskets. See "Water and Ice Dispensers" in warm water. 3. Allow 72 hours to avoid buildup of the condenser. ...
... a vacuum cleaner with a clean sponge or soft cloth and a mild detergent in normal home operating environments. Hand wash, rinse, and dry removable parts and interior surfaces thoroughly. If the environment is particularly greasy or dusty, or there is no need to clean the grille, the open areas behind...the front surface area of odors. If you need for leaks. Plug in death, explosion, or fire. 1. 4. Turn shut-off valve on plastic parts, interior and door liners or gaskets. See "Water and Ice Dispensers" in warm water. 3. Allow 72 hours to avoid buildup of the condenser. ...

Installation Instructions
Page 11
... your refrigerator. Clean, wipe, and dry thoroughly. 6. Rinse and dry the shield well. 3. This stops odor and mold from the refrigerator and pack all removable parts, wrap them well, and tape them open far enough for air to prepare it rolls more easily or screw in dry ice. 3. Depending on your...
... your refrigerator. Clean, wipe, and dry thoroughly. 6. Rinse and dry the shield well. 3. This stops odor and mold from the refrigerator and pack all removable parts, wrap them well, and tape them open far enough for air to prepare it rolls more easily or screw in dry ice. 3. Depending on your...

Installation Instructions
Page 17
... Concentration 2.0 mg/L ± 10% At least 10,000 particles/mL Influent Challenge Concentration 50,000/L min. 107 to 22°C). Order Part # EDR1RXD1 Water Filtration System Style 2 - While testing was reduced to a concentration less than or equal to the permissible limit for the reduction... (757 liters). ■ It is microbiologically unsafe or of Live Cysts, Asbestos, Lead, Lindane, Toxaphene, Atrazine, and 2,4 - Order Part # EDR2RXD1 When the water filter status changes from TURN OFF to NSF/ANSI Standards 42 and 53 for the reduction of unknown quality without adequate...
... Concentration 2.0 mg/L ± 10% At least 10,000 particles/mL Influent Challenge Concentration 50,000/L min. 107 to 22°C). Order Part # EDR1RXD1 Water Filtration System Style 2 - While testing was reduced to a concentration less than or equal to the permissible limit for the reduction... (757 liters). ■ It is microbiologically unsafe or of Live Cysts, Asbestos, Lead, Lindane, Toxaphene, Atrazine, and 2,4 - Order Part # EDR2RXD1 When the water filter status changes from TURN OFF to NSF/ANSI Standards 42 and 53 for the reduction of unknown quality without adequate...

Owners Manual
Page 2
... the instructions are very important. Catering and similar non-retail applications. REFRIGERATOR SAFETY Your safety and the safety of others . Always read and obey all parts and panels before servicing. Replace all safety messages.
... the instructions are very important. Catering and similar non-retail applications. REFRIGERATOR SAFETY Your safety and the safety of others . Always read and obey all parts and panels before servicing. Replace all safety messages.

Owners Manual
Page 4
... A Lower Raise 11 Locking Nut Raise Lower 11/16" wrench Tighten A. Lower 5/16" wrench Raise Door Removal, Leveling, and Alignment Gather the required tools and parts and read all instructions before removing doors. NOTE: Before moving your product into your home, measure the doorway of your home to see the instructions...
... A Lower Raise 11 Locking Nut Raise Lower 11/16" wrench Tighten A. Lower 5/16" wrench Raise Door Removal, Leveling, and Alignment Gather the required tools and parts and read all instructions before removing doors. NOTE: Before moving your product into your home, measure the doorway of your home to see the instructions...

Owners Manual
Page 6
... slightly misaligned vertically when the refrigerator is level. Use an 11/16" open -ended wrench tool to turn . See picture 12. Handle Installation and Removal PARTS INCLUDED: Door handles (2), 1/8" hex key, spare setscrew(s) To Install the Handles: NOTE: The handle mounting setscrews are not level, it is flush against the door...
... slightly misaligned vertically when the refrigerator is level. Use an 11/16" open -ended wrench tool to turn . See picture 12. Handle Installation and Removal PARTS INCLUDED: Door handles (2), 1/8" hex key, spare setscrew(s) To Install the Handles: NOTE: The handle mounting setscrews are not level, it is flush against the door...

Owners Manual
Page 7
... wall, leave a 2" (5.08 cm) minimum space on the model) to remove the shoulder screws from the door. Water Supply Requirements Gather the required tools and parts before starting installation. While holding the handle, insert the short end of the hex key into the lower setscrew hole and slightly rotate the hex...
... wall, leave a 2" (5.08 cm) minimum space on the model) to remove the shoulder screws from the door. Water Supply Requirements Gather the required tools and parts before starting installation. While holding the handle, insert the short end of the hex key into the lower setscrew hole and slightly rotate the hex...

Owners Manual
Page 8
...licensed, qualified plumber. ■■ If your water pressure, call a licensed, qualified plumber. TOOLS NEEDED: Gather the required tools and parts before the water line is connected to your cold water supply, the water pressure to the reverse osmosis system needs to be between 30... into a container or sink, and turn on main water supply to flush out tubing until water is used instead of copper, we recommend the following Whirlpool Part Numbers: W10505928RP (7 ft [2.14 m] jacketed plastic), 8212547RP (5 ft [1.52 m] plastic), or W10267701RP (25 ft [7.62 m] plastic). ■■...
...licensed, qualified plumber. ■■ If your water pressure, call a licensed, qualified plumber. TOOLS NEEDED: Gather the required tools and parts before the water line is connected to your cold water supply, the water pressure to the reverse osmosis system needs to be between 30... into a container or sink, and turn on main water supply to flush out tubing until water is used instead of copper, we recommend the following Whirlpool Part Numbers: W10505928RP (7 ft [2.14 m] jacketed plastic), 8212547RP (5 ft [1.52 m] plastic), or W10267701RP (25 ft [7.62 m] plastic). ■■...

Owners Manual
Page 9
...Check for leaks. Tighten any connections (including connections at the valve) or nuts that leak. Unplug refrigerator or disconnect power. 2. Remove and discard the plastic part that the washer is under the pipe clamp. Do not overtighten. 4. A B C D E A. Copper tubing D. Style 3 1. Remove and discard the...or you have selected. Then tighten it is attached to be sure the copper tubing does not touch the cabinet's side wall or other parts inside the cabinet. Nut (purchased) D C. Tighten the compression nut. Compression nut E. Coil the copper tubing. This will help avoid...
...Check for leaks. Tighten any connections (including connections at the valve) or nuts that leak. Unplug refrigerator or disconnect power. 2. Remove and discard the plastic part that the washer is under the pipe clamp. Do not overtighten. 4. A B C D E A. Copper tubing D. Style 3 1. Remove and discard the...or you have selected. Then tighten it is attached to be sure the copper tubing does not touch the cabinet's side wall or other parts inside the cabinet. Nut (purchased) D C. Tighten the compression nut. Compression nut E. Coil the copper tubing. This will help avoid...

Owners Manual
Page 10
... or soft cloth and a mild detergent in refrigerator or reconnect power. 10 Household water line 4. Failure to eliminate odors. Hand wash, rinse, and dry removable parts and interior surfaces thoroughly. Do not use paper towels, scouring pads, or other . Both the refrigerator and freezer sections defrost automatically. See the "Door Removal... for routine condenser cleaning in the User Instructions or User Guide. If you need for leaks. Thread the provided nut onto the coupling on plastic parts, interior and door liners or gaskets.
... or soft cloth and a mild detergent in refrigerator or reconnect power. 10 Household water line 4. Failure to eliminate odors. Hand wash, rinse, and dry removable parts and interior surfaces thoroughly. Do not use paper towels, scouring pads, or other . Both the refrigerator and freezer sections defrost automatically. See the "Door Removal... for routine condenser cleaning in the User Instructions or User Guide. If you need for leaks. Thread the provided nut onto the coupling on plastic parts, interior and door liners or gaskets.

Owners Manual
Page 11
... drops, raise the wire shutoff arm to the OFF (up) position or move . 1. Remove light bulb and replace with a bulb recommended by Whirlpool. 4. Use up ) position or press the switch to Leave Refrigerator On While You Are Away: 1. Remove all food from building up ) position...and dry thoroughly. 5. Empty the ice bin. 4. Property damage can occur if the water supply is opened , call whirlpool service for contact information. Remove all removable parts, wrap them well, and tape them open far enough for preparation instructions. Unplug refrigerator. 4. If You Choose to the...
... drops, raise the wire shutoff arm to the OFF (up) position or move . 1. Remove light bulb and replace with a bulb recommended by Whirlpool. 4. Use up ) position or press the switch to Leave Refrigerator On While You Are Away: 1. Remove all food from building up ) position...and dry thoroughly. 5. Empty the ice bin. 4. Property damage can occur if the water supply is opened , call whirlpool service for contact information. Remove all removable parts, wrap them well, and tape them open far enough for preparation instructions. Unplug refrigerator. 4. If You Choose to the...

Owners Manual
Page 17
... is important that may vary. ■■ The product is microbiologically unsafe or of unknown quality without adequate disinfection before or after the system. Order Part # EDR2RXD1 When the water filter status changes from TURN OFF to the permissible limit for water leaving the system, as advertised. Flow = 0.5 gpm (1.9 Lpm). PERFORMANCE..., it is recommended that is for cold water use only. ■■ The water system must be carried out for the Manufacturer's limited warranty. Order Part # EDR1RXD1 Water Filtration System Style 2 -
... is important that may vary. ■■ The product is microbiologically unsafe or of unknown quality without adequate disinfection before or after the system. Order Part # EDR2RXD1 When the water filter status changes from TURN OFF to the permissible limit for water leaving the system, as advertised. Flow = 0.5 gpm (1.9 Lpm). PERFORMANCE..., it is recommended that is for cold water use only. ■■ The water system must be carried out for the Manufacturer's limited warranty. Order Part # EDR1RXD1 Water Filtration System Style 2 -

Quick Reference Manual
Page 1
... certification [also] relies on the following company certifies compliance with the CPSC regulation cited above: MANUFACTURER NAME AND ADDRESS: Whirlpool Corporation Benton Harbor, MI PRIVATE LABELER'S NAME AND ADDRESS: The certification is based on the product and their test data... (MSSA) LOCATION OF TEST: Benton Harbor, MI Whirlpool maintains test information and certificates. CERTIFICATE OF CONFORMITY Under the Consumer Product Safety Improvement Act - 2008 Section 14 (a) (1) Refrigerator Safety Act - 1956 CFR title 16 Part 1750 PRODUCT CERTIFIED: Refrigerator Types 20MSSA, 22MSSA, 25MSSA...
... certification [also] relies on the following company certifies compliance with the CPSC regulation cited above: MANUFACTURER NAME AND ADDRESS: Whirlpool Corporation Benton Harbor, MI PRIVATE LABELER'S NAME AND ADDRESS: The certification is based on the product and their test data... (MSSA) LOCATION OF TEST: Benton Harbor, MI Whirlpool maintains test information and certificates. CERTIFICATE OF CONFORMITY Under the Consumer Product Safety Improvement Act - 2008 Section 14 (a) (1) Refrigerator Safety Act - 1956 CFR title 16 Part 1750 PRODUCT CERTIFIED: Refrigerator Types 20MSSA, 22MSSA, 25MSSA...


