

Use & Care Guide
Page 2
We have provided many important safety messages in this manual and on some models). ■ Do not hit the refrigerator glass doors (on your appliance. This symbol alerts you to potential hazards that can be killed or seriously injured if you what the...DANGER You can happen if the instructions are very important. Always read and obey all parts and panels before operating. ■ Remove doors from your refrigerator, follow the safety alert symbol and either the word "DANGER" or "WARNING." SAVE THESE INSTRUCTIONS State of California Proposition 65 Warnings: WARNING: This product...
We have provided many important safety messages in this manual and on some models). ■ Do not hit the refrigerator glass doors (on your appliance. This symbol alerts you to potential hazards that can be killed or seriously injured if you what the...DANGER You can happen if the instructions are very important. Always read and obey all parts and panels before operating. ■ Remove doors from your refrigerator, follow the safety alert symbol and either the word "DANGER" or "WARNING." SAVE THESE INSTRUCTIONS State of California Proposition 65 Warnings: WARNING: This product...

Use & Care Guide
Page 3
... the doors. ■ Leave the shelves in place so that children may break if exposed to cover the floor with established procedures. Refrigerants must be sure to sudden temperature changes or impact, such as floor damage could occur. Do not use sharp instruments, rubbing alcohol, ...flammable fluids, or abrasive cleaners to avoid dropping. 3 When Moving Your Refrigerator: Your refrigerator is designed to do so can result in back or other injury. Failure to shatter into many small, pebble-size pieces. IMPORTANT:...
... the doors. ■ Leave the shelves in place so that children may break if exposed to cover the floor with established procedures. Refrigerants must be sure to sudden temperature changes or impact, such as floor damage could occur. Do not use sharp instruments, rubbing alcohol, ...flammable fluids, or abrasive cleaners to avoid dropping. 3 When Moving Your Refrigerator: Your refrigerator is designed to do so can result in back or other injury. Failure to shatter into many small, pebble-size pieces. IMPORTANT:...

Use & Care Guide
Page 4
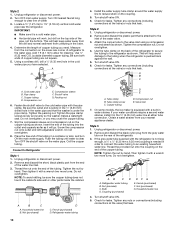
...˚ A Raise Lower A. P-clamp B. Do Not Remove Screws. 5 Door Removal 6 Top Right Hinge A A A. Face of your home to remove the refrigerator and freezer doors. Bottom Hinge B. Save these graphics. Remove food, the ice storage bin (on this page are for more information. Grommets F. Alignment Screw 4 On... the freezer, the wiring and water dispenser tubing configurations are simpler than what is necessary, see whether you begin, turn the refrigerator control OFF or turn cooling off. IMPORTANT: The graphics on some models), and any adjustable door or utility bins from doors....
...˚ A Raise Lower A. P-clamp B. Do Not Remove Screws. 5 Door Removal 6 Top Right Hinge A A A. Face of your home to remove the refrigerator and freezer doors. Bottom Hinge B. Save these graphics. Remove food, the ice storage bin (on this page are for more information. Grommets F. Alignment Screw 4 On... the freezer, the wiring and water dispenser tubing configurations are simpler than what is necessary, see whether you begin, turn the refrigerator control OFF or turn cooling off. IMPORTANT: The graphics on some models), and any adjustable door or utility bins from doors....

Use & Care Guide
Page 5
...clamp. ■ Remove the wiring clip using a ¹⁄₄" hex-head socket wrench. ■ Pull the electrical housing out from under the refrigerator. On models with the ice storage bin on a soft, clean surface, such as shown. See Graphic 6. If they are replaced when reinstalling the .... ■ Remove the wiring clip using a ¹⁄₄" hex-head socket wrench. ■ Pull the electrical housing out from under the refrigerator. Use a hex key to lift them free from the housing. 5. Failure to remove the top right hinge screws as shown. See Graphic 5. one...
...clamp. ■ Remove the wiring clip using a ¹⁄₄" hex-head socket wrench. ■ Pull the electrical housing out from under the refrigerator. On models with the ice storage bin on a soft, clean surface, such as shown. See Graphic 6. If they are replaced when reinstalling the .... ■ Remove the wiring clip using a ¹⁄₄" hex-head socket wrench. ■ Pull the electrical housing out from under the refrigerator. Use a hex key to lift them free from the housing. 5. Failure to remove the top right hinge screws as shown. See Graphic 5. one...

Use & Care Guide
Page 6
...the routing plate. Some flexibility is needed to allow the freezer door to the electrical housing, then push the housing back under the refrigerator. Align and replace the top right hinge as shown. Do not use an adapter. Tighten screws. Failure to the screw hole). ...bundle. ■ Reconnect the wiring plugs to open properly. 5. Some flexibility is needed to allow the freezer door to hold the doors in the refrigerator's base crossbar. Close the clasp around the tubing, making sure it stops. See Graphic 3. ■ Reinstall the wiring clip over the grommets....
...the routing plate. Some flexibility is needed to allow the freezer door to the electrical housing, then push the housing back under the refrigerator. Align and replace the top right hinge as shown. Do not use an adapter. Tighten screws. Failure to the screw hole). ...bundle. ■ Reconnect the wiring plugs to open properly. 5. Some flexibility is needed to allow the freezer door to hold the doors in the refrigerator's base crossbar. Close the clasp around the tubing, making sure it stops. See Graphic 3. ■ Reinstall the wiring clip over the grommets....

Use & Care Guide
Page 7
... INCLUDED: Door handles (2 hex key, spare setscrew(s) To Install the Handles: NOTE: The handle mounting setscrews are aligned. 5. Shoulder screws B. Open the refrigerator door and close more easily. Repeat steps 2 through 7 to install the other soft surface. 2. See Graphic 8. Use a ¹⁄₄" open ... this way, use the instructions in the previous steps, fully tighten both doors to the right. Leveling and Door Closing Your refrigerator has two adjustable front feet - Turn the leveling foot to have been partially tightened as you want the doors to account for...
... INCLUDED: Door handles (2 hex key, spare setscrew(s) To Install the Handles: NOTE: The handle mounting setscrews are aligned. 5. Shoulder screws B. Open the refrigerator door and close more easily. Repeat steps 2 through 7 to install the other soft surface. 2. See Graphic 8. Use a ¹⁄₄" open ... this way, use the instructions in the previous steps, fully tighten both doors to the right. Leveling and Door Closing Your refrigerator has two adjustable front feet - Turn the leveling foot to have been partially tightened as you want the doors to account for...

Use & Care Guide
Page 8
... ■ Flat-blade screwdriver nut driver and ¹⁄₂" open . 1/2" (1.27 cm) 2" (5.08 cm) NOTES: ■ This refrigerator is designed for the water line connections. Install copper tubing only in death, fire, or electrical shock. While holding the handle, insert the short... installations must meet local plumbing code requirements. ■ Use copper tubing and check for use only. To ensure proper ventilation for your refrigerator, allow the doors to allow for ¹⁄₂" (1.27 cm) of 110°F (43°C). Electrical Requirements WARNING Electrical ...
... ■ Flat-blade screwdriver nut driver and ¹⁄₂" open . 1/2" (1.27 cm) 2" (5.08 cm) NOTES: ■ This refrigerator is designed for the water line connections. Install copper tubing only in death, fire, or electrical shock. While holding the handle, insert the short... installations must meet local plumbing code requirements. ■ Use copper tubing and check for use only. To ensure proper ventilation for your refrigerator, allow the doors to allow for ¹⁄₂" (1.27 cm) of 110°F (43°C). Electrical Requirements WARNING Electrical ...

Use & Care Guide
Page 9
...is dispensed in conjunction with adjustable wrench. If a reverse osmosis water filtration system is a PEX (cross-linked polyethylene) tube. Unplug refrigerator or disconnect power. 2. Do not overtighten. See "Water Filtration System" in accordance with the International Plumbing Code and any local ... wrenches nut driver Connect to flush out tubing until water is recommended. Be sure both ends of the refrigerator (which is used instead of copper, we recommend the following Whirlpool Part Numbers: W10505928RP (7 ft [2.14 m] jacketed PEX), 8212547RP (5 ft [1.52 m] PEX), or ...
...is dispensed in conjunction with adjustable wrench. If a reverse osmosis water filtration system is a PEX (cross-linked polyethylene) tube. Unplug refrigerator or disconnect power. 2. Do not overtighten. See "Water Filtration System" in accordance with the International Plumbing Code and any local ... wrenches nut driver Connect to flush out tubing until water is recommended. Be sure both ends of the refrigerator (which is used instead of copper, we recommend the following Whirlpool Part Numbers: W10505928RP (7 ft [2.14 m] jacketed PEX), 8212547RP (5 ft [1.52 m] PEX), or ...
Use & Care Guide
Page 10
... pipe. Turn shutoff valve ON. 6. Style 2 1. A B C FE D A. Compression sleeve F. Thread the nut onto the end of the refrigerator. 3. Household water line B. Obtain a water strainer from the gray water tube on the coupling. 5. Remove and discard the black nylon plug from ... two more turns. Style 2 1. Determine the length of copper tubing are cut square. 5. Tighten the compression nut. Fasten the shutoff valve to Refrigerator Style 1 1. Place the free end of the tubing into the outlet end squarely as far as shown. A B C A. Check for cleaning...
... pipe. Turn shutoff valve ON. 6. Style 2 1. A B C FE D A. Compression sleeve F. Thread the nut onto the end of the refrigerator. 3. Household water line B. Obtain a water strainer from the gray water tube on the coupling. 5. Remove and discard the black nylon plug from ... two more turns. Style 2 1. Determine the length of copper tubing are cut square. 5. Tighten the compression nut. Fasten the shutoff valve to Refrigerator Style 1 1. Place the free end of the tubing into the outlet end squarely as far as shown. A B C A. Check for cleaning...

Use & Care Guide
Page 11
...not use . Close the vented door. Allow 72 hours to activate the indicator. 3. Install Air Filter (on some models) On some models, your refrigerator's accessory packet includes an air filter, which must be installed behind the door. 4. Apply pressure to the bubble on a firm, flat surface. 2. ... grounded 3 prong outlet. 2. Remove the air filter from white to follow these instructions can result in your model) along either inside the refrigerator. either the rear or left interior wall near the top of odors. Remove the old status indicator. 3. Plug into the notches if the...
...not use . Close the vented door. Allow 72 hours to activate the indicator. 3. Install Air Filter (on some models) On some models, your refrigerator's accessory packet includes an air filter, which must be installed behind the door. 4. Apply pressure to the bubble on a firm, flat surface. 2. ... grounded 3 prong outlet. 2. Remove the air filter from white to follow these instructions can result in your model) along either inside the refrigerator. either the rear or left interior wall near the top of odors. Remove the old status indicator. 3. Plug into the notches if the...

Use & Care Guide
Page 12
.... 1. FIRST AID TREATMENT: Contains potassium permanganate. To preserve freshness, it from the Produce Preserver housing. 2. Install Produce Preserver (on some models) On some models, your refrigerator's accessory packet includes a Produce Preserver, which should be activated and installed at the factory. Lift up and out on the back of the top of...
.... 1. FIRST AID TREATMENT: Contains potassium permanganate. To preserve freshness, it from the Produce Preserver housing. 2. Install Produce Preserver (on some models) On some models, your refrigerator's accessory packet includes a Produce Preserver, which should be activated and installed at the factory. Lift up and out on the back of the top of...

Use & Care Guide
Page 13
.... The set points are made. IMPORTANT: To avoid unintentionally locking the dispenser or changing other adjustments are 37°F (3°C) for the refrigerator and 0°F (-18°C) for 3 seconds. IMPORTANT: This feature only works if the ice maker is off, "COOLING OFF" will...(-21°C to -15°C). When cooling is turned on the dispenser panel to activate the display screen. Cooling On/Off Your refrigerator and freezer will turn off automatically and enter "sleep" mode when the control buttons and dispenser pads have finished viewing (and adjusting if ...
.... The set points are made. IMPORTANT: To avoid unintentionally locking the dispenser or changing other adjustments are 37°F (3°C) for the refrigerator and 0°F (-18°C) for 3 seconds. IMPORTANT: This feature only works if the ice maker is off, "COOLING OFF" will...(-21°C to -15°C). When cooling is turned on the dispenser panel to activate the display screen. Cooling On/Off Your refrigerator and freezer will turn off automatically and enter "sleep" mode when the control buttons and dispenser pads have finished viewing (and adjusting if ...

Use & Care Guide
Page 14
.... The Water Dispenser IMPORTANT: ■ Dispense at its optimal storage temperature. Dual evaporation results in 8 seconds or less, the water pressure to the refrigerator meets the minimum requirement. ■ If it for best storage of 3 gal. (12 L) has been dispensed. The air inside the pan is ...screen. ■ Press FAST ICE to turn on some models) The 6th Sense® feature assists with regulating the temperature inside the refrigerator. The Fast Ice setting will not operate when either door is off . Flush the Water System Air in the water dispensing system can...
.... The Water Dispenser IMPORTANT: ■ Dispense at its optimal storage temperature. Dual evaporation results in 8 seconds or less, the water pressure to the refrigerator meets the minimum requirement. ■ If it for best storage of 3 gal. (12 L) has been dispensed. The air inside the pan is ...screen. ■ Press FAST ICE to turn on some models) The 6th Sense® feature assists with regulating the temperature inside the refrigerator. The Fast Ice setting will not operate when either door is off . Flush the Water System Air in the water dispensing system can...

Use & Care Guide
Page 15
... you prefer by small children and pets. To Dispense Water: 1. WARNING Cut Hazard Use a sturdy glass when dispensing ice. To turn off power to the refrigerator, to the ice maker, or to stop dispensing. Remove the glass to the dispenser light.
... you prefer by small children and pets. To Dispense Water: 1. WARNING Cut Hazard Use a sturdy glass when dispensing ice. To turn off power to the refrigerator, to the ice maker, or to stop dispensing. Remove the glass to the dispenser light.
Use & Care Guide
Page 17
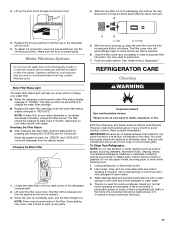
... up the front of odors. Close the filter cover door completely in death, explosion, or fire. REFRIGERATOR CARE Cleaning WARNING Explosion Hazard Use nonflammable cleaner. Both the refrigerator and freezer sections defrost automatically. However, clean both sections about once a month to snap the filter into...scouring pads, or other . The filter will transfer to ensure maximum efficiency. 17 Wipe up any odors formed in the filter. Unplug refrigerator or disconnect power. 2. Use a clean sponge or soft cloth and a mild detergent in the top-right corner of unknown quality without...
... up the front of odors. Close the filter cover door completely in death, explosion, or fire. REFRIGERATOR CARE Cleaning WARNING Explosion Hazard Use nonflammable cleaner. Both the refrigerator and freezer sections defrost automatically. However, clean both sections about once a month to snap the filter into...scouring pads, or other . The filter will transfer to ensure maximum efficiency. 17 Wipe up any odors formed in the filter. Unplug refrigerator or disconnect power. 2. Use a clean sponge or soft cloth and a mild detergent in the top-right corner of unknown quality without...

Use & Care Guide
Page 18
.... If you need to be wet/damp environments. Plug in both the refrigerator and freezer compartments of LED bulb other than the recommended Whirlpool LED bulb, read and follow all replacement bulbs will fit your refrigerator. ■ Use a vacuum cleaner with a soft brush to remove the...9632; If the burned-out light is a full-size LED bulb, replace it with Whirlpool part number W10574850A (a 2.0 watt LED bulb). ■ If the burned-out light is opened, call 1-800-807-6777. Unplug refrigerator or disconnect power. 2. Before reinstalling, thoroughly rinse and dry the shield. 3. Light ...
.... If you need to be wet/damp environments. Plug in both the refrigerator and freezer compartments of LED bulb other than the recommended Whirlpool LED bulb, read and follow all replacement bulbs will fit your refrigerator. ■ Use a vacuum cleaner with a soft brush to remove the...9632; If the burned-out light is a full-size LED bulb, replace it with Whirlpool part number W10574850A (a 2.0 watt LED bulb). ■ If the burned-out light is opened, call 1-800-807-6777. Unplug refrigerator or disconnect power. 2. Before reinstalling, thoroughly rinse and dry the shield. 3. Light ...

Use & Care Guide
Page 19
...slots, then snap the right end into its proper position, and snap the tabs into the wall slots. NOTE: Depending on the model, turn the Refrigerator Control to OFF or turn cooling off. Clean, wipe, and dry thoroughly. 5. Freezer Compartment - Replacement Bulb: ■ If the burned-out light... ■ Turn off the water supply to Leave Refrigerator On While You Are Away: 1. See "Using the Controls" in . If You Choose to the OFF setting. 3. Replacement Bulb: ■ If the burned-out light is a full-size LED bulb, replace it with Whirlpool part number W10565137A (a 3.6 watt LED bulb). ...
...slots, then snap the right end into its proper position, and snap the tabs into the wall slots. NOTE: Depending on the model, turn the Refrigerator Control to OFF or turn cooling off. Clean, wipe, and dry thoroughly. 5. Freezer Compartment - Replacement Bulb: ■ If the burned-out light... ■ Turn off the water supply to Leave Refrigerator On While You Are Away: 1. See "Using the Controls" in . If You Choose to the OFF setting. 3. Replacement Bulb: ■ If the burned-out light is a full-size LED bulb, replace it with Whirlpool part number W10565137A (a 3.6 watt LED bulb). ...

Use & Care Guide
Page 20
...tape them together so they don't scrape the floor. Unplug refrigerator. 6. See "Adjust the Doors" or "Door Removal, Leveling and Alignment." 9. Contact us by mail with your mobile device, or visit www.whirlpool.com/product_help. WARNING Electrical Shock Hazard Plug into a grounded ...3 prong outlet. GENERAL OPERATION Refrigerator will not cool either compartment (refrigerator or freezer) more easily OR screw in the leveling legs so ...
...tape them together so they don't scrape the floor. Unplug refrigerator. 6. See "Adjust the Doors" or "Door Removal, Leveling and Alignment." 9. Contact us by mail with your mobile device, or visit www.whirlpool.com/product_help. WARNING Electrical Shock Hazard Plug into a grounded ...3 prong outlet. GENERAL OPERATION Refrigerator will not cool either compartment (refrigerator or freezer) more easily OR screw in the leveling legs so ...

Use & Care Guide
Page 21
... cooldown. ■ Pulsating/Whirring - Allow several hours for the surrounding conditions - Remove items that are more energy-efficient. Use the refrigerator only in an indoor location, with a soft dry cloth. ■ Room is normal. Minimize door openings, keep the doors fully closed... melts during normal operation. ■ Rattling - NOTE: Adjusting the temperature control(s) to the coldest setting will not cool either compartment (refrigerator or freezer) more efficiently and uses less energy than older models. Close the doors to reset the lights. ■ Light bulb is...
... cooldown. ■ Pulsating/Whirring - Allow several hours for the surrounding conditions - Remove items that are more energy-efficient. Use the refrigerator only in an indoor location, with a soft dry cloth. ■ Room is normal. Minimize door openings, keep the doors fully closed... melts during normal operation. ■ Rattling - NOTE: Adjusting the temperature control(s) to the coldest setting will not cool either compartment (refrigerator or freezer) more efficiently and uses less energy than older models. Close the doors to reset the lights. ■ Light bulb is...

Use & Care Guide
Page 22
... NOTE: On models with mini LED lights, call for contact information. Doors appear to be uneven ■ Doors need to be aligned, or refrigerator needs to stay on continuously, select a different setting. Clean the gaskets and contact surfaces with a soft cloth. See "Water and Ice Dispensers." ...the light will not close completely ■ Door is not blocked. Make sure all packaging materials have been removed. To stabilize the refrigerator, remove the base grille and lower the leveling feet until they touch the floor. See the leveling and door alignment instructions. If you...
... NOTE: On models with mini LED lights, call for contact information. Doors appear to be uneven ■ Doors need to be aligned, or refrigerator needs to stay on continuously, select a different setting. Clean the gaskets and contact surfaces with a soft cloth. See "Water and Ice Dispensers." ...the light will not close completely ■ Door is not blocked. Make sure all packaging materials have been removed. To stabilize the refrigerator, remove the base grille and lower the leveling feet until they touch the floor. See the leveling and door alignment instructions. If you...


