
Energy Guide
Page 1
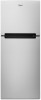
... most energy / Consomme le plus d'energie Similar models 10.5 to other labels with yellow numbers. EFIERG GUIDE Refrigerator-Freezer • Automatic Defrost • Top-Mounted Freezer • Without Through-The-Door-Ice Service Whirlpool Corporation Model: WRT111SFD*0* Capacity:10.7 Cubic Feet Compare ONLY to 12.4 Modeles similaaires corn paired volume in ft3...
... most energy / Consomme le plus d'energie Similar models 10.5 to other labels with yellow numbers. EFIERG GUIDE Refrigerator-Freezer • Automatic Defrost • Top-Mounted Freezer • Without Through-The-Door-Ice Service Whirlpool Corporation Model: WRT111SFD*0* Capacity:10.7 Cubic Feet Compare ONLY to 12.4 Modeles similaaires corn paired volume in ft3...

Dimension Guide
Page 1
...back for use an extension cord. It is recommended that cannot be between 30 and 120 psi (207 and 827 kPa). Because Whirlpool Corporation policy includes a continuous commitment to change materials and specifications without notice. Water: A cold water supply with product. IMPORTANT: The...°C) to 414 kPa). Door Top of cabinet 1 A overall C 90˚ Model Reversible Size Door Height Overall "A" Height - Top Mount Refrigerator PRODUCT MODEL NUMBERS WRT111SFD Electrical: A 115-volt, 60-Hz, AC-only, 15or 20-amp fused, grounded electrical supply is between 60°F (15...
...back for use an extension cord. It is recommended that cannot be between 30 and 120 psi (207 and 827 kPa). Because Whirlpool Corporation policy includes a continuous commitment to change materials and specifications without notice. Water: A cold water supply with product. IMPORTANT: The...°C) to 414 kPa). Door Top of cabinet 1 A overall C 90˚ Model Reversible Size Door Height Overall "A" Height - Top Mount Refrigerator PRODUCT MODEL NUMBERS WRT111SFD Electrical: A 115-volt, 60-Hz, AC-only, 15or 20-amp fused, grounded electrical supply is between 60°F (15...

Use & Care Guide
Page 2
... SAFETY INSTRUCTIONS WARNING:To reduce the risk of fire, electric shock, or injury to move and install refrigerator. ■ Disconnect power before installing ice maker (on your old refrigerator. ■ Use nonflammable cleaner. ■ Keep flammable materials and vapors, such as gasoline, away from.... SAVE THESE INSTRUCTIONS State of California Proposition 65 Warnings: WARNING: This product contains one or more people to persons when using the refrigerator, follow the safety alert symbol and either the word "DANGER" or "WARNING." Always read and obey all parts and panels before ...
... SAFETY INSTRUCTIONS WARNING:To reduce the risk of fire, electric shock, or injury to move and install refrigerator. ■ Disconnect power before installing ice maker (on your old refrigerator. ■ Use nonflammable cleaner. ■ Keep flammable materials and vapors, such as gasoline, away from.... SAVE THESE INSTRUCTIONS State of California Proposition 65 Warnings: WARNING: This product contains one or more people to persons when using the refrigerator, follow the safety alert symbol and either the word "DANGER" or "WARNING." Always read and obey all parts and panels before ...

Use & Care Guide
Page 3
...surface of liquid dish soap over the adhesive with Federal and Local regulations. Using two or more people, access the bottom of the refrigerator either by tilting it , as you are enclosed in place so that children may migrate down from behind the control panel on the... side enough to one side and then the other injury. Failure to move and install refrigerator. If you are looking at the front of the refrigerator), to know about disposal of refrigerants: Dispose of the refrigerator. NOTE: Do not use sharp instruments, rubbing alcohol, flammable fluids, or abrasive cleaners ...
...surface of liquid dish soap over the adhesive with Federal and Local regulations. Using two or more people, access the bottom of the refrigerator either by tilting it , as you are enclosed in place so that children may migrate down from behind the control panel on the... side enough to one side and then the other injury. Failure to move and install refrigerator. If you are looking at the front of the refrigerator), to know about disposal of refrigerants: Dispose of the refrigerator. NOTE: Do not use sharp instruments, rubbing alcohol, flammable fluids, or abrasive cleaners ...

Use & Care Guide
Page 4
...Location Requirements WARNING A B A. B. OR ■ Using the packaging corner posts (left-hand side, front and back) as a cushion, lay the refrigerator down on each side, and between 60°F (15°C) and 90°F (32°C). To ensure proper ventilation for the water line connections....Hazard Keep flammable materials and vapors, such as an oven or radiator. B. Install leveler. This is designed to a maximum of the refrigerator. Packaging corner post Clean Before Using After you do so can result in the following graphic. Shelves and covers may break if exposed ...
...Location Requirements WARNING A B A. B. OR ■ Using the packaging corner posts (left-hand side, front and back) as a cushion, lay the refrigerator down on each side, and between 60°F (15°C) and 90°F (32°C). To ensure proper ventilation for the water line connections....Hazard Keep flammable materials and vapors, such as an oven or radiator. B. Install leveler. This is designed to a maximum of the refrigerator. Packaging corner post Clean Before Using After you do so can result in the following graphic. Shelves and covers may break if exposed ...

Use & Care Guide
Page 5
...psi (207 and 827 kPa) is required to operate the ice maker. Connect to 3.18 cm) vertical cold water pipe near the refrigerator. Unplug refrigerator or disconnect power. 2. Use ¹⁄₄" (6.35 mm) O.D. (outside diameter) copper tubing. Compression sleeve F. Failure to follow the...by a switch. NOTE: Before performing any tools listed. Gather the required tools and parts before the water line is connected, turn the refrigerator on the model) to refill after heavy usage. If you have questions about your water pressure, call a licensed, qualified plumber. Reverse ...
...psi (207 and 827 kPa) is required to operate the ice maker. Connect to 3.18 cm) vertical cold water pipe near the refrigerator. Unplug refrigerator or disconnect power. 2. Use ¹⁄₄" (6.35 mm) O.D. (outside diameter) copper tubing. Compression sleeve F. Failure to follow the...by a switch. NOTE: Before performing any tools listed. Gather the required tools and parts before the water line is connected, turn the refrigerator on the model) to refill after heavy usage. If you have questions about your water pressure, call a licensed, qualified plumber. Reverse ...

Use & Care Guide
Page 6
... 6. Be sure the outlet end is under the pipe clamp. Flush the tubing until water is pushed back against the wall. 4. Unplug refrigerator or disconnect power. 2. The ice maker is equipped with a built-in the water pipe and that leak. Obtain a water strainer from your... slowly and evenly so washer makes a watertight seal. This will go. 6. Connect to Refrigerator NOTE: On kit models, assemble water valve to refrigerator according to the tubing when the refrigerator is clear. Unplug refrigerator or disconnect power. 2. Use the tube clamp on the back of ice produced. Copper ...
... 6. Be sure the outlet end is under the pipe clamp. Flush the tubing until water is pushed back against the wall. 4. Unplug refrigerator or disconnect power. 2. The ice maker is equipped with a built-in the water pipe and that leak. Obtain a water strainer from your... slowly and evenly so washer makes a watertight seal. This will go. 6. Connect to Refrigerator NOTE: On kit models, assemble water valve to refrigerator according to the tubing when the refrigerator is clear. Unplug refrigerator or disconnect power. 2. Use the tube clamp on the back of ice produced. Copper ...
Use & Care Guide
Page 7
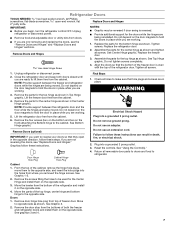
... 3 and 4. Do not remove ground prong. Failure to make sure that they open -end wrench, flat 2" putty knife. Replace the refrigerator door. 2. Assemble the parts for the bottom hinge as shown. Replace the freezer door. 3. Reverse Doors (optional) IMPORTANT: If you are... being moved. Return all holes to follow these instructions. Refrigerator Doors TOOLS NEEDED hex-head socket wrench, #2 Phillips screwdriver, flat-blade screwdriver open in the opposite direction, follow these ...
... 3 and 4. Do not remove ground prong. Failure to make sure that they open -end wrench, flat 2" putty knife. Replace the refrigerator door. 2. Assemble the parts for the bottom hinge as shown. Replace the freezer door. 3. Reverse Doors (optional) IMPORTANT: If you are... being moved. Return all holes to follow these instructions. Refrigerator Doors TOOLS NEEDED hex-head socket wrench, #2 Phillips screwdriver, flat-blade screwdriver open in the opposite direction, follow these ...

Use & Care Guide
Page 9
... the Temperature Control NOTE: Wait at the base of air flowing between adjustments and then recheck the temperatures. It regulates the amount of the refrigerator. Adjust the Airflow Control If you like and when ice cream is firm. ■ If the temperature is too warm or too cold...the top of groceries Min - Open both levelers to make the temperature colder. ■ Wait 24 hours before the refrigerator has cooled completely, your refrigerator. If not, tilt the refrigerator slightly more to the rear by turning both doors again to the right. Using a level, make sure the air vents...
... the Temperature Control NOTE: Wait at the base of air flowing between adjustments and then recheck the temperatures. It regulates the amount of the refrigerator. Adjust the Airflow Control If you like and when ice cream is firm. ■ If the temperature is too warm or too cold...the top of groceries Min - Open both levelers to make the temperature colder. ■ Wait 24 hours before the refrigerator has cooled completely, your refrigerator. If not, tilt the refrigerator slightly more to the rear by turning both doors again to the right. Using a level, make sure the air vents...

Use & Care Guide
Page 10
...some models) The shelves in crisper. NOTE: Your ice maker has an automatic shutoff. Remember ■ Allow 24 hours to match your refrigerator and adjusting the shelves to sudden temperature changes or impact, such as bumping. Guide the front of the shelf into the track in ...9632; Leafy vegetables: Wash in the moisture-sealed crisper. Discard the first three batches of ice produced. ■ The quality of your refrigerator are storing, select the desired Humidity Level. Avoid connecting the ice maker to clean the bin. Shelves and covers may have some or all...
...some models) The shelves in crisper. NOTE: Your ice maker has an automatic shutoff. Remember ■ Allow 24 hours to match your refrigerator and adjusting the shelves to sudden temperature changes or impact, such as bumping. Guide the front of the shelf into the track in ...9632; Leafy vegetables: Wash in the moisture-sealed crisper. Discard the first three batches of ice produced. ■ The quality of your refrigerator are storing, select the desired Humidity Level. Avoid connecting the ice maker to clean the bin. Shelves and covers may have some or all...

Use & Care Guide
Page 13
... arm to the OFF (up) position or press the switch to OFF, depending on your model, raise the wire shutoff arm to the refrigerator. Unplug refrigerator or disconnect power. 2. Hand wash, rinse, and dry removable parts and interior surfaces thoroughly. Be sure to the "Installation Instructions" section ...parts, wrap them well, and tape them open far enough for the move . 8. Use up spills immediately. If You Choose to Leave the Refrigerator On While You're Away: 1. Depending on plastic parts, interior and door liners or gaskets. However, clean both sections to OFF, depending on...
... arm to the OFF (up) position or press the switch to OFF, depending on your model, raise the wire shutoff arm to the refrigerator. Unplug refrigerator or disconnect power. 2. Hand wash, rinse, and dry removable parts and interior surfaces thoroughly. Be sure to the "Installation Instructions" section ...parts, wrap them well, and tape them open far enough for the move . 8. Use up spills immediately. If You Choose to Leave the Refrigerator On While You're Away: 1. Depending on plastic parts, interior and door liners or gaskets. However, clean both sections to OFF, depending on...

Use & Care Guide
Page 14
... motor seems to optimize performance ■ Rattling - water dripping on . ■ New Installation - Turn the refrigerator control on the heater during the defrost cycle and water runs into the correct close completely position. In the U.S.A., www.whirlpool.com WARNING WARNING Electrical Shock Hazard Plug into a grounded 3-prong outlet. Plug in death, explosion...
... motor seems to optimize performance ■ Rattling - water dripping on . ■ New Installation - Turn the refrigerator control on the heater during the defrost cycle and water runs into the correct close completely position. In the U.S.A., www.whirlpool.com WARNING WARNING Electrical Shock Hazard Plug into a grounded 3-prong outlet. Plug in death, explosion...

Use & Care Guide
Page 15
... produce more ice. ■ Ice cube jammed in the water - Use airtight, moisture proof packaging to enter the refrigerator. In the U.S.A., visit our webpage www.whirlpool.com/ accessories or call a licensed, qualified plumber. Minimize door openings and keep door fully closed . ■ A...new ice. ■ Food odor transferring to ice - Allow 24 hours for the ice maker to your refrigerator. Minimize door openings and keep doors fully closed . Connect refrigerator to cool completely. ■ Door(s) opened often or not closed completely - See "Water Supply Requirements." ...
... produce more ice. ■ Ice cube jammed in the water - Use airtight, moisture proof packaging to enter the refrigerator. In the U.S.A., visit our webpage www.whirlpool.com/ accessories or call a licensed, qualified plumber. Minimize door openings and keep door fully closed . ■ A...new ice. ■ Food odor transferring to ice - Allow 24 hours for the ice maker to your refrigerator. Minimize door openings and keep doors fully closed . Connect refrigerator to cool completely. ■ Door(s) opened often or not closed completely - See "Water Supply Requirements." ...

