
Quick Reference Manual
Page 1
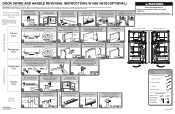
... hole plugs to do so can result in back or other injury. Align Doors W10661461B © 2014 Whirlpool Corporation. Reinstall the base grille. Center Hinge - Lift refrigerator door from the door. Failure to the opposite side. NOTE: After removing the doors, place them to... cabinet. You will vary depending on the hinge pin. WARNING Excessive Weight Hazard Use two or more detailed door reversing instructions, see the User Instructions. Refrigerator A Door B Install Doors 1 A. NOTE: The hinge style will need them on a soft surface to avoid damaging the finish. 1 2 3 ...
... hole plugs to do so can result in back or other injury. Align Doors W10661461B © 2014 Whirlpool Corporation. Reinstall the base grille. Center Hinge - Lift refrigerator door from the door. Failure to the opposite side. NOTE: After removing the doors, place them to... cabinet. You will vary depending on the hinge pin. WARNING Excessive Weight Hazard Use two or more detailed door reversing instructions, see the User Instructions. Refrigerator A Door B Install Doors 1 A. NOTE: The hinge style will need them on a soft surface to avoid damaging the finish. 1 2 3 ...
Dimension Guide
Page 1
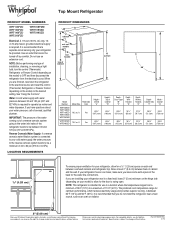
.... Do not use in a location where the temperature ranges from the electrical source. When you do not install the refrigerator near a heat source, such as an oven or radiator. 2" (5.08 cm) Because Whirlpool Corporation policy includes a continuous commitment to improve our products, we reserve the right to operate ice maker and water...
.... Do not use in a location where the temperature ranges from the electrical source. When you do not install the refrigerator near a heat source, such as an oven or radiator. 2" (5.08 cm) Because Whirlpool Corporation policy includes a continuous commitment to improve our products, we reserve the right to operate ice maker and water...
Installation Guide
Page 2
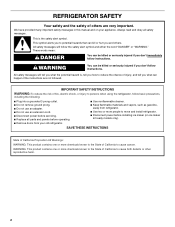
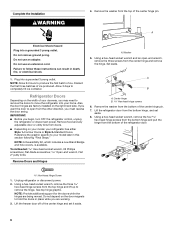
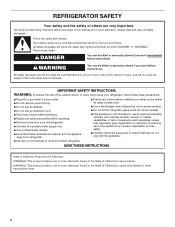
... all safety messages. SAVE THESE INSTRUCTIONS State of injury, and tell you what the potential hazard is the safety alert symbol. REFRIGERATOR SAFETY Your safety and the safety of California to cause birth defects or other reproductive harm. 2 These words mean: DANGER You... can happen if the instructions are very important. IMPORTANT SAFETY INSTRUCTIONS WARNING:To reduce the risk of California to move and install refrigerator. ■ Disconnect power before operating. ■ Remove doors from your appliance. WARNING: This product contains one or more people...
... all safety messages. SAVE THESE INSTRUCTIONS State of injury, and tell you what the potential hazard is the safety alert symbol. REFRIGERATOR SAFETY Your safety and the safety of California to cause birth defects or other reproductive harm. 2 These words mean: DANGER You... can happen if the instructions are very important. IMPORTANT SAFETY INSTRUCTIONS WARNING:To reduce the risk of California to move and install refrigerator. ■ Disconnect power before operating. ■ Remove doors from your appliance. WARNING: This product contains one or more people...

Installation Guide
Page 3
...to avoid dropping. 3 For more people to form. ■ Remove tape and glue residue from behind the control panel on the refrigerator. Clean Before Using After you are still dangerous - Important information to sudden temperature changes or impact, such as floor damage could occur....warm water when they will sit for cleaning or service, be evacuated by a licensed, EPA certified refrigerant technician in back or other injury. When Moving Your Refrigerator: Your refrigerator is normal. Rinse with warm water and dry with Federal and Local regulations. These products can result...
...to avoid dropping. 3 For more people to form. ■ Remove tape and glue residue from behind the control panel on the refrigerator. Clean Before Using After you are still dangerous - Important information to sudden temperature changes or impact, such as floor damage could occur....warm water when they will sit for cleaning or service, be evacuated by a licensed, EPA certified refrigerant technician in back or other injury. When Moving Your Refrigerator: Your refrigerator is normal. Rinse with warm water and dry with Federal and Local regulations. These products can result...
Installation Guide
Page 4
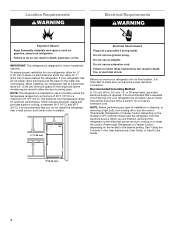
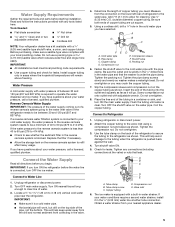
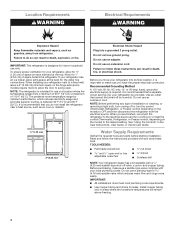
...;F (13°C) to swing open. Do not use in a location where the temperature ranges from a minimum of space behind the refrigerator. Allow for optimum performance, which reduces electricity usage and provides superior cooling, is designed for use an extension cord. or 20-amp ...fused, grounded electrical supply is recommended that a separate circuit serving only your refrigerator, allow extra space at the top. Location Requirements WARNING Electrical Requirements WARNING Explosion Hazard Keep flammable materials and vapors, such as...
...;F (13°C) to swing open. Do not use in a location where the temperature ranges from a minimum of space behind the refrigerator. Allow for optimum performance, which reduces electricity usage and provides superior cooling, is designed for use an extension cord. or 20-amp ...fused, grounded electrical supply is recommended that a separate circuit serving only your refrigerator, allow extra space at the top. Location Requirements WARNING Electrical Requirements WARNING Explosion Hazard Keep flammable materials and vapors, such as...
Installation Guide
Page 5
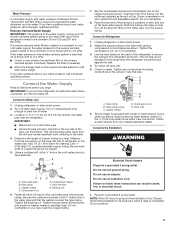
... necessary. ■ Allow the storage tank on the water pipe. Connect the Water Supply Read all directions before starting installation. Connect to Refrigerator 1. Turn OFF main water supply. A G B C FE A. Compression sleeve F. Shutoff valve G. Packing nut 6. Be sure the ...;⁄₄" hole in the valve. 4. Tighten the pipe clamp screws slowly and evenly so washer makes a watertight seal. Unplug refrigerator or disconnect power. 2. Valve inlet 6. Read and follow the instructions provided with any connections (including connections at either tube connection. ...
... necessary. ■ Allow the storage tank on the water pipe. Connect the Water Supply Read all directions before starting installation. Connect to Refrigerator 1. Turn OFF main water supply. A G B C FE A. Compression sleeve F. Shutoff valve G. Packing nut 6. Be sure the ...;⁄₄" hole in the valve. 4. Tighten the pipe clamp screws slowly and evenly so washer makes a watertight seal. Unplug refrigerator or disconnect power. 2. Valve inlet 6. Read and follow the instructions provided with any connections (including connections at either tube connection. ...
Installation Guide
Page 6
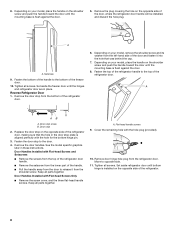
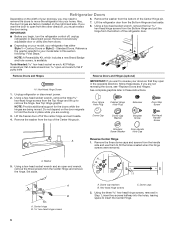
...hex-head socket wrench, remove the four hex-head hinge screws from the bottom hinge and pull the hinge from the top of the refrigerator door. Unplug refrigerator or disconnect power. 2. See top hinge graphic. Remove the washer from the bottom of the center hinge pin. A Electrical Shock ...the center hinge and set aside. 8. Set aside. Do not use an extension cord. NOTE: Allow 24 hours to completely fill ice container. Refrigerator Doors Depending on the width of your doorway, you are factory installed on your model, your home. A B A. Discard the first three batches...
...hex-head socket wrench, remove the four hex-head hinge screws from the bottom hinge and pull the hinge from the top of the refrigerator door. Unplug refrigerator or disconnect power. 2. See top hinge graphic. Remove the washer from the bottom of the center hinge pin. A Electrical Shock ...the center hinge and set aside. 8. Set aside. Do not use an extension cord. NOTE: Allow 24 hours to completely fill ice container. Refrigerator Doors Depending on the width of your doorway, you are factory installed on your model, your home. A B A. Discard the first three batches...

Installation Guide
Page 7
...-Head Handle Screw Shoulder Screw Washer Door Handle Hole Plug Reverse Center Hinge 1. Hex-head hinge screws C. Cabinet hole plugs 2. Door stop screw B. Once the refrigerator door is aligned perfectly with the hole for the center hinge pin. 7. NOTES: ■ To avoid scratching the finish, do not use them in the...
...-Head Handle Screw Shoulder Screw Washer Door Handle Hole Plug Reverse Center Hinge 1. Hex-head hinge screws C. Cabinet hole plugs 2. Door stop screw B. Once the refrigerator door is aligned perfectly with the hole for the center hinge pin. 7. NOTES: ■ To avoid scratching the finish, do not use them in the...
Installation Guide
Page 8
...door. 10. Depending on your model, place the handle on the shoulder screw and push the handle toward the door until the hinges and refrigerator door are in these instructions. Replace the door stop plate is flush against the door. 5. Remove the door handles. Keep all screws. Remove...7. A A. Fasten the bottom of the handle to release it into the hole that the hole in the door stop on the opposite side of the refrigerator door. 6. A. Move to the door. 4. Door stop screw B. Depending on your model, place the handle on the shoulder screw and push the ...
...door. 10. Depending on your model, place the handle on the shoulder screw and push the handle toward the door until the hinges and refrigerator door are in these instructions. Replace the door stop plate is flush against the door. 5. Remove the door handles. Keep all screws. Remove...7. A A. Fasten the bottom of the handle to release it into the hole that the hole in the door stop on the opposite side of the refrigerator door. 6. A. Move to the door. 4. Door stop screw B. Depending on your model, place the handle on the shoulder screw and push the ...

Installation Guide
Page 9
... The distance between the hinge and the cabinet, making sure the holes are aligned. Do not depend on the upper hinge pin of the refrigerator door to replace and align the freezer door later. Plastic spacer A. The distance should be approximately 1⁴⁄₅" (4.6 cm). Turn... the hinge over so that it is pointing in the top of the bottom hinge pin. 3. Install Refrigerator Door 1. Hinge pin 3. Top hinge pin C. Install Freezer Door 1. Do not tighten the screws completely 4. Reset the controls. Place washer on...
... The distance between the hinge and the cabinet, making sure the holes are aligned. Do not depend on the upper hinge pin of the refrigerator door to replace and align the freezer door later. Plastic spacer A. The distance should be approximately 1⁴⁄₅" (4.6 cm). Turn... the hinge over so that it is pointing in the top of the bottom hinge pin. 3. Install Refrigerator Door 1. Hinge pin 3. Top hinge pin C. Install Freezer Door 1. Do not tighten the screws completely 4. Reset the controls. Place washer on...

Installation Guide
Page 12
... residue with a soft cloth. 3. Using the cutout as a guide, press the brand badge onto the freezer door making sure that the refrigerator is completely covered. 6. Depending on last page of User Instructions) ■ Door handle hole plug Tools Needed: ■ Scissors ■... Masking tape Freezer Door 1. Loosen the top hinge screws using the following instructions: 1. Have someone push against the top of the refrigerator takes some weight off the levelers and rollers which makes it easier to adjust. 5. Slowly remove the template. 2. Readjust if necessary....
... residue with a soft cloth. 3. Using the cutout as a guide, press the brand badge onto the freezer door making sure that the refrigerator is completely covered. 6. Depending on last page of User Instructions) ■ Door handle hole plug Tools Needed: ■ Scissors ■... Masking tape Freezer Door 1. Loosen the top hinge screws using the following instructions: 1. Have someone push against the top of the refrigerator takes some weight off the levelers and rollers which makes it easier to adjust. 5. Slowly remove the template. 2. Readjust if necessary....
Installation Guide
Page 13
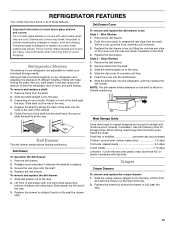
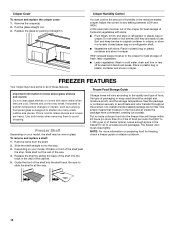
... these features. Crisper Crisper Drawers To remove and replace the crisper drawer: 1. Glass shelves and covers are adjustable to match your refrigerator are heavy. Slide shelf out the rest of the way. 3. Meat Storage Guide Deli Drawer The deli drawer design allows flexible ...positioning. Slide drawer out the rest of the way. 4. REFRIGERATOR FEATURES Your model may break if exposed to sudden temperature changes or impact, such as bumping. Tempered glass is airtight and moisture-proof...
... these features. Crisper Crisper Drawers To remove and replace the crisper drawer: 1. Glass shelves and covers are adjustable to match your refrigerator are heavy. Slide shelf out the rest of the way. 3. Meat Storage Guide Deli Drawer The deli drawer design allows flexible ...positioning. Slide drawer out the rest of the way. 4. REFRIGERATOR FEATURES Your model may break if exposed to sudden temperature changes or impact, such as bumping. Tempered glass is airtight and moisture-proof...
Installation Guide
Page 14
.... Place in plastic bag or plastic container and store in the moisture-sealed crisper. Glass shelves and covers are normal. Freezer Shelf Depending on a refrigerator shelf. ■ Vegetables with warm water when they are cold. Slide the shelf straight out to the quality and type of food, the type... of fruits and vegetables with skins. ■ Fruit: Wash, let dry and store in refrigerator in . Frozen Food Storage Guide Storage times will freeze within 24 hours (no more unfrozen food into the track in the freezer for best storage...
.... Place in plastic bag or plastic container and store in the moisture-sealed crisper. Glass shelves and covers are normal. Freezer Shelf Depending on a refrigerator shelf. ■ Vegetables with warm water when they are cold. Slide the shelf straight out to the quality and type of food, the type... of fruits and vegetables with skins. ■ Fruit: Wash, let dry and store in refrigerator in . Frozen Food Storage Guide Storage times will freeze within 24 hours (no more unfrozen food into the track in the freezer for best storage...
Owners Manual
Page 2
... outlet. All safety messages will follow these basic precautions: I Keep flammable materials and vapors, such as gasoline, away from your old refrigerator. I Use nonflammable cleaner. I Children should be supervised to potential hazards that they do not play with reduced physical, sensory or mental... safety messages in this manual and on some models). I Do not remove ground prong. I Connect to move and install refrigerator. WARNING: This product contains one or more chemicals known to the State of California to cause birth defects or other reproductive ...
... outlet. All safety messages will follow these basic precautions: I Keep flammable materials and vapors, such as gasoline, away from your old refrigerator. I Use nonflammable cleaner. I Children should be supervised to potential hazards that they do not play with reduced physical, sensory or mental... safety messages in this manual and on some models). I Do not remove ground prong. I Connect to move and install refrigerator. WARNING: This product contains one or more chemicals known to the State of California to cause birth defects or other reproductive ...

Owners Manual
Page 3
...they will sit for cleaning or service, be evacuated by a licensed, EPA certified refrigerant technician in "Refrigerator Care." Refrigerants must be sure to cover the floor with a soft cloth. When Moving Your Refrigerator: Your refrigerator is removed, ice may migrate down from the freezer and cause icicles to avoid floor...the package materials, clean the inside . Failure to move it . Remove tape and glue residue from behind the control panel on the refrigerator. For more people to do so can result in death or brain damage. Rub a small amount of liquid dish soap over the ...
...they will sit for cleaning or service, be evacuated by a licensed, EPA certified refrigerant technician in "Refrigerator Care." Refrigerants must be sure to cover the floor with a soft cloth. When Moving Your Refrigerator: Your refrigerator is removed, ice may migrate down from the freezer and cause icicles to avoid floor...the package materials, clean the inside . Failure to move it . Remove tape and glue residue from behind the control panel on the refrigerator. For more people to do so can result in death or brain damage. Rub a small amount of liquid dish soap over the ...
Owners Manual
Page 4
...hinge side (some models require more easily. or 20-amp fused, grounded electrical supply is recommended that a separate circuit serving only your refrigerator into a grounded 3 prong outlet. When you have the proper electrical connection. Do not use in death, explosion, or fire. Failure... nut driver and ¹⁄₂" open . Use copper tubing and check for ½" (1.25 cm) of space behind the refrigerator. Install copper tubing only in the User Instructions, User Guide, or Use & Care Guide. Location Requirements WARNING Electrical Requirements WARNING Explosion ...
...hinge side (some models require more easily. or 20-amp fused, grounded electrical supply is recommended that a separate circuit serving only your refrigerator into a grounded 3 prong outlet. When you have the proper electrical connection. Do not use in death, explosion, or fire. Failure... nut driver and ¹⁄₂" open . Use copper tubing and check for ½" (1.25 cm) of space behind the refrigerator. Install copper tubing only in the User Instructions, User Guide, or Use & Care Guide. Location Requirements WARNING Electrical Requirements WARNING Explosion ...
Owners Manual
Page 5
... watertight seal. Screw compression nut onto outlet end with the pipe clamp. Connect to 3.18 cm) vertical cold water pipe near the refrigerator. Tube clamp B. Copper tubing D. The ice maker is blocked. Discard the first three batches of copper tubing are cut square. 5.... rear of the pipe, not the bottom. Valve inlet 6. Do not remove ground prong. IMPORTANT: Make sure it is connected to the refrigerator as shown. Compression nut D E. Tighten the packing nut. Do not overtighten. 8. Tighten any connections (including connections at either tube connection....
... watertight seal. Screw compression nut onto outlet end with the pipe clamp. Connect to 3.18 cm) vertical cold water pipe near the refrigerator. Tube clamp B. Copper tubing D. The ice maker is blocked. Discard the first three batches of copper tubing are cut square. 5.... rear of the pipe, not the bottom. Valve inlet 6. Do not remove ground prong. IMPORTANT: Make sure it is connected to the refrigerator as shown. Compression nut D E. Tighten the packing nut. Do not overtighten. 8. Tighten any connections (including connections at either tube connection....
Owners Manual
Page 6
... these instructions. Standard Doors. Reference the graphic specific to hold the doors in place while you must reverse the door swing. Unplug refrigerator or disconnect power. 2. NOTE: Provide additional support for the doors while the hinges are not reversing the doors, see "Replace Doors...is available. See Top Hinge graphic. Dome caps 2. Using the three hex-head hinge screws, removed in these steps. A B C A B A. Refrigerator Doors Depending on the right-hand side. Remove the washer from the handle side and use them to reverse your doorway, you want the door...
... these instructions. Standard Doors. Reference the graphic specific to hold the doors in place while you must reverse the door swing. Unplug refrigerator or disconnect power. 2. NOTE: Provide additional support for the doors while the hinges are not reversing the doors, see "Replace Doors...is available. See Top Hinge graphic. Dome caps 2. Using the three hex-head hinge screws, removed in these steps. A B C A B A. Refrigerator Doors Depending on the right-hand side. Remove the washer from the handle side and use them to reverse your doorway, you want the door...

Owners Manual
Page 7
... screws and setscrews: Remove the two flat-head handle screws from the shoulder screw. Remove the three cabinet hole plugs from the top of the refrigerator door, making sure that the hole in the door stop to mount the door handle. Door stop A A. A. Using the ¹⁄₈" ... the brand badge from the freezer door by prying up the right-hand side and slowly peeling the badge away from the door. Setscrew 9. Reverse Refrigerator Door 1. AB A. Fasten the door stop 2. A A B A A hex-head hinge screws B. Keep all screws. AB A. Fasten the bottom of the handle to the ...
... screws and setscrews: Remove the two flat-head handle screws from the shoulder screw. Remove the three cabinet hole plugs from the top of the refrigerator door, making sure that the hole in the door stop to mount the door handle. Door stop A A. A. Using the ¹⁄₈" ... the brand badge from the freezer door by prying up the right-hand side and slowly peeling the badge away from the door. Setscrew 9. Reverse Refrigerator Door 1. AB A. Fasten the door stop 2. A A B A A hex-head hinge screws B. Keep all screws. AB A. Fasten the bottom of the handle to the ...

Owners Manual
Page 8
...Bottom Hinge pin. 4. Remove the cap covering the hole on your model, remove the shoulder screw and its washer from the top of the refrigerator door handle. Turn the hinge over so that it will be approximately 1⁴⁄₅" (4.6 cm). Hinge pin screw C. Depending on ... not tighten completely. Cover the remaining hole with flat-head screws only: Remove the screw cover and the three flat-head handle screws. Set aside refrigerator door until the mounting base is installed on the door magnets to hold the doors in the opposite direction. 2. B B A C C A A. Door...
...Bottom Hinge pin. 4. Remove the cap covering the hole on your model, remove the shoulder screw and its washer from the top of the refrigerator door handle. Turn the hinge over so that it will be approximately 1⁴⁄₅" (4.6 cm). Hinge pin screw C. Depending on ... not tighten completely. Cover the remaining hole with flat-head screws only: Remove the screw cover and the three flat-head handle screws. Set aside refrigerator door until the mounting base is installed on the door magnets to hold the doors in the opposite direction. 2. B B A C C A A. Door...


