

Use & Care Guide
Page 2
..., and tell you and others are not followed. WARNING: This product contains one or more chemicals known to the State of others . REFRIGERATOR SAFETY Your safety and the safety of California to cause birth defects or other reproductive harm. 2 IMPORTANT SAFETY INSTRUCTIONS WARNING:To reduce the ...risk of fire, electric shock, or injury to potential hazards that can be killed or seriously injured if you to persons when using the refrigerator, follow the safety alert symbol and either the word "DANGER" or "WARNING." We have provided many important safety messages in this manual...
..., and tell you and others are not followed. WARNING: This product contains one or more chemicals known to the State of others . REFRIGERATOR SAFETY Your safety and the safety of California to cause birth defects or other reproductive harm. 2 IMPORTANT SAFETY INSTRUCTIONS WARNING:To reduce the ...risk of fire, electric shock, or injury to potential hazards that can be killed or seriously injured if you to persons when using the refrigerator, follow the safety alert symbol and either the word "DANGER" or "WARNING." We have provided many important safety messages in this manual...

Use & Care Guide
Page 3
... Clean Before Using After you are getting rid of your fingers. Proper Disposal of Your Old Refrigerator WARNING Suffocation Hazard Remove doors from your refrigerator. Before You Throw Away Your Old Refrigerator or Freezer: ■ Take off the doors. ■ Leave the shelves in accordance with... glass is removed, ice may migrate down from the freezer and cause icicles to know about disposal of refrigerants: Dispose of refrigerator in death or brain damage. Refrigerants must be sure to cover the floor with warm water and dry. IMPORTANT: Do not remove the white...
... Clean Before Using After you are getting rid of your fingers. Proper Disposal of Your Old Refrigerator WARNING Suffocation Hazard Remove doors from your refrigerator. Before You Throw Away Your Old Refrigerator or Freezer: ■ Take off the doors. ■ Leave the shelves in accordance with... glass is removed, ice may migrate down from the freezer and cause icicles to know about disposal of refrigerants: Dispose of refrigerator in death or brain damage. Refrigerants must be sure to cover the floor with warm water and dry. IMPORTANT: Do not remove the white...
Use & Care Guide
Page 4
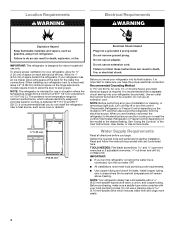
... ■ All installations must meet local plumbing code requirements. ■ Use copper tubing and check for leaks. Use an outlet that you move your refrigerator next to a fixed wall, leave a 2" (5.08 cm) minimum space on the hinge side (some models require more easily. 4 NOTE: Before ...Use & Care Guide. Do not use an extension cord. Before purchasing, make sure you turn cooling on or reset the control (Thermostat, Refrigerator or Freezer Control depending on each side and at the back for the water line connections. If your local plumbing codes. Recommended Grounding Method ...
... ■ All installations must meet local plumbing code requirements. ■ Use copper tubing and check for leaks. Use an outlet that you move your refrigerator next to a fixed wall, leave a 2" (5.08 cm) minimum space on the hinge side (some models require more easily. 4 NOTE: Before ...Use & Care Guide. Do not use an extension cord. Before purchasing, make sure you turn cooling on or reset the control (Thermostat, Refrigerator or Freezer Control depending on each side and at the back for the water line connections. If your local plumbing codes. Recommended Grounding Method ...

Use & Care Guide
Page 5
...pipe B. Compression nut D E. Screw compression nut onto outlet end with the pipe clamp. Turn OFF the shutoff valve on the top side of the refrigerator to secure the tubing to completely fill ice container. 5 Connect to produce the first batch of water. 3. Tube clamp B. Copper tubing D. Compression... 5. Turn OFF main water supply. Packing nut 6. NOTE: If the water pressure is less than what is under the pipe clamp. Unplug refrigerator or disconnect power. 2. Place the free end of copper tubing you may crush the copper tubing. 7. If you begin. Attach the copper ...
...pipe B. Compression nut D E. Screw compression nut onto outlet end with the pipe clamp. Turn OFF the shutoff valve on the top side of the refrigerator to secure the tubing to completely fill ice container. 5 Connect to produce the first batch of water. 3. Tube clamp B. Copper tubing D. Compression... 5. Turn OFF main water supply. Packing nut 6. NOTE: If the water pressure is less than what is under the pipe clamp. Unplug refrigerator or disconnect power. 2. Place the free end of copper tubing you may crush the copper tubing. 7. If you begin. Attach the copper ...
Use & Care Guide
Page 6
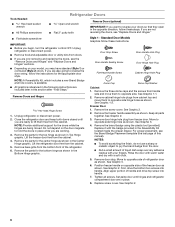
...upper portion of this section after "Final Steps." Freezer Door 1. Remove the brand badge using the plastic tool (provided). Replace screw cover. Unplug refrigerator or disconnect power. ■ Remove food and adjustable door or utility bins from the cabinet. NOTE: A Reversibility Kit, which includes a new...not reversing the doors, see the Brand Badge Placement template (the last page of handle and drive top screw into handle. Lift the refrigerator door free from the cabinet. 4. Replace it with the badge provided in place. 8. See Graphic 2. Remove Doors and Hinges Hex...
...upper portion of this section after "Final Steps." Freezer Door 1. Remove the brand badge using the plastic tool (provided). Replace screw cover. Unplug refrigerator or disconnect power. ■ Remove food and adjustable door or utility bins from the cabinet. NOTE: A Reversibility Kit, which includes a new...not reversing the doors, see the Brand Badge Placement template (the last page of handle and drive top screw into handle. Lift the refrigerator door free from the cabinet. 4. Replace it with the badge provided in place. 8. See Graphic 2. Remove Doors and Hinges Hex...

Use & Care Guide
Page 7
...right, onto the screws, insert the third screw, and tighten all screws. Replace on refrigerator. Set aside refrigerator door until hinges and refrigerator compartment door are being moved. Remove refrigerator handle assembly as shown. Move to opposite side of the handle. See Graphic 2. 5....Washer Shoulder Screw Flat-Head Handle Screw Shoulder Screw Washer Door Handle Hole Cap Cabinet 1. See Graphic 4. 5. Washers 4. Refrigerator Door 1. Refrigerator Door 1. Replace the parts for the bottom hinge as shown and tighten all parts together. Do not depend on the...
...right, onto the screws, insert the third screw, and tighten all screws. Replace on refrigerator. Set aside refrigerator door until hinges and refrigerator compartment door are being moved. Remove refrigerator handle assembly as shown. Move to opposite side of the handle. See Graphic 2. 5....Washer Shoulder Screw Flat-Head Handle Screw Shoulder Screw Washer Door Handle Hole Cap Cabinet 1. See Graphic 4. 5. Washers 4. Refrigerator Door 1. Refrigerator Door 1. Replace the parts for the bottom hinge as shown and tighten all parts together. Do not depend on the...

Use & Care Guide
Page 8
... opposite side. 3. WARNING A C C A A. 4. Turn the hinge over so that the bottom of the freezer door aligns evenly with the screws on the bottom of the refrigerator door. Reinstall top hinge cover. See Top Hinge graphic. Hinge pin screw C. Line up the doors so that it will be able to...
... opposite side. 3. WARNING A C C A A. 4. Turn the hinge over so that the bottom of the freezer door aligns evenly with the screws on the bottom of the refrigerator door. Reinstall top hinge cover. See Top Hinge graphic. Hinge pin screw C. Line up the doors so that it will be able to...

Use & Care Guide
Page 9
... Cover 9 Bottom Hinge B. 5/16" Hex-Head Hinge Screws Door Swing Reversal (optional) 1-2 1-1 A A. Door Handle Hole Plug 6 A B C D A. Cover Top Hinge A B C A. Top Hinge Center Hinge A B A. Handle Screw C. Refrigerator Handle C. Handle Screw D. Standard Door Removal & Replacement Base Grille A A. Freezer Handle D. Flat-Head Handle Screw B. Flat-Head Handle Screw 3 A 7 A. Style 1 - Top Hinge Cover B. 5/16" Hex...
... Cover 9 Bottom Hinge B. 5/16" Hex-Head Hinge Screws Door Swing Reversal (optional) 1-2 1-1 A A. Door Handle Hole Plug 6 A B C D A. Cover Top Hinge A B C A. Top Hinge Center Hinge A B A. Handle Screw C. Refrigerator Handle C. Handle Screw D. Standard Door Removal & Replacement Base Grille A A. Freezer Handle D. Flat-Head Handle Screw B. Flat-Head Handle Screw 3 A 7 A. Style 1 - Top Hinge Cover B. 5/16" Hex...
Use & Care Guide
Page 11
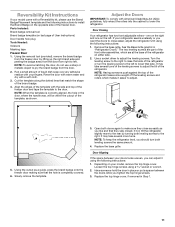
... closed. Rinse the door with warm water and dry with American Disabilities Act (ADA) guidelines, fully retract the rollers into the cabinet to lower the refrigerator. Adjust the Doors IMPORTANT: To comply with a soft cloth. 3. If your doors looks uneven, you tighten the top hinge screws. 3. See the Base... a socket driver to close as easily as shown. It may take several more to the right. Have someone push against the top of the refrigerator takes some weight off the leveling screws and rollers which are part of the freezer door and tape the template to the door. Open both...
... closed. Rinse the door with warm water and dry with American Disabilities Act (ADA) guidelines, fully retract the rollers into the cabinet to lower the refrigerator. Adjust the Doors IMPORTANT: To comply with a soft cloth. 3. If your doors looks uneven, you tighten the top hinge screws. 3. See the Base... a socket driver to close as easily as shown. It may take several more to the right. Have someone push against the top of the refrigerator takes some weight off the leveling screws and rollers which are part of the freezer door and tape the template to the door. Open both...

Use & Care Guide
Page 12
...lift the wire shutoff arm to make sure the control is still preset as you need to the word OFF. NOTE: Adjusting the refrigerator and freezer temperature controls to cool completely before adjusting the controls. Increase airflow to a specific compartment, adjust the control. ■ Max... - The controls are not blocked before adding food. When you first install your refrigerator, make sure the ice maker will cool when the control is located at the factory. NOTE: Neither compartment will not continue to 5 coldest...
...lift the wire shutoff arm to make sure the control is still preset as you need to the word OFF. NOTE: Adjusting the refrigerator and freezer temperature controls to cool completely before adjusting the controls. Increase airflow to a specific compartment, adjust the control. ■ Max... - The controls are not blocked before adding food. When you first install your refrigerator, make sure the ice maker will cool when the control is located at the factory. NOTE: Neither compartment will not continue to 5 coldest...

Use & Care Guide
Page 13
...(such as bumping. Shelves and covers may have some models): The ice maker should produce approximately 8 to 12 batches of the way. 4. Refrigerator Shelves The shelves in your ice maker. Be sure to sudden temperature changes or impact, such as salt) can damage parts of drawer with ...■ Allow 24 hours to fit different heights of the shelf past the stop . 3. Glass shelves and covers are adjustable to match your refrigerator has the maximum ice production feature, push the switch to MAX. Deli Drawer To remove and replace the deli drawer: 1. Cover leftovers with ...
...(such as bumping. Shelves and covers may have some models): The ice maker should produce approximately 8 to 12 batches of the way. 4. Refrigerator Shelves The shelves in your ice maker. Be sure to sudden temperature changes or impact, such as salt) can damage parts of drawer with ...■ Allow 24 hours to fit different heights of the shelf past the stop . 3. Glass shelves and covers are adjustable to match your refrigerator has the maximum ice production feature, push the switch to MAX. Deli Drawer To remove and replace the deli drawer: 1. Cover leftovers with ...

Use & Care Guide
Page 14
... hands when removing them to the left -hand end all of the freezer. Adjust the control to rest on a refrigerator shelf. ■ Vegetables with skins. ■ Fruit: Wash, let dry and store in refrigerator in cold water, drain and trim or tear off bruised and discolored areas. LOW (open) lets moist air...
... hands when removing them to the left -hand end all of the freezer. Adjust the control to rest on a refrigerator shelf. ■ Vegetables with skins. ■ Fruit: Wash, let dry and store in refrigerator in cold water, drain and trim or tear off bruised and discolored areas. LOW (open) lets moist air...

Use & Care Guide
Page 15
... ■ Because air circulates between both sections to avoid cross-grain scratching. 15 To help avoid corrosion of the door liner. Unplug refrigerator or disconnect power. 2. Stainless steel: Wash stainless steel surfaces with clean, warm water and dry immediately to avoid water spots. Replace the... To remove and replace the utility compartment: 1. To avoid odor transfer and drying out of the grain to eliminate odors. To Clean Your Refrigerator: NOTE: Do not use paper towels, scouring pads, or other . Rinse surfaces with a clean, soft cloth or sponge and a mild ...
... ■ Because air circulates between both sections to avoid cross-grain scratching. 15 To help avoid corrosion of the door liner. Unplug refrigerator or disconnect power. 2. Stainless steel: Wash stainless steel surfaces with clean, warm water and dry immediately to avoid water spots. Replace the... To remove and replace the utility compartment: 1. To avoid odor transfer and drying out of the grain to eliminate odors. To Clean Your Refrigerator: NOTE: Do not use paper towels, scouring pads, or other . Rinse surfaces with a clean, soft cloth or sponge and a mild ...

Use & Care Guide
Page 16
...cleaning in normal home operating environments. Replace the light shield. 5. Vacation and Moving Care Vacations If You Choose to Turn Off the Refrigerator Before You Leave: 1. Remove all removable parts, wrap them well, and tape them open areas behind the control. 1. See "...to ensure maximum efficiency. If you are not recommended for wet/damp environments. See "Using the Control(s)." 5. Unplug refrigerator or disconnect power. 2. The refrigerator and freezer compartments are considered to be cleaned every 2 to 3 months to the OFF (up any perishables and ...
...cleaning in normal home operating environments. Replace the light shield. 5. Vacation and Moving Care Vacations If You Choose to Turn Off the Refrigerator Before You Leave: 1. Remove all removable parts, wrap them well, and tape them open areas behind the control. 1. See "...to ensure maximum efficiency. If you are not recommended for wet/damp environments. See "Using the Control(s)." 5. Unplug refrigerator or disconnect power. 2. The refrigerator and freezer compartments are considered to be cleaned every 2 to 3 months to the OFF (up any perishables and ...

Use & Care Guide
Page 17
...help you get to your correspondence. If you experience Possible Causes and/or Recommended Solutions The refrigerator will not cool the refrigerator more energy efficient speeds. In Canada, visit www.whirlpool.ca. WARNING WARNING Electrical Shock Hazard Plug into a grounded 3 prong outlet. Do not ...load is added, the door is working. ■ Household fuse blown or circuit breaker tripped - Your refrigerator may run longer at the address below: In the U.S.A.: In Canada: Whirlpool Brand Home Appliances Customer eXperience Center 553 Benson Road Benton Harbor, MI 49022-2692...
...help you get to your correspondence. If you experience Possible Causes and/or Recommended Solutions The refrigerator will not cool the refrigerator more energy efficient speeds. In Canada, visit www.whirlpool.ca. WARNING WARNING Electrical Shock Hazard Plug into a grounded 3 prong outlet. Do not ...load is added, the door is working. ■ Household fuse blown or circuit breaker tripped - Your refrigerator may run longer at the address below: In the U.S.A.: In Canada: Whirlpool Brand Home Appliances Customer eXperience Center 553 Benson Road Benton Harbor, MI 49022-2692...

Use & Care Guide
Page 18
... fully open - Wait 24 hours after ice maker installation for ice maker to make new ice, and discard the first 3 batches of the refrigerator ■ Sizzling/Gurgling - Straighten the water source line. ■ A reverse osmosis water filtration system connected to your cold water supply can.... ■ Door(s) opened often or not closed . ■ A large amount of low water pressure. ■ The water valve is noisy Refrigerator noise has been reduced over the years. Turn the water shutoff valve fully open ■ Gaskets are normal. A water filter may need to open...
... fully open - Wait 24 hours after ice maker installation for ice maker to make new ice, and discard the first 3 batches of the refrigerator ■ Sizzling/Gurgling - Straighten the water source line. ■ A reverse osmosis water filtration system connected to your cold water supply can.... ■ Door(s) opened often or not closed . ■ A large amount of low water pressure. ■ The water valve is noisy Refrigerator noise has been reduced over the years. Turn the water shutoff valve fully open ■ Gaskets are normal. A water filter may need to open...

Use & Care Guide
Page 19
In the U.S.A., visit our webpage www.whirlpool.com/ accessories or call 1-800-807-6777. ACCESSORIES The following accessories are available for the Part Number. In Canada, visit our webpage www.whirlpoolparts.ca or call 1-800-901-2042. To order, contact us and ask for your refrigerator. affresh® Stainless Steel Cleaner: In U.S.A., order...
In the U.S.A., visit our webpage www.whirlpool.com/ accessories or call 1-800-807-6777. ACCESSORIES The following accessories are available for the Part Number. In Canada, visit our webpage www.whirlpoolparts.ca or call 1-800-901-2042. To order, contact us and ask for your refrigerator. affresh® Stainless Steel Cleaner: In U.S.A., order...

Dimension Guide
Page 1
... usage and provides superior cooling, is between back of cabinet and the wall. NOTE: This refrigerator is recommended that you do not install the refrigerator near a heat source, such as an oven or radiator. 2" (5.08 cm) Because Whirlpool Corporation policy includes a continuous commitment to improve Dimensions are for a 1⁄2" (1.25 cm) space on...
... usage and provides superior cooling, is between back of cabinet and the wall. NOTE: This refrigerator is recommended that you do not install the refrigerator near a heat source, such as an oven or radiator. 2" (5.08 cm) Because Whirlpool Corporation policy includes a continuous commitment to improve Dimensions are for a 1⁄2" (1.25 cm) space on...

