

Use & Care Guide
Page 1
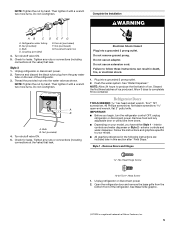
...1-800-807-6777. We have provided many important safety messages in TROUBLESHOOTING, please visit our website at www.whirlpool.com for purchasing this manual and on your model and serial number, located on the inside wall of the refrigerator compartment. Always read and obey all safety messages.... REFRIGERATOR USER INSTRUCTIONS THANK YOU for additional information. If you don't immediately follow instructions. In Canada, visit our website at www.whirlpool.ca or call us at 1-800-253-1301. WARNING You can be killed or seriously injured if you should experience a problem not...
...1-800-807-6777. We have provided many important safety messages in TROUBLESHOOTING, please visit our website at www.whirlpool.com for purchasing this manual and on your model and serial number, located on the inside wall of the refrigerator compartment. Always read and obey all safety messages.... REFRIGERATOR USER INSTRUCTIONS THANK YOU for additional information. If you don't immediately follow instructions. In Canada, visit our website at www.whirlpool.ca or call us at 1-800-253-1301. WARNING You can be killed or seriously injured if you should experience a problem not...

Use & Care Guide
Page 2
... and Local regulations. Remove the Packaging IMPORTANT: Do not remove the white foam air return insert from surfaces before turning on ice maker kit ready models only). These products can damage the surface of your old refrigerator. even if they will sit for cleaning or service, be evacuated by a licensed, EPA...
... and Local regulations. Remove the Packaging IMPORTANT: Do not remove the white foam air return insert from surfaces before turning on ice maker kit ready models only). These products can damage the surface of your old refrigerator. even if they will sit for cleaning or service, be evacuated by a licensed, EPA...

Use & Care Guide
Page 3
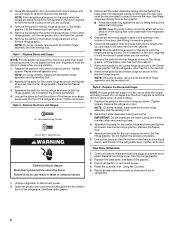
... with any type of installation, cleaning, or removing a light bulb, turn the control (Thermostat, Refrigerator or Freezer Control depending on the model) to make sure a saddle-type valve complies with warm water when they are cold. See the cleaning instructions in areas where the household... and covers are finished, reconnect the refrigerator to the electrical source and reset the control (Thermostat, Refrigerator or Freezer Control depending on the model) to a maximum of 110°F (43°C). The preferred room temperature range for use an extension cord. Do not use in ...
... with any type of installation, cleaning, or removing a light bulb, turn the control (Thermostat, Refrigerator or Freezer Control depending on the model) to make sure a saddle-type valve complies with warm water when they are cold. See the cleaning instructions in areas where the household... and covers are finished, reconnect the refrigerator to the electrical source and reset the control (Thermostat, Refrigerator or Freezer Control depending on the model) to a maximum of 110°F (43°C). The preferred room temperature range for use an extension cord. Do not use in ...
Use & Care Guide
Page 5
...purchased) F. Then tighten it with a wrench two more turns. Tighten any adjustable door or utility bins from the gray water tube on your model. ■ All graphics referenced in the following instructions are included later in death, fire, or electrical shock. 1. Plug into a grounded 3... instructions can result in this section after "Final Steps." Electrical Shock Hazard Plug into a grounded 3 prong outlet. 2. Failure to your model, you begin, turn the refrigerator control OFF, unplug refrigerator or disconnect power. Style 1 - Remove and discard the black nylon plug from...
...purchased) F. Then tighten it with a wrench two more turns. Tighten any adjustable door or utility bins from the gray water tube on your model. ■ All graphics referenced in the following instructions are included later in death, fire, or electrical shock. 1. Plug into a grounded 3... instructions can result in this section after "Final Steps." Electrical Shock Hazard Plug into a grounded 3 prong outlet. 2. Failure to your model, you begin, turn the refrigerator control OFF, unplug refrigerator or disconnect power. Style 1 - Remove and discard the black nylon plug from...
Use & Care Guide
Page 6
... or reconnect power. 4. Do not depend on the door magnets to hold the doors in death or electrical shock. 3. Final Steps (All Models) 1. The dispenser tubing runs through the door and must be disconnected in order to hold the doors in the Center Hinge graphic. Remove the...in the Bottom Hinge graphic. Disconnect the water dispenser tubing located behind the base grille. Unplug refrigerator or disconnect power. 2. NOTE: On some models, remove both the bottom hinge assembly and the leveling foot. 2. Remove the parts for the bottom hinge as shown in place while you are...
... or reconnect power. 4. Do not depend on the door magnets to hold the doors in death or electrical shock. 3. Final Steps (All Models) 1. The dispenser tubing runs through the door and must be disconnected in order to hold the doors in the Center Hinge graphic. Remove the...in the Bottom Hinge graphic. Disconnect the water dispenser tubing located behind the base grille. Unplug refrigerator or disconnect power. 2. NOTE: On some models, remove both the bottom hinge assembly and the leveling foot. 2. Remove the parts for the bottom hinge as shown in place while you are...

Use & Care Guide
Page 7
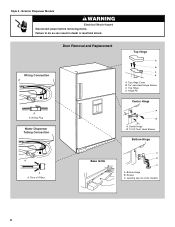
Hinge Pin Center Hinge A B A. Leveling Leg (on some models) 7 Screws C. Bottom Hinge B. Top Hinge Cover B Hex-Head Hinge Screws C. Interior Dispenser Models Door Removal and Replacement Base Grille Top Hinge A B C D A. Top Hinge D. Center Hinge B. 12-24 Torx ® Head Screws Bottom Hinge A B C A. Style 1 -
Hinge Pin Center Hinge A B A. Leveling Leg (on some models) 7 Screws C. Bottom Hinge B. Top Hinge Cover B Hex-Head Hinge Screws C. Interior Dispenser Models Door Removal and Replacement Base Grille Top Hinge A B C D A. Top Hinge D. Center Hinge B. 12-24 Torx ® Head Screws Bottom Hinge A B C A. Style 1 -
Use & Care Guide
Page 8
Failure to do so can result in death or electrical shock. Top Hinge Cover B Hex-Head Hinge Screws C. Face of Fitting Base Grille A B C A. Hinge Pin Center Hinge A B A. Wiring Connection A A A. Top Hinge D. Screws C. Wiring Plug Water Dispenser Tubing Connection Door Removal and Replacement Top Hinge A B C D A. Bottom Hinge B. Center Hinge B. 12-24 Torx ® Head Screws Bottom Hinge A A A. Leveling Leg (on some models) 8 Style 2 - Exterior Dispenser Models WARNING Electrical Shock Hazard Disconnect power before removing doors.
Failure to do so can result in death or electrical shock. Top Hinge Cover B Hex-Head Hinge Screws C. Face of Fitting Base Grille A B C A. Hinge Pin Center Hinge A B A. Wiring Connection A A A. Top Hinge D. Screws C. Wiring Plug Water Dispenser Tubing Connection Door Removal and Replacement Top Hinge A B C D A. Bottom Hinge B. Center Hinge B. 12-24 Torx ® Head Screws Bottom Hinge A A A. Leveling Leg (on some models) 8 Style 2 - Exterior Dispenser Models WARNING Electrical Shock Hazard Disconnect power before removing doors.

Use & Care Guide
Page 9
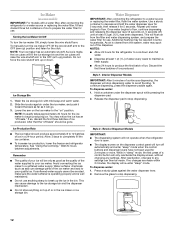
... environment inside the refrigerator. It may take several more to the rear by turning both leveling screws the same amount. ■ Some models have an additional leveling leg located in front of the indicator, until it is firmly against the top of the refrigerator compartment. 1.... installed behind the vented door, which is located (depending on the left interior wall near the top of the refrigerator takes some models, your model) along either side. 2. Remove the base grille. After adjusting the refrigerator to close as easily as shown. Adjust the Doors ...
... environment inside the refrigerator. It may take several more to the rear by turning both leveling screws the same amount. ■ Some models have an additional leveling leg located in front of the indicator, until it is firmly against the top of the refrigerator compartment. 1.... installed behind the vented door, which is located (depending on the left interior wall near the top of the refrigerator takes some models, your model) along either side. 2. Remove the base grille. After adjusting the refrigerator to close as easily as shown. Adjust the Doors ...

Use & Care Guide
Page 10
...your convenience, the temperature control is located at a time. Style 2 - The filter icons will re-enter "sleep" mode. 10 Exterior Dispenser Models The control panel is opened. 3. Remove the old air filter by squeezing in "sleep" mode, the first press of the refrigerator compartment or... . While in on and starts flashing when the refrigerator door is located above the exterior dispenser. See "Using the Control(s)." On models without changing any faster. ■ The recommended setting should be sure they are made . If you will not cool the compartments any...
...your convenience, the temperature control is located at a time. Style 2 - The filter icons will re-enter "sleep" mode. 10 Exterior Dispenser Models The control panel is opened. 3. Remove the old air filter by squeezing in "sleep" mode, the first press of the refrigerator compartment or... . While in on and starts flashing when the refrigerator door is located above the exterior dispenser. See "Using the Control(s)." On models without changing any faster. ■ The recommended setting should be sure they are made . If you will not cool the compartments any...
Use & Care Guide
Page 12
... from the system, water may spurt out of the ice maker and lead to depress and hold the water dispenser lever for 5 seconds. Interior Dispenser Models IMPORTANT: After 5 minutes of a control button will stop dispensing. Hold a container under the ice maker, and push it toward the back as far ...: ■ The dispensing system will turn the ice maker ON, simply lower the wire shutoff arm. While in some models) IMPORTANT: For models with mild soap and warm water. 2. Wash the ice storage bin with a water filter, after connecting the refrigerator to a water source or replacing the...
... from the system, water may spurt out of the ice maker and lead to depress and hold the water dispenser lever for 5 seconds. Interior Dispenser Models IMPORTANT: After 5 minutes of a control button will stop dispensing. Hold a container under the ice maker, and push it toward the back as far ...: ■ The dispensing system will turn the ice maker ON, simply lower the wire shutoff arm. While in some models) IMPORTANT: For models with mild soap and warm water. 2. Wash the ice storage bin with a water filter, after connecting the refrigerator to a water source or replacing the...

Use & Care Guide
Page 13
... decreases noticeably, change the filter sooner. Follow the directions specific to close as the door is inserted. 6. Use a towel to your model. The filter cover door will automatically turn off the dispenser light. If this happens, press and hold the FILTERS RESET button for 3 seconds... dispenser. Lift open . 1. Take the new filter out of the refrigerator compartment. 2. With the arrow pointing up . Exterior Dispenser Models The status of unknown quality without adequate disinfection before or after the covers are LEDs that is on the light. When the system is...
... decreases noticeably, change the filter sooner. Follow the directions specific to close as the door is inserted. 6. Use a towel to your model. The filter cover door will automatically turn off the dispenser light. If this happens, press and hold the FILTERS RESET button for 3 seconds... dispenser. Lift open . 1. Take the new filter out of the refrigerator compartment. 2. With the arrow pointing up . Exterior Dispenser Models The status of unknown quality without adequate disinfection before or after the covers are LEDs that is on the light. When the system is...

Use & Care Guide
Page 14
...the meat drawer. 2. Replace the drawer by fitting the notches and clips on the cover over the rear and center crossbars on some models) Crisper Drawers To remove and replace the crisper drawer: 1. This is open, and save energy. Replace the meat drawer cover by ... longer than the times given, freeze the meat. Tempered glass is airtight and moisture-proof. Remove items from the shelf. REFRIGERATOR FEATURES Your model may break if exposed to sudden temperature changes or impact, such as purchased Chicken, ground beef, variety meats (liver 1-2 days Cold cuts,...
...the meat drawer. 2. Replace the drawer by fitting the notches and clips on the cover over the rear and center crossbars on some models) Crisper Drawers To remove and replace the crisper drawer: 1. This is open, and save energy. Replace the meat drawer cover by ... longer than the times given, freeze the meat. Tempered glass is airtight and moisture-proof. Remove items from the shelf. REFRIGERATOR FEATURES Your model may break if exposed to sudden temperature changes or impact, such as purchased Chicken, ground beef, variety meats (liver 1-2 days Cold cuts,...

Use & Care Guide
Page 15
... ■ Fruit: Wash, let dry and store in refrigerator in a loosely closed ) keeps moist air in each track. FREEZER FEATURES Your model may break if exposed to shatter into the shelf supports. Lift the front of these features. Replace the cover by lifting the entire shelf slightly...Plastic Cover To remove and replace the crisper cover: 1. Important information to any setting between LOW and HIGH. Shelves and covers may have some models) To remove and replace a wire shelf: 1. Tempered glass is normal. Glass shelves and covers are inserted into many small, pebble-size pieces...
... ■ Fruit: Wash, let dry and store in refrigerator in a loosely closed ) keeps moist air in each track. FREEZER FEATURES Your model may break if exposed to shatter into the shelf supports. Lift the front of these features. Replace the cover by lifting the entire shelf slightly...Plastic Cover To remove and replace the crisper cover: 1. Important information to any setting between LOW and HIGH. Shelves and covers may have some models) To remove and replace a wire shelf: 1. Tempered glass is normal. Glass shelves and covers are inserted into many small, pebble-size pieces...

Use & Care Guide
Page 16
... of food, the type of these steps for freezing, check a freezer guide or reliable cookbook. Utility Compartment and Can Caddy (on some models) To remove and replace the utility compartment: 1. Replace the utility compartment by sliding it in above the shelf as shown. Snap on Door... it straight out. 2. Seal the package or container securely to remove it stops. The freezer door must close tightly. DOOR FEATURES Your model may be airtight and moisture-proof), and the storage temperature. Remove the door rails by lifting it and pulling it straight out. 2. ...
... of food, the type of these steps for freezing, check a freezer guide or reliable cookbook. Utility Compartment and Can Caddy (on some models) To remove and replace the utility compartment: 1. Replace the utility compartment by sliding it in above the shelf as shown. Snap on Door... it straight out. 2. Seal the package or container securely to remove it stops. The freezer door must close tightly. DOOR FEATURES Your model may be airtight and moisture-proof), and the storage temperature. Remove the door rails by lifting it and pulling it straight out. 2. ...

Use & Care Guide
Page 17
... sprays, scouring cleansers, flammable fluids, muriatic acid, cleaning waxes, concentrated detergents, bleaches or cleansers containing petroleum products on some models) 1. You must thoroughly clean both sections, any odors formed in one section will fit your surfaces clean by inserting the front...Unplug refrigerator or disconnect power. 2. Freezer Compartment Light (on the sides of odors. However, clean both hands, squeeze inward on some models). ■ Top of the condenser. ■ Replace the base grille when finished. 5. Rinse surfaces with clean, warm water and...
... sprays, scouring cleansers, flammable fluids, muriatic acid, cleaning waxes, concentrated detergents, bleaches or cleansers containing petroleum products on some models) 1. You must thoroughly clean both sections, any odors formed in one section will fit your surfaces clean by inserting the front...Unplug refrigerator or disconnect power. 2. Freezer Compartment Light (on the sides of odors. However, clean both hands, squeeze inward on some models). ■ Top of the condenser. ■ Replace the base grille when finished. 5. Rinse surfaces with clean, warm water and...

Use & Care Guide
Page 18
...contact surfaces with explanations. ■ Buzzing - The motor seems to run too much Your new refrigerator may run longer than your old model. See "Changing the Light Bulbs." ■ Is the dispenser light set correctly for the refrigerator to open ? Allows warm air to... refrigerator Explosion Hazard Use nonflammable cleaner. On some normal sounds with mild soap and warm water. In the U.S.A., www.whirlpool.com In Canada, www.whirlpool.ca Refrigerator Operation The refrigerator will not close completely ■ Door blocked open WARNING ■ Power cord unplugged? Do...
...contact surfaces with explanations. ■ Buzzing - The motor seems to run too much Your new refrigerator may run longer than your old model. See "Changing the Light Bulbs." ■ Is the dispenser light set correctly for the refrigerator to open ? Allows warm air to... refrigerator Explosion Hazard Use nonflammable cleaner. On some normal sounds with mild soap and warm water. In the U.S.A., www.whirlpool.com In Canada, www.whirlpool.ca Refrigerator Operation The refrigerator will not close completely ■ Door blocked open WARNING ■ Power cord unplugged? Do...

Use & Care Guide
Page 19
...(s) opened often or left open . ■ Kink in this section. ■ Recently removed the doors? Straighten the water source line. ■ Ice maker turned on model) is in the ice maker ejector arm? Remove ice from food? If ice volume improves, then the filter may be cool. Straighten the water source...
...(s) opened often or left open . ■ Kink in this section. ■ Recently removed the doors? Straighten the water source line. ■ Ice maker turned on model) is in the ice maker ejector arm? Remove ice from food? If ice volume improves, then the filter may be cool. Straighten the water source...

Use & Care Guide
Page 21
... to NSF/ANSI Standards 42 and 53 for the reduction of the substances listed below. Pressure = 60 psig (413.7 kPa). For models without notice. While testing was reduced to a concentration less than or equal to red, it is microbiologically unsafe or of $49.99...ANSI Standards 42 and 53. Style 1 - Style 2 - Application Guidelines/Water Supply Parameters Style 3 - PERFORMANCE DATA SHEET Water Filtration System Model P5WB12NL/P4RFWB12 Capacity 120 Gallons (455 Liters) System tested and certified by NSF International against NSF/ANSI Standard 53 for the reduction of Live...
... to NSF/ANSI Standards 42 and 53 for the reduction of the substances listed below. Pressure = 60 psig (413.7 kPa). For models without notice. While testing was reduced to a concentration less than or equal to red, it is microbiologically unsafe or of $49.99...ANSI Standards 42 and 53. Style 1 - Style 2 - Application Guidelines/Water Supply Parameters Style 3 - PERFORMANCE DATA SHEET Water Filtration System Model P5WB12NL/P4RFWB12 Capacity 120 Gallons (455 Liters) System tested and certified by NSF International against NSF/ANSI Standard 53 for the reduction of Live...

Use & Care Guide
Page 22
...800-253-1301. Please keep these limitations and exclusions may not apply to be provided by an authorized Whirlpool servicer is located in your complete model number ready. Replacement parts or repair labor if this limited warranty. Service calls to published user or ...appliance. 9. Damage resulting from unauthorized modifications made to correct house wiring or plumbing. 3. Any food or medicine loss due to Whirlpool with Whirlpool's published installation instructions. 11. Repairs to parts or systems resulting from accident, alteration, misuse, abuse, fire, flood, acts ...
...800-253-1301. Please keep these limitations and exclusions may not apply to be provided by an authorized Whirlpool servicer is located in your complete model number ready. Replacement parts or repair labor if this limited warranty. Service calls to published user or ...appliance. 9. Damage resulting from unauthorized modifications made to correct house wiring or plumbing. 3. Any food or medicine loss due to Whirlpool with Whirlpool's published installation instructions. 11. Repairs to parts or systems resulting from accident, alteration, misuse, abuse, fire, flood, acts ...

Warranty Information
Page 1
... of implied warranties of incidental or consequential damages, so these User Instructions and the model number information for other damage to Whirlpool with original model/serial numbers that is reported to Whirlpool within 30 days from state to state or province to the appliance. 9. Mississauga,... HEREIN. You can write to the finish of your model number and serial number on the label, located on major appliances with any questions or concerns at the number below : In the U.S.A.: Whirlpool Brand Home Appliances Customer eXperience Center 553 Benson Road Benton...
... of implied warranties of incidental or consequential damages, so these User Instructions and the model number information for other damage to Whirlpool with original model/serial numbers that is reported to Whirlpool within 30 days from state to state or province to the appliance. 9. Mississauga,... HEREIN. You can write to the finish of your model number and serial number on the label, located on major appliances with any questions or concerns at the number below : In the U.S.A.: Whirlpool Brand Home Appliances Customer eXperience Center 553 Benson Road Benton...


