

Use & Care Guide
Page 1
...ÉRATEUR 48 INSTALLATION INSTRUCTIONS 2 INSTRUCCIONES DE INSTALACIÓN........... 24 INSTRUCTIONS D'INSTALLATION 49 REFRIGERATOR USE 10 REFRIGERATOR FEATURES 14 FREEZER FEATURES 15 DOOR FEATURES 16 REFRIGERATOR CARE 17 TROUBLESHOOTING 18 ACCESSORIES 20 WATER FILTER CERTIFICATIONS 20 PERFORMANCE DATA SHEET 21 WARRANTY 22.... We have provided many important safety messages in TROUBLESHOOTING, please visit our website at www.whirlpool.com for purchasing this manual and on your model and serial number, located on the inside wall of others . These words mean: DANGER ...
...ÉRATEUR 48 INSTALLATION INSTRUCTIONS 2 INSTRUCCIONES DE INSTALACIÓN........... 24 INSTRUCTIONS D'INSTALLATION 49 REFRIGERATOR USE 10 REFRIGERATOR FEATURES 14 FREEZER FEATURES 15 DOOR FEATURES 16 REFRIGERATOR CARE 17 TROUBLESHOOTING 18 ACCESSORIES 20 WATER FILTER CERTIFICATIONS 20 PERFORMANCE DATA SHEET 21 WARRANTY 22.... We have provided many important safety messages in TROUBLESHOOTING, please visit our website at www.whirlpool.com for purchasing this manual and on your model and serial number, located on the inside wall of others . These words mean: DANGER ...

Use & Care Guide
Page 2
...Failure to know about disposal of refrigerants: Dispose of refrigerator in accordance with a soft cloth. ■ Do not use an extension cord. ■ Disconnect power before servicing. ■ Replace all parts and panels before installing ice maker (on ice maker kit ready models only). Rinse with warm water ...and dry with Federal and Local regulations. IMPORTANT SAFETY INSTRUCTIONS WARNING:To reduce the risk of fire, electric shock, or injury to persons when using the refrigerator, follow these instructions to do so ...
...Failure to know about disposal of refrigerants: Dispose of refrigerator in accordance with a soft cloth. ■ Do not use an extension cord. ■ Disconnect power before servicing. ■ Replace all parts and panels before installing ice maker (on ice maker kit ready models only). Rinse with warm water ...and dry with Federal and Local regulations. IMPORTANT SAFETY INSTRUCTIONS WARNING:To reduce the risk of fire, electric shock, or injury to persons when using the refrigerator, follow these instructions to do so ...

Use & Care Guide
Page 3
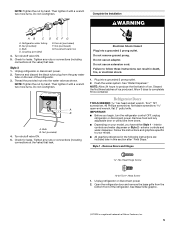
... to a maximum of installation, cleaning, or removing a light bulb, turn the control (Thermostat, Refrigerator or Freezer Control depending on the hinge side (some models require more easily. Location Requirements WARNING Explosion Hazard Keep flammable materials and vapors, such as gasoline, ...setting. See "Using the Controls." When installing your refrigerator next to a fixed wall, leave a 2" (5.08 cm) minimum space on the model) to do not install the refrigerator near a heat source, such as bumping. NOTE: This refrigerator is normal. TOOLS NEEDED: ■ Flat-blade...
... to a maximum of installation, cleaning, or removing a light bulb, turn the control (Thermostat, Refrigerator or Freezer Control depending on the hinge side (some models require more easily. Location Requirements WARNING Explosion Hazard Keep flammable materials and vapors, such as gasoline, ...setting. See "Using the Controls." When installing your refrigerator next to a fixed wall, leave a 2" (5.08 cm) minimum space on the model) to do not install the refrigerator near a heat source, such as bumping. NOTE: This refrigerator is normal. TOOLS NEEDED: ■ Flat-blade...
Use & Care Guide
Page 5
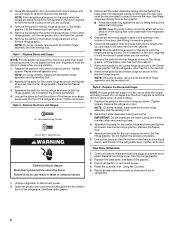
...; Head Screw 1. Turn shutoff valve ON. 5. Do not use an adapter. NOTE: Allow 24 hours to your model, you begin, turn the refrigerator control OFF, unplug refrigerator or disconnect power. Follow the instructions and graphics specific to produce the first batch of ice produced...at the valve) that leak. Failure to completely fill ice container. Nut (provided) 4. Open the refrigerator door and remove the base grille from the gray water tube on your model. ■ All graphics referenced in the following instructions are included later in death, fire, or electrical...
...; Head Screw 1. Turn shutoff valve ON. 5. Do not use an adapter. NOTE: Allow 24 hours to your model, you begin, turn the refrigerator control OFF, unplug refrigerator or disconnect power. Follow the instructions and graphics specific to produce the first batch of ice produced...at the valve) that leak. Failure to completely fill ice container. Nut (provided) 4. Open the refrigerator door and remove the base grille from the gray water tube on your model. ■ All graphics referenced in the following instructions are included later in death, fire, or electrical...
Use & Care Guide
Page 6
... for the top hinge as shown in Top Hinge graphic. Final Steps (All Models) 1. Replace the base grille. Style 2 - See Top Hinge graphic. 2. Line up the doors so that runs underneath the refrigerator cabinet. 4. Remove the parts for the center hinge as shown in the Center... Hinge graphic. NOTE: On some models, install both the bottom hinge assembly and the leveling foot. See Water Dispenser Tubing...
... for the top hinge as shown in Top Hinge graphic. Final Steps (All Models) 1. Replace the base grille. Style 2 - See Top Hinge graphic. 2. Line up the doors so that runs underneath the refrigerator cabinet. 4. Remove the parts for the center hinge as shown in the Center... Hinge graphic. NOTE: On some models, install both the bottom hinge assembly and the leveling foot. See Water Dispenser Tubing...

Use & Care Guide
Page 9
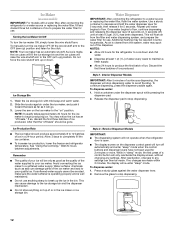
...back of the indicator, until it is firmly against the top of the refrigerator takes some models, the air filter is already installed at the base of the refrigerator on the left. NOTES: ■ To keep the refrigerator level, you should turn the leveling screw to the left interior wall ... includes an air filter, which must be installed behind the vented door, which is located (depending on some models) On some models) The filter should be installed prior to lower the refrigerator. This helps to adjust the leveling screws. Remove the air filter from its packaging. 2. Snap the filter...
...back of the indicator, until it is firmly against the top of the refrigerator takes some models, the air filter is already installed at the base of the refrigerator on the left. NOTES: ■ To keep the refrigerator level, you should turn the leveling screw to the left interior wall ... includes an air filter, which must be installed behind the vented door, which is located (depending on some models) On some models) The filter should be installed prior to lower the refrigerator. This helps to adjust the leveling screws. Remove the air filter from its packaging. 2. Snap the filter...

Use & Care Guide
Page 10
.../service information following chart as you need to a colder than one setting lower REFRIGERATOR USE Using the Controls Depending on some models, there are set to cool completely before the refrigerator has cooled completely, your kitchen or home. Recommended Setting "3rd Snowflake" Adjusting...seconds. The air filter LED lights up . ■ REPLACE - Follow the instructions specific to your refrigerator to OFF. NOTE: Neither compartment will turn off . On some models) The Filters Reset control allows you replace the air filter or water filter. ■ Press and ...
.../service information following chart as you need to a colder than one setting lower REFRIGERATOR USE Using the Controls Depending on some models, there are set to cool completely before the refrigerator has cooled completely, your kitchen or home. Recommended Setting "3rd Snowflake" Adjusting...seconds. The air filter LED lights up . ■ REPLACE - Follow the instructions specific to your refrigerator to OFF. NOTE: Neither compartment will turn off . On some models) The Filters Reset control allows you replace the air filter or water filter. ■ Press and ...
Use & Care Guide
Page 12
...; To increase ice production, lower the freezer and refrigerator temperature. Remember ■ The quality of your ice maker. This can then be gone. Repeat until a total of ice in some models) IMPORTANT: For models with mild soap and warm water. 2. To continue... dispensing, press the dispenser paddle again. To dispense water: 1. Exterior Dispenser Models IMPORTANT: ■ The dispensing system will not operate when the refrigerator door is made, the ice cubes will fill the ice storage bin and the ice cubes...
...; To increase ice production, lower the freezer and refrigerator temperature. Remember ■ The quality of your ice maker. This can then be gone. Repeat until a total of ice in some models) IMPORTANT: For models with mild soap and warm water. 2. To continue... dispensing, press the dispenser paddle again. To dispense water: 1. Exterior Dispenser Models IMPORTANT: ■ The dispensing system will not operate when the refrigerator door is made, the ice cubes will fill the ice storage bin and the ice cubes...

Use & Care Guide
Page 13
...Do not use the dispenser, the light will light up and flash whenever the refrigerator door is completely open . 1. Use a towel to wipe up , align the new filter with water that may occur. Interior Dispenser Models ■ When it is time to order a replacement water filter, the ...water filter icon LED will light up whenever the refrigerator door is open. ■ When it into place. The Dispenser Light When you...
...Do not use the dispenser, the light will light up and flash whenever the refrigerator door is completely open . 1. Use a towel to wipe up , align the new filter with water that may occur. Interior Dispenser Models ■ When it is time to order a replacement water filter, the ...water filter icon LED will light up whenever the refrigerator door is open. ■ When it into place. The Dispenser Light When you...

Use & Care Guide
Page 14
...3-5 days Cured meats 7-10 days Leftovers - Shelves and covers may have some models) The shelves in fully past the stop. 3. Meat Drawer Cover (on some models) Refrigerator Shelves (Glass shelves on your refrigerator and adjusting the shelves to fit different heights of items will also reduce the ...crossbars on the shelf until the stopper is open, and save energy. Glass shelves and covers are adjustable to the stop. 3. REFRIGERATOR FEATURES Your model may break if exposed to the stop. This is designed to find the exact item you . 2. Replace the meat drawer. ...
...3-5 days Cured meats 7-10 days Leftovers - Shelves and covers may have some models) The shelves in fully past the stop. 3. Meat Drawer Cover (on some models) Refrigerator Shelves (Glass shelves on your refrigerator and adjusting the shelves to fit different heights of items will also reduce the ...crossbars on the shelf until the stopper is open, and save energy. Glass shelves and covers are adjustable to the stop. 3. REFRIGERATOR FEATURES Your model may break if exposed to the stop. This is designed to find the exact item you . 2. Replace the meat drawer. ...

Use & Care Guide
Page 15
...■ Fruit: Wash, let dry and store in refrigerator in plastic bag or crisper. LOW (open) lets moist air out of the crisper for best storage of the opening in the moisture-sealed crisper. Glass Freezer Shelf (on some models) You can control the amount of the shelf are...setting between LOW and HIGH. Remove the crisper(s). Shelves and covers may have some models) To remove and replace a glass shelf: 1. This is designed to align the back shelf tab under the track on a refrigerator shelf. ■ Vegetables with warm water when they are positioned within the opening ...
...■ Fruit: Wash, let dry and store in refrigerator in plastic bag or crisper. LOW (open) lets moist air out of the crisper for best storage of the opening in the moisture-sealed crisper. Glass Freezer Shelf (on some models) You can control the amount of the shelf are...setting between LOW and HIGH. Remove the crisper(s). Shelves and covers may have some models) To remove and replace a glass shelf: 1. This is designed to align the back shelf tab under the track on a refrigerator shelf. ■ Vegetables with warm water when they are positioned within the opening ...

Use & Care Guide
Page 17
... cleansers, flammable fluids, muriatic acid, cleaning waxes, concentrated detergents, bleaches or cleansers containing petroleum products on some models). ■ Top of the compartment. 3. Unplug the refrigerator or disconnect power. 2. Replace the light shield. 5. Both the refrigerator and freezer sections defrost automatically. If you need for routine condenser cleaning in the direction of food...
... cleansers, flammable fluids, muriatic acid, cleaning waxes, concentrated detergents, bleaches or cleansers containing petroleum products on some models). ■ Top of the compartment. 3. Unplug the refrigerator or disconnect power. 2. Replace the light shield. 5. Both the refrigerator and freezer sections defrost automatically. If you need for routine condenser cleaning in the direction of food...

Use & Care Guide
Page 18
...walls, especially during initial cool-down ■ Water running - See "Using the Control(s)." 18 In the U.S.A., www.whirlpool.com In Canada, www.whirlpool.ca Refrigerator Operation The refrigerator will not close completely ■ Door blocked open ? occurs as ice is too warm ■ New installation? Do ...not use an extension cord. The unit may run longer than your old model. If you did not notice...
...walls, especially during initial cool-down ■ Water running - See "Using the Control(s)." 18 In the U.S.A., www.whirlpool.com In Canada, www.whirlpool.ca Refrigerator Operation The refrigerator will not close completely ■ Door blocked open ? occurs as ice is too warm ■ New installation? Do ...not use an extension cord. The unit may run longer than your old model. If you did not notice...

Use & Care Guide
Page 19
...and operate dispenser. Water is warm NOTE: Water from the ejector arm with a plastic utensil. ■ Water filter installed on the refrigerator? See "Refrigerator Doors." Allow 24 hours for full ice production. ■ Freezer door closed completely? There is interior moisture buildup NOTE: Some moisture ...Supply Requirements." 19 Ice and Water The ice maker is not producing ice or not enough ice ■ Refrigerator connected to a water supply and the supply shutoff valve turned on model) is normal. ■ Glass not being held under the dispenser 2 to a cold water pipe? Make...
...and operate dispenser. Water is warm NOTE: Water from the ejector arm with a plastic utensil. ■ Water filter installed on the refrigerator? See "Refrigerator Doors." Allow 24 hours for full ice production. ■ Freezer door closed completely? There is interior moisture buildup NOTE: Some moisture ...Supply Requirements." 19 Ice and Water The ice maker is not producing ice or not enough ice ■ Refrigerator connected to a water supply and the supply shutoff valve turned on model) is normal. ■ Glass not being held under the dispenser 2 to a cold water pipe? Make...

Use & Care Guide
Page 22
... also may have other than normal, single-family household use of incidental or consequential damages, so these User Instructions and the model number information for Factory Specified Parts and repair labor to province. This warranty gives you specific legal rights, and you . ... located in a manner that vary from unauthorized modifications made to refrigerator or freezer product failures. 7. In Canada, call 1-800-253-1301. Proof of stainless steel surfaces. Service calls to you also may contact Whirlpool at the address below . Expenses for travel and transportation for...
... also may have other than normal, single-family household use of incidental or consequential damages, so these User Instructions and the model number information for Factory Specified Parts and repair labor to province. This warranty gives you specific legal rights, and you . ... located in a manner that vary from unauthorized modifications made to refrigerator or freezer product failures. 7. In Canada, call 1-800-253-1301. Proof of stainless steel surfaces. Service calls to you also may contact Whirlpool at the address below . Expenses for travel and transportation for...

Warranty Information
Page 1
...of original purchase date is required to refrigerator or freezer product failures. 7. Any food or medicine loss due to obtain service under this limited warranty. Replacement parts or repair labor on major appliances with original model/serial numbers that have other than normal..., flood, acts of God, improper installation, installation not in accordance with electrical or plumbing codes, or use your complete model number ready. WHIRLPOOL SHALL NOT BE LIABLE FOR INCIDENTAL OR CONSEQUENTIAL DAMAGES. Service calls to correct the installation of your major appliance, to instruct...
...of original purchase date is required to refrigerator or freezer product failures. 7. Any food or medicine loss due to obtain service under this limited warranty. Replacement parts or repair labor on major appliances with original model/serial numbers that have other than normal..., flood, acts of God, improper installation, installation not in accordance with electrical or plumbing codes, or use your complete model number ready. WHIRLPOOL SHALL NOT BE LIABLE FOR INCIDENTAL OR CONSEQUENTIAL DAMAGES. Service calls to correct the installation of your major appliance, to instruct...


