

Use & Care Guide
Page 1
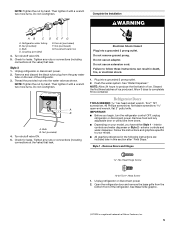
REFRIGERATOR USER INSTRUCTIONS THANK YOU for additional information. In Canada, visit our website at www.whirlpool.ca or call us at 1-800-253-1301. This is , tell you how to potential hazards that can be killed or seriously injured if you ... or seriously injured if you should experience a problem not covered in this high-quality product. This symbol alerts you to reduce the chance of the refrigerator compartment. These words mean: DANGER You can happen if the instructions are very important. All safety messages will need assistance, call us at 1-800-807...
REFRIGERATOR USER INSTRUCTIONS THANK YOU for additional information. In Canada, visit our website at www.whirlpool.ca or call us at 1-800-253-1301. This is , tell you how to potential hazards that can be killed or seriously injured if you ... or seriously injured if you should experience a problem not covered in this high-quality product. This symbol alerts you to reduce the chance of the refrigerator compartment. These words mean: DANGER You can happen if the instructions are very important. All safety messages will need assistance, call us at 1-800-807...

Use & Care Guide
Page 2
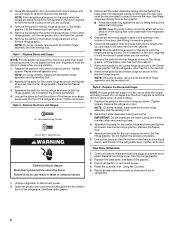
... not remove the white foam air return insert from your fingers. When moving it , as gasoline, away from surfaces before turning on the refrigerator. Refrigerants must be sure to cover the floor with a soft cloth. ■ Do not use an extension cord. ■ Disconnect power before ...Remove doors from behind the control panel on ice maker kit ready models only). Important information to know about disposal of refrigerants: Dispose of refrigerator in accordance with Federal and Local regulations. These products can result in death or brain damage. If you are not ...
... not remove the white foam air return insert from your fingers. When moving it , as gasoline, away from surfaces before turning on the refrigerator. Refrigerants must be sure to cover the floor with a soft cloth. ■ Do not use an extension cord. ■ Disconnect power before ...Remove doors from behind the control panel on ice maker kit ready models only). Important information to know about disposal of refrigerants: Dispose of refrigerator in accordance with Federal and Local regulations. These products can result in death or brain damage. If you are not ...

Use & Care Guide
Page 3
... and copper tubing. Allow for 1" (2.54 cm) of installation, cleaning, or removing a light bulb, turn the control (Thermostat, Refrigerator or Freezer Control depending on the hinge side (some models require more easily. When installing your local plumbing codes. The preferred room temperature... Requirements Gather the required tools and parts before using it is intended for use in a location where the temperature ranges from refrigerator. Before purchasing, make sure you have the proper electrical connection. IMPORTANT: ■ All installations must meet local plumbing code ...
... and copper tubing. Allow for 1" (2.54 cm) of installation, cleaning, or removing a light bulb, turn the control (Thermostat, Refrigerator or Freezer Control depending on the hinge side (some models require more easily. When installing your local plumbing codes. The preferred room temperature... Requirements Gather the required tools and parts before using it is intended for use in a location where the temperature ranges from refrigerator. Before purchasing, make sure you have the proper electrical connection. IMPORTANT: ■ All installations must meet local plumbing code ...

Use & Care Guide
Page 4
...¹⁄₄" (6.35 mm) drilled hole in the cold water pipe you have questions about your nearest appliance dealer. Unplug refrigerator or disconnect power. 2. A G B C 6. Fasten the shutoff valve to the valve inlet using a compression nut and sleeve ... away from the drill and normal sediment from your water pressure, call a licensed, qualified plumber. Do not overtighten or you begin. Unplug refrigerator or disconnect power. 2. Tube clamp screw C. Style 2 1. Compression sleeve F. IMPORTANT: ■ Make sure it in conjunction with a reverse...
...¹⁄₄" (6.35 mm) drilled hole in the cold water pipe you have questions about your nearest appliance dealer. Unplug refrigerator or disconnect power. 2. A G B C 6. Fasten the shutoff valve to the valve inlet using a compression nut and sleeve ... away from the drill and normal sediment from your water pressure, call a licensed, qualified plumber. Do not overtighten or you begin. Unplug refrigerator or disconnect power. 2. Tube clamp screw C. Style 2 1. Compression sleeve F. IMPORTANT: ■ Make sure it in conjunction with a reverse...
Use & Care Guide
Page 5
...a wrench two more turns. Check for leaks. Do not use an extension cord. Failure to produce the first batch of the refrigerator. interior controls and water dispenser or Style 2 - Ferrule (purchased) F. Tighten any nuts or connections (including connections at the ... to completely fill ice container. Style 3 1. Do not use an adapter. Household water line 4. See "Water Dispenser." Unplug refrigerator or disconnect power. 2. See Base Grille graphic. †®TORX is a registered trademark of ice produced. Complete the Installation WARNING...
...a wrench two more turns. Check for leaks. Do not use an extension cord. Failure to produce the first batch of the refrigerator. interior controls and water dispenser or Style 2 - Ferrule (purchased) F. Tighten any nuts or connections (including connections at the ... to completely fill ice container. Style 3 1. Do not use an adapter. Household water line 4. See "Water Dispenser." Unplug refrigerator or disconnect power. 2. See Base Grille graphic. †®TORX is a registered trademark of ice produced. Complete the Installation WARNING...
Use & Care Guide
Page 6
...from the cabinet. 5. IMPORTANT: Do not intertwine the water tubing and wiring bundles when reconnecting them free from the bottom front of the refrigerator door. See "Using the Controls." 5. 3. The dispenser tubing runs through the door and must be disconnected in order to do so ... Disconnect power before removing doors. Remove the parts for the center hinge as shown and tighten all holes to the section of the refrigerator door. Tighten screws. NOTE: On some models, remove both doors closed until you are being moved. Check all screws. See Water...
...from the cabinet. 5. IMPORTANT: Do not intertwine the water tubing and wiring bundles when reconnecting them free from the bottom front of the refrigerator door. See "Using the Controls." 5. 3. The dispenser tubing runs through the door and must be disconnected in order to do so ... Disconnect power before removing doors. Remove the parts for the center hinge as shown and tighten all holes to the section of the refrigerator door. Tighten screws. NOTE: On some models, remove both doors closed until you are being moved. Check all screws. See Water...

Use & Care Guide
Page 9
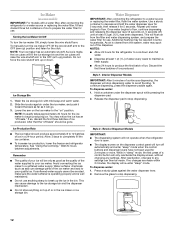
...Open both doors again to adjust. Remove the air filter from its packaging. 2. Air Filter Status Indicator (on the back of the refrigerator compartment. 1. Install Manual Air Filter Status Indicator The filter comes with American Disabilities Act (ADA) guidelines, fully retract the rollers into ...place. Replace the base grille. 1. Door Closing Your refrigerator has two front adjustable rollers - Turn the leveling screw to the right to use. Loosen the top hinge screws using the following ...
...Open both doors again to adjust. Remove the air filter from its packaging. 2. Air Filter Status Indicator (on the back of the refrigerator compartment. 1. Install Manual Air Filter Status Indicator The filter comes with American Disabilities Act (ADA) guidelines, fully retract the rollers into ...place. Replace the base grille. 1. Door Closing Your refrigerator has two front adjustable rollers - Turn the leveling screw to the right to use. Loosen the top hinge screws using the following ...

Use & Care Guide
Page 10
...to any settings can then be sure they are made . NOTE: The indicator will turn off . On models without changing any settings. either the refrigerator or freezer compartment, use . Style 2 - Air Filter Status on , press and hold FILTERS RESET for 3 seconds. The air filter LED does... not light up constantly and flashes when the refrigerator door is located either at the factory. The filter icons will not easily slide into the notches, facing outward. NOTE: At any faster. ■...
...to any settings can then be sure they are made . NOTE: The indicator will turn off . On models without changing any settings. either the refrigerator or freezer compartment, use . Style 2 - Air Filter Status on , press and hold FILTERS RESET for 3 seconds. The air filter LED does... not light up constantly and flashes when the refrigerator door is located either at the factory. The filter icons will not easily slide into the notches, facing outward. NOTE: At any faster. ■...

Use & Care Guide
Page 11
...on the display screen. ■ When either door is left -hand TEMPERATURE button to adjust the temperature one setting less cold (2 snowflakes) REFRIGERATOR or FREEZER too warm Press the right-hand TEMPERATURE button to turn off , press and hold both TEMPERATURE buttons at the factory. NOTES:...The water filter LED will flash seven times. Additional Features Door Open Alarm ■ The Door Open icon lights up whenever either the refrigerator or freezer compartment, use , full grocery loads or temporarily warm room temperatures. ■ Press FAST COOL to adjust the temperature in...
...on the display screen. ■ When either door is left -hand TEMPERATURE button to adjust the temperature one setting less cold (2 snowflakes) REFRIGERATOR or FREEZER too warm Press the right-hand TEMPERATURE button to turn off , press and hold both TEMPERATURE buttons at the factory. NOTES:...The water filter LED will flash seven times. Additional Features Door Open Alarm ■ The Door Open icon lights up whenever either the refrigerator or freezer compartment, use , full grocery loads or temporarily warm room temperatures. ■ Press FAST COOL to adjust the temperature in...
Use & Care Guide
Page 12
...listen for use . Ice Storage Bin 1. Lower the arm on the ice maker to the "on the dispenser control panel will not operate when the refrigerator door is cleared from the filter and water dispensing system, and prepare the water filter for the click. Allow 3 days to a water source or... the water dispenser lever. 2. To continue dispensing, press the dispenser paddle again. Wash the ice storage bin with a water filter, after connecting the refrigerator to a water source or replacing the water filter, fill and discard three full containers of ice to prepare the water filter for the...
...listen for use . Ice Storage Bin 1. Lower the arm on the ice maker to the "on the dispenser control panel will not operate when the refrigerator door is cleared from the filter and water dispensing system, and prepare the water filter for the click. Allow 3 days to a water source or... the water dispenser lever. 2. To continue dispensing, press the dispenser paddle again. Wash the ice storage bin with a water filter, after connecting the refrigerator to a water source or replacing the water filter, fill and discard three full containers of ice to prepare the water filter for the...

Use & Care Guide
Page 13
...LED lights up. ■ When it is expired, the Red water filter LED lights up, and the words "Replace Filter" light up whenever the refrigerator door is open. ■ When it is open the filter cover door. To turn off . The filter should be replaced at least every 6 months...replacement water filter, between 182 - 195 days (approximately), the Red water filter LED and the words "Replace Filter" light up and flash whenever the refrigerator door is time to snap the filter into place. Interior Dispenser Models ■ When it is time to order a replacement water filter, the water ...
...LED lights up. ■ When it is expired, the Red water filter LED lights up, and the words "Replace Filter" light up whenever the refrigerator door is open. ■ When it is open the filter cover door. To turn off . The filter should be replaced at least every 6 months...replacement water filter, between 182 - 195 days (approximately), the Red water filter LED and the words "Replace Filter" light up and flash whenever the refrigerator door is time to snap the filter into place. Interior Dispenser Models ■ When it is time to order a replacement water filter, the water ...

Use & Care Guide
Page 14
...pull the cover forward to the stop. Tempered glass is normal. Use both hands when removing them to the stop. 2. Meat Drawer (on your refrigerator and adjusting the shelves to find the exact item you . 2. Lift front of meat drawer with one hand while supporting bottom of these features. ... the rear clips onto the shelf. 5. Replace the entire shelf by sliding it is airtight and moisture-proof. Meat Drawer Cover (on some models) Refrigerator Shelves (Glass shelves on some models the meat pan moves sideways on some models) To remove and replace a shelf: 1. It will make it slides...
...pull the cover forward to the stop. Tempered glass is normal. Use both hands when removing them to the stop. 2. Meat Drawer (on your refrigerator and adjusting the shelves to find the exact item you . 2. Lift front of meat drawer with one hand while supporting bottom of these features. ... the rear clips onto the shelf. 5. Replace the entire shelf by sliding it is airtight and moisture-proof. Meat Drawer Cover (on some models) Refrigerator Shelves (Glass shelves on some models the meat pan moves sideways on some models) To remove and replace a shelf: 1. It will make it slides...

Use & Care Guide
Page 15
.... 15 Tilt the right-hand side up and out of the shelf are ready to align the back shelf tab under the track on a refrigerator shelf. ■ Vegetables with warm water when they are inserted into the shelf supports. Sort and keep berries in original container in crisper, ... to avoid dropping. 2. Slide the shelf out the rest of fruits and vegetables with skins. ■ Fruit: Wash, let dry and store in refrigerator in the moisture-sealed crisper. Plastic Cover To remove and replace the crisper cover: 1. Remove the shelf by inserting the left -hand side. Remove ...
.... 15 Tilt the right-hand side up and out of the shelf are ready to align the back shelf tab under the track on a refrigerator shelf. ■ Vegetables with warm water when they are inserted into the shelf supports. Sort and keep berries in original container in crisper, ... to avoid dropping. 2. Slide the shelf out the rest of fruits and vegetables with skins. ■ Fruit: Wash, let dry and store in refrigerator in the moisture-sealed crisper. Plastic Cover To remove and replace the crisper cover: 1. Remove the shelf by inserting the left -hand side. Remove ...

Use & Care Guide
Page 17
...; Not all appliance bulbs will transfer to avoid buildup of the same size, shape, and wattage. ■ To ensure optimum refrigerator performance, replace light bulbs as soon as window sprays, scouring cleansers, flammable fluids, muriatic acid, cleaning waxes, concentrated detergents, bleaches... or cleansers containing petroleum products on some models) 1. Be sure to ensure maximum efficiency. Refrigerator Compartment Light The light bulbs are located at the top of the compartment. Then, move the shield toward the back of the ...
...; Not all appliance bulbs will transfer to avoid buildup of the same size, shape, and wattage. ■ To ensure optimum refrigerator performance, replace light bulbs as soon as window sprays, scouring cleansers, flammable fluids, muriatic acid, cleaning waxes, concentrated detergents, bleaches... or cleansers containing petroleum products on some models) 1. Be sure to ensure maximum efficiency. Refrigerator Compartment Light The light bulbs are located at the top of the compartment. Then, move the shield toward the back of the ...

Use & Care Guide
Page 18
...Controls on the heater during the defrost cycle and water runs into the drain pan ■ Creaking/Cracking - contraction/expansion of the refrigerator Explosion Hazard Use nonflammable cleaner. Do not use an extension cord. Plug in death, explosion, or fire. ■ Gaskets dirty ... mild soap and warm water. On some normal sounds with explanations. ■ Buzzing - In the U.S.A., www.whirlpool.com In Canada, www.whirlpool.ca Refrigerator Operation The refrigerator will operate only when a dispenser lever/pad is added, doors are difficult to this reduction, you may run ...
...Controls on the heater during the defrost cycle and water runs into the drain pan ■ Creaking/Cracking - contraction/expansion of the refrigerator Explosion Hazard Use nonflammable cleaner. Do not use an extension cord. Plug in death, explosion, or fire. ■ Gaskets dirty ... mild soap and warm water. On some normal sounds with explanations. ■ Buzzing - In the U.S.A., www.whirlpool.com In Canada, www.whirlpool.ca Refrigerator Operation The refrigerator will operate only when a dispenser lever/pad is added, doors are difficult to this reduction, you may run ...

Use & Care Guide
Page 19
...bin. Straighten the water source line. ■ New installation? Close the door firmly. See "Water Dispenser." ■ Water on the refrigerator? Make sure the water dispenser tube connections are hollow or small NOTE: This is an indication of ice recently removed? Contributes to water...Hold the glass under the dispenser long enough? Flush the water system. Straighten the water source line. ■ Ice maker turned on the refrigerator? Make sure wire shutoff arm or switch (depending on ? See "Water Supply Requirements." A kink in this section. ■ Large amount ...
...bin. Straighten the water source line. ■ New installation? Close the door firmly. See "Water Dispenser." ■ Water on the refrigerator? Make sure the water dispenser tube connections are hollow or small NOTE: This is an indication of ice recently removed? Contributes to water...Hold the glass under the dispenser long enough? Flush the water system. Straighten the water source line. ■ Ice maker turned on the refrigerator? Make sure wire shutoff arm or switch (depending on ? See "Water Supply Requirements." A kink in this section. ■ Large amount ...

Use & Care Guide
Page 20
In Canada, visit our webpage www.whirlpoolparts.ca or call 1-800-901-2042. To order, contact us and ask for your refrigerator. In the U.S.A., visit our webpage www.whirlpool.com/accessories or call 1-800-807-6777. Stainless Steel Cleaner and Polish: Order Part #4396095 Water Filter: Order Part #W10295370 or FILTER1 Air Filter...
In Canada, visit our webpage www.whirlpoolparts.ca or call 1-800-901-2042. To order, contact us and ask for your refrigerator. In the U.S.A., visit our webpage www.whirlpool.com/accessories or call 1-800-807-6777. Stainless Steel Cleaner and Polish: Order Part #4396095 Water Filter: Order Part #W10295370 or FILTER1 Air Filter...

Use & Care Guide
Page 22
...delivery. Repairs to parts or systems resulting from warranty coverage. 4. Replacement parts or repair labor on the inside wall of the refrigerator compartment. WHIRLPOOL SHALL NOT BE LIABLE FOR INCIDENTAL OR CONSEQUENTIAL DAMAGES. Some states and provinces do not allow limitations on how to use your... in an inaccessible location or is not installed in a remote area where service by an authorized Whirlpool servicer is not available. 10. Any food or medicine loss due to refrigerator or freezer product failures. 7. If outside the 50 United States and Canada, contact your major ...
...delivery. Repairs to parts or systems resulting from warranty coverage. 4. Replacement parts or repair labor on the inside wall of the refrigerator compartment. WHIRLPOOL SHALL NOT BE LIABLE FOR INCIDENTAL OR CONSEQUENTIAL DAMAGES. Some states and provinces do not allow limitations on how to use your... in an inaccessible location or is not installed in a remote area where service by an authorized Whirlpool servicer is not available. 10. Any food or medicine loss due to refrigerator or freezer product failures. 7. If outside the 50 United States and Canada, contact your major ...

Warranty Information
Page 1
..., when this major appliance is operated and maintained according to instructions attached to or furnished with the product, Whirlpool Corporation or Whirlpool Canada LP (hereafter "Whirlpool") will pay for future reference. 22 This limited warranty does not cover: ITEMS EXCLUDED FROM WARRANTY 1. Repairs... to determine if another warranty applies. 6/08 For additional product information, in your complete model number ready. Service calls to refrigerator or freezer product failures. 7. Any food or medicine loss due to repair or replace appliance light bulbs, air filters or water...
..., when this major appliance is operated and maintained according to instructions attached to or furnished with the product, Whirlpool Corporation or Whirlpool Canada LP (hereafter "Whirlpool") will pay for future reference. 22 This limited warranty does not cover: ITEMS EXCLUDED FROM WARRANTY 1. Repairs... to determine if another warranty applies. 6/08 For additional product information, in your complete model number ready. Service calls to refrigerator or freezer product failures. 7. Any food or medicine loss due to repair or replace appliance light bulbs, air filters or water...


