

Warranty Information
Page 1
...you also may have other than normal, single-family household use or when it was purchased. Replacement parts or repair labor on how to use your authorized Whirlpool dealer to determine if another warranty applies. You must be found by checking the "Assistance or Service...operated, and maintained according to instructions attached to or furnished with electrical or plumbing codes, or use of products not approved by Whirlpool. 5. LIMITATION OF REMEDIES; The removal and reinstallation of your complete model number and serial number. Service calls to repair or ...
...you also may have other than normal, single-family household use or when it was purchased. Replacement parts or repair labor on how to use your authorized Whirlpool dealer to determine if another warranty applies. You must be found by checking the "Assistance or Service...operated, and maintained according to instructions attached to or furnished with electrical or plumbing codes, or use of products not approved by Whirlpool. 5. LIMITATION OF REMEDIES; The removal and reinstallation of your complete model number and serial number. Service calls to repair or ...

Use & Care Guide
Page 18
... the United States or Canada and applies only when the major appliance is used in accordance with Whirlpool published installation instructions. 10. Repairs to parts or systems resulting from unauthorized modifications made to resolve the problem after checking "Troubleshooting," additional help... is installed, operated, and maintained according to instructions attached to or furnished with the product, Whirlpool Corporation or Whirlpool Canada LP (hereafter "Whirlpool") will need to Whirlpool within 30 days from the date of purchase. 6. Some states and provinces do not allow the...
... the United States or Canada and applies only when the major appliance is used in accordance with Whirlpool published installation instructions. 10. Repairs to parts or systems resulting from unauthorized modifications made to resolve the problem after checking "Troubleshooting," additional help... is installed, operated, and maintained according to instructions attached to or furnished with the product, Whirlpool Corporation or Whirlpool Canada LP (hereafter "Whirlpool") will need to Whirlpool within 30 days from the date of purchase. 6. Some states and provinces do not allow the...
Dimension Guide
Page 2
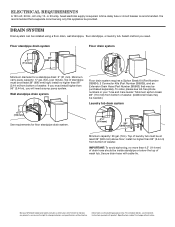
... laundry tub must be provided. IMPORTANT: To avoid siphoning, no more than 96" (2.44 m) from bottom of washer. Because Whirlpool Corporation policy includes a continuous commitment to improve our products, we reserve the right to change materials and specifications without notice. Specifications... be purchased separately. Wall standpipe drain system Floor drain system requires a Siphon Break Kit (Part Number 285834), 2 Connector Kits (Part Number 285835), and an Extension Drain Hose (Part Number 285863) that a separate circuit serving only this appliance be at least 39" (990...
... laundry tub must be provided. IMPORTANT: To avoid siphoning, no more than 96" (2.44 m) from bottom of washer. Because Whirlpool Corporation policy includes a continuous commitment to improve our products, we reserve the right to change materials and specifications without notice. Specifications... be purchased separately. Wall standpipe drain system Floor drain system requires a Siphon Break Kit (Part Number 285834), 2 Connector Kits (Part Number 285835), and an Extension Drain Hose (Part Number 285863) that a separate circuit serving only this appliance be at least 39" (990...
Installation Guide
Page 2
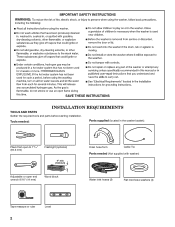
Tools needed: Parts supplied (located in the washer basket): Pliers that open to 19/16" (39.5 mm) Flashlight (optional) 4" min (102 mm) Adjustable or open end wrench 9/16" (14 mm) Wood block Drain hose form Cable Tie Parts needed (Not supplied with washer): Water inlet hoses (2) Flat inlet hose washers (4) Tape measure or ruler Level 2 INSTALLATION REQUIREMENTS TOOLS AND PARTS Gather the required tools and parts before starting installation.
Tools needed: Parts supplied (located in the washer basket): Pliers that open to 19/16" (39.5 mm) Flashlight (optional) 4" min (102 mm) Adjustable or open end wrench 9/16" (14 mm) Wood block Drain hose form Cable Tie Parts needed (Not supplied with washer): Water inlet hoses (2) Flat inlet hose washers (4) Tape measure or ruler Level 2 INSTALLATION REQUIREMENTS TOOLS AND PARTS Gather the required tools and parts before starting installation.
Installation Guide
Page 3
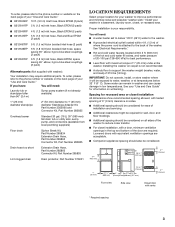
...ft. (1.2 m) of where the power cord is attached to the back of the washer. Louvered doors with washer): Your installation may require additional parts. If you have: You will need : Laundry tub or standpipe taller than 96" (2.4 m) Sump pump system (if not already available) ...1" (25 mm) diameter standpipe 2" (50 mm) diameter to 1" (25 mm) diameter Standpipe Adapter Kit, Part Number 3363920 and Connector Kit, Part Number 285835 Overhead sewer Standard 20 gal. (76 L) 39" (990 mm) tall drain tub or utility sink, sump pump, and...
...ft. (1.2 m) of where the power cord is attached to the back of the washer. Louvered doors with washer): Your installation may require additional parts. If you have: You will need : Laundry tub or standpipe taller than 96" (2.4 m) Sump pump system (if not already available) ...1" (25 mm) diameter standpipe 2" (50 mm) diameter to 1" (25 mm) diameter Standpipe Adapter Kit, Part Number 3363920 and Connector Kit, Part Number 285835 Overhead sewer Standard 20 gal. (76 L) 39" (990 mm) tall drain tub or utility sink, sump pump, and...
Installation Guide
Page 4
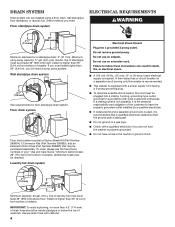
..., grounding-type outlet, grounded in your "Use and Care Guide." Floor drain system Floor drain system requires a Siphon Break Kit (Part Number 285834), 2 Connector Kits (Part Number 285835), and an Extension Drain Hose (Part Number 285863) that the ground path is adequate. ■■ Do not ground to a gas pipe. ■■ Check...
..., grounding-type outlet, grounded in your "Use and Care Guide." Floor drain system Floor drain system requires a Siphon Break Kit (Part Number 285834), 2 Connector Kits (Part Number 285835), and an Extension Drain Hose (Part Number 285863) that the ground path is adequate. ■■ Do not ground to a gas pipe. ■■ Check...
Installation Guide
Page 6
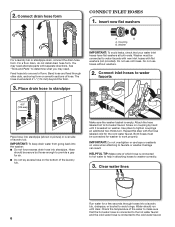
Connect drain hose form CONNECT INLET HOSES 1. See "Tools and Parts" to avoid clogs. Coupling B. Washer IMPORTANT: To avoid leaks, check that the hot water hose is connected to hot water faucet. Repeat this step with ... not use old hoses. Both hoses must be secure but loose enough to provide a gap for washer to help in standpipe A B A. You may need alternate parts with flat washers (not provided). 2. Hose should run until it is connected to hot water to work properly. Water should be connected for air. ■...
Connect drain hose form CONNECT INLET HOSES 1. See "Tools and Parts" to avoid clogs. Coupling B. Washer IMPORTANT: To avoid leaks, check that the hot water hose is connected to hot water faucet. Repeat this step with ... not use old hoses. Both hoses must be secure but loose enough to provide a gap for washer to help in standpipe A B A. You may need alternate parts with flat washers (not provided). 2. Hose should run until it is connected to hot water to work properly. Water should be connected for air. ■...
Installation Guide
Page 9
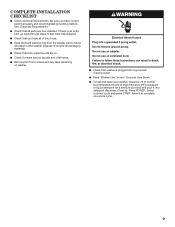
.... Select a normal cycle and press START. See "Electrical Requirements." ■■ Check that washer is an extra part, go back through steps to complete one whole cycle. 9 Press POWER. Dispose of/recycle all parts are on. ■■ Check for a medium-size load and pour it to see what was skipped. ■...
.... Select a normal cycle and press START. See "Electrical Requirements." ■■ Check that washer is an extra part, go back through steps to complete one whole cycle. 9 Press POWER. Dispose of/recycle all parts are on. ■■ Check for a medium-size load and pour it to see what was skipped. ■...


