
User Guide
Page 6
Please read the following instructions carefully before cleaning. CAUTION: This symbol indicates a Laser is being used on electromechanical equipment. Operator access to hazardous areas is not specifically described in the user documentation supplied with ...Aerosol surfaces. The safety testing and performance of the machine. • Always locate the machine in the fuser area are fastened with an energy saving device to a location outside of your Xerox equipment, follow all warnings and instructions that are hot. WARNING: This product must be left on this manual...
Please read the following instructions carefully before cleaning. CAUTION: This symbol indicates a Laser is being used on electromechanical equipment. Operator access to hazardous areas is not specifically described in the user documentation supplied with ...Aerosol surfaces. The safety testing and performance of the machine. • Always locate the machine in the fuser area are fastened with an energy saving device to a location outside of your Xerox equipment, follow all warnings and instructions that are hot. WARNING: This product must be left on this manual...

User Guide
Page 8
... please contact your authorized local dealer or Service Provider. Do not attempt to laser safety, the equipment complies with the instructions given on reciprocity agreements, which include requirements for laser product set by the following Agency using the Safety Standards listed. • Agency...containers into an open flame. • Cartridges: When handing cartridges, for example ink, fuser, etc, avoid skin or eye contact. If you may result in the Xerox installation procedure will produce ozone during all consumables away from the reach of customer operation and...
... please contact your authorized local dealer or Service Provider. Do not attempt to laser safety, the equipment complies with the instructions given on reciprocity agreements, which include requirements for laser product set by the following Agency using the Safety Standards listed. • Agency...containers into an open flame. • Cartridges: When handing cartridges, for example ink, fuser, etc, avoid skin or eye contact. If you may result in the Xerox installation procedure will produce ozone during all consumables away from the reach of customer operation and...
User Guide
Page 33
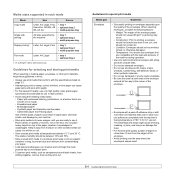
...cause paper jams and poor print quality. • For the best print quality, use only high quality copier grade paper specifically recommended for use in laser printers. • Avoid using the following factors: - When selecting envelopes, consider the following media types: - Condition: Envelopes should not be between... to printing, envelopes should lie flat with less than 6 mm curl, and should not exceed 90 g/m2 or jamming may even damage the fuser. • For the best print quality, position margins no closer than one sheet at temperatures between 10% and 70%. • Store unused...
...cause paper jams and poor print quality. • For the best print quality, use only high quality copier grade paper specifically recommended for use in laser printers. • Avoid using the following factors: - When selecting envelopes, consider the following media types: - Condition: Envelopes should not be between... to printing, envelopes should lie flat with less than 6 mm curl, and should not exceed 90 g/m2 or jamming may even damage the fuser. • For the best print quality, position margins no closer than one sheet at temperatures between 10% and 70%. • Store unused...

User Guide
Page 38
Printing to the rear cover provides a straight paper path. Using the rear cover might improve the output quality with special print media. Caution The fuser area inside the rear cover of the machine face up. Printing from the multi-purpose tray to the rear cover Using the rear cover, paper comes out of your machine becomes very hot when in use the rear cover, open it by pulling down. Take care when you access this area. 5.9 To use .
Printing to the rear cover provides a straight paper path. Using the rear cover might improve the output quality with special print media. Caution The fuser area inside the rear cover of the machine face up. Printing from the multi-purpose tray to the rear cover Using the rear cover, paper comes out of your machine becomes very hot when in use the rear cover, open it by pulling down. Take care when you access this area. 5.9 To use .

User Guide
Page 75
...Press Stop/Clear to return to Standby mode. 13.6 Checking replaceables If you bought printer performs this maintenance activity. Items ADF rubber pad Transfer roller Fuser unit Tray rubber pad Pickup roller Yield (Average) Approx. 20,000 pages Approx. 70,000 pages Approx. 80,000 pages Approx. 250,000... pages Approx. 150,000 pages Xerox highly recommends that the new cartridge needs to be installed for checking the replaceable elements of your printer in the cartridge. • Drum: displays...
...Press Stop/Clear to return to Standby mode. 13.6 Checking replaceables If you bought printer performs this maintenance activity. Items ADF rubber pad Transfer roller Fuser unit Tray rubber pad Pickup roller Yield (Average) Approx. 20,000 pages Approx. 70,000 pages Approx. 80,000 pages Approx. 250,000... pages Approx. 150,000 pages Xerox highly recommends that the new cartridge needs to be installed for checking the replaceable elements of your printer in the cartridge. • Drum: displays...

User Guide
Page 79
... feed area (tray 1, optional tray 2, or multipurpose tray) below to the table below and page 14.3 In the fuser area or around the print cartridge. Follow the instructions in this area, check the fuser area around the page 14.3 print cartridge In the paper exit area page 14.4 In the duplex unit... page 14.5 Between the duplex unit and fuser area page 14.6 Caution To avoid tearing the paper, pull out the jammed paper gently and slowly. See page 14.3. 4 Insert tray 1 into the machine ...
... feed area (tray 1, optional tray 2, or multipurpose tray) below to the table below and page 14.3 In the fuser area or around the print cartridge. Follow the instructions in this area, check the fuser area around the page 14.3 print cartridge In the paper exit area page 14.4 In the duplex unit... page 14.5 Between the duplex unit and fuser area page 14.6 Caution To avoid tearing the paper, pull out the jammed paper gently and slowly. See page 14.3. 4 Insert tray 1 into the machine ...

User Guide
Page 80
... the tray 1 half. 4 Pull the paper straight up and out. 2 Open and close the front cover to resume printing. In the fuser area or around the print cartridge Note The fuser area is not feeding properly, remove and reload the paper into the machine. Take care when removing paper from the machine...
... the tray 1 half. 4 Pull the paper straight up and out. 2 Open and close the front cover to resume printing. In the fuser area or around the print cartridge Note The fuser area is not feeding properly, remove and reload the paper into the machine. Take care when removing paper from the machine...

User Guide
Page 82
..., push the pressure lever on each side up to loosen the paper, and then remove it. 1 1 duplex guide 7 While pushing the fuser lever to the right, open the fuser door. 1 2 1 fuser lever 2 fuser door 1 pressure lever 9 Return the lever, door, stopper, and guide to their original position. 10 Close the rear cover. 6 Unfold the...
..., push the pressure lever on each side up to loosen the paper, and then remove it. 1 1 duplex guide 7 While pushing the fuser lever to the right, open the fuser door. 1 2 1 fuser lever 2 fuser door 1 pressure lever 9 Return the lever, door, stopper, and guide to their original position. 10 Close the rear cover. 6 Unfold the...

User Guide
Page 84
...0 Check Inside Duplex Jam 1 Open/Close Door Enter Again File Access Denied File Name Exist File Name Over Limit File Format Not Supported Fuser Door Open Global Address Not Found Global Query Size Exceeded Meaning Paper has jammed during duplex printing. However, access to doc999. When the ...cable. Check the protocol or server port. Paper has jammed during duplex printing. Enter a different file name. Open the rear cover and close the fuser door until it is wrong. Refine your search by entering more letters. • Contact a LDAP Server administrator. 14.7 Ask the sender to ...
...0 Check Inside Duplex Jam 1 Open/Close Door Enter Again File Access Denied File Name Exist File Name Over Limit File Format Not Supported Fuser Door Open Global Address Not Found Global Query Size Exceeded Meaning Paper has jammed during duplex printing. However, access to doc999. When the ...cable. Check the protocol or server port. Paper has jammed during duplex printing. Enter a different file name. Open the rear cover and close the fuser door until it is wrong. Refine your search by entering more letters. • Contact a LDAP Server administrator. 14.7 Ask the sender to ...

User Guide
Page 85
..., this message displays. The speed button or speed dial number you have tried to find the Global server. A problem has occurred in the fuser unit. The memory is a communication error between the global server and the device. • Try again. • Contact a LDAP Server administrator.... The paper in the tray Load paper in the LSU (Laser Scanning Unit). A problem has occurred in the tray. Open and then close the front cover. Delete unnecessary fax jobs and retransmit after more...
..., this message displays. The speed button or speed dial number you have tried to find the Global server. A problem has occurred in the fuser unit. The memory is a communication error between the global server and the device. • Try again. • Contact a LDAP Server administrator.... The paper in the tray Load paper in the LSU (Laser Scanning Unit). A problem has occurred in the tray. Open and then close the front cover. Delete unnecessary fax jobs and retransmit after more...

User Guide
Page 86
.../Close Door Paper Jam 1 Open/Close Door Paper Jam 2 Check Inside Power Failure Retry Redial? Unplug the power cord and plug it back in the fuser unit. See page 14.4. Clear the jam. The machine is a problem in the paper exit area. There is waiting for service. There is no ...Empty Tray 2 Paper Empty Meaning Suggested solutions There is checking some problems detected. The engine in your printer is locked press Stop/Clear. The LSU (Laser Scanning Unit) in your network interface card correctly. Check the display to the available server. Clear the jam.
.../Close Door Paper Jam 1 Open/Close Door Paper Jam 2 Check Inside Power Failure Retry Redial? Unplug the power cord and plug it back in the fuser unit. See page 14.4. Clear the jam. The machine is a problem in the paper exit area. There is waiting for service. There is no ...Empty Tray 2 Paper Empty Meaning Suggested solutions There is checking some problems detected. The engine in your printer is locked press Stop/Clear. The LSU (Laser Scanning Unit) in your network interface card correctly. Check the display to the available server. Clear the jam.
User Guide
Page 103
.../IP 4.2 n-up (multiple pages per sheet) copying 6.2 O originals jam, clear 14.1 loading 5.1 output location, select 5.8 output tray 5.8 P paper guidelines 5.4 paper jam, clear duplex area 14.5 fuser area or around toner cartridge 14.3 multi-purpose tray 14.3 optional tray 2 14.3 paper exit area 14.4 tray 1 14.2 paper level indicator 5.5 paper load multi...
.../IP 4.2 n-up (multiple pages per sheet) copying 6.2 O originals jam, clear 14.1 loading 5.1 output location, select 5.8 output tray 5.8 P paper guidelines 5.4 paper jam, clear duplex area 14.5 fuser area or around toner cartridge 14.3 multi-purpose tray 14.3 optional tray 2 14.3 paper exit area 14.4 tray 1 14.2 paper level indicator 5.5 paper load multi...
Service Manual
Page 11
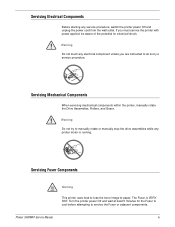
... Warning This printer uses heat to fuse the toner image to do so by a service procedure. Phaser 3300MFP Service Manual ix The Fuser is running. Warning Do not touch any printer motor is VERY HOT. Servicing Electrical Components Before starting any service procedure, switch the printer power Off ...
... Warning This printer uses heat to fuse the toner image to do so by a service procedure. Phaser 3300MFP Service Manual ix The Fuser is running. Warning Do not touch any printer motor is VERY HOT. Servicing Electrical Components Before starting any service procedure, switch the printer power Off ...

Service Manual
Page 17
... Specifications 1-18 CentreWare IS 1-19 Accessing CentreWare IS 1-19 2 Theory of Operation Phaser 3300MFP Operational Overview 2-2 Summary 2-2 Paper Path 2-3 Engine H/W 2-3 Assembly Description 2-5 Mechanical Parts Specifications 2-12 Frame 2-12 Feeding Part 2-12 Transfer Assembly 2-13 Driver Assembly 2-13 Fuser 2-14 LSU (Laser Scanner Unit 2-16 Print Cartridge 2-18 FAX Section 2-19 Line Interface 2-22 Scan...
... Specifications 1-18 CentreWare IS 1-19 Accessing CentreWare IS 1-19 2 Theory of Operation Phaser 3300MFP Operational Overview 2-2 Summary 2-2 Paper Path 2-3 Engine H/W 2-3 Assembly Description 2-5 Mechanical Parts Specifications 2-12 Frame 2-12 Feeding Part 2-12 Transfer Assembly 2-13 Driver Assembly 2-13 Fuser 2-14 LSU (Laser Scanner Unit 2-16 Print Cartridge 2-18 FAX Section 2-19 Line Interface 2-22 Scan...

Service Manual
Page 18
... 4-5 Report 4-7 Paper Feeding Problems 4-8 Wrong Print Position 4-8 Multi-Feeding 4-8 Paper rolled in the fuser 4-8 Paper rolled in the OPC 4-9 Defective ADF 4-9 Printing Problems (Malfunction 4-10 Defective Operation (LCD WINDOW) Display 4-10 Defective... LCD Operation 4-10 Fuser Gear not functioning due to melting 4-10 Paper Empty 4-10 Paper Empty without indication 4-11 Door... (3 4-15 Defective FAX RECEIVE (4 4-15 Defective Automatic Receiving 4-15 xvi Phaser 3300MFP Service Manual
... 4-5 Report 4-7 Paper Feeding Problems 4-8 Wrong Print Position 4-8 Multi-Feeding 4-8 Paper rolled in the fuser 4-8 Paper rolled in the OPC 4-9 Defective ADF 4-9 Printing Problems (Malfunction 4-10 Defective Operation (LCD WINDOW) Display 4-10 Defective... LCD Operation 4-10 Fuser Gear not functioning due to melting 4-10 Paper Empty 4-10 Paper Empty without indication 4-11 Door... (3 4-15 Defective FAX RECEIVE (4 4-15 Defective Automatic Receiving 4-15 xvi Phaser 3300MFP Service Manual

Service Manual
Page 20
... and Maintenance Service Maintenance Procedure 7-2 Recommended Tools 7-2 Cleaning 7-2 Cleaning the Print Cartridge 7-3 Cleaning the Laser Unit 7-4 Maintenance 7-5 RIP (Repair, Inspect, and Prevent) Procedure 7-5 Software Maintenance 7-6 Clearing the ... 8-6 ADF Pickup Assembly (PL 13.0.4 8-6 ADF Rubber Pad (PL 13.0.3-2 8-7 Transfer Roller 8-8 Pick Up Roller (PL3.0.3-9 8-9 Fuser Assembly (PL3.0.61 8-10 Tray Holder Pad (PL15.0.4 8-16 Print Cartridge (PL1.0.16 8-18 Covers 8-19 Upper Cover (Left, Right... Assembly & Solenoids 8-45 Exit Roller 8-46 xviii Phaser 3300MFP Service Manual
... and Maintenance Service Maintenance Procedure 7-2 Recommended Tools 7-2 Cleaning 7-2 Cleaning the Print Cartridge 7-3 Cleaning the Laser Unit 7-4 Maintenance 7-5 RIP (Repair, Inspect, and Prevent) Procedure 7-5 Software Maintenance 7-6 Clearing the ... 8-6 ADF Pickup Assembly (PL 13.0.4 8-6 ADF Rubber Pad (PL 13.0.3-2 8-7 Transfer Roller 8-8 Pick Up Roller (PL3.0.3-9 8-9 Fuser Assembly (PL3.0.61 8-10 Tray Holder Pad (PL15.0.4 8-16 Print Cartridge (PL1.0.16 8-18 Covers 8-19 Upper Cover (Left, Right... Assembly & Solenoids 8-45 Exit Roller 8-46 xviii Phaser 3300MFP Service Manual

Service Manual
Page 21
...8-61 CRUM2 PBA 8-62 Drive 8-63 Drive Assembly 8-63 Duplex Drive Assembly 8-65 Fuser Drive Assembly 8-66 Electrical 8-68 Control Board Shield Assembly 8-68 Control Board 8-70 Fax/...Front Cover 9-11 Parts List 5.0 Rear Cover Assembly 9-12 Parts List 6.0 Frame 9-13 Parts List 7.0 Fuser Drive Assembly 9-17 Parts List 8.0 Main Drive Assembly 9-18 Parts List 9.0 MP Assembly 9-19 Parts ...30 Parts List 15.0 Cassette Assembly 9-32 Parts List 16.0 Fuser Assembly 9-33 Parts List 17.0 Duplex Unit (Optional 9-35 Xerox Supplies and Accessories 9-37 10 Wiring Diagrams Block Diagram 10-2 WD...
...8-61 CRUM2 PBA 8-62 Drive 8-63 Drive Assembly 8-63 Duplex Drive Assembly 8-65 Fuser Drive Assembly 8-66 Electrical 8-68 Control Board Shield Assembly 8-68 Control Board 8-70 Fax/...Front Cover 9-11 Parts List 5.0 Rear Cover Assembly 9-12 Parts List 6.0 Frame 9-13 Parts List 7.0 Fuser Drive Assembly 9-17 Parts List 8.0 Main Drive Assembly 9-18 Parts List 9.0 MP Assembly 9-19 Parts ...30 Parts List 15.0 Cassette Assembly 9-32 Parts List 16.0 Fuser Assembly 9-33 Parts List 17.0 Duplex Unit (Optional 9-35 Xerox Supplies and Accessories 9-37 10 Wiring Diagrams Block Diagram 10-2 WD...

Service Manual
Page 22
..., Ethernet, USB 10-9 Control Board to Main and Flat Motors, Clutches, Sensors, Laser Interlock 10-10 Control Board to HVPS, CRUM, Paper Empty Sensor 10-11 Control Board to Fuser, CCD 10-15 A Appendix Phaser 3300MFP Menu Map A-2 Acronyms and Abbreviations A-3 xx Phaser 3300MFP Service Manual Tray, Control Panel, ADF Board 10-12 Control Board to...
..., Ethernet, USB 10-9 Control Board to Main and Flat Motors, Clutches, Sensors, Laser Interlock 10-10 Control Board to HVPS, CRUM, Paper Empty Sensor 10-11 Control Board to Fuser, CCD 10-15 A Appendix Phaser 3300MFP Menu Map A-2 Acronyms and Abbreviations A-3 xx Phaser 3300MFP Service Manual Tray, Control Panel, ADF Board 10-12 Control Board to...

Service Manual
Page 31
...conditions and actual use will be sent to record the usage information. Component ADF Rubber Pad ADF Roller Pick-up Roller Transfer Roller Fuser Tray Rubber Pad Replacement Cycle 20.000 Pages 60.000 Pages 150.000 Pages 70.000 Pages 80.000 Pages 150.000 Pages Consumables... has a CRUM (Customer Replaceable Unit Meter) to indicate toner empty. Print Cartridge Standard Capacity High Capacity Print Life 4.000 pages 8,000 pages Phaser 3300MFP Service Manual s3300mfp-185 1-9 The example list is for an average usage of 50 transmitted and received documents per day. The cycle period given ...
...conditions and actual use will be sent to record the usage information. Component ADF Rubber Pad ADF Roller Pick-up Roller Transfer Roller Fuser Tray Rubber Pad Replacement Cycle 20.000 Pages 60.000 Pages 150.000 Pages 70.000 Pages 80.000 Pages 150.000 Pages Consumables... has a CRUM (Customer Replaceable Unit Meter) to indicate toner empty. Print Cartridge Standard Capacity High Capacity Print Life 4.000 pages 8,000 pages Phaser 3300MFP Service Manual s3300mfp-185 1-9 The example list is for an average usage of 50 transmitted and received documents per day. The cycle period given ...

Service Manual
Page 33
Expand Memory specification would be defined separate note. Characteristic Specification Periodic Replacing Pickup Roller 150,000 Pages Pad Unit (Tray) 150,000 pages Pad Unit (ADF) 20,000 Pages Transfer Roller 70,000 Pages Fuser Unit 80,000 Pages ADF Roller 60,000 Pages Device Memory Standard / Max. 96MB / 320MB(Std./Max) Type SDRAM Expand Memory SDRAM DIMM Slot, Type Compression YES Technology General Information Remarks Standard memory is 64MB + 256MB. memory is 64MB + 32MB expansion; Phaser 3300MFP Service Manual 1-11 Max.
Expand Memory specification would be defined separate note. Characteristic Specification Periodic Replacing Pickup Roller 150,000 Pages Pad Unit (Tray) 150,000 pages Pad Unit (ADF) 20,000 Pages Transfer Roller 70,000 Pages Fuser Unit 80,000 Pages ADF Roller 60,000 Pages Device Memory Standard / Max. 96MB / 320MB(Std./Max) Type SDRAM Expand Memory SDRAM DIMM Slot, Type Compression YES Technology General Information Remarks Standard memory is 64MB + 256MB. memory is 64MB + 32MB expansion; Phaser 3300MFP Service Manual 1-11 Max.


