
User Guide
Page 17
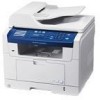
Printer overview These are the main components of your machine: Front view Rear view * The figure above shows Phaser 3300MFP with all available accessories. 1 ADF (automatic document feeder) 10 tray 1 2 document width guides 11 optional tray 2 3 document input tray 12 multi...output tray 16 multi-purpose tray paper width guides 8 front cover 17 scanner glass 9 paper level indicator 18 print cartridge * The figure above shows Phaser 3300MFP with all available accessories. 1 control board cover 2 network port 3 USB port 4 optional tray 2 cable connector 5 telephone line socket (LINE)a...
Printer overview These are the main components of your machine: Front view Rear view * The figure above shows Phaser 3300MFP with all available accessories. 1 ADF (automatic document feeder) 10 tray 1 2 document width guides 11 optional tray 2 3 document input tray 12 multi...output tray 16 multi-purpose tray paper width guides 8 front cover 17 scanner glass 9 paper level indicator 18 print cartridge * The figure above shows Phaser 3300MFP with all available accessories. 1 control board cover 2 network port 3 USB port 4 optional tray 2 cable connector 5 telephone line socket (LINE)a...

User Guide
Page 30
...copying a page from a book or magazine, lift the scanner lid until its hinges are in the ADF, the machine gives it priority over the original on the scanner glass and align it clean. • ...and sending a fax. To get the best scan quality, especially for one job. In the ADF Using the ADF, you use the ADF: • Do not load paper smaller than 142 x 148 mm or larger than 30 mm,...paper or carbon-backed paper - curled or rolled paper - If the book or magazine is detected in the ADF. When you can use the scanner glass. 1 Lift and open while copying may affect copy quality and ...
...copying a page from a book or magazine, lift the scanner lid until its hinges are in the ADF, the machine gives it priority over the original on the scanner glass and align it clean. • ...and sending a fax. To get the best scan quality, especially for one job. In the ADF Using the ADF, you use the ADF: • Do not load paper smaller than 142 x 148 mm or larger than 30 mm,...paper or carbon-backed paper - curled or rolled paper - If the book or magazine is detected in the ADF. When you can use the scanner glass. 1 Lift and open while copying may affect copy quality and ...

User Guide
Page 31
... on the printout. When you choose should be the result of improper handling, unacceptable temperature and humidity levels, or other variables over which Xerox has no control. • Before purchasing large quantities of print media, ensure that meet the guidelines outlined in following problems: • ...jams • Premature wear on the document input tray. 2 Adjust the document width guides to the paper size. Note Dust on the ADF glass may cause problems, requiring repairs. Always use with your machine is described in this user guide may be appropriate for use print ...
... on the printout. When you choose should be the result of improper handling, unacceptable temperature and humidity levels, or other variables over which Xerox has no control. • Before purchasing large quantities of print media, ensure that meet the guidelines outlined in following problems: • ...jams • Premature wear on the document input tray. 2 Adjust the document width guides to the paper size. Note Dust on the ADF glass may cause problems, requiring repairs. Always use with your machine is described in this user guide may be appropriate for use print ...

User Guide
Page 39
... document type for each copy, use special copy features, such as poster copying, 2- Copying 1 Press Copy. Ready to their default status. or 4-up into the ADF, or place a single original face down on the scanner glass. Changing the settings for each copy • Changing the default copy settings • Using special...
... document type for each copy, use special copy features, such as poster copying, 2- Copying 1 Press Copy. Ready to their default status. or 4-up into the ADF, or place a single original face down on the scanner glass. Changing the settings for each copy • Changing the default copy settings • Using special...

User Guide
Page 40
...Enlarge or the Scroll buttons until 2-Up or 4-Up appears and press Enter. 5 Press the Scroll buttons to select Yes. 4-up into the ADF. For example, if you copy a document, the default settings are setting copy options, pressing Stop/Clear cancels the changed by using the number .... Reduced or enlarged copy By using the Reduce/Enlarge button for making a 2- Note When you copy original documents from the scanner glass, or from the ADF. Changing the default copy settings The copy options, including darkness, original type, copy size, and number of paper. 1 Press Copy. 2 2 1 2-up ...
...Enlarge or the Scroll buttons until 2-Up or 4-Up appears and press Enter. 5 Press the Scroll buttons to select Yes. 4-up into the ADF. For example, if you copy a document, the default settings are setting copy options, pressing Stop/Clear cancels the changed by using the number .... Reduced or enlarged copy By using the Reduce/Enlarge button for making a 2- Note When you copy original documents from the scanner glass, or from the ADF. Changing the default copy settings The copy options, including darkness, original type, copy size, and number of paper. 1 Press Copy. 2 2 1 2-up ...

User Guide
Page 42
... copy settings, if you want appears. • Off: Prints in the background, such as a newspaper or a catalog. 1 Press Copy. 2 Load originals face up into the ADF, or place a single original face down on a single page. This copy feature is backlit. 4 Start copying a document.
... copy settings, if you want appears. • Off: Prints in the background, such as a newspaper or a catalog. 1 Press Copy. 2 Load originals face up into the ADF, or place a single original face down on a single page. This copy feature is backlit. 4 Start copying a document.

User Guide
Page 44
... page 8.5. For details, please refer to control the scanning process. A new message window opens with your machine lets you turn pictures and text into the ADF, or place a single original face down on an SMB server. a. Scanning to an application using a network connection: • To your computer.
... page 8.5. For details, please refer to control the scanning process. A new message window opens with your machine lets you turn pictures and text into the ADF, or place a single original face down on an SMB server. a. Scanning to an application using a network connection: • To your computer.

User Guide
Page 46
...as a host name. 9 Enter the server port number, from 1 to a network and Network Scan is running on the computer. 2 Load originals face up into the ADF, or place a single original face down on your machine. 7 Select IP Address or Host Name. 8 Enter the server address in Anonymous if you want to...is folder type, press the Scroll buttons until NetScan appears on your machine. 7 Select IP Address or Host Name. 8 Enter the server address in the Xerox Network Scan Manager window and press Enter. 7 If the scan destination is 21. 10 Put a check mark in Alias for the Setup for the corresponding...
...as a host name. 9 Enter the server port number, from 1 to a network and Network Scan is running on the computer. 2 Load originals face up into the ADF, or place a single original face down on your machine. 7 Select IP Address or Host Name. 8 Enter the server address in Anonymous if you want to...is folder type, press the Scroll buttons until NetScan appears on your machine. 7 Select IP Address or Host Name. 8 Enter the server address in the Xerox Network Scan Manager window and press Enter. 7 If the scan destination is 21. 10 Put a check mark in Alias for the Setup for the corresponding...

User Guide
Page 47
... Setup appears on the scanner glass. If you have activated the Send To Self option in CentreWare IS. You need to set up into the ADF or place a single original on the bottom line of the display and press Enter. 2 Press Enter when Machine Setup appears. 3 Press the Scroll buttons until... Scan. 4 Press the Scroll buttons until Scan to Email appears on the scanner glass. Scanning to an FTP server You can set up into the ADF, or place a single original face down on the bottom line of the display and press Enter. 5 Press the Scroll buttons until the FTP server you...
... Setup appears on the scanner glass. If you have activated the Send To Self option in CentreWare IS. You need to set up into the ADF or place a single original on the bottom line of the display and press Enter. 2 Press Enter when Machine Setup appears. 3 Press the Scroll buttons until... Scan. 4 Press the Scroll buttons until Scan to Email appears on the scanner glass. Scanning to an FTP server You can set up into the ADF, or place a single original face down on the bottom line of the display and press Enter. 5 Press the Scroll buttons until the FTP server you...

User Guide
Page 48
... appears and press Enter. 7 Repeat steps 5 and 6 to change other settings. 8 To change the default settings for each job, you can set up into the ADF or place a single original on the bottom line of the display and press Enter. 5 Press the Scroll buttons until the SMB server you want appears...
... appears and press Enter. 7 Repeat steps 5 and 6 to change other settings. 8 To change the default settings for each job, you can set up into the ADF or place a single original on the bottom line of the display and press Enter. 5 Press the Scroll buttons until the SMB server you want appears...

User Guide
Page 52
... page 9.1. 4 Press Manual Dial. To change the default setting, see page 10.2. Sending a fax automatically 1 Press Fax. 2 Load originals face up into the ADF, or place a single original face down on the top line of the display. 3 Adjust the resolution and the darkness to the current fax job. For...sending. Ready to Fax appears on the scanner glass. Load another page. Sending a fax manually 1 Press Fax. 2 Load originals face up into the ADF, or place a single original face down on the bottom line of gray or photographs. You can use speed buttons, speed dial numbers, or group ...
... page 9.1. 4 Press Manual Dial. To change the default setting, see page 10.2. Sending a fax automatically 1 Press Fax. 2 Load originals face up into the ADF, or place a single original face down on the top line of the display. 3 Adjust the resolution and the darkness to the current fax job. For...sending. Ready to Fax appears on the scanner glass. Load another page. Sending a fax manually 1 Press Fax. 2 Load originals face up into the ADF, or place a single original face down on the bottom line of gray or photographs. You can use speed buttons, speed dial numbers, or group ...

User Guide
Page 53
... When the last page of your selection. 9.3 Automatic redialing When the number you called last: 1 Press Redial/Pause. 2 When an original is loaded in the ADF, the machine automatically begins to send the fax again. Redialing the last number To redial the number you have dialed is busy or there is...
... When the last page of your selection. 9.3 Automatic redialing When the number you called last: 1 Press Redial/Pause. 2 When an original is loaded in the ADF, the machine automatically begins to send the fax again. Redialing the last number To redial the number you have dialed is busy or there is...

User Guide
Page 56
...buttons, speed dial numbers, or group dial numbers. For details, see page 10.2. 7 Press Enter to confirm the number. The original is scanned into the ADF, or place a single original face down on the scanner glass. See page 9.1. 4 Press Menu until Fax Feature appears on the bottom line of the ...: Prints pages to be read like a note pad. • 1->2Side Long: Prints pages to be present. 1 Press Fax. 2 Load originals face up into the ADF, or place a single original face down on the scanner glass. Sending a delayed fax You can add up to 10 destinations. 9.6 The display asks you want...
...buttons, speed dial numbers, or group dial numbers. For details, see page 10.2. 7 Press Enter to confirm the number. The original is scanned into the ADF, or place a single original face down on the scanner glass. See page 9.1. 4 Press Menu until Fax Feature appears on the bottom line of the ...: Prints pages to be read like a note pad. • 1->2Side Long: Prints pages to be present. 1 Press Fax. 2 Load originals face up into the ADF, or place a single original face down on the scanner glass. Sending a delayed fax You can add up to 10 destinations. 9.6 The display asks you want...

User Guide
Page 57
... the scanner glass, select Yes to another page. The original is scanned into memory and immediately transmitted when the current operation is scanned into the ADF, or place a single original face down on the scanner glass, select Yes to Standby mode. For details about loading an original, see page 5.1. 3 Adjust the...
... the scanner glass, select Yes to another page. The original is scanned into memory and immediately transmitted when the current operation is scanned into the ADF, or place a single original face down on the scanner glass, select Yes to Standby mode. For details about loading an original, see page 5.1. 3 Adjust the...

User Guide
Page 65
...; Restore backup files to the machine's memory. • Format the USB memory device. • Check the available memory space. Insert a USB memory device into the ADF, or place a single original face down on the front of up into the USB memory port on your own scan settings. This may not automatically...
...; Restore backup files to the machine's memory. • Format the USB memory device. • Check the available memory space. Insert a USB memory device into the ADF, or place a single original face down on the front of up into the USB memory port on your own scan settings. This may not automatically...

User Guide
Page 72
... warranty does not cover damage caused by using a refilled cartridge. • Store print cartridges in the power cord and turn the machine on. 1 white sheet 2 ADF glass 3 scanner lid 4 scanner glass 4 Wipe the underside of the cartridge compartment, and gently swab the glass to see if dirt turns the white cotton... as needed. 1 Slightly dampen a soft lint-free cloth or paper towel with water. 2 Open the scanner lid. 3 Wipe the surface of the scanner glass and ADF glass until it is clean and dry. 5 Close the scanner lid.
... warranty does not cover damage caused by using a refilled cartridge. • Store print cartridges in the power cord and turn the machine on. 1 white sheet 2 ADF glass 3 scanner lid 4 scanner glass 4 Wipe the underside of the cartridge compartment, and gently swab the glass to see if dirt turns the white cotton... as needed. 1 Slightly dampen a soft lint-free cloth or paper towel with water. 2 Open the scanner lid. 3 Wipe the surface of the scanner glass and ADF glass until it is clean and dry. 5 Close the scanner lid.

User Guide
Page 75
... if necessary. Caution Once you experience frequent paper jams or printing problems, check the number of pages the machine has printed or scanned. Items ADF rubber pad Transfer roller Fuser unit Tray rubber pad Pickup roller Yield (Average) Approx. 20,000 pages Approx. 70,000 pages Approx. 80,...000 pages Approx. 250,000 pages Approx. 150,000 pages Xerox highly recommends that the new cartridge needs to be installed for checking the replaceable elements of your printer in the cartridge. • Drum: displays the...
... if necessary. Caution Once you experience frequent paper jams or printing problems, check the number of pages the machine has printed or scanned. Items ADF rubber pad Transfer roller Fuser unit Tray rubber pad Pickup roller Yield (Average) Approx. 20,000 pages Approx. 70,000 pages Approx. 80,...000 pages Approx. 250,000 pages Approx. 150,000 pages Xerox highly recommends that the new cartridge needs to be installed for checking the replaceable elements of your printer in the cartridge. • Drum: displays the...

User Guide
Page 76
..., such as Internet Explorer, from the ADF, as shown. 1 1 ADF rubber pad 4 Insert a new ADF rubber pad into the right slot. Replacing the ADF rubber pad You will need to replace the ADF rubber pad when there seems to let you can manage the machine via Xerox's CentreWare IS, an embedded web server....machine to send email notifications to be a consistent problem with the slot and push the right end of the ADF roller toward the document input tray. 1 bushing 2 ADF roller 3 Remove the ADF rubber pad from Windows. 2 Enter the machine IP address (http://xxx.xxx.xxx.xxx) in the address ...
..., such as Internet Explorer, from the ADF, as shown. 1 1 ADF rubber pad 4 Insert a new ADF rubber pad into the right slot. Replacing the ADF rubber pad You will need to replace the ADF rubber pad when there seems to let you can manage the machine via Xerox's CentreWare IS, an embedded web server....machine to send email notifications to be a consistent problem with the slot and push the right end of the ADF roller toward the document input tray. 1 bushing 2 ADF roller 3 Remove the ADF rubber pad from Windows. 2 Enter the machine IP address (http://xxx.xxx.xxx.xxx) in the address ...

User Guide
Page 78
...Understanding display messages • Print cartridge-related messages • Solving other problems Clearing document jams When an original jams while passing through the ADF, Document Jam appears on the display. 14 Troubleshooting This chapter gives helpful information for thick, thin, or mixed paper-type originals. 14....1 Caution To avoid tearing the document, pull out the jammed document gently and slowly. 1 Remove any , back into the ADF. 1 1 ADF cover Note To prevent document jams, use the scanner glass for what to do not see the paper in this area, refer to Roller...
...Understanding display messages • Print cartridge-related messages • Solving other problems Clearing document jams When an original jams while passing through the ADF, Document Jam appears on the display. 14 Troubleshooting This chapter gives helpful information for thick, thin, or mixed paper-type originals. 14....1 Caution To avoid tearing the document, pull out the jammed document gently and slowly. 1 Remove any , back into the ADF. 1 1 ADF cover Note To prevent document jams, use the scanner glass for what to do not see the paper in this area, refer to Roller...

User Guide
Page 79
... place. Refer to the table below and page 14.3 In the fuser area or around the print cartridge. See page 14.3. 4 Insert tray 1 into the ADF. Then load the removed pages back into the machine until it to In the paper feed area (tray 1, optional tray 2, or multipurpose tray) below to...
... place. Refer to the table below and page 14.3 In the fuser area or around the print cartridge. See page 14.3. 4 Insert tray 1 into the ADF. Then load the removed pages back into the machine until it to In the paper feed area (tray 1, optional tray 2, or multipurpose tray) below to...


