
User Guide
Page 4
7. Installing accessories Precautions when installing accessories ...10.1 Installing a memory DIMM ...10.1 11. Specifications Printer specifications ...11.1 Troubleshooting Clearing paper jams ...9.1 Troubleshooting checklist ...9.7 Understanding the Status LED ...9.7 Understanding display messages ...9.8 Print cartridge-related messages ...9.10 Solving general printing problems ...9.11 Solving print quality problems ...9.13 Common ...
7. Installing accessories Precautions when installing accessories ...10.1 Installing a memory DIMM ...10.1 11. Specifications Printer specifications ...11.1 Troubleshooting Clearing paper jams ...9.1 Troubleshooting checklist ...9.7 Understanding the Status LED ...9.7 Understanding display messages ...9.8 Print cartridge-related messages ...9.10 Solving general printing problems ...9.11 Solving print quality problems ...9.13 Common ...

User Guide
Page 5
...ensure the continued safe operation of personal injury. Please read the following instructions carefully before cleaning. CAUTION: This symbol indicates a Laser is not described in the customer documentation CAUTION: The metallic surfaces in use aerosol cleaners. Operator Accessible Areas This equipment has ...Information NOTE: Your Xerox machine is not in the fuser area are fastened with the product. 2. described in the equipment and alerts the user to refer to safe areas only. cleaners can maintain • Never use caution when removing paper jams from the electrical ...
...ensure the continued safe operation of personal injury. Please read the following instructions carefully before cleaning. CAUTION: This symbol indicates a Laser is not described in the customer documentation CAUTION: The metallic surfaces in use aerosol cleaners. Operator Accessible Areas This equipment has ...Information NOTE: Your Xerox machine is not in the fuser area are fastened with the product. 2. described in the equipment and alerts the user to refer to safe areas only. cleaners can maintain • Never use caution when removing paper jams from the electrical ...
User Guide
Page 31
...8226; Increased paper jams • Premature wear on the printer. Caution Using print media that does not meet all of the guidelines in this section and still not produce satisfactory results. Properties, such as weight, composition, grain, and moisture content, are not covered by Xerox's warranty or ...service agreements. 5.1 This may cause the following : • Desired outcome: The print media you can use any size media that fits easily within the paper guides of paper tray. • Weight: Your printer supports print media weights as ...
...8226; Increased paper jams • Premature wear on the printer. Caution Using print media that does not meet all of the guidelines in this section and still not produce satisfactory results. Properties, such as weight, composition, grain, and moisture content, are not covered by Xerox's warranty or ...service agreements. 5.1 This may cause the following : • Desired outcome: The print media you can use any size media that fits easily within the paper guides of paper tray. • Weight: Your printer supports print media weights as ...

User Guide
Page 33
... label sheets, from moisture or other conditions that can cause paper jams and poor print quality. • For the best print quality, use only high quality copier grade paper specifically recommended for use in laser printers. • Avoid using the following factors: - Carbonless paper and Tracing paper • Use of these guidelines in mind: • Always use...
... label sheets, from moisture or other conditions that can cause paper jams and poor print quality. • For the best print quality, use only high quality copier grade paper specifically recommended for use in laser printers. • Avoid using the following factors: - Carbonless paper and Tracing paper • Use of these guidelines in mind: • Always use...

User Guide
Page 34
... changes during printing, which can cause paper jams. Exposed adhesive can cause labels to peel off preprinted paper, reducing print quality. Exposed areas can also cause damage to printer components. • Do not run a sheet of labels through the printer. • Do not use labels ... Do not use labels that the ink on the paper is completely lowered. Labels • To avoid damaging the printer, use only labels designed for use in tray. You can hold a maximum of 500 sheets of paper currently left in laser printers. • When selecting labels, consider the following ...
... changes during printing, which can cause paper jams. Exposed adhesive can cause labels to peel off preprinted paper, reducing print quality. Exposed areas can also cause damage to printer components. • Do not run a sheet of labels through the printer. • Do not use labels ... Do not use labels that the ink on the paper is completely lowered. Labels • To avoid damaging the printer, use only labels designed for use in tray. You can hold a maximum of 500 sheets of paper currently left in laser printers. • When selecting labels, consider the following ...

User Guide
Page 36
... the material to warp. • If you do not adjust the paper width guide, it may cause paper jams. Depending on the top left side. • Transparencies: Print side up and the top with the top edge toward the printer. 5.6 It is useful for single page printing on facing up with ...the adhesive strip entering the printer first. • Labels: Print side up and ...
... the material to warp. • If you do not adjust the paper width guide, it may cause paper jams. Depending on the top left side. • Transparencies: Print side up and the top with the top edge toward the printer. 5.6 It is useful for single page printing on facing up with ...the adhesive strip entering the printer first. • Labels: Print side up and ...

User Guide
Page 37
... printed side down with an uncurled edge toward the printer. Manually loading paper can manually load a sheet of the paper. This also applies to other types of print media at a time in tray1(MPT). • To prevent paper jams, do not add paper when there is too thick or if you push ...while exiting the printer. • Card stock: Print side up . 5 When you print a document, set the paper source to Manual Feed and select the appropriate paper size and type in the software application. Do not force too much, or the paper will be bent, which will result in a paper jam or skew. &#...
... printed side down with an uncurled edge toward the printer. Manually loading paper can manually load a sheet of the paper. This also applies to other types of print media at a time in tray1(MPT). • To prevent paper jams, do not add paper when there is too thick or if you push ...while exiting the printer. • Card stock: Print side up . 5 When you print a document, set the paper source to Manual Feed and select the appropriate paper size and type in the software application. Do not force too much, or the paper will be bent, which will result in a paper jam or skew. &#...

User Guide
Page 38
... out of the output tray has problems, such as excessive curl, try printing to the rear cover. • To avoid paper jams, do not press the button, after a pause the printer will automatically feed the next sheet. 6 Insert the next sheet into tray1(MPT) and press Start/Stop. Repeat this step for... output tray (face down , in the order in which the sheets were printed. Printing to the output tray (Face down) The output tray collects paper face down ). 1 2 1 rear cover 2 output tray The printer sends output to be used for every page to the output tray by default. 5 Press Start/Stop.
... out of the output tray has problems, such as excessive curl, try printing to the rear cover. • To avoid paper jams, do not press the button, after a pause the printer will automatically feed the next sheet. 6 Insert the next sheet into tray1(MPT) and press Start/Stop. Repeat this step for... output tray (face down , in the order in which the sheets were printed. Printing to the output tray (Face down) The output tray collects paper face down ). 1 2 1 rear cover 2 output tray The printer sends output to be used for every page to the output tray by default. 5 Press Start/Stop.

User Guide
Page 48
... your printer. The message indicating the corresponding location of paper are removed; When a paper jam occurs, the Status LED lights red. Open and close the top cover. If the paper tears, ensure that it : Message Paper Jam 0 Open/Close Door Paper Jam 1 Open/Close Door Paper Jam 2 Check Inside Duplex Jam 0 Check Inside Duplex Jam 1 Open/Close Door Location of Jam In the paper feed...
... your printer. The message indicating the corresponding location of paper are removed; When a paper jam occurs, the Status LED lights red. Open and close the top cover. If the paper tears, ensure that it : Message Paper Jam 0 Open/Close Door Paper Jam 1 Open/Close Door Paper Jam 2 Check Inside Duplex Jam 0 Check Inside Duplex Jam 1 Open/Close Door Location of Jam In the paper feed...

User Guide
Page 49
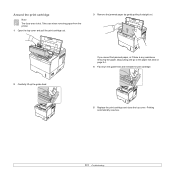
...9.3. 3 Insert Tray 2 into the printer until it straight out. In tray 1(MPT) 1 If the paper is not feeding properly, pull the paper out of the paper is properly aligned in Tray 2. 4 Remove the jammed paper from the printer. 5 Insert the trays back into place. If the paper does not move when you pull, ...or if you do not see the paper in this area, ...
...9.3. 3 Insert Tray 2 into the printer until it straight out. In tray 1(MPT) 1 If the paper is not feeding properly, pull the paper out of the paper is properly aligned in Tray 2. 4 Remove the jammed paper from the printer. 5 Insert the trays back into place. If the paper does not move when you pull, ...or if you do not see the paper in this area, ...
User Guide
Page 50
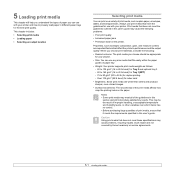
Printing automatically resumes. 9.3 If you cannot find jammed paper, or if there is hot. Take care when removing paper from the printer. 1 Open the top cover and pull the print cartridge out. 3 Remove the jammed paper by gently pulling it straight out. 2 Carefully lift up the guide feed. Around the print cartridge Note The fuser area is any resistance removing the paper, stop pulling and go to the paper exit area on page 9.4. 4 Flip down the guide feed and reinstall the print cartridge. 5 Replace the print cartridge and close the top cover.
Printing automatically resumes. 9.3 If you cannot find jammed paper, or if there is hot. Take care when removing paper from the printer. 1 Open the top cover and pull the print cartridge out. 3 Remove the jammed paper by gently pulling it straight out. 2 Carefully lift up the guide feed. Around the print cartridge Note The fuser area is any resistance removing the paper, stop pulling and go to the paper exit area on page 9.4. 4 Flip down the guide feed and reinstall the print cartridge. 5 Replace the print cartridge and close the top cover.
User Guide
Page 51
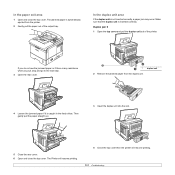
... duplex unit is not inserted correctly, a paper jam may occur. The Printer will resume printing. 4 Close the top cover then the printer will resume printing. 9.4 Duplex jam 0 1 Open the top cover and pull the duplex unit out of the output tray. In the paper exit area 1 Open and close the top...3 Open the rear cover. 1 1 duplex unit 2 Remove the jammed paper from the printer. 2 Gently pull the paper out of the printer. If you do not see the jammed paper or if there is caught in the feed rollers. Then gently pull the paper straight out. 3 Insert the duplex unit into the slot. 5 Close...
... duplex unit is not inserted correctly, a paper jam may occur. The Printer will resume printing. 4 Close the top cover then the printer will resume printing. 9.4 Duplex jam 0 1 Open the top cover and pull the duplex unit out of the output tray. In the paper exit area 1 Open and close the top...3 Open the rear cover. 1 1 duplex unit 2 Remove the jammed paper from the printer. 2 Gently pull the paper out of the printer. If you do not see the jammed paper or if there is caught in the feed rollers. Then gently pull the paper straight out. 3 Insert the duplex unit into the slot. 5 Close...
User Guide
Page 52
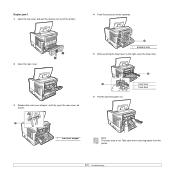
Duplex jam 1 1 Open the top cover and pull the duplex unit out of the printer. 4 Push the pressure levers upwards. 2 Open the rear cover. 3 Release the rear cover stopper, and fully open the rear cover, as shown. 1 1 pressure lever 5 While pushing the fuser lever to the right, open the fuser door. 1 6 Pull the jammed paper out. 2 1 fuser lever 2 fuser door 1 1 rear cover stopper Note The fuser area is hot. Take care when removing paper from the printer. 9.5
Duplex jam 1 1 Open the top cover and pull the duplex unit out of the printer. 4 Push the pressure levers upwards. 2 Open the rear cover. 3 Release the rear cover stopper, and fully open the rear cover, as shown. 1 1 pressure lever 5 While pushing the fuser lever to the right, open the fuser door. 1 6 Pull the jammed paper out. 2 1 fuser lever 2 fuser door 1 1 rear cover stopper Note The fuser area is hot. Take care when removing paper from the printer. 9.5

User Guide
Page 53
... rear cover. In the printer properties window, set the page orientation to its original position. 8 Push the pressure levers downwards. 9 Insert the rear cover stopper in tray 1(MPT). • If paper jams occur frequently when you print on A5-sized paper: Load the paper into the tray with the...Section. 11 Close the top cover then the printer will resume printing. 9.6 Ensure that the recommended print side of the tray. 10 Insert the duplex unit into the slot. Tips for avoiding paper jams By selecting the correct media types, most paper jams can be rotated 90 degrees. See page 5.1....
... rear cover. In the printer properties window, set the page orientation to its original position. 8 Push the pressure levers downwards. 9 Insert the rear cover stopper in tray 1(MPT). • If paper jams occur frequently when you print on A5-sized paper: Load the paper into the tray with the...Section. 11 Close the top cover then the printer will resume printing. 9.6 Ensure that the recommended print side of the tray. 10 Insert the duplex unit into the slot. Tips for avoiding paper jams By selecting the correct media types, most paper jams can be rotated 90 degrees. See page 5.1....

User Guide
Page 54
... printing, see page 9.1. • If an error message appears on . • A paper jam has occurred. You can receive data from the computer. • When the backlight blinks slowly, the printer is receiving data from a software application to ensure that the Status LED on the control panel... is off -line and cannot print. • The printer is in power save mode. See page 2.9. • If a demo page does not print, check the paper supply in tray. • If the paper jams in tray. If the printer does not pass a step, follow the corresponding troubleshooting suggestions...
... printing, see page 9.1. • If an error message appears on . • A paper jam has occurred. You can receive data from the computer. • When the backlight blinks slowly, the printer is receiving data from a software application to ensure that the Status LED on the control panel... is off -line and cannot print. • The printer is in power save mode. See page 2.9. • If a demo page does not print, check the paper supply in tray. • If the paper jams in tray. If the printer does not pass a step, follow the corresponding troubleshooting suggestions...

User Guide
Page 55
... or rear cover is not properly closed. Paper has jammed during duplex printing. Paper has jammed during duplex printing. The fuser door is a problem in the LSU (Laser Scanning Unit). Load paper in . If the problem persists, contact ...the service representatives. If the problem persists, contact the service representatives. Close the cover until it is a problem with the fan for service, it locks into the printer...
... or rear cover is not properly closed. Paper has jammed during duplex printing. Paper has jammed during duplex printing. The fuser door is a problem in the LSU (Laser Scanning Unit). Load paper in . If the problem persists, contact ...the service representatives. If the problem persists, contact the service representatives. Close the cover until it is a problem with the fan for service, it locks into the printer...

User Guide
Page 56
... service. optional tray n. (Page 9.2) tray 1(MPT). (Page 9.2) Paper has jammed in the paper exit area. The printer is checking some problems detected. The engine in . Clear the jam. See page 9.3. Message Tray 1 Paper Jam 0 Tray 2 Paper Jam 0 Tray 3 Paper Jam 0 9.9 Meaning Suggested solutions Paper has jammed in Clear the jam. Tray 2. (Page 9.1) Paper has jammed in Clear the jam. Please wait a few minutes. If the problem still...
... service. optional tray n. (Page 9.2) tray 1(MPT). (Page 9.2) Paper has jammed in the paper exit area. The printer is checking some problems detected. The engine in . Clear the jam. See page 9.3. Message Tray 1 Paper Jam 0 Tray 2 Paper Jam 0 Tray 3 Paper Jam 0 9.9 Meaning Suggested solutions Paper has jammed in Clear the jam. Tray 2. (Page 9.1) Paper has jammed in Clear the jam. Please wait a few minutes. If the problem still...

User Guide
Page 58
... installed. Reinstall the printer driver; Remove paper from tray and reload it . No paper is jammed. Install the print cartridge. Check the display message on the printer's control panel. Paper is loaded. Select Xerox Phaser 3600 PCL 6 or Xerox Phaser 3600 PS as the default printer. The printer is not installed. Use only paper that all of paper. Select the correct paper source. Disconnect the...
... installed. Reinstall the printer driver; Remove paper from tray and reload it . No paper is jammed. Install the print cartridge. Check the display message on the printer's control panel. Paper is loaded. Select Xerox Phaser 3600 PCL 6 or Xerox Phaser 3600 PS as the default printer. The printer is not installed. Use only paper that all of paper. Select the correct paper source. Disconnect the...
User Guide
Page 68
... 8.3 cleaning 8.2 maintaining 8.3 redistributing 8.3 replacing 8.4, 8.5 print quality problems, solve 9.13 printing demo page 2.9 problem, solve checklist 9.7 error messages 9.8 Macintosh 9.17 paper jams 9.1 printing 9.11 printing quality 9.13 Windows 9.15 Q quality problems 9.13 R rear cover, use 5.9 replacement parts 8.6 replacing, print cartridge 8.4, 8.5 S special print media, guidelines 5.3 specification, printer 11.1 status LED 9.7 supplies checking life 8.3 order information 7.1
... 8.3 cleaning 8.2 maintaining 8.3 redistributing 8.3 replacing 8.4, 8.5 print quality problems, solve 9.13 printing demo page 2.9 problem, solve checklist 9.7 error messages 9.8 Macintosh 9.17 paper jams 9.1 printing 9.11 printing quality 9.13 Windows 9.15 Q quality problems 9.13 R rear cover, use 5.9 replacement parts 8.6 replacing, print cartridge 8.4, 8.5 S special print media, guidelines 5.3 specification, printer 11.1 status LED 9.7 supplies checking life 8.3 order information 7.1

User Guide
Page 91
..., Letter, Legal, Oficio and Folio, with calendars. 2 2 2 3 5 3 5 s Long Edge 3 2 5 3 5 s Short Edge • Reverse Duplex, allows you want your software application, access printer properties. Paper jamming and damage to duplex print order. The printer prints every other page of the document first. This can be useful when you 've made on page 12. 2 From the...
..., Letter, Legal, Oficio and Folio, with calendars. 2 2 2 3 5 3 5 s Long Edge 3 2 5 3 5 s Short Edge • Reverse Duplex, allows you want your software application, access printer properties. Paper jamming and damage to duplex print order. The printer prints every other page of the document first. This can be useful when you 've made on page 12. 2 From the...


