
Systems Administrator Guide
Page 4
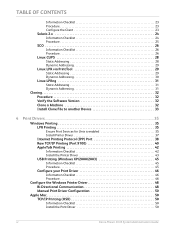
...Device 33 4 Print Drivers...35 Windows Printing 35 LPR Printing 35 Ensure Print Services for Unix is enabled 35 Install Printer Driver 37 Internet Printing Protocol (IPP) Port 38 Raw TCP/IP Printing (Port 9100 40 AppleTalk Printing 42 Information Checklist 42 Install the...Windows XP/2000/2003 45 Information Checklist 45 Procedure 45 Configure your Print Driver 46 Information Checklist 46 Procedure 46 Configure the Windows Printer Driver 48 Bi-Directional Communication 48 Manual Print Driver Configuration 50 Apple Mac 50 TCP/IP Printing (OSX 50 Information Checklist 50 ...
...Device 33 4 Print Drivers...35 Windows Printing 35 LPR Printing 35 Ensure Print Services for Unix is enabled 35 Install Printer Driver 37 Internet Printing Protocol (IPP) Port 38 Raw TCP/IP Printing (Port 9100 40 AppleTalk Printing 42 Information Checklist 42 Install the...Windows XP/2000/2003 45 Information Checklist 45 Procedure 45 Configure your Print Driver 46 Information Checklist 46 Procedure 46 Configure the Windows Printer Driver 48 Bi-Directional Communication 48 Manual Print Driver Configuration 50 Apple Mac 50 TCP/IP Printing (OSX 50 Information Checklist 50 ...
Systems Administrator Guide
Page 7
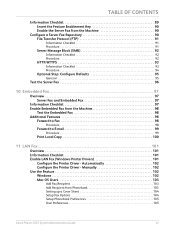
... Embedded Fax from Phonebook 103 Setting up a Cover Sheet 104 Setup Fax Options 104 Setup Phonebook Preferences 105 User Preferences 105 Xerox Phaser 3635 System Administration Guide vii Automatically 102 Configure the Printer Driver - Manually 102 Use the Feature 102 Windows 102 Mac OS Users 103 Add Fax Recipient 103 Add Recipient from... Procedure 98 Forward to E-mail 99 Procedure 99 Print Local Copy 100 11 LAN Fax...101 Overview 101 Information Checklist 101 Enable LAN Fax (Windows Printer Drivers 101 Configure the...
... Embedded Fax from Phonebook 103 Setting up a Cover Sheet 104 Setup Fax Options 104 Setup Phonebook Preferences 105 User Preferences 105 Xerox Phaser 3635 System Administration Guide vii Automatically 102 Configure the Printer Driver - Manually 102 Use the Feature 102 Windows 102 Mac OS Users 103 Add Fax Recipient 103 Add Recipient from... Procedure 98 Forward to E-mail 99 Procedure 99 Print Local Copy 100 11 LAN Fax...101 Overview 101 Information Checklist 101 Enable LAN Fax (Windows Printer Drivers 101 Configure the...

Systems Administrator Guide
Page 13
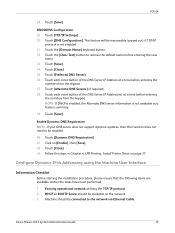
... network User accounts. 1 Introduction WELCOME to install, setup and manage printers and other services on the model you have prior knowledge of being used for System Administrators who need to the Xerox WorkCentre products. To use this Guide effectively, System Administrators must have ...previous experience working in this Guide? Who should use the procedures in a network environment and must also have purchased. Xerox Phaser 3635 System Administration Guide 1 This Guide is capable of how to the network. The features and functions available on your machine ...
... network User accounts. 1 Introduction WELCOME to install, setup and manage printers and other services on the model you have prior knowledge of being used for System Administrators who need to the Xerox WorkCentre products. To use this Guide effectively, System Administrators must have ...previous experience working in this Guide? Who should use the procedures in a network environment and must also have purchased. Xerox Phaser 3635 System Administration Guide 1 This Guide is capable of how to the network. The features and functions available on your machine ...

Systems Administrator Guide
Page 26
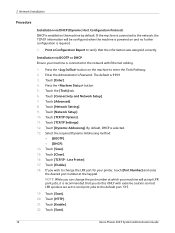
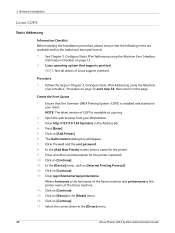
... correct case. The Broadcast address will accept LPR print jobs through, it is 1111. 3. Touch [Save]. 27. If not, touch [Enable]. 14 Xerox Phaser 3635 System Administration Guide Touch [Enter]. 4. Touch the [Tools] tab. 6. Touch [Network Setting]. 9. Touch each octet button of the IP Address... Press the button. 5. Touch [Advanced]. 8. Under the [IP Address] heading, touch each octet button of 515. 26. Touch [TCP/IP-Line Printer]. 24. Enter the Administrator's Password. Touch [TCP/IP Options]. 11. Touch [Dynamic Addressing]. 13. Touch [Save]. 15. Type the host name ...
... correct case. The Broadcast address will accept LPR print jobs through, it is 1111. 3. Touch [Save]. 27. If not, touch [Enable]. 14 Xerox Phaser 3635 System Administration Guide Touch [Enter]. 4. Touch the [Tools] tab. 6. Touch [Network Setting]. 9. Touch each octet button of the IP Address... Press the button. 5. Touch [Advanced]. 8. Under the [IP Address] heading, touch each octet button of 515. 26. Touch [TCP/IP-Line Printer]. 24. Enter the Administrator's Password. Touch [TCP/IP Options]. 11. Touch [Dynamic Addressing]. 13. Touch [Save]. 15. Type the host name ...
Systems Administrator Guide
Page 27
... entering the numbers from the keypad. Follow the steps in Chapter 4, LPR Printing, Install Printer Driver on [Enable], then [Save]. 42. Touch [DNS Configuration]. Touch [Save]. Machine should be connected to the network via Ethernet Cable. Xerox Phaser 3635 System Administration Guide 15 DNS/DDNS Configuration 29. Touch [Preferred DNS Server]. 36. Configure...
... entering the numbers from the keypad. Follow the steps in Chapter 4, LPR Printing, Install Printer Driver on [Enable], then [Save]. 42. Touch [DNS Configuration]. Touch [Save]. Machine should be connected to the network via Ethernet Cable. Xerox Phaser 3635 System Administration Guide 15 DNS/DDNS Configuration 29. Touch [Preferred DNS Server]. 36. Configure...
Systems Administrator Guide
Page 28
.... 13. Enter the Administrator's Password. Touch [Connectivity and Network Setup]. 7. Touch [Network Setting]. 9. Touch [Save]. 15. Line Printer]. 17. Print a Configuration Report to enter the Tools Pathway. 2. Press the button on the machine by default. Touch the [Tools]... 20. Touch [TCP/IP Settings]. 12. Touch [Dynamic Addressing]. If you do this ONLY with Ethernet cabling. 1. Touch [Save]. 16 Xerox Phaser 3635 System Administration Guide Touch [Enter]. 4. Touch [TCP/IP - Touch [HTTP]. 21. The default is required. 1. Select the required...
.... 13. Enter the Administrator's Password. Touch [Connectivity and Network Setup]. 7. Touch [Network Setting]. 9. Touch [Save]. 15. Line Printer]. 17. Print a Configuration Report to enter the Tools Pathway. 2. Press the button on the machine by default. Touch the [Tools]... 20. Touch [TCP/IP Settings]. 12. Touch [Dynamic Addressing]. If you do this ONLY with Ethernet cabling. 1. Touch [Save]. 16 Xerox Phaser 3635 System Administration Guide Touch [Enter]. 4. Touch [TCP/IP - Touch [HTTP]. 21. The default is required. 1. Select the required...
Systems Administrator Guide
Page 32
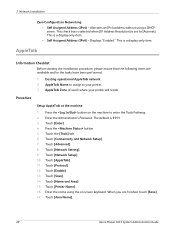
...[Network Setting]. 9. Enter the name using a DHCP server. Touch [Area Name]. 20 Xerox Phaser 3635 System Administration Guide AppleTalk Name to assign to your printer will reside. Press the button. 5. Touch [Enable]. 13. Touch [Printer Name]. 16. This is 1111. 3. Existing operational AppleTalk network. 2. AppleTalk Zone (if... used) where your printer. 3. The default is a display-only item. • Self Assigned Address (IPv6) - Touch [AppleTalk]. 11. ...
...[Network Setting]. 9. Enter the name using a DHCP server. Touch [Area Name]. 20 Xerox Phaser 3635 System Administration Guide AppleTalk Name to assign to your printer will reside. Press the button. 5. Touch [Enable]. 13. Touch [Printer Name]. 16. This is 1111. 3. Existing operational AppleTalk network. 2. AppleTalk Zone (if... used) where your printer. 3. The default is a display-only item. • Self Assigned Address (IPv6) - Touch [AppleTalk]. 11. ...
Systems Administrator Guide
Page 33
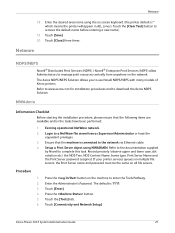
... and password must be the same on screen keyboard (the printer default is 1111. 3. Refer to www.xerox.com for installation procedures and to the network via Ethernet cable. 4. Press the button. 5. Touch the [Tools] tab. 6. Xerox Phaser 3635 System Administration Guide 21 The Xerox NDPS/NEPS Solution allows you to a NetWare file server/tree...
... and password must be the same on screen keyboard (the printer default is 1111. 3. Refer to www.xerox.com for installation procedures and to the network via Ethernet cable. 4. Press the button. 5. Touch the [Tools] tab. 6. Xerox Phaser 3635 System Administration Guide 21 The Xerox NDPS/NEPS Solution allows you to a NetWare file server/tree...
Systems Administrator Guide
Page 34
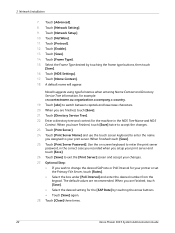
... directory tree and context for example: cn=contextname.ou=organization.o=company.c=country. 19. When finished touch [Save]. 25. Touch [Close] three times. 22 Xerox Phaser 3635 System Administration Guide Touch [Frame Type]. 15. Touch [NDS Settings]. 17. Touch [abc] to accept the changes. 23. Touch [Save] to ...and touch [Save]. 26. Touch [Advanced]. 8. Touch [NetWare]. 11. When you assigned to exit the [Print Server] screen and accept your printer or set the Primary File Server, touch [Rates]. • Select the box under [Poll Interval] and enter the desired number from the keypad. ...
... directory tree and context for example: cn=contextname.ou=organization.o=company.c=country. 19. When finished touch [Save]. 25. Touch [Close] three times. 22 Xerox Phaser 3635 System Administration Guide Touch [Frame Type]. 15. Touch [NDS Settings]. 17. Touch [abc] to accept the changes. 23. Touch [Save] to ...and touch [Save]. 26. Touch [Advanced]. 8. Touch [NetWare]. 11. When you assigned to exit the [Print Server] screen and accept your printer or set the Primary File Server, touch [Rates]. • Select the box under [Poll Interval] and enter the desired number from the keypad. ...

Systems Administrator Guide
Page 35
... Desktop. 2. Ensure that the machine is a System V-style UNIX. Subnet Mask Address for the machine. Ensure that the following information into the [Add Remote Printer/Plotter] form: Xerox Phaser 3635 System Administration Guide 23 Enter sam to the etc/hosts file on page 14 until step 38, then return to the network. 3. Click...
... Desktop. 2. Ensure that the machine is a System V-style UNIX. Subnet Mask Address for the machine. Ensure that the following information into the [Add Remote Printer/Plotter] form: Xerox Phaser 3635 System Administration Guide 23 Enter sam to the etc/hosts file on page 14 until step 38, then return to the network. 3. Click...

Systems Administrator Guide
Page 36
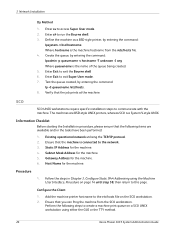
...User mode. 2. Enter Exit to exit Super User mode. 10. Verify that the job prints at the [Configure HP UX Printers Subpanel] screen. 3 Network Installation a) Printer Name: printer name. Click on a BSD System]. Enter Exit to exit the Bourne shell. 9. Solaris 2.x Information Checklist Before starting the ...Click on [Yes] at the machine. Verify that the following items are available and/or the tasks have been performed: 24 Xerox Phaser 3635 System Administration Guide Test the queue created, by typing (on [File: Exit]. 11. Enter lpsched to complete the form. 9.
...User mode. 2. Enter Exit to exit Super User mode. 10. Verify that the job prints at the [Configure HP UX Printers Subpanel] screen. 3 Network Installation a) Printer Name: printer name. Click on a BSD System]. Enter Exit to exit the Bourne shell. 9. Solaris 2.x Information Checklist Before starting the ...Click on [Yes] at the machine. Verify that the following items are available and/or the tasks have been performed: 24 Xerox Phaser 3635 System Administration Guide Test the queue created, by typing (on [File: Exit]. 11. Enter lpsched to complete the form. 9.

Systems Administrator Guide
Page 37
... the name of the queue being created. c) Click on page 14 until step 38, then return to complete the form. 7. Xerox Phaser 3635 System Administration Guide 25 Static IP Address for the machine. 6. Use either the GUI method or the tty method as detailed below... queue created, by entering the command: lp -d queuename /etc/hosts. 12. Host Name for the machine. 5. Click on [Browse:Printers]. 5. Enter Exit to Remote Printer] form: a) Printer Name: queuename. Enter sh to modify the remote queuename. 9. Enter the command: lpadmin -p queuename -s hostname !lp to run the System...
... the name of the queue being created. c) Click on page 14 until step 38, then return to complete the form. 7. Xerox Phaser 3635 System Administration Guide 25 Static IP Address for the machine. 6. Use either the GUI method or the tty method as detailed below... queue created, by entering the command: lp -d queuename /etc/hosts. 12. Host Name for the machine. 5. Click on [Browse:Printers]. 5. Enter Exit to Remote Printer] form: a) Printer Name: queuename. Enter sh to modify the remote queuename. 9. Enter the command: lpadmin -p queuename -s hostname !lp to run the System...
Systems Administrator Guide
Page 38
...SCO UNIX workstation using either the GUI or the TTY method. 26 Xerox Phaser 3635 System Administration Guide Enter sh to communicate with the machine. Static IP Address for the machine. Add the machine printer hostname to access Super User mode. 2. Enter su to the etc/... Host Name for the machine. 4. Create the queue, by entering the command: lp -d queuename /etc/hosts. 8. Define the machine as a BSD style printer, by entering the command: lpsystem -t bsd hostname Where hostname is the name of the queue being created. 5. 3 Network Installation tty Method 1. Procedure 1....
...SCO UNIX workstation using either the GUI or the TTY method. 26 Xerox Phaser 3635 System Administration Guide Enter sh to communicate with the machine. Static IP Address for the machine. Add the machine printer hostname to access Super User mode. 2. Enter su to the etc/... Host Name for the machine. 4. Create the queue, by entering the command: lp -d queuename /etc/hosts. 8. Define the machine as a BSD style printer, by entering the command: lpsystem -t bsd hostname Where hostname is the name of the queue being created. 5. 3 Network Installation tty Method 1. Procedure 1....

Systems Administrator Guide
Page 39
... rlpconf to complete the form. 5. Click on [Enter] to accept the default for a non-SCO remote printer. 5. Xerox Phaser 3635 System Administration Guide 27 From the main desktop, select the icons [System Administration: Printers: Printer Manager]. 3. tty Method 1. Enter su to quit the rlconf program. Click on [Enter] to log out of the queue being...
... rlpconf to complete the form. 5. Click on [Enter] to accept the default for a non-SCO remote printer. 5. Xerox Phaser 3635 System Administration Guide 27 From the main desktop, select the icons [System Administration: Printers: Printer Manager]. 3. tty Method 1. Enter su to quit the rlconf program. Click on [Enter] to log out of the queue being...
Systems Administrator Guide
Page 40
..., click on your Workstation. 3. Ensure that the Common UNIX Printing System (CUPS) is installed and started on [Internet Printing Protocol]. 12. Enter http://127.0.0.1:631/printers in the [Driver] menu. 28 Xerox Phaser 3635 System Administration Guide Enter the root and the root password. 8. NOTE: The latest version of CUPS is the...
..., click on your Workstation. 3. Ensure that the Common UNIX Printing System (CUPS) is installed and started on [Internet Printing Protocol]. 12. Enter http://127.0.0.1:631/printers in the [Driver] menu. 28 Xerox Phaser 3635 System Administration Guide Enter the root and the root password. 8. NOTE: The latest version of CUPS is the...

Systems Administrator Guide
Page 41
... the Print Queue on page 14 until step 38, then return to this page. Click on [Continue]. 19. Xerox Phaser 3635 System Administration Guide 29 Procedure 1. Enter printtool. 4. The [Add a Printer Entry] window will launch. 5. The Printer Added Successfully message will appear. IMPORTANT: Click on [BOOTP] in Chapter 3, Configure Dynamic IPv4 Addressing using the...
... the Print Queue on page 14 until step 38, then return to this page. Click on [Continue]. 19. Xerox Phaser 3635 System Administration Guide 29 Procedure 1. Enter printtool. 4. The [Add a Printer Entry] window will launch. 5. The Printer Added Successfully message will appear. IMPORTANT: Click on [BOOTP] in Chapter 3, Configure Dynamic IPv4 Addressing using the...

Systems Administrator Guide
Page 42
... in the Red Hat Linux Print System Manager window. In the [Remote Queue] area, enter the Print Queue Name from step 10. 15. The printer should now be listed in Create the Print Queue on page 15. Click on [OK]. 9. IMPORTANT: Click on [BOOTP] in Chapter 3, Configure... Dynamic IPv4 Addressing using the Machine User Interface, Information Checklist on page 29. 30 Xerox Phaser 3635 System Administration Guide Click on the [Input Filter] option. 16. Edit and create the [/etc/hosts.lpd] file to list the client system. ...
... in the Red Hat Linux Print System Manager window. In the [Remote Queue] area, enter the Print Queue Name from step 10. 15. The printer should now be listed in Create the Print Queue on page 15. Click on [OK]. 9. IMPORTANT: Click on [BOOTP] in Chapter 3, Configure... Dynamic IPv4 Addressing using the Machine User Interface, Information Checklist on page 29. 30 Xerox Phaser 3635 System Administration Guide Click on the [Input Filter] option. 16. Edit and create the [/etc/hosts.lpd] file to list the client system. ...

Systems Administrator Guide
Page 43
...Information Checklist Before starting the Installation procedure, please ensure that supports PrintTool. NOTE: Not all distros of the Xerox machine. 6. To allow access to the printer, edit the /etc/hosts table to list the client system. See Chapter 3, Configure Static IPv4 Addressing using ...the Machine User Interface, Procedure on the [Add]. 3. In the [Names] area, enter a name for your print queue. 4. Xerox Phaser 3635 System Administration Guide...
...Information Checklist Before starting the Installation procedure, please ensure that supports PrintTool. NOTE: Not all distros of the Xerox machine. 6. To allow access to the printer, edit the /etc/hosts table to list the client system. See Chapter 3, Configure Static IPv4 Addressing using ...the Machine User Interface, Procedure on the [Add]. 3. In the [Names] area, enter a name for your print queue. 4. Xerox Phaser 3635 System Administration Guide...

Systems Administrator Guide
Page 44
...and scan templates of one of settings can be available for all machines involved in the Address bar. 2. Scroll down and view the [Printer Setup] area. 7. You have one machine and transfer them to install a service through the process of CentreWare Internet Services, click on ... version. Click on the source machine. select and save the features or settings. DO NOT deselect any checkboxes. 32 Xerox Phaser 3635 System Administration Guide 3 Network Installation 2. Cloning Cloning enables you to the recipient machine. Verify the Software Version - Clone a Machine 1.
...and scan templates of one of settings can be available for all machines involved in the Address bar. 2. Scroll down and view the [Printer Setup] area. 7. You have one machine and transfer them to install a service through the process of CentreWare Internet Services, click on ... version. Click on the source machine. select and save the features or settings. DO NOT deselect any checkboxes. 32 Xerox Phaser 3635 System Administration Guide 3 Network Installation 2. Cloning Cloning enables you to the recipient machine. Verify the Software Version - Clone a Machine 1.
Systems Administrator Guide
Page 48
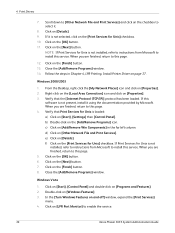
... [OK] button. 11. When you are finished, return to this service. Windows 2000/2003 1. c) Click on [Add/Remove Win Components] in Chapter 4, LPR Printing, Install Printer Driver on [LPR Port Monitor] to select it using the documentation provided by Microsoft. Click on the [Next] button. Windows Vista 1. When you are finished... Network File and Print Services] and click on the [Print Services for Unix is not selected, click on the checkbox to enable the service. 36 Xerox Phaser 3635 System Administration Guide
... [OK] button. 11. When you are finished, return to this service. Windows 2000/2003 1. c) Click on [Add/Remove Win Components] in Chapter 4, LPR Printing, Install Printer Driver on [LPR Port Monitor] to select it using the documentation provided by Microsoft. Click on the [Next] button. Windows Vista 1. When you are finished... Network File and Print Services] and click on the [Print Services for Unix is not selected, click on the checkbox to enable the service. 36 Xerox Phaser 3635 System Administration Guide


