Getting Started Guide
Page 8
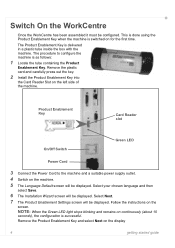
...slot On/Off Switch Green LED Power Cord 3 Connect the Power Cord to configure the machine is delivered in a plastic tube inside the box with the machine. Select your chosen language and then select Save. 6 The Installation Wizard screen will be configured. Remove the Product Enablement... LED light stops blinking and remains on continuously (about 10 seconds), the configuration is switched on the screen. Switch On the WorkCentre Once the WorkCentre has been assembled it must be displayed. Follow the instructions on for the first time. This is done using the Product Enablement...
...slot On/Off Switch Green LED Power Cord 3 Connect the Power Cord to configure the machine is delivered in a plastic tube inside the box with the machine. Select your chosen language and then select Save. 6 The Installation Wizard screen will be configured. Remove the Product Enablement... LED light stops blinking and remains on continuously (about 10 seconds), the configuration is switched on the screen. Switch On the WorkCentre Once the WorkCentre has been assembled it must be displayed. Follow the instructions on for the first time. This is done using the Product Enablement...

Getting Started Guide
Page 14
... screen select Go to configure DNS settings select the DNS Configuration button. By default, DHCP will be selected. Enter the Host Name, by touching each box and entering the number using the Numeric Keypad. Select Save. 8 If you wish to Tools > Connectivity and Network Setup > Network Setup > TCP/IP Options. 3 Select...
... screen select Go to configure DNS settings select the DNS Configuration button. By default, DHCP will be selected. Enter the Host Name, by touching each box and entering the number using the Numeric Keypad. Select Save. 8 If you wish to Tools > Connectivity and Network Setup > Network Setup > TCP/IP Options. 3 Select...

Getting Started Guide
Page 15
...by default. 6 To install the PCL 5 or PCL 6 Print Drivers, select Option and check the boxes for the drivers required. 7 Enter the Printer's IP address, DNS name or UNC path for the WorkCentre. 8 Select Install. 9 Follow the on screen messages to complete the installation. 10 When the Print...install Print Drivers using a different operating system refer to install different print drivers or are on the Print Driver CD that accompanied your WorkCentre. Install Print Drivers This procedure describes how to Troubleshooting on page 31. To use the CentreWare Print and Fax Drivers CD to install ...
...by default. 6 To install the PCL 5 or PCL 6 Print Drivers, select Option and check the boxes for the drivers required. 7 Enter the Printer's IP address, DNS name or UNC path for the WorkCentre. 8 Select Install. 9 Follow the on screen messages to complete the installation. 10 When the Print...install Print Drivers using a different operating system refer to install different print drivers or are on the Print Driver CD that accompanied your WorkCentre. Install Print Drivers This procedure describes how to Troubleshooting on page 31. To use the CentreWare Print and Fax Drivers CD to install ...
Getting Started Guide
Page 16
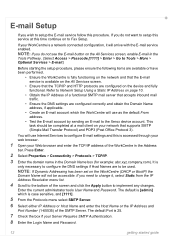
..., if applicable. • Create an E-mail account which is accessed through your web browser. 1 Open your WorkCentre is only necessary to the bottom of the WorkCentre in the Domain Name box (for example: abc.xyz.company.com). You will not be completed at this procedure. Press Enter. 2 Select... (1-65535) of a functional SMTP mail server that the E-mail service is 25. 7 Check the box if your network that the TCP/IP and HTTP protocols are to the Xerox device account. Enter the current administrator tools User Name and Password. If you need to Network Setup ...
..., if applicable. • Create an E-mail account which is accessed through your web browser. 1 Open your WorkCentre is only necessary to the bottom of the WorkCentre in the Domain Name box (for example: abc.xyz.company.com). You will not be completed at this procedure. Press Enter. 2 Select... (1-65535) of a functional SMTP mail server that the E-mail service is 25. 7 Check the box if your network that the TCP/IP and HTTP protocols are to the Xerox device account. Enter the current administrator tools User Name and Password. If you need to Network Setup ...
Getting Started Guide
Page 20
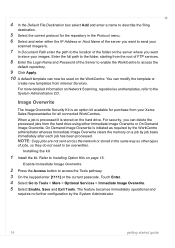
... enter [1111] or the current passcode. Enter the full path to the folder, starting from Internet Services. 4 In the Default File Destination box select Add and enter a name to describe the filing destination. 5 Select the correct protocol for the repository in the same way as required by... services. 8 Enter the Login Name and Password of the Server to enable the WorkCentre to access the default repository. 9 Click Apply. 10 A default template can delete the processed jobs from your Xerox Sales Representative for purchase from the hard drive using either the IP Address or Host...
... enter [1111] or the current passcode. Enter the full path to the folder, starting from Internet Services. 4 In the Default File Destination box select Add and enter a name to describe the filing destination. 5 Select the correct protocol for the repository in the same way as required by... services. 8 Enter the Login Name and Password of the Server to enable the WorkCentre to access the default repository. 9 Click Apply. 10 A default template can delete the processed jobs from your Xerox Sales Representative for purchase from the hard drive using either the IP Address or Host...
Getting Started Guide
Page 28
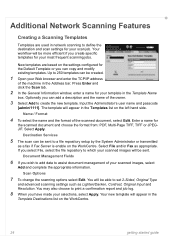
Your workflow will appear in the Address bar. New templates are used in the Template Name box. Up to 250 templates can be more efficient if you create specific templates for the scanned document and choose the format from: PDF, Multi-Page ... the destination and scan settings for your scanned images will appear in the Templates list on the WorkCentre. 24 getting started guide Additional Network Scanning Features Creating a Scanning Templates Templates are based on the WorkCentre. Press Enter and click the Scan tab. 2 In the General Information window, enter a name for your scanned...
Your workflow will appear in the Address bar. New templates are used in the Template Name box. Up to 250 templates can be more efficient if you create specific templates for the scanned document and choose the format from: PDF, Multi-Page ... the destination and scan settings for your scanned images will appear in the Templates list on the WorkCentre. 24 getting started guide Additional Network Scanning Features Creating a Scanning Templates Templates are based on the WorkCentre. Press Enter and click the Scan tab. 2 In the General Information window, enter a name for your scanned...

User Guide
Page 158
...browse through the User Accounts. To change the limit, touch the numeric display region and type in the new limit using the keypad. 136 Xerox WorkCentre 4150 User Guide The buttons on the keypad. Group Number Copy Limit A valid Group Number is from 0 to 999 999. 9 Setups ...Alternatively, use the up User Accounts involves creating an account, password, limits and Accounts and access rights. The User Number and Group Account boxes display information for the currently selected User Account. If the User Number is not unique a message is from 1-255. Button Description Next Open...
...browse through the User Accounts. To change the limit, touch the numeric display region and type in the new limit using the keypad. 136 Xerox WorkCentre 4150 User Guide The buttons on the keypad. Group Number Copy Limit A valid Group Number is from 0 to 999 999. 9 Setups ...Alternatively, use the up User Accounts involves creating an account, password, limits and Accounts and access rights. The User Number and Group Account boxes display information for the currently selected User Account. If the User Number is not unique a message is from 1-255. Button Description Next Open...

User Guide
Page 181
...Drum Cartridge is positioned and latched correctly. 12.Close the side door. 13. WARNING: Only install the correct Xerox SMart KitTM Drum Cartridge in place. Remove the protective paper and seal tape from you to the instructions contained in... the new SMart KitTM Drum Cartridge box. Slide the SMart KitTM Drum Cartridge into the frame in the machine. 10.Replace the toner cartridge (see ...door will tell you when you how to lock the cartridge in the machine. 7. Xerox WorkCentre 4150 User Guide 159
...Drum Cartridge is positioned and latched correctly. 12.Close the side door. 13. WARNING: Only install the correct Xerox SMart KitTM Drum Cartridge in place. Remove the protective paper and seal tape from you to the instructions contained in... the new SMart KitTM Drum Cartridge box. Slide the SMart KitTM Drum Cartridge into the frame in the machine. 10.Replace the toner cartridge (see ...door will tell you when you how to lock the cartridge in the machine. 7. Xerox WorkCentre 4150 User Guide 159

