Statement of Volatility - WorkCentre 4150
Page 1
... Memory types for the WorkCentre 4150 are enabled / utilized (Secure print, sample print, or saved print or job accounting) or for scanning. No user data is retained in this memory. The WorkCentre 4150 does not retain any device information. The WorkCentre 4150 contains non-volatile ...flash memory contained on the controller. The WorkCentre 4150 contains non-volatile memory in the ...
... Memory types for the WorkCentre 4150 are enabled / utilized (Secure print, sample print, or saved print or job accounting) or for scanning. No user data is retained in this memory. The WorkCentre 4150 does not retain any device information. The WorkCentre 4150 contains non-volatile ...flash memory contained on the controller. The WorkCentre 4150 contains non-volatile memory in the ...
Getting Started Guide
Page 5
Xerox WorkCentre 4150 Getting Started Guide Thank you will successfully: Connect the WorkCentre Set-up the WorkCentre Install optional features Operate the WorkCentre Contents Install the WorkCentre 3 Switch On the WorkCentre 4 Your WorkCentre 6 Connecting to the Network 9 Install Print Drivers 11 E-mail Setup 12 Fax Setup 14 ...Installing Option Kits 15 Making Copies 17 Printing a Document 19 Sending a Fax 21 Network Scanning 23 Sending an E-mail 25 LAN Fax 27 Enhance your WorkCentre's productivity 29 Troubleshooting 31 Help 33 getting started guide 1 If you work through the ...
Xerox WorkCentre 4150 Getting Started Guide Thank you will successfully: Connect the WorkCentre Set-up the WorkCentre Install optional features Operate the WorkCentre Contents Install the WorkCentre 3 Switch On the WorkCentre 4 Your WorkCentre 6 Connecting to the Network 9 Install Print Drivers 11 E-mail Setup 12 Fax Setup 14 ...Installing Option Kits 15 Making Copies 17 Printing a Document 19 Sending a Fax 21 Network Scanning 23 Sending an E-mail 25 LAN Fax 27 Enhance your WorkCentre's productivity 29 Troubleshooting 31 Help 33 getting started guide 1 If you work through the ...

Getting Started Guide
Page 7
... Interface 256 Mb Memory Image Overwrite Network Scanning Network Accounting Server Fax Image Overwrite Network Scanning Network Accounting Server Fax In addition you will be one of these four configurations. getting started guide 3 The result will have: Power Cord, User Documentation CD, Print Driver CD (WorkCentre 4150s, 4150x and 4150 xf configurations only), Getting...
... Interface 256 Mb Memory Image Overwrite Network Scanning Network Accounting Server Fax Image Overwrite Network Scanning Network Accounting Server Fax In addition you will be one of these four configurations. getting started guide 3 The result will have: Power Cord, User Documentation CD, Print Driver CD (WorkCentre 4150s, 4150x and 4150 xf configurations only), Getting...
Getting Started Guide
Page 10
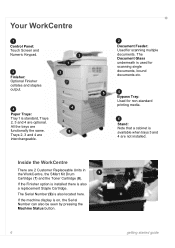
... are functionally the same. If the machine display is standard, Trays 2, 3 and 4 are optional. Your WorkCentre 1 Control Panel: Touch Screen and Numeric Keypad. 3 Finisher: Optional Finisher collates and staples output. 4 Paper Trays: Tray 1 is... guide All the trays are 2 Customer Replaceable Units in the WorkCentre, the SMart Kit Drum 9 Cartridge (7) and the Toner Cartridge (8). The Document Glass underneath is used for scanning single documents, bound documents etc. 5 5 Bypass Tray: Used for scanning multiple documents. If the Finisher option is installed there is available...
... are functionally the same. If the machine display is standard, Trays 2, 3 and 4 are optional. Your WorkCentre 1 Control Panel: Touch Screen and Numeric Keypad. 3 Finisher: Optional Finisher collates and staples output. 4 Paper Trays: Tray 1 is... guide All the trays are 2 Customer Replaceable Units in the WorkCentre, the SMart Kit Drum 9 Cartridge (7) and the Toner Cartridge (8). The Document Glass underneath is used for scanning single documents, bound documents etc. 5 5 Bypass Tray: Used for scanning multiple documents. If the Finisher option is installed there is available...

Getting Started Guide
Page 12
... the tray. 2 Move the Document Guide to just touch both sides of the tray. 3 When you have loaded and press Confirm. NOTE: Documents are only scanned once even when several copies are selected. 8 getting started guide Input the size, type and color of the paper you close the tray, the Tray...
... the tray. 2 Move the Document Guide to just touch both sides of the tray. 3 When you have loaded and press Confirm. NOTE: Documents are only scanned once even when several copies are selected. 8 getting started guide Input the size, type and color of the paper you close the tray, the Tray...

Getting Started Guide
Page 17
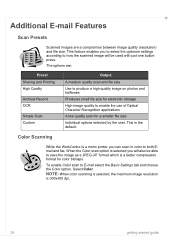
... settings. 12 From the Properties menu, Select Services > E-mail Settings > E-mail Setup. 13 On the E-mail Setup screen you can select the following options: • Scan Resolution • Attachment Type • Output color • Date/Time stamp on all of the E-mail features including setting up address books, please refer to...
... settings. 12 From the Properties menu, Select Services > E-mail Settings > E-mail Setup. 13 On the E-mail Setup screen you can select the following options: • Scan Resolution • Attachment Type • Output color • Date/Time stamp on all of the E-mail features including setting up address books, please refer to...
Getting Started Guide
Page 19
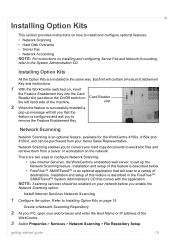
... the feature is an optional feature, available for the WorkCentre 4150s, 4150x and 4150xf, and can be enabled on your Xerox Sales Representative. NOTE: Scanning services should be purchased from a server or workstation on the network. Network Scanning Network Scanning is configured and ask you enable the Network Scanning option. Installing Option Kits All the Option Kits...
... the feature is an optional feature, available for the WorkCentre 4150s, 4150x and 4150xf, and can be enabled on your Xerox Sales Representative. NOTE: Scanning services should be purchased from a server or workstation on the network. Network Scanning Network Scanning is configured and ask you enable the Network Scanning option. Installing Option Kits All the Option Kits...
Getting Started Guide
Page 20
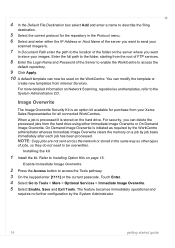
... other types of jobs, so they do not need to be used on the server where you want to store your Xerox Sales Representative for all connected WorkCentres. For security, you want to send your scanned images to. 7 In Document Path enter the path to the location of the Server to enable the... WorkCentre to access the default repository. 9 Click Apply. 10 A default template can modify the template or create new templates from your images. Enter the full path ...
... other types of jobs, so they do not need to be used on the server where you want to store your Xerox Sales Representative for all connected WorkCentres. For security, you want to send your scanned images to. 7 In Document Path enter the path to the location of the Server to enable the... WorkCentre to access the default repository. 9 Click Apply. 10 A default template can modify the template or create new templates from your images. Enter the full path ...
Getting Started Guide
Page 22
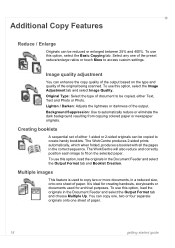
...option, load the originals in the Document Feeder and select the Output Format tab and Booklet Creation. It is used for archival purposes. The WorkCentre produces 2-sided prints automatically, which when folded, produces a booklet with all the pages in the correct sequence. To use this option, ...custom settings. Select any one of the preset reduce/enlarge ratios or touch More to fit on the type and quality of the original being scanned. Lighten / Darken: Adjusts the lightness or darkness of the output. Additional Copy Features Reduce / Enlarge Originals can be copied, either 1-sided...
...option, load the originals in the Document Feeder and select the Output Format tab and Booklet Creation. It is used for archival purposes. The WorkCentre produces 2-sided prints automatically, which when folded, produces a booklet with all the pages in the correct sequence. To use this option, ...custom settings. Select any one of the preset reduce/enlarge ratios or touch More to fit on the type and quality of the original being scanned. Lighten / Darken: Adjusts the lightness or darkness of the output. Additional Copy Features Reduce / Enlarge Originals can be copied, either 1-sided...

Getting Started Guide
Page 25
...Add several recipients. Select the All Services button and choose the Fax option. They are shown in the following table: Basic Faxing Image Adjustment Sides Scanned - 1-sided or 2-sided Image Quality - Select Speed Dial and enter a pre-set size of image Color Mode - The queued job will ...handset. • Speed Dial - if a telephone handset is attached to several recipients to the Send List to send the same fax to the WorkCentre, select Manual Dial and dial the number on the Control Panel. set speed dial number. • Send List - adjust settings to be displayed....
...Add several recipients. Select the All Services button and choose the Fax option. They are shown in the following table: Basic Faxing Image Adjustment Sides Scanned - 1-sided or 2-sided Image Quality - Select Speed Dial and enter a pre-set size of image Color Mode - The queued job will ...handset. • Speed Dial - if a telephone handset is attached to several recipients to the Send List to send the same fax to the WorkCentre, select Manual Dial and dial the number on the Control Panel. set speed dial number. • Send List - adjust settings to be displayed....

Getting Started Guide
Page 27
... the options on the Control Panel. Original can retrieve the files from 72x72 to 600x600 dpi Quality/File Size - Scan the complete page Original Type - PDF, TIF or JPEG Resolution - getting started guide 23 Touch the All Services button and choose the...- The Refresh Destinations tab will be 1 or 2 sided Image Options - This displays the Network Scanning screen. 3 Select the Scanning Template you to scan your documents. Lighten or darken the image Scan to scan your hard copy documents and store them as electronic files. optimum quality versus file size NOTE: The...
... the options on the Control Panel. Original can retrieve the files from 72x72 to 600x600 dpi Quality/File Size - Scan the complete page Original Type - PDF, TIF or JPEG Resolution - getting started guide 23 Touch the All Services button and choose the...- The Refresh Destinations tab will be 1 or 2 sided Image Options - This displays the Network Scanning screen. 3 Select the Scanning Template you to scan your documents. Lighten or darken the image Scan to scan your hard copy documents and store them as electronic files. optimum quality versus file size NOTE: The...
Getting Started Guide
Page 28
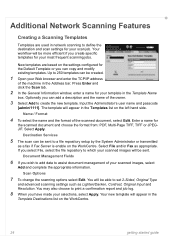
... of the machine in the Address bar. Select Apply. Additional Network Scanning Features Creating a Scanning Templates Templates are based on the WorkCentre. 24 getting started guide New templates are used in network scanning to 250 templates can add a description and the name of the owner...Enter a name for your scanned images will appear in the Templates list on the WorkCentre. Destination Services 5 The scan can copy and modify existing templates. Press Enter and click the Scan tab. 2 In the General Information window, enter a name for the scanned document and choose the ...
... of the machine in the Address bar. Select Apply. Additional Network Scanning Features Creating a Scanning Templates Templates are based on the WorkCentre. 24 getting started guide New templates are used in network scanning to 250 templates can add a description and the name of the owner...Enter a name for your scanned images will appear in the Templates list on the WorkCentre. Destination Services 5 The scan can copy and modify existing templates. Press Enter and click the Scan tab. 2 In the General Information window, enter a name for the scanned document and choose the ...

Getting Started Guide
Page 29
... document from the resulting list of the recipient. Touch the All Services button and choose the E-mail option. Multiple recipients can be 1 or 2 sided Scan to other recipients. 6 Select Edit Subject and enter the Subject of the E-mail. 7 Select any setting appropriate for your document and send it as an... attachment to appear in the job queue. Set size of the fax . Sets the scan settings to 600x600 dpi Quality/File Size - If an address book has been set up into the Document Feeder. 2 Press the Services button on ...
... document from the resulting list of the recipient. Touch the All Services button and choose the E-mail option. Multiple recipients can be 1 or 2 sided Scan to other recipients. 6 Select Edit Subject and enter the Subject of the E-mail. 7 Select any setting appropriate for your document and send it as an... attachment to appear in the job queue. Set size of the fax . Sets the scan settings to 600x600 dpi Quality/File Size - If an address book has been set up into the Document Feeder. 2 Press the Services button on ...
Getting Started Guide
Page 30
... is selected you will also be used with just one button press. Color Scanning While the WorkCentre is a better compression format for color bitmaps. This is 300x300 dpi. 26 getting started guide Select Color. NOTE: When color scanning is selected, the maximum image resolution is the default. The options are a compromise between image...
... is selected you will also be used with just one button press. Color Scanning While the WorkCentre is a better compression format for color bitmaps. This is 300x300 dpi. 26 getting started guide Select Color. NOTE: When color scanning is selected, the maximum image resolution is the default. The options are a compromise between image...
Getting Started Guide
Page 34
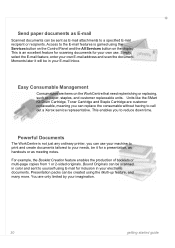
...scanned in color and sent to reduce down time. This enables you to yourself using E-mail for inclusion in your machine to print and create documents tailored to call out a Xerox service representative. Presentation packs can be created using the Multi-up feature, and many more. Powerful Documents The WorkCentre...as meeting notes. Send paper documents as E-mail Scanned documents can be sent as E-mail attachments to the E-mail features is gained using the Services button on the Control Panel and the All Services button on the WorkCentre that need replenishing or replacing, such as paper...
...scanned in color and sent to reduce down time. This enables you to yourself using E-mail for inclusion in your machine to print and create documents tailored to call out a Xerox service representative. Presentation packs can be created using the Multi-up feature, and many more. Powerful Documents The WorkCentre...as meeting notes. Send paper documents as E-mail Scanned documents can be sent as E-mail attachments to the E-mail features is gained using the Services button on the Control Panel and the All Services button on the WorkCentre that need replenishing or replacing, such as paper...

User Guide
Page 3
... 5 Network Scan 55 Network Scan Procedure 56 Scanning Resources 61 Network Scanning 62 Basic Settings 64 Advanced Settings 66 Options 69 Refresh Destinations 71 6 Scan to E-mail 73 Scan to E-mail Procedure 74 E-mail 79 Basic Settings 81 Advanced Settings 83 7 Print...89 Print Procedure 90 Printer Drivers 92 Paper / Output 93 Image Options 94 Xerox WorkCentre 4150...
... 5 Network Scan 55 Network Scan Procedure 56 Scanning Resources 61 Network Scanning 62 Basic Settings 64 Advanced Settings 66 Options 69 Refresh Destinations 71 6 Scan to E-mail 73 Scan to E-mail Procedure 74 E-mail 79 Basic Settings 81 Advanced Settings 83 7 Print...89 Print Procedure 90 Printer Drivers 92 Paper / Output 93 Image Options 94 Xerox WorkCentre 4150...

User Guide
Page 6
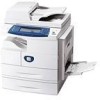
... Interface Device, 256 Mb Memory Upgrade and Cabinet or Short Stand are available as options. 2 Xerox WorkCentre 4150 User Guide Xerox WorkCentre 4150x This model has digital copying, printing, scan to support the networked capability and an additional 32Mb memory is supplied with the e-mail function. Documentation and software is provided to e-mail and faxing ...
... Interface Device, 256 Mb Memory Upgrade and Cabinet or Short Stand are available as options. 2 Xerox WorkCentre 4150 User Guide Xerox WorkCentre 4150x This model has digital copying, printing, scan to support the networked capability and an additional 32Mb memory is supplied with the e-mail function. Documentation and software is provided to e-mail and faxing ...
User Guide
Page 28
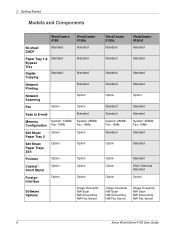
... Option Option Standard System: 256Mb Fax: 16Mb Option Option Option Option Option Image Overwrite NW Scan NW Accounting NW Fax Server WorkCentre 4150x Standard WorkCentre 4150xf Standard Standard Standard Standard Standard Standard Standard Option Option Standard Standard System: 256Mb Fax: ...Option Option Standard Short Stand as Standard Option Image Overwrite NW Scan NW Accounting NW Fax Server Image Overwrite NW Scan NW Accounting NW Fax Server 6 Xerox WorkCentre 4150 User Guide Scanning Fax Option Scan to E-mail - Memory System: 128Mb Configuration Fax: 16Mb 520...
... Option Option Standard System: 256Mb Fax: 16Mb Option Option Option Option Option Image Overwrite NW Scan NW Accounting NW Fax Server WorkCentre 4150x Standard WorkCentre 4150xf Standard Standard Standard Standard Standard Standard Standard Option Option Standard Standard System: 256Mb Fax: ...Option Option Standard Short Stand as Standard Option Image Overwrite NW Scan NW Accounting NW Fax Server Image Overwrite NW Scan NW Accounting NW Fax Server 6 Xerox WorkCentre 4150 User Guide Scanning Fax Option Scan to E-mail - Memory System: 128Mb Configuration Fax: 16Mb 520...

User Guide
Page 34
...Prints all listed reports Press the Accounting Reports button to print the following reports: Report Description Auditron Displays Auditron accounting data 12 Xerox WorkCentre 4150 User Guide Paper Tray Status Displays the following information about each machine feature: • Copy • Print (where ...installed) • Fax (where installed) • E-mail (where installed) • Scanning (where installed) Print Reports Allows the user to access the following reports: Report Description Call For Assistance Displays the error and fault ...
...Prints all listed reports Press the Accounting Reports button to print the following reports: Report Description Auditron Displays Auditron accounting data 12 Xerox WorkCentre 4150 User Guide Paper Tray Status Displays the following information about each machine feature: • Copy • Print (where ...installed) • Fax (where installed) • E-mail (where installed) • Scanning (where installed) Print Reports Allows the user to access the following reports: Report Description Call For Assistance Displays the error and fault ...

User Guide
Page 43
.... The number of copies remaining is displayed. If there are no incomplete jobs in the upper right-hand corner of the screen. 5 Job Status Screen 1. Xerox WorkCentre 4150 User Guide 21 NOTE: To cancel an incorrect entry, press the Clear C button and enter the correct quantity. 4 Start the Copy Job Press the... job. Use the numeric keypad on the control panel to enter the number of copies required. 3 Copy 3 Enter the Quantity The maximum copy quantity is scanned only once.
.... The number of copies remaining is displayed. If there are no incomplete jobs in the upper right-hand corner of the screen. 5 Job Status Screen 1. Xerox WorkCentre 4150 User Guide 21 NOTE: To cancel an incorrect entry, press the Clear C button and enter the correct quantity. 4 Start the Copy Job Press the... job. Use the numeric keypad on the control panel to enter the number of copies required. 3 Copy 3 Enter the Quantity The maximum copy quantity is scanned only once.


