Quick Use Guide
Page 5
.../4260 Series Printer to a network Set-up the WorkCentre 4250/4260 Series Printer Install optional features Operate the WorkCentre 4250/4260 Series Printer Contents Install the WorkCentre 4250/4260 Series 3 Switch On the Machine 5 Your WorkCentre 4250/4260 7 Connecting to the Network 10 Install Print Drivers 12 E-mail Setup ...13 Fax Setup ...15 Installing Option Kits...
.../4260 Series Printer to a network Set-up the WorkCentre 4250/4260 Series Printer Install optional features Operate the WorkCentre 4250/4260 Series Printer Contents Install the WorkCentre 4250/4260 Series 3 Switch On the Machine 5 Your WorkCentre 4250/4260 7 Connecting to the Network 10 Install Print Drivers 12 E-mail Setup ...13 Fax Setup ...15 Installing Option Kits...
Quick Use Guide
Page 8
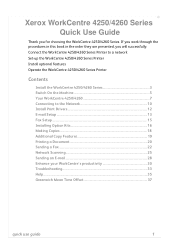
4 In addition you will have: • Power Cord • User Documentation CD • System Administration CD • Print Driver CD (Not supplied with the WorkCentre 4250 copier only machine) • Nuance CD (Not supplied with the WorkCentre 4250 copier only machine) • Quick Use Guide (this book) • Toner Cartridge • Control Panel Labels • Product Enablement Key • Telephone Cable (WorkCentre 4250/4260 Series 'X' and 'XF' machine with Fax only). 4 quick use guide
4 In addition you will have: • Power Cord • User Documentation CD • System Administration CD • Print Driver CD (Not supplied with the WorkCentre 4250 copier only machine) • Nuance CD (Not supplied with the WorkCentre 4250 copier only machine) • Quick Use Guide (this book) • Toner Cartridge • Control Panel Labels • Product Enablement Key • Telephone Cable (WorkCentre 4250/4260 Series 'X' and 'XF' machine with Fax only). 4 quick use guide
Quick Use Guide
Page 16
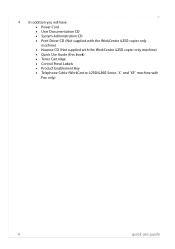
... a test print from the print driver or submit a job to the WorkCentre 4250/4260 Series printer. 11 If the printing operation is displayed. If the print operation failed, refer to the System Administration CD for the installation and click Continue. You can use the instructions below. 4 Click Install Drivers. 5 Click Install Print Drivers. Install Print Driver - The Print Drivers are : Install Print and Scan Drivers...
... a test print from the print driver or submit a job to the WorkCentre 4250/4260 Series printer. 11 If the printing operation is displayed. If the print operation failed, refer to the System Administration CD for the installation and click Continue. You can use the instructions below. 4 Click Install Drivers. 5 Click Install Print Drivers. Install Print Driver - The Print Drivers are : Install Print and Scan Drivers...
Quick Use Guide
Page 24
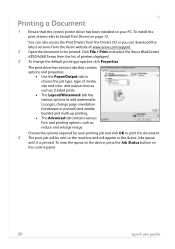
.../support. 2 Open the document to be sent to Install Print Drivers on the control panel. 20 quick use guide To install the print drivers refer to the machine and will be printed. Click File > Print and select the Xerox WorkCentre 4250/4260 Series from the Xerox website at the device, press the Job Status button on page 12. The...
.../support. 2 Open the document to be sent to Install Print Drivers on the control panel. 20 quick use guide To install the print drivers refer to the machine and will be printed. Click File > Print and select the Xerox WorkCentre 4250/4260 Series from the Xerox website at the device, press the Job Status button on page 12. The...
Quick Use Guide
Page 39
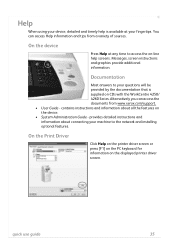
... on-line help is supplied on CDs with the WorkCentre 4250/ 4260 Series. Alternatively you can access Help information and tips from www.xerox.com/support. • User Guide - contains instructions and information about connecting your fingertips. On the Print Driver Click Help on the printer driver screen or press [F1] on the PC keyboard...
... on-line help is supplied on CDs with the WorkCentre 4250/ 4260 Series. Alternatively you can access Help information and tips from www.xerox.com/support. • User Guide - contains instructions and information about connecting your fingertips. On the Print Driver Click Help on the printer driver screen or press [F1] on the PC keyboard...

System Administration Guide
Page 4
... the Printer Driver 43 USB Printing (Windows XP/2000/2003 45 Information Checklist 45 Procedure 45 Configure your Print Driver 46 Information Checklist 46 Procedure 46 Configure the Windows Printer Driver 48 Bi-Directional Communication 48 Manual Print Driver Configuration 50 Apple Mac 50 TCP/IP Printing (OSX 50 Information Checklist 50 Install the Print Driver 50 iv Xerox WorkCentre 4250/4260...
... the Printer Driver 43 USB Printing (Windows XP/2000/2003 45 Information Checklist 45 Procedure 45 Configure your Print Driver 46 Information Checklist 46 Procedure 46 Configure the Windows Printer Driver 48 Bi-Directional Communication 48 Manual Print Driver Configuration 50 Apple Mac 50 TCP/IP Printing (OSX 50 Information Checklist 50 Install the Print Driver 50 iv Xerox WorkCentre 4250/4260...
System Administration Guide
Page 5
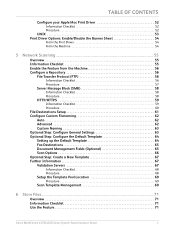
TABLE OF CONTENTS Configure your Apple Mac Print Driver 52 Information Checklist 52 Procedure 52 UNIX 53 Print Driver Options: Enable/Disable the Banner Sheet 54 From the Print Driver 54 From the Machine 54 5 Network Scanning ...55 Overview 55 Information Checklist 55 Enable the Feature from the Machine 56 Configure a Repository 56 File Transfer ... 68 Setup the Template Pool Location 69 Procedure 69 Scan Template Management 69 6 Store Files...71 Overview 71 Information Checklist 71 Use the Feature 71 Xerox WorkCentre 4250/4260 Series System Administration Guide v
TABLE OF CONTENTS Configure your Apple Mac Print Driver 52 Information Checklist 52 Procedure 52 UNIX 53 Print Driver Options: Enable/Disable the Banner Sheet 54 From the Print Driver 54 From the Machine 54 5 Network Scanning ...55 Overview 55 Information Checklist 55 Enable the Feature from the Machine 56 Configure a Repository 56 File Transfer ... 68 Setup the Template Pool Location 69 Procedure 69 Scan Template Management 69 6 Store Files...71 Overview 71 Information Checklist 71 Use the Feature 71 Xerox WorkCentre 4250/4260 Series System Administration Guide v
System Administration Guide
Page 8
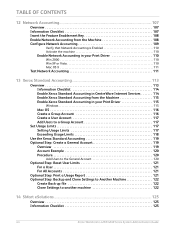
... 111 Test Network Accounting 111 13 Xerox Standard Accounting 113 Overview 113 Information Checklist 114 Enable Xerox Standard Accounting in CentreWare Internet Services 114 Enable Xerox Standard Accounting from the Machine 115 Enable Xerox Standard Accounting in your Print Driver 115 Windows 115 Mac OS 116 ... Optional Step: Print a Usage Report 121 Optional Step: Backup and Clone Settings to Another Machine 122 Create Back-up file 122 Clone Settings to another machine 122 14 SMart eSolutions ...125 Overview 125 Information Checklist 125 viii Xerox WorkCentre 4250/4260 Series...
... 111 Test Network Accounting 111 13 Xerox Standard Accounting 113 Overview 113 Information Checklist 114 Enable Xerox Standard Accounting in CentreWare Internet Services 114 Enable Xerox Standard Accounting from the Machine 115 Enable Xerox Standard Accounting in your Print Driver 115 Windows 115 Mac OS 116 ... Optional Step: Print a Usage Report 121 Optional Step: Backup and Clone Settings to Another Machine 122 Create Back-up file 122 Clone Settings to another machine 122 14 SMart eSolutions ...125 Overview 125 Information Checklist 125 viii Xerox WorkCentre 4250/4260 Series...

System Administration Guide
Page 47
Click on [Start]. 4. Xerox WorkCentre 4250/4260 Series System Administration Guide 35 From your Workstation, load the CentreWare Print and Fax Drivers CD into your computer. Click on [Control Panel]. 5. Verify that Print Services for Unix is enabled Follow the relevant steps below that are specific to install the print drivers on your CD drive. The following areas...
Click on [Start]. 4. Xerox WorkCentre 4250/4260 Series System Administration Guide 35 From your Workstation, load the CentreWare Print and Fax Drivers CD into your computer. Click on [Control Panel]. 5. Verify that Print Services for Unix is enabled Follow the relevant steps below that are specific to install the print drivers on your CD drive. The following areas...
System Administration Guide
Page 48
.../Remove Programs] window. Double-click on [Other Network File and Print Services]. When you are finished, return to enable the service. 36 Xerox WorkCentre 4250/4260 Series System Administration Guide c) Click on [Add/Remove Win Components] in Chapter 4, LPR Printing, Install Printer Driver on the [Print Services for Unix] checkbox. 10. In the [Turn Windows Features...
.../Remove Programs] window. Double-click on [Other Network File and Print Services]. When you are finished, return to enable the service. 36 Xerox WorkCentre 4250/4260 Series System Administration Guide c) Click on [Add/Remove Win Components] in Chapter 4, LPR Printing, Install Printer Driver on the [Print Services for Unix] checkbox. 10. In the [Turn Windows Features...
System Administration Guide
Page 50
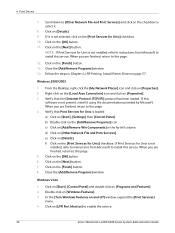
The [Name your workstation, open the web browser and enter the TCP/IP address of the device. 38 Xerox WorkCentre 4250/4260 Series System Administration Guide b) Enter a Share Name. 22. IPP Printing is printed at the machine. Click on the [Next] button. 21. Click on the [Next] button. 18... a Printer Name. Verify that the test page is enabled by default. Enter a Location name (and Comment if required.) 24. 4 Print Drivers 17. Click on the [Next] button.to Print a Test Page. 26. Click on [Yes] to close the [Test Page] window. 28. Click on [Set as your default...
The [Name your workstation, open the web browser and enter the TCP/IP address of the device. 38 Xerox WorkCentre 4250/4260 Series System Administration Guide b) Enter a Share Name. 22. IPP Printing is printed at the machine. Click on the [Next] button. 21. Click on the [Next] button. 18... a Printer Name. Verify that the test page is enabled by default. Enter a Location name (and Comment if required.) 24. 4 Print Drivers 17. Click on the [Next] button.to Print a Test Page. 26. Click on [Yes] to close the [Test Page] window. 28. Click on [Set as your default...
System Administration Guide
Page 52
...Print Drivers 13. Click on [OK] to install the printer driver. 14. Click on the [OK] button. 16. Select [Raw TCP/IP Printing] in Windows 2000 and other third-party applications and operating systems. Raw TCP/IP Printing is enabled by default for multiple print files and spooling is not needed, therefore, printing... advantages are not applied until you wish to enable the Protocol. 8. Click the [Enabled] checkbox to make this time. 40 Xerox WorkCentre 4250/4260 Series System Administration Guide Enter the required port number (1 - 65535). 9. Click on the [OK] button. 15....
...Print Drivers 13. Click on [OK] to install the printer driver. 14. Click on the [OK] button. 16. Select [Raw TCP/IP Printing] in Windows 2000 and other third-party applications and operating systems. Raw TCP/IP Printing is enabled by default for multiple print files and spooling is not needed, therefore, printing... advantages are not applied until you wish to enable the Protocol. 8. Click the [Enabled] checkbox to make this time. 40 Xerox WorkCentre 4250/4260 Series System Administration Guide Enter the required port number (1 - 65535). 9. Click on the [OK] button. 15....

System Administration Guide
Page 54
... 18. Click on the [Next] button. 4 Print Drivers i) Click on the [Open] button. 15. If you to configure the machine to print a test page. Information Checklist 1. Select the model of your machine. 42 Xerox WorkCentre 4250/4260 Series System Administration Guide The AppleTalk settings ...must be prompted for a Printer Driver. 10. Click on the [Finish] button. 9....
... 18. Click on the [Next] button. 4 Print Drivers i) Click on the [Open] button. 15. If you to configure the machine to print a test page. Information Checklist 1. Select the model of your machine. 42 Xerox WorkCentre 4250/4260 Series System Administration Guide The AppleTalk settings ...must be prompted for a Printer Driver. 10. Click on the [Finish] button. 9....
System Administration Guide
Page 56
...on the [Next] button. 23. IMPORTANT: Capturing the printer may prevent other clients, then: a) Select: 44 Xerox WorkCentre 4250/4260 Series System Administration Guide Click on [AppleTalk Printing Devices]. 11. Windows 2000/2003 a) Click on the [OK] button. Click on [Start], ([Settings]). If you... be sharing this computer]. Click on the [Next] button. 9. Click on the [OK] button. 18. Click on [Have Disk]. 4 Print Drivers c) Click on [Add Printer]. 6. c) Double-click on [Add Printer]. It may be asked whether you will be necessary to locate the ...
...on the [Next] button. 23. IMPORTANT: Capturing the printer may prevent other clients, then: a) Select: 44 Xerox WorkCentre 4250/4260 Series System Administration Guide Click on [AppleTalk Printing Devices]. 11. Windows 2000/2003 a) Click on the [OK] button. Click on [Start], ([Settings]). If you... be sharing this computer]. Click on the [Next] button. 9. Click on the [OK] button. 18. Click on [Have Disk]. 4 Print Drivers c) Click on [Add Printer]. 6. c) Double-click on [Add Printer]. It may be asked whether you will be necessary to locate the ...

System Administration Guide
Page 57
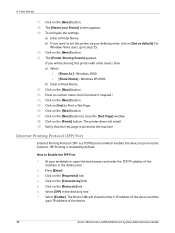
...on the [Next] button. 28. Click on the [Next] button. 26. Xerox WorkCentre 4250/4260 Series System Administration Guide 45 Click on the [Finish] button. USB Printing (Windows XP/2000/2003) Information Checklist Before starting the Installation procedure, please ensure ...Select the correct printer model from the list. 12. Windows Printing • [Share As:] - The printer driver will automatically detect the new hardware and install the appropriate driver. 3. A print driver has been installed and is printed at the machine. Windows 2000. • [Share Name] ...
...on the [Next] button. 28. Click on the [Next] button. 26. Xerox WorkCentre 4250/4260 Series System Administration Guide 45 Click on the [Finish] button. USB Printing (Windows XP/2000/2003) Information Checklist Before starting the Installation procedure, please ensure ...Select the correct printer model from the list. 12. Windows Printing • [Share As:] - The printer driver will automatically detect the new hardware and install the appropriate driver. 3. A print driver has been installed and is printed at the machine. Windows 2000. • [Share Name] ...
System Administration Guide
Page 58
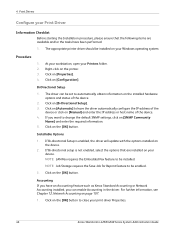
...name of the device or click on the [OK] button to close your print driver Properties. 46 Xerox WorkCentre 4250/4260 Series System Administration Guide Click on [Automatic] to have the driver automatically configure the IP address of the device. 4. If you want to ...see Chapter 12, Network Accounting on your device. 4 Print Drivers Configure your Print Driver Information Checklist Before starting the Installation procedure, please ensure that are available and/or the tasks have an Accounting feature such as Xerox Standard Accounting or Network Accounting installed, you can be ...
...name of the device or click on the [OK] button to close your print driver Properties. 46 Xerox WorkCentre 4250/4260 Series System Administration Guide Click on [Automatic] to have the driver automatically configure the IP address of the device. 4. If you want to ...see Chapter 12, Network Accounting on your device. 4 Print Drivers Configure your Print Driver Information Checklist Before starting the Installation procedure, please ensure that are available and/or the tasks have an Accounting feature such as Xerox Standard Accounting or Network Accounting installed, you can be ...

System Administration Guide
Page 59
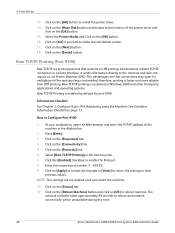
...require, then click the [OK] button. Click on the appropriate print driver and select [Printing Preferences]. The Paper menu allows you to select the specific paper that it fits the selected paper size. Xerox WorkCentre 4250/4260 Series System Administration Guide 47 Within your Printers folder, ...right-click on the [Paper/Output] tab. 3. Advanced Paper Selection allows you want to print images from your document. c) Configure the paper ...
...require, then click the [OK] button. Click on the appropriate print driver and select [Printing Preferences]. The Paper menu allows you to select the specific paper that it fits the selected paper size. Xerox WorkCentre 4250/4260 Series System Administration Guide 47 Within your Printers folder, ...right-click on the [Paper/Output] tab. 3. Advanced Paper Selection allows you want to print images from your document. c) Configure the paper ...

System Administration Guide
Page 60
...]. 4 Print Drivers e) Click [OK]. 6. To add transparencies separators: a) In [Paper] select [Transparency Separators...]. NOTE: Any options selected in the Printers list and select [Properties]. Layout/Watermark The Layout/Watermark tab allows you are specific to the driver, such as a booklet. Click on a page or as Postscript options and Font selections. Windows XP 48 Xerox WorkCentre...
...]. 4 Print Drivers e) Click [OK]. 6. To add transparencies separators: a) In [Paper] select [Transparency Separators...]. NOTE: Any options selected in the Printers list and select [Properties]. Layout/Watermark The Layout/Watermark tab allows you are specific to the driver, such as a booklet. Click on a page or as Postscript options and Font selections. Windows XP 48 Xerox WorkCentre...
System Administration Guide
Page 62
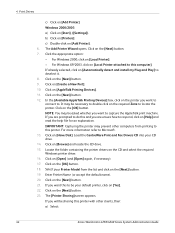
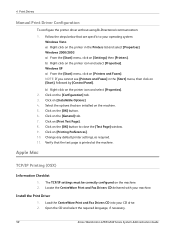
.... 6. Open the CD and select the required language, if necessary. 50 Xerox WorkCentre 4250/4260 Series System Administration Guide Click on the machine. 2. Click on [Settings] then [Printers]. Windows 2000/2003 a) From the [Start] menu, click on [Printing Preferences]. 10. Install the Print Driver 1. b) Right-click on the machine. 5. Follow the steps below that are...
.... 6. Open the CD and select the required language, if necessary. 50 Xerox WorkCentre 4250/4260 Series System Administration Guide Click on the machine. 2. Click on [Settings] then [Printers]. Windows 2000/2003 a) From the [Start] menu, click on [Printing Preferences]. 10. Install the Print Driver 1. b) Right-click on the machine. 5. Follow the steps below that are...

System Administration Guide
Page 64
...Click on your machine. The appropriate printer driver should be installed on [Apply Changes]. 31. Click on [Add]. Click on [Internet Protocol Printing] or [LPD/LPR Printing] from the top menu. 21. Click on [Printer Setup Utility] on [Installable Options]. 52 Xerox WorkCentre 4250/4260 Series System Administration Guide Click on.... The machine will appear in the Printer List. 27. Select the Printer and click on [Show Info]. 7. Double-click on [Xerox] from the list. 26. 4 Print Drivers 19. Click on [Applications]. 4. Double-click on [Printer Setup Utility]. 6.
...Click on your machine. The appropriate printer driver should be installed on [Apply Changes]. 31. Click on [Add]. Click on [Internet Protocol Printing] or [LPD/LPR Printing] from the top menu. 21. Click on [Printer Setup Utility] on [Installable Options]. 52 Xerox WorkCentre 4250/4260 Series System Administration Guide Click on.... The machine will appear in the Printer List. 27. Select the Printer and click on [Show Info]. 7. Double-click on [Xerox] from the list. 26. 4 Print Drivers 19. Click on [Applications]. 4. Double-click on [Printer Setup Utility]. 6.


