Quick Use Guide
Page 5
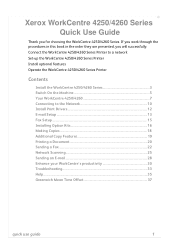
...WorkCentre 4250/4260 Series. Xerox WorkCentre 4250/4260 Series Quick Use Guide Thank you will successfully: Connect the WorkCentre 4250/4260 Series Printer to a network Set-up the WorkCentre 4250/4260 Series Printer Install optional features Operate the WorkCentre 4250/4260 Series Printer Contents Install the WorkCentre... 4250/4260 Series 3 Switch On the Machine 5 Your WorkCentre 4250/4260 7 Connecting to the Network 10 Install Print Drivers 12 E-...
...WorkCentre 4250/4260 Series. Xerox WorkCentre 4250/4260 Series Quick Use Guide Thank you will successfully: Connect the WorkCentre 4250/4260 Series Printer to a network Set-up the WorkCentre 4250/4260 Series Printer Install optional features Operate the WorkCentre 4250/4260 Series Printer Contents Install the WorkCentre... 4250/4260 Series 3 Switch On the Machine 5 Your WorkCentre 4250/4260 7 Connecting to the Network 10 Install Print Drivers 12 E-...

Quick Use Guide
Page 10
... the Supplies Telephone Number and select Next. Follow the instructions to Fax Setup on each screen. 12 The Congratulations screen will allow you do not have successfully completed the System Settings portion of the Xerox Installation Wizard. Select Finish to use guide Your machine is now ready for the Page Pack Passcode...
... the Supplies Telephone Number and select Next. Follow the instructions to Fax Setup on each screen. 12 The Congratulations screen will allow you do not have successfully completed the System Settings portion of the Xerox Installation Wizard. Select Finish to use guide Your machine is now ready for the Page Pack Passcode...
Quick Use Guide
Page 16
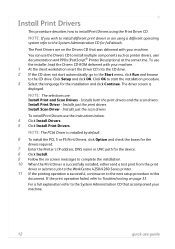
... different operating system refer to install different print drivers or are : Install Print and Scan Drivers - For a full explanation refer to the WorkCentre 4250/4260 Series printer. 11 If the printing operation is displayed. You can use the instructions below. 4 Click Install Drivers. 5 Click ...Install Print Drivers. To use the installer, load the Drivers CD-ROM delivered with your machine. 12 quick use guide Installs just the scan drivers. Install Print Drivers This procedure describes how to Troubleshooting on page 33. Install Scan Driver ...
... different operating system refer to install different print drivers or are : Install Print and Scan Drivers - For a full explanation refer to the WorkCentre 4250/4260 Series printer. 11 If the printing operation is displayed. You can use the instructions below. 4 Click Install Drivers. 5 Click ...Install Print Drivers. To use the installer, load the Drivers CD-ROM delivered with your machine. 12 quick use guide Installs just the scan drivers. Install Print Drivers This procedure describes how to Troubleshooting on page 33. Install Scan Driver ...
Quick Use Guide
Page 18
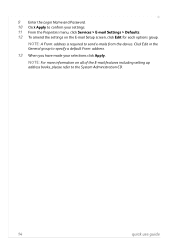
NOTE: A From: address is required to the System Administration CD. 14 quick use guide 9 Enter the Login Name and Password. 10 Click Apply to confirm your selections click Apply. NOTE: For more information on the E-mail Setup screen, click Edit for each options group. Click Edit in the General group to specify a default From: address. 13 When you have made your settings. 11 From the Properties menu, click Services > E-mail Settings > Defaults. 12 To amend the settings on all of the E-mail features including setting up address books, please refer to send e-mails from the device.
NOTE: A From: address is required to the System Administration CD. 14 quick use guide 9 Enter the Login Name and Password. 10 Click Apply to confirm your selections click Apply. NOTE: For more information on the E-mail Setup screen, click Edit for each options group. Click Edit in the General group to specify a default From: address. 13 When you have made your settings. 11 From the Properties menu, click Services > E-mail Settings > Defaults. 12 To amend the settings on all of the E-mail features including setting up address books, please refer to send e-mails from the device.
Quick Use Guide
Page 24
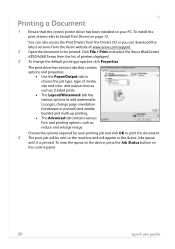
... to add watermarks to pages, change the default printing properties click Properties. Choose the options required for your PC. To view the queue at www.xerox.com/support. 2 Open the document to be sent to the machine and will be printed. To install the print drivers refer to print the document... on your printing job and click OK to Install Print Drivers on the control panel. 20 quick use guide Click File > Print and select the Xerox WorkCentre 4250/4260 Series from the Xerox website at the device, press the Job Status button on page...
... to add watermarks to pages, change the default printing properties click Properties. Choose the options required for your PC. To view the queue at www.xerox.com/support. 2 Open the document to be sent to the machine and will be printed. To install the print drivers refer to print the document... on your printing job and click OK to Install Print Drivers on the control panel. 20 quick use guide Click File > Print and select the Xerox WorkCentre 4250/4260 Series from the Xerox website at the device, press the Job Status button on page...

Quick Use Guide
Page 41
... Date Line West Midway Island Samoa Hawaii Alaska Pacific Time (US, Canada) Tijuana Mountain Time (US, Canada) Central America -12.0 -11.0 -11.0 -10.0 -9.0 -8.0 -8.0 -7.0 -6.0 Switzerland Luxembourg Austria Croatia Czech Republic Finland Denmark Sweden Poland Central ... +10.0 +4.0 Port Moresby +10.0 +4.0 Vladivostok +10.0 +4.0 Magadan +11.0 +4.0 Soloman Islands +11.0 +4.5 New Caledonia +11.0 +5.0 Fiji +12.0 +5.0 Kamchatka +12.0 +5.0 Marshall Islands +12.0 +5.0 Nuku'alofa +13.0 quick use guide 37 Greenwich Mean Time Offset http://wwp.greenwichmeantime.com/.
... Date Line West Midway Island Samoa Hawaii Alaska Pacific Time (US, Canada) Tijuana Mountain Time (US, Canada) Central America -12.0 -11.0 -11.0 -10.0 -9.0 -8.0 -8.0 -7.0 -6.0 Switzerland Luxembourg Austria Croatia Czech Republic Finland Denmark Sweden Poland Central ... +10.0 +4.0 Port Moresby +10.0 +4.0 Vladivostok +10.0 +4.0 Magadan +11.0 +4.0 Soloman Islands +11.0 +4.5 New Caledonia +11.0 +5.0 Fiji +12.0 +5.0 Kamchatka +12.0 +5.0 Marshall Islands +12.0 +5.0 Nuku'alofa +13.0 quick use guide 37 Greenwich Mean Time Offset http://wwp.greenwichmeantime.com/.
System Administration Guide
Page 8
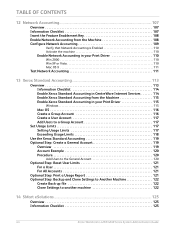
TABLE OF CONTENTS 12 Network Accounting...107 Overview 107 Information Checklist 107 Insert the Feature Enablement Key 108 Enable Network ... 117 Add Users to a Group Account 117 Set Usage Limits 117 Setting Usage Limits 117 Exceeding Usage Limits 118 Use the Xerox Standard Accounting 119 Optional Step: Create a General Account 119 Overview 119 Account Example 120 Procedure 120 Add Users to the General...122 Clone Settings to another machine 122 14 SMart eSolutions ...125 Overview 125 Information Checklist 125 viii Xerox WorkCentre 4250/4260 Series System Administration Guide
TABLE OF CONTENTS 12 Network Accounting...107 Overview 107 Information Checklist 107 Insert the Feature Enablement Key 108 Enable Network ... 117 Add Users to a Group Account 117 Set Usage Limits 117 Setting Usage Limits 117 Exceeding Usage Limits 118 Use the Xerox Standard Accounting 119 Optional Step: Create a General Account 119 Overview 119 Account Example 120 Procedure 120 Add Users to the General...122 Clone Settings to another machine 122 14 SMart eSolutions ...125 Overview 125 Information Checklist 125 viii Xerox WorkCentre 4250/4260 Series System Administration Guide

System Administration Guide
Page 21
...and Network Setup]. 7. Select the Speed to match the speed set via the machine and the CentreWare Internet Service. Touch [Save]. 12. Touch [Confirm] to print a Configuration Report: 1. Touch [Close]. Internet Services allows Administrators to change network and system settings on...the button on your machine will require an Administrator Username and Password. Touch [Physical Media]. 10. Press the button on Xerox WorkCentre 4250/4260 Series System Administration Guide 9 Enter the Administrator's Password. Press the button. 13. CentreWare Internet Services CentreWare ...
...and Network Setup]. 7. Select the Speed to match the speed set via the machine and the CentreWare Internet Service. Touch [Save]. 12. Touch [Confirm] to print a Configuration Report: 1. Touch [Close]. Internet Services allows Administrators to change network and system settings on...the button on your machine will require an Administrator Username and Password. Touch [Physical Media]. 10. Press the button on Xerox WorkCentre 4250/4260 Series System Administration Guide 9 Enter the Administrator's Password. Press the button. 13. CentreWare Internet Services CentreWare ...

System Administration Guide
Page 23
CentreWare Internet Services 12. Click on [Login]. 6. If prompted, enter the Administrator's User ID [admin] and... Password It is not compromised. IMPORTANT: Do not forget the password or you change the admin password: 1. Xerox WorkCentre 4250/4260 Series System Administration Guide 11 At your Workstation, open your web browser and enter the TCP/IP ...Click on the [Properties] tab. 4. To change the default administrator password to a more secure password, so this Xerox device is recommended that you could be completely locked out of the machine in the [New Admin Password] area....
CentreWare Internet Services 12. Click on [Login]. 6. If prompted, enter the Administrator's User ID [admin] and... Password It is not compromised. IMPORTANT: Do not forget the password or you change the admin password: 1. Xerox WorkCentre 4250/4260 Series System Administration Guide 11 At your Workstation, open your web browser and enter the TCP/IP ...Click on the [Properties] tab. 4. To change the default administrator password to a more secure password, so this Xerox device is recommended that you could be completely locked out of the machine in the [New Admin Password] area....
System Administration Guide
Page 26
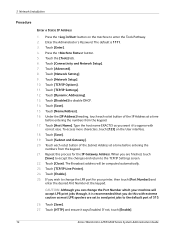
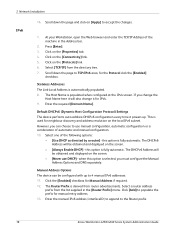
... the keypad. Touch [HTTP] and ensure it is 1111. 3. Touch [Enter]. 4. Touch [Connectivity and Network Setup]. 7. Touch [TCP/IP Settings]. 12. Under the [IP Address] heading, touch each octet button of 515. 26. Type the host name EXACTLY as you do this process for your machine... will be computed automatically. 23. Touch [Enable]. 25. Touch [Save]. 27. If not, touch [Enable]. 14 Xerox WorkCentre 4250/4260 Series System Administration Guide The default is recommended that you want it to appear with extreme caution as most LPR spoolers are finished...
... the keypad. Touch [HTTP] and ensure it is 1111. 3. Touch [Enter]. 4. Touch [Connectivity and Network Setup]. 7. Touch [TCP/IP Settings]. 12. Under the [IP Address] heading, touch each octet button of 515. 26. Type the host name EXACTLY as you do this process for your machine... will be computed automatically. 23. Touch [Enable]. 25. Touch [Save]. 27. If not, touch [Enable]. 14 Xerox WorkCentre 4250/4260 Series System Administration Guide The default is recommended that you want it to appear with extreme caution as most LPR spoolers are finished...
System Administration Guide
Page 28
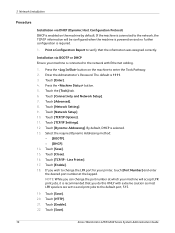
... will accept LPR print jobs, it is recommended that you can change the LPR port for your machine is selected. 13. Touch [TCP/IP Settings]. 12. Press the button on the machine by default. 3 Network Installation Procedure Installation via BOOTP or DHCP Ensure your printer, touch [Port Number] and enter the... desired port number at which your machine will be configured when the machine is powered on and no further configuration is required. 1. Touch [Save]. 16 Xerox WorkCentre 4250/4260 Series System Administration Guide
... will accept LPR print jobs, it is recommended that you can change the LPR port for your machine is selected. 13. Touch [TCP/IP Settings]. 12. Press the button on the machine by default. 3 Network Installation Procedure Installation via BOOTP or DHCP Ensure your printer, touch [Port Number] and enter the... desired port number at which your machine will be configured when the machine is powered on and no further configuration is required. 1. Touch [Save]. 16 Xerox WorkCentre 4250/4260 Series System Administration Guide

System Administration Guide
Page 29
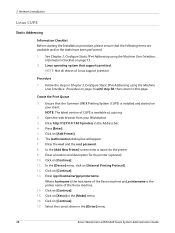
... 7. Zero-Configuration Networking 14. Select the [Multicast DNS] enabled box if you cannot change the IP address, Subnet Mask, or default gateway. Xerox WorkCentre 4250/4260 Series System Administration Guide 17 Click on the [Properties] tab. 4. Enter a unique [Host Name] for the Apple Bonjour protocol to... there is selected. TCP/IP must then be able to advertise the services of the device. Enter a valid [Domain Name]. DNS Configuration 12. Enter an IP address for the [Preferred DNS Server]. Click on the [Protocols] link. 6. Select the [Self Assigned Address] enabled ...
... 7. Zero-Configuration Networking 14. Select the [Multicast DNS] enabled box if you cannot change the IP address, Subnet Mask, or default gateway. Xerox WorkCentre 4250/4260 Series System Administration Guide 17 Click on the [Properties] tab. 4. Enter a unique [Host Name] for the Apple Bonjour protocol to... there is selected. TCP/IP must then be able to advertise the services of the device. Enter a valid [Domain Name]. DNS Configuration 12. Enter an IP address for the [Preferred DNS Server]. Click on the [Protocols] link. 6. Select the [Self Assigned Address] enabled ...
System Administration Guide
Page 30
...change it powers up to use DHCP] - Press [Enter]. 3. 3 Network Installation IPv6 16. Scroll down the page to the Router prefix. 18 Xerox WorkCentre 4250/4260 Series System Administration Guide Click on the [Protocols] link. 6. Click on the [Connectivity] link. 5. If you must configure the Manual ...Address Options and DNS separately. when this option is used for Manual Address if required. 12. Select a router address prefix from the list supplied in the Address bar. 2. Click [Add] to accept the changes. 1.
...change it powers up to use DHCP] - Press [Enter]. 3. 3 Network Installation IPv6 16. Scroll down the page to the Router prefix. 18 Xerox WorkCentre 4250/4260 Series System Administration Guide Click on the [Protocols] link. 6. Click on the [Connectivity] link. 5. If you must configure the Manual ...Address Options and DNS separately. when this option is used for Manual Address if required. 12. Select a router address prefix from the list supplied in the Address bar. 2. Click [Add] to accept the changes. 1.

System Administration Guide
Page 32
...Enter the Administrator's Password. Touch [Network Setting]. 9. Touch [Enable]. 13. Touch [Name and Area]. 15. Touch [Area Name]. 20 Xerox WorkCentre 4250/4260 Series System Administration Guide The default is a display-only item. • Self Assigned Address (IPv6) - Displays "Enabled". Touch ... used) where your printer. 3. When you are available and/or the tasks have been performed: 1. Touch [Enter]. 4. Touch [Protocol]. 12. Existing operational AppleTalk network. 2. Touch [Save]. 14. This is set to enter the Tools Pathway. 2. Enter the name using a DHCP...
...Enter the Administrator's Password. Touch [Network Setting]. 9. Touch [Enable]. 13. Touch [Name and Area]. 15. Touch [Area Name]. 20 Xerox WorkCentre 4250/4260 Series System Administration Guide The default is a display-only item. • Self Assigned Address (IPv6) - Displays "Enabled". Touch ... used) where your printer. 3. When you are available and/or the tasks have been performed: 1. Touch [Enter]. 4. Touch [Protocol]. 12. Existing operational AppleTalk network. 2. Touch [Save]. 14. This is set to enter the Tools Pathway. 2. Enter the name using a DHCP...

System Administration Guide
Page 34
Touch [Protocol]. 12. Touch [Name Context]. 18. When you assigned to accept the changes. 23. Touch [Print Server Name] and use the touch screen keyboard to enter the ... your print server and touch [Save]. 26. Touch [Frame Type]. 15. A default name will appear. When finished touch [Save]. 25. Touch [Close] three times. 22 Xerox WorkCentre 4250/4260 Series System Administration Guide Touch [Network Setup]. 10. Select the Frame Type desired by touching the arrow buttons. • Touch [Save] again. 28...
Touch [Protocol]. 12. Touch [Name Context]. 18. When you assigned to accept the changes. 23. Touch [Print Server Name] and use the touch screen keyboard to enter the ... your print server and touch [Save]. 26. Touch [Frame Type]. 15. A default name will appear. When finished touch [Save]. 25. Touch [Close] three times. 22 Xerox WorkCentre 4250/4260 Series System Administration Guide Touch [Network Setup]. 10. Select the Frame Type desired by touching the arrow buttons. • Touch [Save] again. 28...

System Administration Guide
Page 36
... being created and hostname is on [File: Exit Sam]. 12. Enter su to exit Super User mode. 13. Solaris 2.x Information Checklist Before starting the installation procedure, please ensure that the following items are available and/or the tasks have been performed: 24 Xerox WorkCentre 4250/4260 Series System Administration Guide This screen may...
... being created and hostname is on [File: Exit Sam]. 12. Enter su to exit Super User mode. 13. Solaris 2.x Information Checklist Before starting the installation procedure, please ensure that the following items are available and/or the tasks have been performed: 24 Xerox WorkCentre 4250/4260 Series System Administration Guide This screen may...

System Administration Guide
Page 37
... on page 14 until step 38, then return to complete the form. 7. Enter Exit to Remote Printer] form: a) Printer Name: queuename. Xerox WorkCentre 4250/4260 Series System Administration Guide 25 Ensure that the job prints at the machine. Open a command window from the /etc/hosts file. Where...shell. 10. Configure the Client 1. Click on [Browse:Printers]. 5. Test the queue created, by entering the command: lp -d queuename /etc/hosts. 12. Verify that you can ping the machine. 3. Enter su to Printer...]. 6. Enter sh to exit Super User mode. 11. Unix 1. Use either...
... on page 14 until step 38, then return to complete the form. 7. Enter Exit to Remote Printer] form: a) Printer Name: queuename. Xerox WorkCentre 4250/4260 Series System Administration Guide 25 Ensure that the job prints at the machine. Open a command window from the /etc/hosts file. Where...shell. 10. Configure the Client 1. Click on [Browse:Printers]. 5. Test the queue created, by entering the command: lp -d queuename /etc/hosts. 12. Verify that you can ping the machine. 3. Enter su to Printer...]. 6. Enter sh to exit Super User mode. 11. Unix 1. Use either...
System Administration Guide
Page 40
...client. Enter http://127.0.0.1:631/printers in the [Driver] menu. 28 Xerox WorkCentre 4250/4260 Series System Administration Guide Enter ipp://hostname/ipp/printername. NOTE: Not all distros of the Xerox machine and printername is available at cups.org. 2. Click on [Continue...Enter a location and description for the printer. 9. Click on [Internet Printing Protocol]. 12. Create the Print Queue 1. In the [Device] menu, click on [Continue]. 13. Click on [Xerox] in Chapter 3, Configure Static IPv4 Addressing using the Machine User Interface, Information Checklist on...
...client. Enter http://127.0.0.1:631/printers in the [Driver] menu. 28 Xerox WorkCentre 4250/4260 Series System Administration Guide Enter ipp://hostname/ipp/printername. NOTE: Not all distros of the Xerox machine and printername is available at cups.org. 2. Click on [Continue...Enter a location and description for the printer. 9. Click on [Internet Printing Protocol]. 12. Create the Print Queue 1. In the [Device] menu, click on [Continue]. 13. Click on [Xerox] in Chapter 3, Configure Static IPv4 Addressing using the Machine User Interface, Information Checklist on...

System Administration Guide
Page 42
...close the program. 22. 3 Network Installation 7. The Spool directory is the directory where print jobs are stored and is a subdirectory of the subdirectory path. 12. Add the name of the print queue to the end of [/var/spool/lpd]. In the [Remote Host] area, enter the IP Address of your...page 15. IMPORTANT: Click on the [Input Filter] option. 16. Enter the name of the Xerox machine. 14. DO NOT click on [BOOTP] in the [Names] area. 11. Click on page 29. 30 Xerox WorkCentre 4250/4260 Series System Administration Guide Follow the steps above in the Red Hat Linux Print System...
...close the program. 22. 3 Network Installation 7. The Spool directory is the directory where print jobs are stored and is a subdirectory of the subdirectory path. 12. Add the name of the print queue to the end of [/var/spool/lpd]. In the [Remote Host] area, enter the IP Address of your...page 15. IMPORTANT: Click on the [Input Filter] option. 16. Enter the name of the Xerox machine. 14. DO NOT click on [BOOTP] in the [Names] area. 11. Click on page 29. 30 Xerox WorkCentre 4250/4260 Series System Administration Guide Follow the steps above in the Red Hat Linux Print System...
System Administration Guide
Page 48
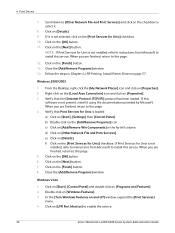
...page. 4. Verify that the [Internet Protocol (TCP/IP)] protocol has been loaded. Click on [LPR Port Monitor] to install this page. 12. NOTE: If Print Services for Unix is not present, install it . 8. Follow the steps in Chapter 4, LPR Printing, Install Printer Driver... software is loaded: a) Click on the [Print Services for Unix is not installed, refer to instructions from Microsoft to enable the service. 36 Xerox WorkCentre 4250/4260 Series System Administration Guide f) Click on [Properties]. 3. Click on and off] window, expand the [Print Services] menu. 4. Windows...
...page. 4. Verify that the [Internet Protocol (TCP/IP)] protocol has been loaded. Click on [LPR Port Monitor] to install this page. 12. NOTE: If Print Services for Unix is not present, install it . 8. Follow the steps in Chapter 4, LPR Printing, Install Printer Driver... software is loaded: a) Click on the [Print Services for Unix is not installed, refer to instructions from Microsoft to enable the service. 36 Xerox WorkCentre 4250/4260 Series System Administration Guide f) Click on [Properties]. 3. Click on and off] window, expand the [Print Services] menu. 4. Windows...