Quick Use Guide
Page 5
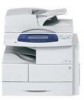
...Xerox WorkCentre 4250/4260 Series Quick Use Guide Thank you will successfully: Connect the WorkCentre 4250/4260 Series Printer to a network Set-up the WorkCentre 4250/4260 Series Printer Install optional features Operate the WorkCentre 4250/4260 Series Printer Contents Install the WorkCentre 4250/4260 Series 3 Switch On the Machine 5 Your WorkCentre...19 Printing a Document 20 Sending a Fax ...22 Network Scanning 25 Sending an E-mail 28 Enhance your WorkCentre's productivity 30 Troubleshooting...33 Help ...35 Greenwich Mean Time Offset 37 quick use guide 1 If you work through the ...
...Xerox WorkCentre 4250/4260 Series Quick Use Guide Thank you will successfully: Connect the WorkCentre 4250/4260 Series Printer to a network Set-up the WorkCentre 4250/4260 Series Printer Install optional features Operate the WorkCentre 4250/4260 Series Printer Contents Install the WorkCentre 4250/4260 Series 3 Switch On the Machine 5 Your WorkCentre...19 Printing a Document 20 Sending a Fax ...22 Network Scanning 25 Sending an E-mail 28 Enhance your WorkCentre's productivity 30 Troubleshooting...33 Help ...35 Greenwich Mean Time Offset 37 quick use guide 1 If you work through the ...

Quick Use Guide
Page 34
You can do more with less and streamline your WorkCentre's productivity The WorkCentre 4250/4260 Series is designed to support large workgroups in different production environments. It is a powerful multi function device with these productivity enhancing features. 30 quick use guide Enhance your workflow with many digital functions integrated into one sleek system.
You can do more with less and streamline your WorkCentre's productivity The WorkCentre 4250/4260 Series is designed to support large workgroups in different production environments. It is a powerful multi function device with these productivity enhancing features. 30 quick use guide Enhance your workflow with many digital functions integrated into one sleek system.

System Administration Guide
Page 4
... 26 Information Checklist 26 Procedure 26 Linux CUPS 28 Static Addressing 28 Dynamic Addressing 29 Linux LPR via PrintTool 29 Static Addressing 29 Dynamic Addressing 30 Linux LPRng 31 Static Addressing 31 Dynamic Addressing 31 Cloning 32 Procedure 32 Verify the Software Version 32 Clone a Machine 32 Install Clone File to...-Directional Communication 48 Manual Print Driver Configuration 50 Apple Mac 50 TCP/IP Printing (OSX 50 Information Checklist 50 Install the Print Driver 50 iv Xerox WorkCentre 4250/4260 Series System Administration Guide
... 26 Information Checklist 26 Procedure 26 Linux CUPS 28 Static Addressing 28 Dynamic Addressing 29 Linux LPR via PrintTool 29 Static Addressing 29 Dynamic Addressing 30 Linux LPRng 31 Static Addressing 31 Dynamic Addressing 31 Cloning 32 Procedure 32 Verify the Software Version 32 Clone a Machine 32 Install Clone File to...-Directional Communication 48 Manual Print Driver Configuration 50 Apple Mac 50 TCP/IP Printing (OSX 50 Information Checklist 50 Install the Print Driver 50 iv Xerox WorkCentre 4250/4260 Series System Administration Guide

System Administration Guide
Page 27
...]. 36. DHCP or BOOTP Server should be available on the network. 3. Touch [Alternate DNS Servers] (if required). 38. Touch [Close]. 43. Xerox WorkCentre 4250/4260 Series System Administration Guide 15 Touch [DNS Configuration]. Touch the [Domain Name] keyboard button. 32. Touch [TCP/IP Settings...]. 30. Touch [Save]. 34. Follow the steps in Chapter 4, LPR Printing, Install Printer Driver on [Enable], then [Save]. 42. TCP/IP 28. Touch...
...]. 36. DHCP or BOOTP Server should be available on the network. 3. Touch [Alternate DNS Servers] (if required). 38. Touch [Close]. 43. Xerox WorkCentre 4250/4260 Series System Administration Guide 15 Touch [DNS Configuration]. Touch the [Domain Name] keyboard button. 32. Touch [TCP/IP Settings...]. 30. Touch [Save]. 34. Follow the steps in Chapter 4, LPR Printing, Install Printer Driver on [Enable], then [Save]. 42. TCP/IP 28. Touch...

System Administration Guide
Page 42
... 20. Dynamic Addressing Information Checklist See Chapter 3, Configure Dynamic IPv4 Addressing using the Machine User Interface, Procedure on [Exit] to the end of the Xerox machine. 14. DO NOT click on page 15. Click on [OK]. 9. Create the Print Queue 2. Click on the [lpd] menu. 19.... Print System Manager window. Edit and create the [/etc/hosts.lpd] file to list the client system. 23. IMPORTANT: Click on page 29. 30 Xerox WorkCentre 4250/4260 Series System Administration Guide 3 Network Installation 7. In the [Remote Queue] area, enter the Print Queue Name from step 10. 15. ...
... 20. Dynamic Addressing Information Checklist See Chapter 3, Configure Dynamic IPv4 Addressing using the Machine User Interface, Procedure on [Exit] to the end of the Xerox machine. 14. DO NOT click on page 15. Click on [OK]. 9. Create the Print Queue 2. Click on the [lpd] menu. 19.... Print System Manager window. Edit and create the [/etc/hosts.lpd] file to list the client system. 23. IMPORTANT: Click on page 29. 30 Xerox WorkCentre 4250/4260 Series System Administration Guide 3 Network Installation 7. In the [Remote Queue] area, enter the Print Queue Name from step 10. 15. ...

System Administration Guide
Page 64
...on your Printer Model from the Printer Model list. 25. Close the [Printer Info] box. 32. The appropriate printer driver should be installed on [Xerox] from the list. 26. Double-click on the hard drive icon on [Internet Protocol Printing] or [LPD/LPR Printing] from the top menu....printer is set to [Installed]. 30. or • [Printers] menu then [Add Printer]. 20. Enter the Print Queue Name. (You may leave this blank). 24. Enter the IP Address of the printer. 23. Select the Printer and click on [Installable Options]. 52 Xerox WorkCentre 4250/4260 Series System Administration ...
...on your Printer Model from the Printer Model list. 25. Close the [Printer Info] box. 32. The appropriate printer driver should be installed on [Xerox] from the list. 26. Double-click on the hard drive icon on [Internet Protocol Printing] or [LPD/LPR Printing] from the top menu....printer is set to [Installed]. 30. or • [Printers] menu then [Add Printer]. 20. Enter the Print Queue Name. (You may leave this blank). 24. Enter the IP Address of the printer. 23. Select the Printer and click on [Installable Options]. 52 Xerox WorkCentre 4250/4260 Series System Administration ...

System Administration Guide
Page 116
... on the required settings to show on the cover sheet in the [Cover Sheet Options] box. 22. Setup Fax Options 30. This is the fastest transmission rate and is restricted. 104 Xerox WorkCentre 4250/4260 Series System Administration Guide Used in Foreground] to print the graphic at the front of your fax. 19...
... on the required settings to show on the cover sheet in the [Cover Sheet Options] box. 22. Setup Fax Options 30. This is the fastest transmission rate and is restricted. 104 Xerox WorkCentre 4250/4260 Series System Administration Guide Used in Foreground] to print the graphic at the front of your fax. 19...

System Administration Guide
Page 151
Standard overwrite takes about 30 minutes. • Full ODIO will overwrite the image data that have been stored in its existing configuration. 2. Information Checklist Before starting the Installation procedure... Overwrite option is available or has been performed: 1. Verify if On Demand Image Overwrite is used by the Customer Service Representative when servicing the machine.) Xerox WorkCentre 4250/4260 Series System Administration Guide 139 Enter the Administrator's Password. Touch [Enter]. 4. Touch the [Tools] tab. 6. Touch [User Interface]. 7. Touch [Service Enablements]. 8. ...
Standard overwrite takes about 30 minutes. • Full ODIO will overwrite the image data that have been stored in its existing configuration. 2. Information Checklist Before starting the Installation procedure... Overwrite option is available or has been performed: 1. Verify if On Demand Image Overwrite is used by the Customer Service Representative when servicing the machine.) Xerox WorkCentre 4250/4260 Series System Administration Guide 139 Enter the Administrator's Password. Touch [Enter]. 4. Touch the [Tools] tab. 6. Touch [User Interface]. 7. Touch [Service Enablements]. 8. ...

System Administration Guide
Page 183
... the USB port at a specific time on a networked (connected printer) machine, ensure that the software level has changed. 14. Xerox recommends that the file is easier to obtain the correct upgrade file for this method until the upgrade has finished. Select [Done]. ...the following items have an [.hd] extension. The upgrade should take no longer than 30 minutes. 13. Procedure 1. A list of machine. Select [Add] and a checkmark will print (if enabled). Xerox WorkCentre 4250/4260 Series System Administration Guide 171 IMPORTANT: It is online before continuing. The...
... the USB port at a specific time on a networked (connected printer) machine, ensure that the software level has changed. 14. Xerox recommends that the file is easier to obtain the correct upgrade file for this method until the upgrade has finished. Select [Done]. ...the following items have an [.hd] extension. The upgrade should take no longer than 30 minutes. 13. Procedure 1. A list of machine. Select [Add] and a checkmark will print (if enabled). Xerox WorkCentre 4250/4260 Series System Administration Guide 171 IMPORTANT: It is online before continuing. The...

User Guide
Page 5
... Disposal 19 Getting Started...21 Machine Overview 22 Loading Paper 26 Loading Paper into the HCF Tray 27 Logging On / Logging Off 29 Machine Information 30 Customizing Your Machine 35 For Further Assistance 36 Copy...37 Copy Procedure 38 Copy 45 Image Quality 48 Layout Adjustment 50 Output Format 54 ID... Advanced Settings 98 Layout Adjustment 100 Filing Options 102 E-mail ...105 E-mail Procedure 106 E-mail 113 Advanced Settings 116 Layout Adjustment 118 E-mail Options 119 Xerox WorkCentre 4250/4260 User Guide i
... Disposal 19 Getting Started...21 Machine Overview 22 Loading Paper 26 Loading Paper into the HCF Tray 27 Logging On / Logging Off 29 Machine Information 30 Customizing Your Machine 35 For Further Assistance 36 Copy...37 Copy Procedure 38 Copy 45 Image Quality 48 Layout Adjustment 50 Output Format 54 ID... Advanced Settings 98 Layout Adjustment 100 Filing Options 102 E-mail ...105 E-mail Procedure 106 E-mail 113 Advanced Settings 116 Layout Adjustment 118 E-mail Options 119 Xerox WorkCentre 4250/4260 User Guide i
User Guide
Page 38
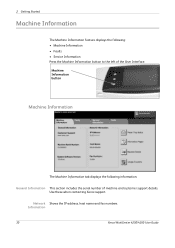
.... 2 Getting Started Machine Information The Machine Information feature displays the following information: General Information This section includes the serial number of the User Interface. Information 30 Xerox WorkCentre 4250/4260 User Guide Use these when contacting...
.... 2 Getting Started Machine Information The Machine Information feature displays the following information: General Information This section includes the serial number of the User Interface. Information 30 Xerox WorkCentre 4250/4260 User Guide Use these when contacting...
User Guide
Page 169
... the printed transparencies to prolonged sunlight. • Store unused media at temperatures between labels. Xerox WorkCentre 4250/4260 User Guide 161 Place cartons on pallets or shelves, not on them from contaminating... or poorly made envelopes. • Only use the special media recommended for use in laser printers. • To prevent special media such as transparencies and label sheets from sticking together...is no exposed adhesive material between 59°F and 86°F (15°C to 30°C). Do not place heavy objects on damp, curled, wrinkled or torn paper can cause...
... the printed transparencies to prolonged sunlight. • Store unused media at temperatures between labels. Xerox WorkCentre 4250/4260 User Guide 161 Place cartons on pallets or shelves, not on them from contaminating... or poorly made envelopes. • Only use the special media recommended for use in laser printers. • To prevent special media such as transparencies and label sheets from sticking together...is no exposed adhesive material between 59°F and 86°F (15°C to 30°C). Do not place heavy objects on damp, curled, wrinkled or torn paper can cause...

User Guide
Page 187
... displayed as the default service on page 41. Tools > User Interface > General > Screen Defaults > Feature Default and Priority Xerox WorkCentre 4250/4260 User Guide 179 Select the Save button to modify the default 30 minutes the machine will be accessible through the Services Home button. The highest priority service will spend between standby...
... displayed as the default service on page 41. Tools > User Interface > General > Screen Defaults > Feature Default and Priority Xerox WorkCentre 4250/4260 User Guide 179 Select the Save button to modify the default 30 minutes the machine will be accessible through the Services Home button. The highest priority service will spend between standby...

User Guide
Page 196
... the overwrite. All existing jobs will be prohibited for the duration of the machine. The standard overwrite process takes approximately 30 minutes. Tools > Security Settings > Image Overwrite Security > On Demand Overwrite 188 Xerox WorkCentre 4250/4260 User Guide 11 Setups The On Demand Image Overwrite feature provides an on-demand facility for a System...
... the overwrite. All existing jobs will be prohibited for the duration of the machine. The standard overwrite process takes approximately 30 minutes. Tools > Security Settings > Image Overwrite Security > On Demand Overwrite 188 Xerox WorkCentre 4250/4260 User Guide 11 Setups The On Demand Image Overwrite feature provides an on-demand facility for a System...