
Quick Use Guide
Page 38
...; Follow the instructions on the display and remove all jam clearance doors and covers are returned to their correct positions. Lower Jam Clearance Cover handle 34 quick use guide Paper jams Side Cover Area Jam The screen will be recycled automatically to recover the job integrity. Paper Jam Area • Ensure...
...; Follow the instructions on the display and remove all jam clearance doors and covers are returned to their correct positions. Lower Jam Clearance Cover handle 34 quick use guide Paper jams Side Cover Area Jam The screen will be recycled automatically to recover the job integrity. Paper Jam Area • Ensure...

System Administration Guide
Page 27
... Checklist Before starting the installation procedure, please ensure that the following items are available and/or the tasks have been performed: 1. Xerox WorkCentre 4250/4260 Series System Administration Guide 15 Touch the [Domain Name] keyboard button. 32. Touch each octet button of the DNS ...numbers from the keypad. 37. Touch the [Clear Text] button to be available on the network. 3. Touch [DNS Configuration]. Touch [Save]. 34. Touch each octet button of the DNS Server IP Address at a time before entering the numbers from the keypad. Follow the steps in Chapter...
... Checklist Before starting the installation procedure, please ensure that the following items are available and/or the tasks have been performed: 1. Xerox WorkCentre 4250/4260 Series System Administration Guide 15 Touch the [Domain Name] keyboard button. 32. Touch each octet button of the DNS ...numbers from the keypad. 37. Touch the [Clear Text] button to be available on the network. 3. Touch [DNS Configuration]. Touch [Save]. 34. Touch each octet button of the DNS Server IP Address at a time before entering the numbers from the keypad. Follow the steps in Chapter...

System Administration Guide
Page 117
... machine to use . If you can specify which phonebook to send your fax at a specific time, click on the [Fax Recipients] tab. Xerox WorkCentre 4250/4260 Series System Administration Guide 105 The Personal Phonebook is created when you delete a recipient from the phonebook, select the [Prompt When Removing ...43. Use the Feature 33. Click on the [Select File...] box next to use as the default from the [Fax Resolution] drop-down menu. 34. If you add duplicate recipients to close the [Fax] window. If your selections. 44. Setup Phonebook Preferences 37. Click on [OK] to ...
... machine to use . If you can specify which phonebook to send your fax at a specific time, click on the [Fax Recipients] tab. Xerox WorkCentre 4250/4260 Series System Administration Guide 105 The Personal Phonebook is created when you delete a recipient from the phonebook, select the [Prompt When Removing ...43. Use the Feature 33. Click on the [Select File...] box next to use as the default from the [Fax Resolution] drop-down menu. 34. If you add duplicate recipients to close the [Fax] window. If your selections. 44. Setup Phonebook Preferences 37. Click on [OK] to ...
User Guide
Page 42
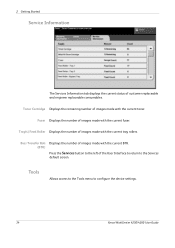
... default screen. Bias Transfer Roll Displays the number of images made with the current BTR. (BTR) Press the Services button to configure the device settings. 34 Xerox WorkCentre 4250/4260 User Guide Fuser Displays the number of images made with the current fuser.
... default screen. Bias Transfer Roll Displays the number of images made with the current BTR. (BTR) Press the Services button to configure the device settings. 34 Xerox WorkCentre 4250/4260 User Guide Fuser Displays the number of images made with the current fuser.