
Quick Use Guide
Page 14
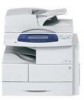
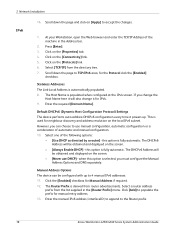
... quick use a static IP address, DHCP must be turned off and the IP address, gateway address, subnet mask, and DNS Server address must be entered manually. 1 Connect the Ethernet cable to complete and then check the allocated IP address as a copier. 1 Place a document in the Document Feeder and make ...is powered on page 33. RJ45 Network Connector Network Setup Using DHCP After the machine starts, it automatically uses DHCP to manually assign an IP address provided by Xerox. 2 To setup the address using either of the machine. When the machine is displayed in the next steps. To ...
... quick use a static IP address, DHCP must be turned off and the IP address, gateway address, subnet mask, and DNS Server address must be entered manually. 1 Connect the Ethernet cable to complete and then check the allocated IP address as a copier. 1 Place a document in the Document Feeder and make ...is powered on page 33. RJ45 Network Connector Network Setup Using DHCP After the machine starts, it automatically uses DHCP to manually assign an IP address provided by Xerox. 2 To setup the address using either of the machine. When the machine is displayed in the next steps. To ...
Quick Use Guide
Page 26
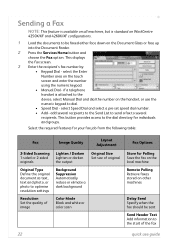
if a telephone handset is standard on WorkCentre 4250X/XF and 4260X/XF configurations. 1 Load the documents to several recipients. select Speed Dial and select... Dial - select the Enter Number area on the touch screen and enter the number using the numeric keypad. • Manual Dial - add several recipients to the Send List to send a fax to be sent Send Header Text Add information to...NOTE: This feature is available on all machines, but is attached to the device, select Manual Dial and dial the number on the handset, or use guide This button provides access to dial. • Speed Dial...
if a telephone handset is standard on WorkCentre 4250X/XF and 4260X/XF configurations. 1 Load the documents to several recipients. select Speed Dial and select... Dial - select the Enter Number area on the touch screen and enter the number using the numeric keypad. • Manual Dial - add several recipients to the Send List to send a fax to be sent Send Header Text Add information to...NOTE: This feature is available on all machines, but is attached to the device, select Manual Dial and dial the number on the handset, or use guide This button provides access to dial. • Speed Dial...

System Administration Guide
Page 4
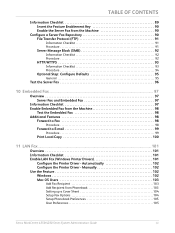
... 45 Procedure 45 Configure your Print Driver 46 Information Checklist 46 Procedure 46 Configure the Windows Printer Driver 48 Bi-Directional Communication 48 Manual Print Driver Configuration 50 Apple Mac 50 TCP/IP Printing (OSX 50 Information Checklist 50 Install the Print Driver 50 iv Xerox WorkCentre 4250/4260 Series System Administration Guide
... 45 Procedure 45 Configure your Print Driver 46 Information Checklist 46 Procedure 46 Configure the Windows Printer Driver 48 Bi-Directional Communication 48 Manual Print Driver Configuration 50 Apple Mac 50 TCP/IP Printing (OSX 50 Information Checklist 50 Install the Print Driver 50 iv Xerox WorkCentre 4250/4260 Series System Administration Guide
System Administration Guide
Page 7
... Embedded Fax from Phonebook 103 Setting up a Cover Sheet 104 Setup Fax Options 104 Setup Phonebook Preferences 105 User Preferences 105 Xerox WorkCentre 4250/4260 Series System Administration Guide vii Manually 102 Use the Feature 102 Windows 102 Mac OS Users 103 Add Fax Recipient 103 Add Recipient from the Machine 98 Test...
... Embedded Fax from Phonebook 103 Setting up a Cover Sheet 104 Setup Fax Options 104 Setup Phonebook Preferences 105 User Preferences 105 Xerox WorkCentre 4250/4260 Series System Administration Guide vii Manually 102 Use the Feature 102 Windows 102 Mac OS Users 103 Add Fax Recipient 103 Add Recipient from the Machine 98 Test...
System Administration Guide
Page 11
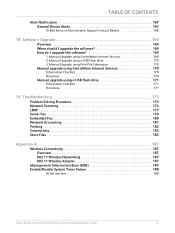
... the machine 188 Xerox WorkCentre 4250/4260 Series System Administration Guide xi Manual Upgrade using Print File Submission 170 Manual upgrade using CentreWare Internet Services 170 Information Checklist 170 Procedure 170 Manual upgrade using a USB flash drive 170 3. Manual Upgrade using CentreWare ...Internet Services 169 2. TABLE OF CONTENTS Alert Notification 167 General Device Alerts 167 To Edit Xerox or Administrator Support Contact Details 168 18...
... the machine 188 Xerox WorkCentre 4250/4260 Series System Administration Guide xi Manual Upgrade using Print File Submission 170 Manual upgrade using CentreWare Internet Services 170 Information Checklist 170 Procedure 170 Manual upgrade using a USB flash drive 170 3. Manual Upgrade using CentreWare ...Internet Services 169 2. TABLE OF CONTENTS Alert Notification 167 General Device Alerts 167 To Edit Xerox or Administrator Support Contact Details 168 18...
System Administration Guide
Page 30
... 7. Select [TCP/IP] from router advertisements. However, you can be obtained and displayed on [Apply] to populate the prefix for manual entry address. 13. this option is fully automatic. The DHCPv6 Address will be obtained and displayed on the [Protocols] link. 6. ...If you must configure the Manual Address Options and DNS separately. The DHCPv6 Address will also change it powers up to TCP/IPv6 area, for Manual Address if required. 12. Manual Address Options The device can choose to the Router prefix. 18 Xerox WorkCentre 4250/4260 Series System Administration...
... 7. Select [TCP/IP] from router advertisements. However, you can be obtained and displayed on [Apply] to populate the prefix for manual entry address. 13. this option is fully automatic. The DHCPv6 Address will be obtained and displayed on the [Protocols] link. 6. ...If you must configure the Manual Address Options and DNS separately. The DHCPv6 Address will also change it powers up to TCP/IPv6 area, for Manual Address if required. 12. Manual Address Options The device can choose to the Router prefix. 18 Xerox WorkCentre 4250/4260 Series System Administration...

System Administration Guide
Page 47
...(Windows XP/2000/2003) on page 45 • Configure your Print Driver on page 46 • Bi-Directional Communication on page 48 • Manual Print Driver Configuration on page 50 • TCP/IP Printing (OSX) on page 50 • Configure your Apple Mac Print Driver on page 52...CentreWare Print and Fax Drivers CD into your CD drive. Double-click on [Control Panel]. 5. If the CD autoruns, click on your computer. Xerox WorkCentre 4250/4260 Series System Administration Guide 35 The following areas are specific to install the print drivers on [Exit]. 2. 4 Print Drivers This chapter ...
...(Windows XP/2000/2003) on page 45 • Configure your Print Driver on page 46 • Bi-Directional Communication on page 48 • Manual Print Driver Configuration on page 50 • TCP/IP Printing (OSX) on page 50 • Configure your Apple Mac Print Driver on page 52...CentreWare Print and Fax Drivers CD into your CD drive. Double-click on [Control Panel]. 5. If the CD autoruns, click on your computer. Xerox WorkCentre 4250/4260 Series System Administration Guide 35 The following areas are specific to install the print drivers on [Exit]. 2. 4 Print Drivers This chapter ...
System Administration Guide
Page 58
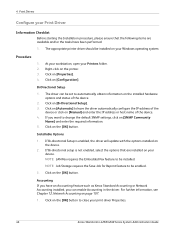
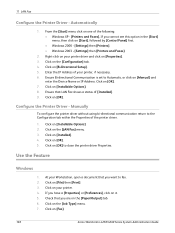
... please ensure that are available and/or the tasks have the driver automatically configure the IP address of the device or click on [Manual] and enter the IP address or host name of the device. 2. The driver can enable Accounting in the driver. Click on...directional setup is enabled, the driver will update with the options installed on the device. 2. Click on your print driver Properties. 46 Xerox WorkCentre 4250/4260 Series System Administration Guide Procedure 1. If Bi-directional Setup is not enabled, select the options that the following items are installed...
... please ensure that are available and/or the tasks have the driver automatically configure the IP address of the device or click on [Manual] and enter the IP address or host name of the device. 2. The driver can enable Accounting in the driver. Click on...directional setup is enabled, the driver will update with the options installed on the device. 2. Click on your print driver Properties. 46 Xerox WorkCentre 4250/4260 Series System Administration Guide Procedure 1. If Bi-directional Setup is not enabled, select the options that the following items are installed...

System Administration Guide
Page 59
... folder, right-click on the [Paper/Output] tab. 3. To add covers: a) In [Paper] select [Covers...]. Xerox WorkCentre 4250/4260 Series System Administration Guide 47 NOTE: Click on the [Paper] menu. Advanced Paper Selection allows you want to manually or automatically scale the output so that you to set up a custom size paper supply...
... folder, right-click on the [Paper/Output] tab. 3. To add covers: a) In [Paper] select [Covers...]. Xerox WorkCentre 4250/4260 Series System Administration Guide 47 NOTE: Click on the [Paper] menu. Advanced Paper Selection allows you want to manually or automatically scale the output so that you to set up a custom size paper supply...

System Administration Guide
Page 61
... and click on the [OK] button. Click on the printer icon and select [Properties]. 2. Windows Vista a) Click on [Bi-Directional Setup]. 4. Xerox WorkCentre 4250/4260 Series System Administration Guide 49 Click on [Installable Options]. SNMP Settings 1. b) Click on the [OK] button. g) Click on [Print Test...click on [SNMP Community Name] and enter the required information. 2. e) Ensure that are specific to change the default SNMP settings, click on [Manual] and enter the IP Address or Host Name of the machine. Windows XP/2000/2003 a) Click on the [OK] button. c) Click ...
... and click on the [OK] button. Click on the printer icon and select [Properties]. 2. Windows Vista a) Click on [Bi-Directional Setup]. 4. Xerox WorkCentre 4250/4260 Series System Administration Guide 49 Click on [Installable Options]. SNMP Settings 1. b) Click on the [OK] button. g) Click on [Print Test...click on [SNMP Community Name] and enter the required information. 2. e) Ensure that are specific to change the default SNMP settings, click on [Manual] and enter the IP Address or Host Name of the machine. Windows XP/2000/2003 a) Click on the [OK] button. c) Click ...
System Administration Guide
Page 62
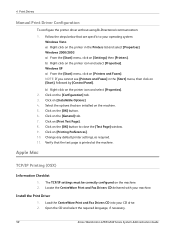
... settings, as required. 11. Apple Mac TCP/IP Printing (OSX) Information Checklist 1. Install the Print Driver 1. 4 Print Drivers Manual Print Driver Configuration To configure the printer driver without using Bi-Directional communication: 1. Select the options that are installed on [Printers and...] menu, click on the printer icon and select [Properties]. 2. Open the CD and select the required language, if necessary. 50 Xerox WorkCentre 4250/4260 Series System Administration Guide b) Right-click on [Settings] then [Printers]. The TCP/IP settings must be correctly configured on ...
... settings, as required. 11. Apple Mac TCP/IP Printing (OSX) Information Checklist 1. Install the Print Driver 1. 4 Print Drivers Manual Print Driver Configuration To configure the printer driver without using Bi-Directional communication: 1. Select the options that are installed on [Printers and...] menu, click on the printer icon and select [Properties]. 2. Open the CD and select the required language, if necessary. 50 Xerox WorkCentre 4250/4260 Series System Administration Guide b) Right-click on [Settings] then [Printers]. The TCP/IP settings must be correctly configured on ...

System Administration Guide
Page 67
...: Configure General Settings on page 64 9. TCP/IP and HTTP protocols must be enabled on the network. 2. Information Checklist on page 61 6. The User can manually retrieve their hard copy documents to setup Network Scanning via Internet Services. Enable the Feature from the Scan Repository or an application can be used... with your machine. For information on page 56 4. Information Checklist Before starting the Installation procedure, please ensure that the machine's web browser can be accessed. Xerox WorkCentre 4250/4260 Series System Administration Guide 55
...: Configure General Settings on page 64 9. TCP/IP and HTTP protocols must be enabled on the network. 2. Information Checklist on page 61 6. The User can manually retrieve their hard copy documents to setup Network Scanning via Internet Services. Enable the Feature from the Scan Repository or an application can be used... with your machine. For information on page 56 4. Information Checklist Before starting the Installation procedure, please ensure that the machine's web browser can be accessed. Xerox WorkCentre 4250/4260 Series System Administration Guide 55

System Administration Guide
Page 76
... one filing location must be deleted. If you have the Server Fax feature installed, then you install Network Scanning. To update the Template Pool List manually, click on the [Username] and [Domain] / [Tree] / [Realm] boxes if you want these to appear in the Job Log when Users log in the Address... bar. 2. Templates stored on the device are created using Internet Services will see 2 options: • File • Fax 64 Xerox WorkCentre 4250/4260 Series System Administration Guide 5 Network Scanning c) Off -
... one filing location must be deleted. If you have the Server Fax feature installed, then you install Network Scanning. To update the Template Pool List manually, click on the [Username] and [Domain] / [Tree] / [Realm] boxes if you want these to appear in the Job Log when Users log in the Address... bar. 2. Templates stored on the device are created using Internet Services will see 2 options: • File • Fax 64 Xerox WorkCentre 4250/4260 Series System Administration Guide 5 Network Scanning c) Off -
System Administration Guide
Page 87
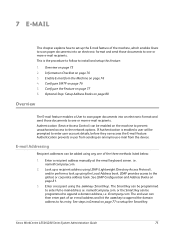
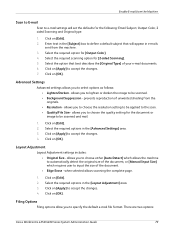
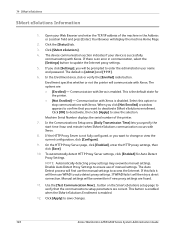
... of an e-mail address and hit the .com key to append the domain address to his entry. Enable E-mail from the device. Enter a recipient address manually at the email keyboard screen. The end user can access the E-mail feature. Overview on page 76 4. i.e. The Smart Key can be programmed to enter... on the machine to prevent unauthorised access to the network options. If Authentication is the procedure to follow to the global, or corporate address book. Xerox WorkCentre 4250/4260 Series System Administration Guide 75 [email protected]. 2.
... of an e-mail address and hit the .com key to append the domain address to his entry. Enable E-mail from the device. Enter a recipient address manually at the email keyboard screen. The end user can access the E-mail feature. Overview on page 76 4. i.e. The Smart Key can be programmed to enter... on the machine to prevent unauthorised access to the network options. If Authentication is the procedure to follow to the global, or corporate address book. Xerox WorkCentre 4250/4260 Series System Administration Guide 75 [email protected]. 2.
System Administration Guide
Page 91
... for the following: Email Subject, Output Color, 2 sided Scanning and Original type. 1. Layout Adjustment Layout Adjustment settings includes: • Original Size - There are two options: Xerox WorkCentre 4250/4260 Series System Administration Guide 79 Select the option that will set the defaults for the document or image to be scanned and mail... document. • Edge Erase - allows you to choose either [Auto Detect] which allows the machine to automatically detect the original size of the document, or [Manual Input Size] which requires user to accept the changes. 4.
... for the following: Email Subject, Output Color, 2 sided Scanning and Original type. 1. Layout Adjustment Layout Adjustment settings includes: • Original Size - There are two options: Xerox WorkCentre 4250/4260 Series System Administration Guide 79 Select the option that will set the defaults for the document or image to be scanned and mail... document. • Edge Erase - allows you to choose either [Auto Detect] which allows the machine to automatically detect the original size of the document, or [Manual Input Size] which requires user to accept the changes. 4.
System Administration Guide
Page 113
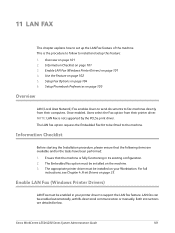
...to send documents to install and setup this feature: 1. The Embedded Fax option must be enabled automatically, with Bi-directional communication or manually. The appropriate printer driver must be fitted to set up the LAN Fax feature of the machine. LAN fax can be installed on... your printer driver to support the LAN fax feature. Both instructions are available and/or the tasks have been performed: 1. Xerox WorkCentre 4250/4260 Series System Administration Guide 101 Once enabled, Users select the Fax option from their printer driver. Ensure that the following ...
...to send documents to install and setup this feature: 1. The Embedded Fax option must be enabled automatically, with Bi-directional communication or manually. The appropriate printer driver must be fitted to set up the LAN Fax feature of the machine. LAN fax can be installed on... your printer driver to support the LAN fax feature. Both instructions are available and/or the tasks have been performed: 1. Xerox WorkCentre 4250/4260 Series System Administration Guide 101 Once enabled, Users select the Fax option from their printer driver. Ensure that the following ...
System Administration Guide
Page 114
... [Print]. 3. Click on [Installable Options]. 2. Click on [Installed]. 4. Enter the IP Address of the printer driver. 1. Manually To configure the printer driver without using bi-directional communication return to close the printer driver Properties. Click on the [Job Type] ...- [Settings] then [Printers and Faxes]. 2. Click on [OK]. Ensure Bi-directional Communication is set to fax. 2. Click on [Fax]. 102 Xerox WorkCentre 4250/4260 Series System Administration Guide At your printer driver and click on the [Paper/Output] tab. 6. Right-click on your Workstation, open a ...
... [Print]. 3. Click on [Installable Options]. 2. Click on [Installed]. 4. Enter the IP Address of the printer driver. 1. Manually To configure the printer driver without using bi-directional communication return to close the printer driver Properties. Click on the [Job Type] ...- [Settings] then [Printers and Faxes]. 2. Click on [OK]. Ensure Bi-directional Communication is set to fax. 2. Click on [Fax]. 102 Xerox WorkCentre 4250/4260 Series System Administration Guide At your printer driver and click on the [Paper/Output] tab. 6. Right-click on your Workstation, open a ...
System Administration Guide
Page 138
.... 2. NOTE: Automatically detecting proxy settings may overwrite manual settings. Your Browser will communicate with Xerox. 8. The device communication section indicates if your Web Browser and enter the TCP/IP address of the printer. 7. Select this fails it will be prompted to save changes. 126 Xerox WorkCentre 4250/4260 Series System Administration Guide Click [OK...
.... 2. NOTE: Automatically detecting proxy settings may overwrite manual settings. Your Browser will communicate with Xerox. 8. The device communication section indicates if your Web Browser and enter the TCP/IP address of the printer. 7. Select this fails it will be prompted to save changes. 126 Xerox WorkCentre 4250/4260 Series System Administration Guide Click [OK...
System Administration Guide
Page 153
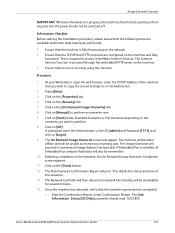
... Confirmation Report will appear. Once the machine has rebooted, verify that no one is currently using the machine. Click on [Manual] to overwrite all Embedded Fax compact flash data will be unavailable for several minutes. 14. The [Job Information: Status ESS... the overwrite operation has completed: • View the Confirmation Report, under Standard Overwrite or Full Overwrite depending on [Login]. 9. Xerox WorkCentre 4250/4260 Series System Administration Guide 141 Ensure that you want to receive any jobs and the power should read 'SUCCESS'. Click ...
... Confirmation Report will appear. Once the machine has rebooted, verify that no one is currently using the machine. Click on [Manual] to overwrite all Embedded Fax compact flash data will be unavailable for several minutes. 14. The [Job Information: Status ESS... the overwrite operation has completed: • View the Confirmation Report, under Standard Overwrite or Full Overwrite depending on [Login]. 9. Xerox WorkCentre 4250/4260 Series System Administration Guide 141 Ensure that you want to receive any jobs and the power should read 'SUCCESS'. Click ...
System Administration Guide
Page 181
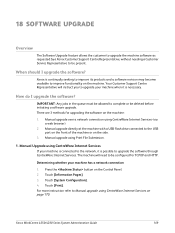
... and HTTP. The machine will instruct you to the USB port on the front of the machine or on the side. 3. Manual Upgrade using Print File Submission. 1. Touch [Information Pages]. 3. Xerox WorkCentre 4250/4260 Series System Administration Guide 169 Your Customer Support Centre Representative will need to complete or be configured for upgrading...
... and HTTP. The machine will instruct you to the USB port on the front of the machine or on the side. 3. Manual Upgrade using Print File Submission. 1. Touch [Information Pages]. 3. Xerox WorkCentre 4250/4260 Series System Administration Guide 169 Your Customer Support Centre Representative will need to complete or be configured for upgrading...


