Quick Use Guide
Page 5
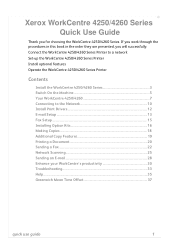
Xerox WorkCentre 4250/4260 Series Quick Use Guide Thank you will successfully: Connect the WorkCentre 4250/4260 Series Printer to a network Set-up the WorkCentre 4250/4260 Series Printer Install optional features Operate the WorkCentre 4250/4260 Series Printer Contents Install the WorkCentre 4250/4260 Series 3 Switch On the Machine 5 Your WorkCentre......18 Additional Copy Features 19 Printing a Document 20 Sending a Fax ...22 Network Scanning 25 Sending an E-mail 28 Enhance your WorkCentre's productivity 30 Troubleshooting...33 Help ...35 Greenwich Mean Time Offset 37 quick use guide ...
Xerox WorkCentre 4250/4260 Series Quick Use Guide Thank you will successfully: Connect the WorkCentre 4250/4260 Series Printer to a network Set-up the WorkCentre 4250/4260 Series Printer Install optional features Operate the WorkCentre 4250/4260 Series Printer Contents Install the WorkCentre 4250/4260 Series 3 Switch On the Machine 5 Your WorkCentre......18 Additional Copy Features 19 Printing a Document 20 Sending a Fax ...22 Network Scanning 25 Sending an E-mail 28 Enhance your WorkCentre's productivity 30 Troubleshooting...33 Help ...35 Greenwich Mean Time Offset 37 quick use guide ...
Quick Use Guide
Page 7
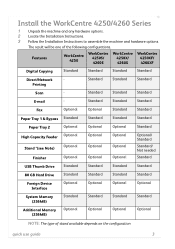
.... 3 Follow the Installation Instructions to assemble the machine and hardware options. Printing Standard Standard Standard Scan - The result will be one of stand available depends on the configuration. quick use guide 3 Features WorkCentre 4250 WorkCentre 4250S/ 4260S WorkCentre 4250X/ 4260X WorkCentre 4250XF/ 4260XF Digital Copying Standard Standard Standard Standard Direct/Network - Standard Standard Standard Standard Standard...
.... 3 Follow the Installation Instructions to assemble the machine and hardware options. Printing Standard Standard Standard Scan - The result will be one of stand available depends on the configuration. quick use guide 3 Features WorkCentre 4250 WorkCentre 4250S/ 4260S WorkCentre 4250X/ 4260X WorkCentre 4250XF/ 4260XF Digital Copying Standard Standard Standard Standard Direct/Network - Standard Standard Standard Standard Standard...
Quick Use Guide
Page 11
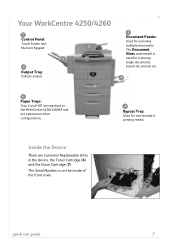
...: Used for scanning multiple documents. The Document Glass underneath is on other configurations. 2 Document Feeder: Used for non-standard printing media Inside the Device There are Customer Replaceable Units in the device, the Toner Cartridge (6) and the Drum Cartridge (7). Your WorkCentre 4250/4260 1... Control Panel: Touch Screen and Numeric Keypad 2 3 1 3 Output Tray: Collects output 5 5 Paper Trays: Tray 2 and HCF are standard on the WorkCentre 4250/4260XF and are optional on the inside of the ...
...: Used for scanning multiple documents. The Document Glass underneath is on other configurations. 2 Document Feeder: Used for non-standard printing media Inside the Device There are Customer Replaceable Units in the device, the Toner Cartridge (6) and the Drum Cartridge (7). Your WorkCentre 4250/4260 1... Control Panel: Touch Screen and Numeric Keypad 2 3 1 3 Output Tray: Collects output 5 5 Paper Trays: Tray 2 and HCF are standard on the WorkCentre 4250/4260XF and are optional on the inside of the ...
Quick Use Guide
Page 13
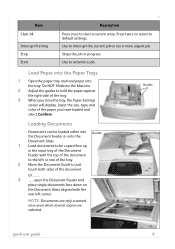
... Confirm. Loading Documents Documents can be copied face up in progress. Use to run a more urgent job. Guides quick use guide 9 NOTE: Documents are only scanned once even when several copies are selected. Input the size, type and color of the tray. 2 Move the Document Guide to be loaded either into...
... Confirm. Loading Documents Documents can be copied face up in progress. Use to run a more urgent job. Guides quick use guide 9 NOTE: Documents are only scanned once even when several copies are selected. Input the size, type and color of the tray. 2 Move the Document Guide to be loaded either into...
Quick Use Guide
Page 16
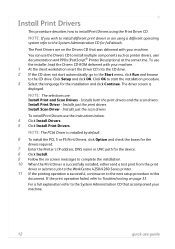
...send a test print from the print driver or submit a job to the WorkCentre 4250/4260 Series printer. 11 If the printing operation is displayed. To use guide Installs just the print drivers. Install Scan Driver - For a full explanation refer to the System Administration CD that was ...If the print operation failed, refer to Troubleshooting on to the next setup procedure in this document. Installs both the print drivers and the scan drivers. You can use the instructions below. 4 Click Install Drivers. 5 Click Install Print Drivers. The driver screen is successful, continue on...
...send a test print from the print driver or submit a job to the WorkCentre 4250/4260 Series printer. 11 If the printing operation is displayed. To use guide Installs just the print drivers. Install Scan Driver - For a full explanation refer to the System Administration CD that was ...If the print operation failed, refer to Troubleshooting on to the next setup procedure in this document. Installs both the print drivers and the scan drivers. You can use the instructions below. 4 Click Install Drivers. 5 Click Install Print Drivers. The driver screen is successful, continue on...
Quick Use Guide
Page 20
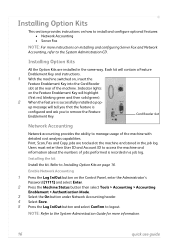
... highlight (first red, blinking green and then solid green). 2 When the feature is configured and ask you to Installing Option Kits on page 16. Print, Scan, Fax and Copy jobs are installed in a job log. Installing Option Kits This section provides instructions on how to install and configure optional features: •...
... highlight (first red, blinking green and then solid green). 2 When the feature is configured and ask you to Installing Option Kits on page 16. Print, Scan, Fax and Copy jobs are installed in a job log. Installing Option Kits This section provides instructions on how to install and configure optional features: •...
Quick Use Guide
Page 23
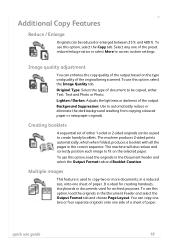
... produces 2-sided prints automatically, which when folded, produces a booklet with all the pages in a reduced size, onto one side of a sheet of the original being scanned. Additional Copy Features Reduce / Enlarge Originals can be copied, either 1-sided or 2-sided originals can be copied to be reduced or enlarged between 25% and...
... produces 2-sided prints automatically, which when folded, produces a booklet with all the pages in a reduced size, onto one side of a sheet of the original being scanned. Additional Copy Features Reduce / Enlarge Originals can be copied, either 1-sided or 2-sided originals can be copied to be reduced or enlarged between 25% and...
Quick Use Guide
Page 26
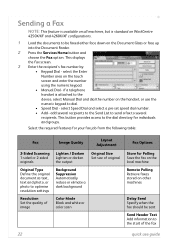
...option. This displays the Fax screen. 3 Enter the recipient's fax number by: • Keypad Dial - if a telephone handset is standard on WorkCentre 4250X/XF and 4260X/XF configurations. 1 Load the documents to be sent Send Header Text Add information to the start of original Background Suppression Automatically reduce... or elimate a dark background Color Mode Black and white or color scan Fax Options Store for individuals and groups. Select the required features for your fax job from the following table: Fax 2-Sided...
...option. This displays the Fax screen. 3 Enter the recipient's fax number by: • Keypad Dial - if a telephone handset is standard on WorkCentre 4250X/XF and 4260X/XF configurations. 1 Load the documents to be sent Send Header Text Add information to the start of original Background Suppression Automatically reduce... or elimate a dark background Color Mode Black and white or color scan Fax Options Store for individuals and groups. Select the required features for your fax job from the following table: Fax 2-Sided...
Quick Use Guide
Page 29
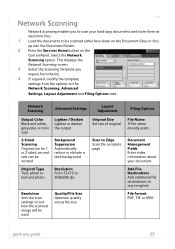
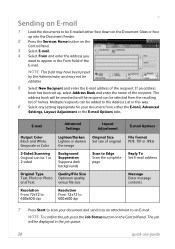
.../File Size Optimum quality versus file size Original Size Set size of original File Name If file name already exists Scan to Edge Scan the complete page Document Management Fields Enter index information about your document Add File Destinations Add additional file destinations to ...Document Glass or face up into the Document Feeder. 2 Press the Services Home button on the Network Scanning, Advanced Settings, Layout Adjustment and Filing Options tabs. Network Scanning Network Scanning enables you require from the list. 4 If required, modify the template settings from the options on ...
.../File Size Optimum quality versus file size Original Size Set size of original File Name If file name already exists Scan to Edge Scan the complete page Document Management Fields Enter index information about your document Add File Destinations Add additional file destinations to ...Document Glass or face up into the Document Feeder. 2 Press the Services Home button on the Network Scanning, Advanced Settings, Layout Adjustment and Filing Options tabs. Network Scanning Network Scanning enables you require from the list. 4 If required, modify the template settings from the options on ...
Quick Use Guide
Page 30
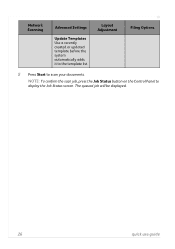
NOTE: To confirm the scan job, press the Job Status button on the Control Panel to scan your documents. The queued job will be displayed. 26 quick use guide Network Scanning Advanced Settings Update Templates Use a recently created or updated template before the system automatically adds it to the template list Layout Adjustment Filing Options 5 Press Start to display the Job Status screen.
NOTE: To confirm the scan job, press the Job Status button on the Control Panel to scan your documents. The queued job will be displayed. 26 quick use guide Network Scanning Advanced Settings Update Templates Use a recently created or updated template before the system automatically adds it to the template list Layout Adjustment Filing Options 5 Press Start to display the Job Status screen.
Quick Use Guide
Page 31
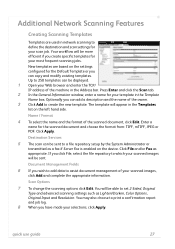
... setup by the System Administrator or transmitted as a fax if Server Fax is enabled on the device. Click Apply. Additional Network Scanning Features Creating Scanning Templates Templates are based on the settings configured for your selections, click Apply. New templates are used in the Templates list on ...File and/or Fax as Lighten/Darken, Color Options, Original Input and Resolution. Document Management Fields 6 If you have made your most frequent scanning jobs. Name / Format 4 To select the name and the format of your template in the Address bar. You will be able to ...
... setup by the System Administrator or transmitted as a fax if Server Fax is enabled on the device. Click Apply. Additional Network Scanning Features Creating Scanning Templates Templates are based on the settings configured for your selections, click Apply. New templates are used in the Templates list on ...File and/or Fax as Lighten/Darken, Color Options, Original Input and Resolution. Document Management Fields 6 If you have made your most frequent scanning jobs. Name / Format 4 To select the name and the format of your template in the Address bar. You will be able to ...
Quick Use Guide
Page 32
...versus file size Resolution From 72x72 to 600x600 dpi Resolution From 72x72 to 600x600 dpi Layout Adjustment Original Size Set size of original Scan to Edge Scan the complete page E-mail Options File format PDF, TIF or JPEG Reply To Set E-mail address Message Enter message contents 7 ...button on the Control Panel. E-mail Advanced Settings Output Color Black and White, Grayscale or Color Lighten/Darken Lighten or darken the image 2-Sided Scanning Original can be added to an E-mail. Sending an E-mail 1 Load the documents to be E-mailed either the E-mail, Advanced Settings, Layout...
...versus file size Resolution From 72x72 to 600x600 dpi Resolution From 72x72 to 600x600 dpi Layout Adjustment Original Size Set size of original Scan to Edge Scan the complete page E-mail Options File format PDF, TIF or JPEG Reply To Set E-mail address Message Enter message contents 7 ...button on the Control Panel. E-mail Advanced Settings Output Color Black and White, Grayscale or Color Lighten/Darken Lighten or darken the image 2-Sided Scanning Original can be added to an E-mail. Sending an E-mail 1 Load the documents to be E-mailed either the E-mail, Advanced Settings, Layout...
Quick Use Guide
Page 33
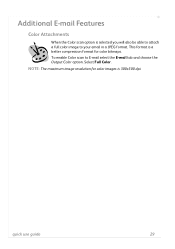
NOTE: The maximum image resolution for color bitmaps. Additional E-mail Features Color Attachments When the Color scan option is 300x300 dpi. This format is a better compression format for color images is selected you will also be able to attach a full color image to E-mail select the E-mail tab and choose the Output Color option. To enable Color scan to your email in a JPEG format. quick use guide 29 Select Full Color.
NOTE: The maximum image resolution for color bitmaps. Additional E-mail Features Color Attachments When the Color scan option is 300x300 dpi. This format is a better compression format for color images is selected you will also be able to attach a full color image to E-mail select the E-mail tab and choose the Output Color option. To enable Color scan to your email in a JPEG format. quick use guide 29 Select Full Color.
Quick Use Guide
Page 36
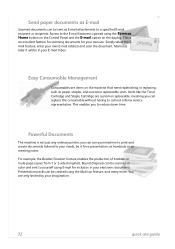
...customer replaceable, meaning you can use guide Send paper documents as E-mail Scanned documents can be sent as paper, staples, and customer replaceable units. Access to call out a Xerox service representative. Bound Originals can be scanned in your needs, be it will be created using the Multi-up ...feature, and many more. Units like the Toner Cartridge and Staple Cartridge are only limited by your own E-mail address and scan the document.
...customer replaceable, meaning you can use guide Send paper documents as E-mail Scanned documents can be sent as paper, staples, and customer replaceable units. Access to call out a Xerox service representative. Bound Originals can be scanned in your needs, be it will be created using the Multi-up ...feature, and many more. Units like the Toner Cartridge and Staple Cartridge are only limited by your own E-mail address and scan the document.
System Administration Guide
Page 5
...52 UNIX 53 Print Driver Options: Enable/Disable the Banner Sheet 54 From the Print Driver 54 From the Machine 54 5 Network Scanning ...55 Overview 55 Information Checklist 55 Enable the Feature from the Machine 56 Configure a Repository 56 File Transfer Protocol (FTP 56 ... 63 Optional Step: Configure the Default Template 64 Setting up the Default Template 64 Fax Destinations 65 Document Management Fields (Optional 65 Scan Options 66 Optional Step: Create a New Template 67 Further Information 67 Validation Servers 67 Information Checklist 68 Procedure 68 Setup the Template...
...52 UNIX 53 Print Driver Options: Enable/Disable the Banner Sheet 54 From the Print Driver 54 From the Machine 54 5 Network Scanning ...55 Overview 55 Information Checklist 55 Enable the Feature from the Machine 56 Configure a Repository 56 File Transfer Protocol (FTP 56 ... 63 Optional Step: Configure the Default Template 64 Setting up the Default Template 64 Fax Destinations 65 Document Management Fields (Optional 65 Scan Options 66 Optional Step: Create a New Template 67 Further Information 67 Validation Servers 67 Information Checklist 68 Procedure 68 Setup the Template...
System Administration Guide
Page 6
... 7 E-mail...75 Overview 75 E-mail Addressing 75 Information Checklist 76 Enable E-mail from the Machine 76 Configure SMTP 76 Configure the Feature 77 General 77 Scan to E-mail 79 Advanced Settings 79 Layout Adjustment 79 Filing Options 79 Image Settings 80 Optional Step: Setup Address Books 80 8 LDAP Configuration and Address... Address Book 86 Create a New Address 86 Test the Group Address Book 86 9 Server Fax...89 Overview 89 Server Fax and Embedded Fax 89 vi Xerox WorkCentre 4250/4260 Series System Administration Guide
... 7 E-mail...75 Overview 75 E-mail Addressing 75 Information Checklist 76 Enable E-mail from the Machine 76 Configure SMTP 76 Configure the Feature 77 General 77 Scan to E-mail 79 Advanced Settings 79 Layout Adjustment 79 Filing Options 79 Image Settings 80 Optional Step: Setup Address Books 80 8 LDAP Configuration and Address... Address Book 86 Create a New Address 86 Test the Group Address Book 86 9 Server Fax...89 Overview 89 Server Fax and Embedded Fax 89 vi Xerox WorkCentre 4250/4260 Series System Administration Guide
System Administration Guide
Page 11
... Checklist 170 Procedure 170 Manual upgrade using a USB flash drive 171 Information Checklist 171 Procedure 171 19 Troubleshooting ...173 Problem Solving Procedure 173 Network Scanning 174 LDAP 177 Server Fax 179 Embedded Fax 180 Network Accounting 181 Printing 182 Connectivity 183 Store Files 185 Appendix A...187 Wireless Connectivity 187 Overview...802.11 Wireless Networking 187 802.11 Wireless Adapter 187 Management Information Base (MIB 187 Enable/Disable System Timer Values 188 At the machine 188 Xerox WorkCentre 4250/4260 Series System Administration Guide xi
... Checklist 170 Procedure 170 Manual upgrade using a USB flash drive 171 Information Checklist 171 Procedure 171 19 Troubleshooting ...173 Problem Solving Procedure 173 Network Scanning 174 LDAP 177 Server Fax 179 Embedded Fax 180 Network Accounting 181 Printing 182 Connectivity 183 Store Files 185 Appendix A...187 Wireless Connectivity 187 Overview...802.11 Wireless Networking 187 802.11 Wireless Adapter 187 Management Information Base (MIB 187 Enable/Disable System Timer Values 188 At the machine 188 Xerox WorkCentre 4250/4260 Series System Administration Guide xi
System Administration Guide
Page 13
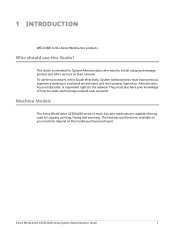
...Account Operator, or equivalent rights to create and manage network User accounts. This Guide is intended for copying, printing, faxing and scanning. Xerox WorkCentre 4250/4260 Series System Administration Guide 1 Who should use the procedures in a network environment and must also have prior knowledge ...of being used for System Administrators who need to the Xerox WorkCentre products. 1 Introduction WELCOME to install, setup and manage printers and other services on the model you have previous experience working ...
...Account Operator, or equivalent rights to create and manage network User accounts. This Guide is intended for copying, printing, faxing and scanning. Xerox WorkCentre 4250/4260 Series System Administration Guide 1 Who should use the procedures in a network environment and must also have prior knowledge ...of being used for System Administrators who need to the Xerox WorkCentre products. 1 Introduction WELCOME to install, setup and manage printers and other services on the model you have previous experience working ...

System Administration Guide
Page 14
Features WorkCentre 4250 WorkCentre 4250S/ 4260S WorkCentre 4250X/ 4260X WorkCentre 4250XF/ 4260XF Digital Copying Standard Standard Standard Standard Direct / Network Printing Standard Standard Standard Scan Standard Standard Standard E-mail Standard Standard Standard Fax Optional Optional Standard Standard...256MB) Optional Optional Optional NOTE: The type of storing print, copy and scan files on the configuration. 1 Introduction Xerox WorkCentre 4250/4260 Series The machine supports scanning to and printing from a USB flash drive and has the capability of...
Features WorkCentre 4250 WorkCentre 4250S/ 4260S WorkCentre 4250X/ 4260X WorkCentre 4250XF/ 4260XF Digital Copying Standard Standard Standard Standard Direct / Network Printing Standard Standard Standard Scan Standard Standard Standard E-mail Standard Standard Standard Fax Optional Optional Standard Standard...256MB) Optional Optional Optional NOTE: The type of storing print, copy and scan files on the configuration. 1 Introduction Xerox WorkCentre 4250/4260 Series The machine supports scanning to and printing from a USB flash drive and has the capability of...
System Administration Guide
Page 44
..., enter the TCP/IP Address of CentreWare Internet Services, click on the [Properties] tab. 4. for cloning only if the Network Scanning optional service is created and saved with the same system software version. NOTE: All machines involved in Create the Print Queue. Install ...software version. Click on [Cloning]. 2. Scroll down and view the [Printer Setup] area. 7. DO NOT deselect any checkboxes. 32 Xerox WorkCentre 4250/4260 Series System Administration Guide Follow the steps above in the Cloning procedure must contain the same system software version. NOTE: Do not...
..., enter the TCP/IP Address of CentreWare Internet Services, click on the [Properties] tab. 4. for cloning only if the Network Scanning optional service is created and saved with the same system software version. NOTE: All machines involved in Create the Print Queue. Install ...software version. Click on [Cloning]. 2. Scroll down and view the [Printer Setup] area. 7. DO NOT deselect any checkboxes. 32 Xerox WorkCentre 4250/4260 Series System Administration Guide Follow the steps above in the Cloning procedure must contain the same system software version. NOTE: Do not...


