
User Guide
Page 15
... then press the OK button to select the new time. 4. To print the sample pages: 1. On the control panel, select Printer Setup > Printer Controls, then press the OK button. 2. Using CentreWare... 2. If Power Saver is On. Enter the printer's IP address in the browser's Address field. 3. See also: Advanced Features Guide at www.xerox.com/office/4510support Power Saver Settings Factory Default: ...switch between Off and On. 3. Sample Pages Your printer comes with a set the Power Saver option to print. Phaser® 4510 Laser Printer 1-9 Select the desired sample page, and then press ...
... then press the OK button to select the new time. 4. To print the sample pages: 1. On the control panel, select Printer Setup > Printer Controls, then press the OK button. 2. Using CentreWare... 2. If Power Saver is On. Enter the printer's IP address in the browser's Address field. 3. See also: Advanced Features Guide at www.xerox.com/office/4510support Power Saver Settings Factory Default: ...switch between Off and On. 3. Sample Pages Your printer comes with a set the Power Saver option to print. Phaser® 4510 Laser Printer 1-9 Select the desired sample page, and then press ...
User Guide
Page 23
... the OK button. 4. Select TCP/IP Setup, and then press the OK button. 5. Phaser® 4510 Laser Printer 2-6 On the control panel, select Information, press the OK button, select Printer Identification, and then press the OK button. Press the OK button to turn on/off either... Network Address Dynamic Methods of Setting the Printer's IP Address There are two protocols available for dynamically setting the printer's IP address: ■ DHCP (enabled by default on all Phaser printers) ■ AutoIP You can view the printer's IP address at any time. Launch your web browser. 2. In the...
... the OK button. 4. Select TCP/IP Setup, and then press the OK button. 5. Phaser® 4510 Laser Printer 2-6 On the control panel, select Information, press the OK button, select Printer Identification, and then press the OK button. Press the OK button to turn on/off either... Network Address Dynamic Methods of Setting the Printer's IP Address There are two protocols available for dynamically setting the printer's IP address: ■ DHCP (enabled by default on all Phaser printers) ■ AutoIP You can view the printer's IP address at any time. Launch your web browser. 2. In the...

User Guide
Page 54
The computer download time and printer processing time are affected by several factors including: ■ Printer memory ■ Connection type (network, parallel or USB) ■ Network operating system ■ Printer configuration ■ File size and type of your printer. For example, if you override them specifically for a job. Phaser® 4510 Laser Printer 3-18 To select printer preferences: 1. In the Printers folder...
The computer download time and printer processing time are affected by several factors including: ■ Printer memory ■ Connection type (network, parallel or USB) ■ Network operating system ■ Printer configuration ■ File size and type of your printer. For example, if you override them specifically for a job. Phaser® 4510 Laser Printer 3-18 To select printer preferences: 1. In the Printers folder...

User Guide
Page 58
For example, your email application; the printer always prints multi-page email messages on Printing Your system administrator can restrict the use of the following printer features: ■ special job types ■ 1-sided printing ■ printing from your system administrator may restrict one-sided printing from a specific tray Usage of these features can be restricted to particular times of the paper. Phaser® 4510 Laser Printer 3-22 Selecting Printing Options Restrictions on both sides of the day and for particular applications.
For example, your email application; the printer always prints multi-page email messages on Printing Your system administrator can restrict the use of the following printer features: ■ special job types ■ 1-sided printing ■ printing from your system administrator may restrict one-sided printing from a specific tray Usage of these features can be restricted to particular times of the paper. Phaser® 4510 Laser Printer 3-22 Selecting Printing Options Restrictions on both sides of the day and for particular applications.
User Guide
Page 69
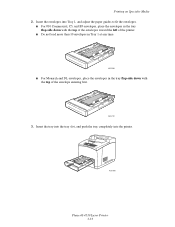
... the printer. ■ Do not load more than 10 envelopes in Tray 1 at any time. 4510-083 ■ For Monarch and DL envelopes, place the envelopes in the tray flap-side down with the top of the envelope entering first. 4510-107 3. Insert the envelopes into the printer. 4510-084 Phaser® 4510 Laser Printer 3-33...
... the printer. ■ Do not load more than 10 envelopes in Tray 1 at any time. 4510-083 ■ For Monarch and DL envelopes, place the envelopes in the tray flap-side down with the top of the envelope entering first. 4510-107 3. Insert the envelopes into the printer. 4510-084 Phaser® 4510 Laser Printer 3-33...
User Guide
Page 70
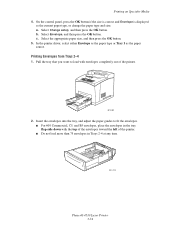
...: a. Insert the envelopes into the tray, and adjust the paper guides to load with the top of the envelopes toward the left of the printer. 4510-089 2. Select Change setup, and then press the OK button. Printing Envelopes from Trays 2-4 1. b. Select the appropriate paper size, ... envelopes, place the envelopes in the tray flap-side down with envelopes completely out of the printer. ■ Do not load more than 75 envelopes in Trays 2-4 at any time. 4510-108 Phaser® 4510 Laser Printer 3-34 c. Select Envelope, and then press the OK button. Printing on Specialty Media 4....
...: a. Insert the envelopes into the tray, and adjust the paper guides to load with the top of the envelopes toward the left of the printer. 4510-089 2. Select Change setup, and then press the OK button. Printing Envelopes from Trays 2-4 1. b. Select the appropriate paper size, ... envelopes, place the envelopes in the tray flap-side down with envelopes completely out of the printer. ■ Do not load more than 75 envelopes in Trays 2-4 at any time. 4510-108 Phaser® 4510 Laser Printer 3-34 c. Select Envelope, and then press the OK button. Printing on Specialty Media 4....
User Guide
Page 86
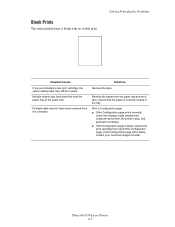
... ■ If the Configuration page prints correctly, check the interface cable between the computer and printer, the printer setup, and application software. ■ If the Configuration page is blank with no visible print. Phaser® 4510 Laser Printer 4-5 Multiple sheets may still be in the tray. Remove the paper from the paper tray ... Causes If you just installed a new print cartridge, the yellow sealing tape may have been received from the paper tray at the same time. Solutions Remove the tape. Also, ensure that the paper is blank, contact your Customer Support Center.
... ■ If the Configuration page prints correctly, check the interface cable between the computer and printer, the printer setup, and application software. ■ If the Configuration page is blank with no visible print. Phaser® 4510 Laser Printer 4-5 Multiple sheets may still be in the tray. Remove the paper from the paper tray ... Causes If you just installed a new print cartridge, the yellow sealing tape may have been received from the paper tray at the same time. Solutions Remove the tape. Also, ensure that the paper is blank, contact your Customer Support Center.

User Guide
Page 104
...Supplies The control panel displays a warning when the supply nears its replacement time. Caution: Use of non-Xerox supplies is available in the United States and Canada. please contact your printer supplies, print the Supplies Usage page: 1. On the control panel, ... hand. Verify that you have replacements on Xerox supplies recycling programs, go to the Xerox Supplies website at www.xerox.com/office/4510supplies. Phaser® 4510 Laser Printer 5-6 Select Supplies Info, and then press the OK button. 3. The Xerox Warranty, Service Agreements, and Total Satisfaction Guarantee...
...Supplies The control panel displays a warning when the supply nears its replacement time. Caution: Use of non-Xerox supplies is available in the United States and Canada. please contact your printer supplies, print the Supplies Usage page: 1. On the control panel, ... hand. Verify that you have replacements on Xerox supplies recycling programs, go to the Xerox Supplies website at www.xerox.com/office/4510supplies. Phaser® 4510 Laser Printer 5-6 Select Supplies Info, and then press the OK button. 3. The Xerox Warranty, Service Agreements, and Total Satisfaction Guarantee...
User Guide
Page 105
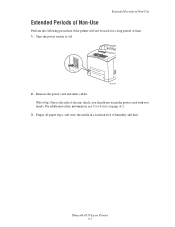
Phaser® 4510 Laser Printer 5-7 For additional safety information, see User Safety on page A-1. 3. Turn the power switch to the risk of time. 1. Extended Periods of Non-Use Extended Periods of Non-Use Perform the following procedure if the printer will not be used for a long period of electric shock, you should not touch the power cord with wet hands. Warning: Due to off. 4510-011 2. Empty all paper trays, and store the media in a location free of humidity and dust. Remove the power cord and other cables.
Phaser® 4510 Laser Printer 5-7 For additional safety information, see User Safety on page A-1. 3. Turn the power switch to the risk of time. 1. Extended Periods of Non-Use Extended Periods of Non-Use Perform the following procedure if the printer will not be used for a long period of electric shock, you should not touch the power cord with wet hands. Warning: Due to off. 4510-011 2. Empty all paper trays, and store the media in a location free of humidity and dust. Remove the power cord and other cables.
User Guide
Page 134
... time, it does not pose a safety hazard. The following : 1. Disconnect the power cord from the electrical outlet. 3. Laser Safety With specific regard to water. The power cord is attached to correct the problem. Call an authorized service representative to the printer as a Class 1 Laser ...The power cord is damaged or frayed. ■ Liquid is spilled into the printer. ■ The printer is certified as a plug-in device at the back of the printer. Phaser® 4510 Laser Printer A-2 If you are installing optional equipment and are specifically instructed to disconnect all ...
... time, it does not pose a safety hazard. The following : 1. Disconnect the power cord from the electrical outlet. 3. Laser Safety With specific regard to water. The power cord is attached to correct the problem. Call an authorized service representative to the printer as a Class 1 Laser ...The power cord is damaged or frayed. ■ Liquid is spilled into the printer. ■ The printer is certified as a plug-in device at the back of the printer. Phaser® 4510 Laser Printer A-2 If you are installing optional equipment and are specifically instructed to disconnect all ...
User Guide
Page 139
Phaser® 4510 Laser Printer A-7 Product Recycling and Disposal for North America Xerox operates a worldwide equipment takeback and reuse/recycle program. If you are managing the disposal of your Xerox sales representative (1-800-ASK-XEROX) to environmental considerations. Contact your Xerox product, please note that the ...other materials whose disposal may be regulated due to determine whether this Xerox product is part of lead, mercury, and perchlorate is fully consistent with regulations applicable at the time that the product was placed on the market. This product may ...
Phaser® 4510 Laser Printer A-7 Product Recycling and Disposal for North America Xerox operates a worldwide equipment takeback and reuse/recycle program. If you are managing the disposal of your Xerox sales representative (1-800-ASK-XEROX) to environmental considerations. Contact your Xerox product, please note that the ...other materials whose disposal may be regulated due to determine whether this Xerox product is part of lead, mercury, and perchlorate is fully consistent with regulations applicable at the time that the product was placed on the market. This product may ...
User Guide
Page 143
... 1-10, 6-25 PostScript, 2-9 fonts, 1-4 power saver settings, 1-9 preparing the printer for shipment, 5-8 pre-printed paper, 3-8 preventing paper jams, 6-2 print processing time, 3-18 speed, 3-18 print cartridge inserting, 6-15 removing, 6-14 print job factors..., 1-6 views, 1-2, 1-3 printer driver available, 2-9 controlling print-quality, 4-2 installing, 2-9 Layout/Watermark tab, 3-19 Macintosh, 2-9 Macintosh OS X version 10.3, 2-10 Macintosh OS X version 10.4, 2-12 operating systems, 2-9 page description languages, 2-9 Paper/Output tab, 3-19 PCL, 2-9 Phaser® 4510 Laser Printer Index-4
... 1-10, 6-25 PostScript, 2-9 fonts, 1-4 power saver settings, 1-9 preparing the printer for shipment, 5-8 pre-printed paper, 3-8 preventing paper jams, 6-2 print processing time, 3-18 speed, 3-18 print cartridge inserting, 6-15 removing, 6-14 print job factors..., 1-6 views, 1-2, 1-3 printer driver available, 2-9 controlling print-quality, 4-2 installing, 2-9 Layout/Watermark tab, 3-19 Macintosh, 2-9 Macintosh OS X version 10.3, 2-10 Macintosh OS X version 10.4, 2-12 operating systems, 2-9 page description languages, 2-9 Paper/Output tab, 3-19 PCL, 2-9 Phaser® 4510 Laser Printer Index-4
Advanced Features Guide
Page 17
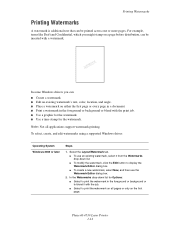
... can be printed across one or more pages. Select the Layout/Watermark tab. ■ To use an existing watermark, select it with a watermark. Phaser® 4510 Laser Printer 1-12 Note: Not all pages or only on a page before distribution, can : ■ Create a watermark. ■ Edit an existing watermark... a watermark in the foreground or background or blend with the print job. ■ Use a graphic for the watermark. ■ Use a time stamp for Options: ■ Select to print the watermark in the foreground or background or to blend it from the Watermarks drop-down list for...
... can be printed across one or more pages. Select the Layout/Watermark tab. ■ To use an existing watermark, select it with a watermark. Phaser® 4510 Laser Printer 1-12 Note: Not all pages or only on a page before distribution, can : ■ Create a watermark. ■ Edit an existing watermark... a watermark in the foreground or background or blend with the print job. ■ Use a graphic for the watermark. ■ Use a time stamp for Options: ■ Select to print the watermark in the foreground or background or to blend it from the Watermarks drop-down list for...

Advanced Features Guide
Page 47
... To change the default control panel language using CentreWare IS: 1. Select the General folder on the control panel: 1. Phaser® 4510 Laser Printer 4-2 Launch your printer's IP address in the browser's Address field (http://xxx.xxx.xxx.xxx). 3. Click the Save Changes button at ... Setting Control Panel Accessibility Behavior on page 4-3 ■ Setting the Printer Date and Time on page 4-4 ■ Controlling Startup Page Printing on page 4-5 ■ Changing the Power Saver Timeout on page 4-6 ■ Setting the Timing of the Low Toner Warning on page 4-7 ■ Controlling Print ...
... To change the default control panel language using CentreWare IS: 1. Select the General folder on the control panel: 1. Phaser® 4510 Laser Printer 4-2 Launch your printer's IP address in the browser's Address field (http://xxx.xxx.xxx.xxx). 3. Click the Save Changes button at ... Setting Control Panel Accessibility Behavior on page 4-3 ■ Setting the Printer Date and Time on page 4-4 ■ Controlling Startup Page Printing on page 4-5 ■ Changing the Power Saver Timeout on page 4-6 ■ Setting the Timing of the Low Toner Warning on page 4-7 ■ Controlling Print ...
Advanced Features Guide
Page 48
....xxx). 3. Enter your web browser. 2. Select the General folder on the control panel: 1. Phaser® 4510 Laser Printer 4-3 There are two control panel accessibility settings: ■ Off: The control panel times out after a short period of the screen. Select Control Panel Setup, and then press the OK...the Accessible Control Panel drop-down a key results in multiple entries of that key. ■ On: The control panel does not time out. Holding down list, select On or Off to improve accessibility for some individuals with disabilities. To adjust the control panel accessibility settings...
....xxx). 3. Enter your web browser. 2. Select the General folder on the control panel: 1. Phaser® 4510 Laser Printer 4-3 There are two control panel accessibility settings: ■ Off: The control panel times out after a short period of the screen. Select Control Panel Setup, and then press the OK...the Accessible Control Panel drop-down a key results in multiple entries of that key. ■ On: The control panel does not time out. Holding down list, select On or Off to improve accessibility for some individuals with disabilities. To adjust the control panel accessibility settings...

Advanced Features Guide
Page 49
... CentreWare IS To change the date or time, select the new values from the drop-down lists. 6. Phaser® 4510 Laser Printer 4-4 To change the printer's date and time setting on the printer date and time settings to select a value, and then press the OK button. Printer Settings Setting the Printer Date and Time Some printer features, like Scheduled Warmup mode and...
... CentreWare IS To change the date or time, select the new values from the drop-down lists. 6. Phaser® 4510 Laser Printer 4-4 To change the printer's date and time setting on the printer date and time settings to select a value, and then press the OK button. Printer Settings Setting the Printer Date and Time Some printer features, like Scheduled Warmup mode and...
Advanced Features Guide
Page 50
... each time the printer is turned on or reset. Select Printer Controls, and then press the OK button. Enter your web browser. 2. Select the General folder on the control panel: 1. The factory default is highlighted. To turn on/off the automatic printing of the Startup page using CentreWare IS: 1. Phaser® 4510 Laser Printer 4-5 Launch your printer...
... each time the printer is turned on or reset. Select Printer Controls, and then press the OK button. Enter your web browser. 2. Select the General folder on the control panel: 1. The factory default is highlighted. To turn on/off the automatic printing of the Startup page using CentreWare IS: 1. Phaser® 4510 Laser Printer 4-5 Launch your printer...
Advanced Features Guide
Page 51
... To change the Power Saver Timeout value on the control panel: 1. Click the Save Changes button at the bottom of time since its last activity. Phaser® 4510 Laser Printer 4-6 Printer Settings Changing the Power Saver Timeout To save energy, the printer enters a Power Saver, low-energy consumption mode after a predefined period of the page. Select...
... To change the Power Saver Timeout value on the control panel: 1. Click the Save Changes button at the bottom of time since its last activity. Phaser® 4510 Laser Printer 4-6 Printer Settings Changing the Power Saver Timeout To save energy, the printer enters a Power Saver, low-energy consumption mode after a predefined period of the page. Select...
Advanced Features Guide
Page 52
..., and then press the OK button. 3. Launch your printer's IP address in increments of 500 pages. Phaser® 4510 Laser Printer 4-7 Printer Settings Setting the Timing of the Low Toner Warning The printer detects when toner is 500 remaining pages. To set the supply level at the bottom of remaining pages...■ CentreWare IS Using the Control Panel To select the timing for the Low Toner Warning message using CentreWare IS: 1. Select Printer Setup, and then press the OK button. 2. Using CentreWare IS To select the timing for the Low Toner Warning message on the Low Toner Warning...
..., and then press the OK button. 3. Launch your printer's IP address in increments of 500 pages. Phaser® 4510 Laser Printer 4-7 Printer Settings Setting the Timing of the Low Toner Warning The printer detects when toner is 500 remaining pages. To set the supply level at the bottom of remaining pages...■ CentreWare IS Using the Control Panel To select the timing for the Low Toner Warning message using CentreWare IS: 1. Select Printer Setup, and then press the OK button. 2. Using CentreWare IS To select the timing for the Low Toner Warning message on the Low Toner Warning...

Advanced Features Guide
Page 56
...after paper is loaded in the tray. To select a Tray 1 or Tray 2-N prompt setting, use one of the page. Click Properties. 4. Phaser® 4510 Laser Printer 4-11 Factory default for Trays 2-4. Select the appropriate duration, and then press the OK button. In either the Tray 1 Mode or Tray 2-N... control panel selection is loaded in the browser's Address field (http://xxx.xxx.xxx.xxx). 3. Click the Save Changes button at the bottom of time the prompt displays on the control panel: 1. Select either Tray 1 Prompt or Tray 2-N Prompt, and then press the OK button. 3. Displays ...
...after paper is loaded in the tray. To select a Tray 1 or Tray 2-N prompt setting, use one of the page. Click Properties. 4. Phaser® 4510 Laser Printer 4-11 Factory default for Trays 2-4. Select the appropriate duration, and then press the OK button. In either the Tray 1 Mode or Tray 2-N... control panel selection is loaded in the browser's Address field (http://xxx.xxx.xxx.xxx). 3. Click the Save Changes button at the bottom of time the prompt displays on the control panel: 1. Select either Tray 1 Prompt or Tray 2-N Prompt, and then press the OK button. 3. Displays ...

