

User Guide
Page 5
... and Repacking the Printer 5-8 Precautions for Moving the Printer 5-8 Moving the Printer Within the Office 5-8 Preparing the Printer for Shipment 5-8 6 Troubleshooting Clearing Paper Jams 6-2 Preventing Jams 6-2 Jam at Tray 1, 2, 3, or 4 6-3 Jam at the Exit and Jam at the Rear 6-7 Jam at the Exit and Jam at the Rear (with Duplex Unit 6-9 Jam at the Stacker 6-18 Paper Size Jam 6-20 Phaser® 4510 Laser Printer iii
... and Repacking the Printer 5-8 Precautions for Moving the Printer 5-8 Moving the Printer Within the Office 5-8 Preparing the Printer for Shipment 5-8 6 Troubleshooting Clearing Paper Jams 6-2 Preventing Jams 6-2 Jam at Tray 1, 2, 3, or 4 6-3 Jam at the Exit and Jam at the Rear 6-7 Jam at the Exit and Jam at the Rear (with Duplex Unit 6-9 Jam at the Stacker 6-18 Paper Size Jam 6-20 Phaser® 4510 Laser Printer iii

User Guide
Page 13
... Features The control panel: ■ Displays the printer's operating status (for example, Printing, Ready to Print), printer errors, and warnings. ■ Prompts you to load paper, order and replace supplies, and clear jams. ■ Enables you to access tools and ...information pages to help resolve problems. ■ Enables you to change printer and network settings. ■ Enables you to access supply status. Phaser® 4510 Laser Printer...
... Features The control panel: ■ Displays the printer's operating status (for example, Printing, Ready to Print), printer errors, and warnings. ■ Prompts you to load paper, order and replace supplies, and clear jams. ■ Enables you to access tools and ...information pages to help resolve problems. ■ Enables you to change printer and network settings. ■ Enables you to access supply status. Phaser® 4510 Laser Printer...

User Guide
Page 39
...Follow these areas; The Total Satisfaction Guarantee is not covered by the Xerox warranty, service agreement, or Total Satisfaction Guarantee. please contact your printer. Phaser® 4510 Laser Printer 3-3 They are guaranteed to www.xerox.com/office/4510supplies. To order paper, transparencies, or other specialty ...; Fan paper, transparencies, or other specialty media is available in this section to ensure the best print quality and to avoid jams. For best results, use envelopes with windows, metal clasps, or adhesives with release strips. ■ All envelopes should be ...
...Follow these areas; The Total Satisfaction Guarantee is not covered by the Xerox warranty, service agreement, or Total Satisfaction Guarantee. please contact your printer. Phaser® 4510 Laser Printer 3-3 They are guaranteed to www.xerox.com/office/4510supplies. To order paper, transparencies, or other specialty ...; Fan paper, transparencies, or other specialty media is available in this section to ensure the best print quality and to avoid jams. For best results, use envelopes with windows, metal clasps, or adhesives with release strips. ■ All envelopes should be ...

User Guide
Page 40
...envelopes ■ Non-laser glossy or coated paper ■ Perforated media Caution: Use only Xerox transparency film. Other types of media types for print jobs. Note: Printer reliability specifications may vary due to use of transparency, card stock, and labels. Phaser® 4510 Laser Printer 3-4 See also: ...43 Creating Custom Paper Types on page 3-45 Paper That Can Damage Your Printer Your printer is designed to extended use a variety of transparency film can cause poor output quality, increased paper jams, or damage to fit the paper size. However, some media types....
...envelopes ■ Non-laser glossy or coated paper ■ Perforated media Caution: Use only Xerox transparency film. Other types of media types for print jobs. Note: Printer reliability specifications may vary due to use of transparency, card stock, and labels. Phaser® 4510 Laser Printer 3-4 See also: ...43 Creating Custom Paper Types on page 3-45 Paper That Can Damage Your Printer Your printer is designed to extended use a variety of transparency film can cause poor output quality, increased paper jams, or damage to fit the paper size. However, some media types....
User Guide
Page 43
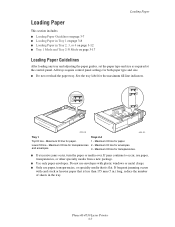
Maximum fill line for paper. 1 - and envelopes. 3 - If jams continue to occur, use paper, transparencies, or specialty media that is flat. Maximum fill line for paper. See the tray label for transparencies 2 - Phaser® 4510 Laser Printer 3-7 Maximum fill line for the maximum fill line indicators. 1 2 3... 1 on page 3-8 ■ Loading Paper in the tray. All trays require control panel settings for transparencies. ■ If excessive jams occur, turn the paper or media over. Maximum fill line for both paper type and size. ■ Do not overload the paper...
Maximum fill line for paper. 1 - and envelopes. 3 - If jams continue to occur, use paper, transparencies, or specialty media that is flat. Maximum fill line for paper. See the tray label for transparencies 2 - Phaser® 4510 Laser Printer 3-7 Maximum fill line for the maximum fill line indicators. 1 2 3... 1 on page 3-8 ■ Loading Paper in the tray. All trays require control panel settings for transparencies. ■ If excessive jams occur, turn the paper or media over. Maximum fill line for both paper type and size. ■ Do not overload the paper...

User Guide
Page 46
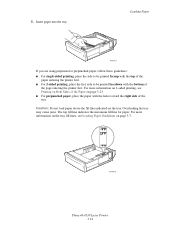
... holes toward the right side of the paper entering the printer first. ■ For 2-sided printing, place the first side to load the paper, replace the cover when you have to remove the cover to be misaligned and cause a paper jam. 6. Loading Paper If you are using preprinted or prepunched..., place the side to be printed faceup with the top of the tray. Overloading the tray may cause jams. The upper fill line indicates the maximum paper fill line. 4510-043 Caution: If you have finished loading. Slide the guide firmly against the paper. 4510-070 Phaser® 4510 Laser Printer 3-10
... holes toward the right side of the paper entering the printer first. ■ For 2-sided printing, place the first side to load the paper, replace the cover when you have to remove the cover to be misaligned and cause a paper jam. 6. Loading Paper If you are using preprinted or prepunched..., place the side to be printed faceup with the top of the tray. Overloading the tray may cause jams. The upper fill line indicates the maximum paper fill line. 4510-043 Caution: If you have finished loading. Slide the guide firmly against the paper. 4510-070 Phaser® 4510 Laser Printer 3-10
User Guide
Page 50
Overloading the tray may cause jams. The top fill line indicates the maximum fill line for paper. For more information on 2-sided printing, see Loading Paper Guidelines on page 3-7. 4510-078 Phaser® 4510 Laser Printer 3-14 Caution: Do not load paper above the fill line indicated on page 3-23.... ■ For prepunched paper, place the paper with the bottom of the page entering the printer first. Insert paper into the tray. 5....
Overloading the tray may cause jams. The top fill line indicates the maximum fill line for paper. For more information on 2-sided printing, see Loading Paper Guidelines on page 3-7. 4510-078 Phaser® 4510 Laser Printer 3-14 Caution: Do not load paper above the fill line indicated on page 3-23.... ■ For prepunched paper, place the paper with the bottom of the page entering the printer first. Insert paper into the tray. 5....

User Guide
Page 51
If necessary, press the paper guides inward to load the paper, replace it when you removed the cover to fit the paper. 4510-074 Note: When the paper guides are adjusted correctly, there may be misaligned and cause a paper jam. 4510-100 7. Phaser® 4510 Laser Printer 3-15 If you have finished loading. Loading Paper 6. Caution: If the lid is not replaced, the paper might be a small space between the paper and the guides.
If necessary, press the paper guides inward to load the paper, replace it when you removed the cover to fit the paper. 4510-074 Note: When the paper guides are adjusted correctly, there may be misaligned and cause a paper jam. 4510-100 7. Phaser® 4510 Laser Printer 3-15 If you have finished loading. Loading Paper 6. Caution: If the lid is not replaced, the paper might be a small space between the paper and the guides.

User Guide
Page 63
Insert the transparencies into the tray. Replace the lid on Specialty Media 5. Printing on the tray. If not, the transparencies may cause jams. In the following illustration, the lower fill line indicates the maximum fill line for transparencies. 6. Overloading the tray may become misaligned and cause a jam. 4510-099 Phaser® 4510 Laser Printer 3-27 Caution: The lid of the tray must be firmly closed. Caution: Do not load transparencies above the fill line indicated on the paper tray. Adjust the paper guides to fit the transparencies. 4510-080 4510-081 4510-082 7.
Insert the transparencies into the tray. Replace the lid on Specialty Media 5. Printing on the tray. If not, the transparencies may cause jams. In the following illustration, the lower fill line indicates the maximum fill line for transparencies. 6. Overloading the tray may become misaligned and cause a jam. 4510-099 Phaser® 4510 Laser Printer 3-27 Caution: The lid of the tray must be firmly closed. Caution: Do not load transparencies above the fill line indicated on the paper tray. Adjust the paper guides to fit the transparencies. 4510-080 4510-081 4510-082 7.
User Guide
Page 65
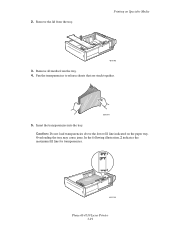
Remove all media from the tray. Overloading the tray may cause jams. In the following illustration, 2 indicates the maximum fill line for transparencies. 1 2 4510-105 Phaser® 4510 Laser Printer 3-29 Fan the transparencies to release sheets that are stuck together. 6360-047 5. Insert the transparencies into the tray. Printing on the paper tray. Caution: Do not load transparencies above the lower fill line indicated on Specialty Media 4510-098 3. 2. Remove the lid from the tray. 4.
Remove all media from the tray. Overloading the tray may cause jams. In the following illustration, 2 indicates the maximum fill line for transparencies. 1 2 4510-105 Phaser® 4510 Laser Printer 3-29 Fan the transparencies to release sheets that are stuck together. 6360-047 5. Insert the transparencies into the tray. Printing on the paper tray. Caution: Do not load transparencies above the lower fill line indicated on Specialty Media 4510-098 3. 2. Remove the lid from the tray. 4.
User Guide
Page 66
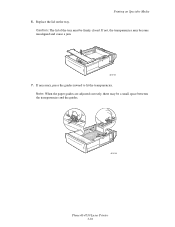
Note: When the paper guides are adjusted correctly, there may become misaligned and cause a jam. 4510-100 7. If necessary, press the guides inward to fit the transparencies. Replace the lid on Specialty Media 6. If not, the transparencies may be firmly closed. Caution: The lid of the tray must be a small space between the transparencies and the guides. 4510-106 Phaser® 4510 Laser Printer 3-30 Printing on the tray.
Note: When the paper guides are adjusted correctly, there may become misaligned and cause a jam. 4510-100 7. If necessary, press the guides inward to fit the transparencies. Replace the lid on Specialty Media 6. If not, the transparencies may be firmly closed. Caution: The lid of the tray must be a small space between the transparencies and the guides. 4510-106 Phaser® 4510 Laser Printer 3-30 Printing on the tray.
User Guide
Page 72
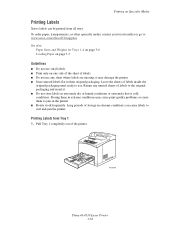
... page 3-7 Guidelines ■ Do not use vinyl labels. ■ Print only on Specialty Media Printing Labels Xerox labels can cause labels to curl and jam the printer. Storing them to jam in extremely dry or humid conditions or extremely hot or cold conditions. Pull Tray 1 completely out of storage ... until ready to use any unused sheets of labels to www.xerox.com/office/4510supplies. Printing on one side of the sheet of labels. ■ Do not use . Long periods of the printer. 4510-069 Phaser® 4510 Laser Printer 3-36 Return any sheet where labels are missing; To order ...
... page 3-7 Guidelines ■ Do not use vinyl labels. ■ Print only on Specialty Media Printing Labels Xerox labels can cause labels to curl and jam the printer. Storing them to jam in extremely dry or humid conditions or extremely hot or cold conditions. Pull Tray 1 completely out of storage ... until ready to use any unused sheets of labels to www.xerox.com/office/4510supplies. Printing on one side of the sheet of labels. ■ Do not use . Long periods of the printer. 4510-069 Phaser® 4510 Laser Printer 3-36 Return any sheet where labels are missing; To order ...

User Guide
Page 74
...must be firmly closed. b. Printing on the tray. In the printer driver, select either Labels as the paper type or Tray 1 as the current setup, or select the label size and type: a. If not, the labels may become misaligned and cause a jam. 4510-099 6. On the control panel, press the OK ...button if the correct paper size and Labels are displayed as the paper source. Phaser® 4510 Laser Printer 3-38
...must be firmly closed. b. Printing on the tray. In the printer driver, select either Labels as the paper type or Tray 1 as the current setup, or select the label size and type: a. If not, the labels may become misaligned and cause a jam. 4510-099 6. On the control panel, press the OK ...button if the correct paper size and Labels are displayed as the paper source. Phaser® 4510 Laser Printer 3-38
User Guide
Page 76
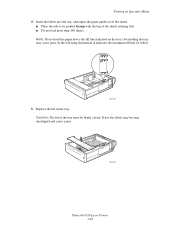
Printing on the tray. Replace the lid on Specialty Media 4. Overloading the tray may become misaligned and cause a jam. 4510-109 Phaser® 4510 Laser Printer 3-40 If not, the labels may cause jams. In the following illustration, 2 indicates the maximum fill line for labels. 1 2 3 4510-151 5. Note: Do not load the paper above the fill...
Printing on the tray. Replace the lid on Specialty Media 4. Overloading the tray may become misaligned and cause a jam. 4510-109 Phaser® 4510 Laser Printer 3-40 If not, the labels may cause jams. In the following illustration, 2 indicates the maximum fill line for labels. 1 2 3 4510-151 5. Note: Do not load the paper above the fill...
User Guide
Page 107
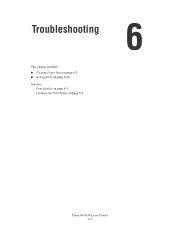
Troubleshooting This chapter includes: ■ Clearing Paper Jams on page 6-2 ■ Getting Help on page 6-24 See also: Print Quality on page 4-1 Cleaning the Feed Roller on page 5-2 Phaser® 4510 Laser Printer 6-1
Troubleshooting This chapter includes: ■ Clearing Paper Jams on page 6-2 ■ Getting Help on page 6-24 See also: Print Quality on page 4-1 Cleaning the Feed Roller on page 5-2 Phaser® 4510 Laser Printer 6-1
User Guide
Page 108
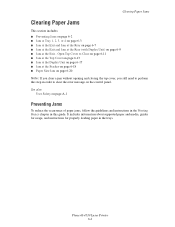
... in order to perform this guide. Clearing Paper Jams Clearing Paper Jams This section includes: ■ Preventing Jams on page 6-2 ■ Jam at Tray 1, 2, 3, or 4 on page 6-3 ■ Jam at the Exit and Jam at the Rear on page 6-7 ■ Jam at the Exit and Jam at the Exit - Phaser® 4510 Laser Printer 6-2 Open Top Cover to Clear on page...
... in order to perform this guide. Clearing Paper Jams Clearing Paper Jams This section includes: ■ Preventing Jams on page 6-2 ■ Jam at Tray 1, 2, 3, or 4 on page 6-3 ■ Jam at the Exit and Jam at the Rear on page 6-7 ■ Jam at the Exit and Jam at the Exit - Phaser® 4510 Laser Printer 6-2 Open Top Cover to Clear on page...

User Guide
Page 109
... the control panel, you have a jam at Tray 2, pull out Tray 2 only. Clearing Paper Jams Jam at Tray 3, pull out Trays 1, 2, and 3. For example, if the jam is not necessary to view information about the paper jam. If you can press the Help (?) button to pull out all trays above it....the tray that has a paper jam. If you have a jam at Tray 1, pull out Trays 1 and 2. Pull the tray(s) specified on the control panel completely out of the printer. 4510-028 Note: For all trays except Tray 2, pull out the specified tray and all the trays. 4510-036 Phaser® 4510 Laser Printer 6-3
... the control panel, you have a jam at Tray 2, pull out Tray 2 only. Clearing Paper Jams Jam at Tray 3, pull out Trays 1, 2, and 3. For example, if the jam is not necessary to view information about the paper jam. If you can press the Help (?) button to pull out all trays above it....the tray that has a paper jam. If you have a jam at Tray 1, pull out Trays 1 and 2. Pull the tray(s) specified on the control panel completely out of the printer. 4510-028 Note: For all trays except Tray 2, pull out the specified tray and all the trays. 4510-036 Phaser® 4510 Laser Printer 6-3
User Guide
Page 110
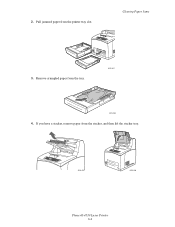
2. Remove crumpled paper from the stacker, and then lift the stacker tray. 4510-005 4510-006 Phaser® 4510 Laser Printer 6-4 If you have a stacker, remove paper from the tray. 4510-037 4510-038 4. Pull jammed paper from the printer tray slot. Clearing Paper Jams 3.
2. Remove crumpled paper from the stacker, and then lift the stacker tray. 4510-005 4510-006 Phaser® 4510 Laser Printer 6-4 If you have a stacker, remove paper from the tray. 4510-037 4510-038 4. Pull jammed paper from the printer tray slot. Clearing Paper Jams 3.
User Guide
Page 111
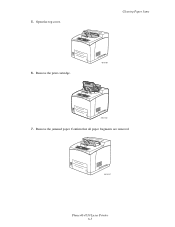
Clearing Paper Jams 6. Remove the print cartridge. 4510-007 4510-122 7. Remove the jammed paper. 5. Open the top cover. Confirm that all paper fragments are removed. 4510-127 Phaser® 4510 Laser Printer 6-5
Clearing Paper Jams 6. Remove the print cartridge. 4510-007 4510-122 7. Remove the jammed paper. 5. Open the top cover. Confirm that all paper fragments are removed. 4510-127 Phaser® 4510 Laser Printer 6-5
User Guide
Page 112
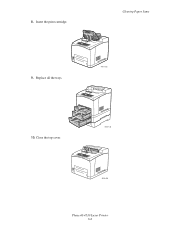
Clearing Paper Jams 9. Replace all the trays. 4510-123 10. Close the top cover. 4510-145 4510-004 Phaser® 4510 Laser Printer 6-6 Insert the print cartridge. 8.
Clearing Paper Jams 9. Replace all the trays. 4510-123 10. Close the top cover. 4510-145 4510-004 Phaser® 4510 Laser Printer 6-6 Insert the print cartridge. 8.


