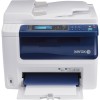
User Guide
Page 5
... Printing on Custom Paper Sizes ...87 Printing on Both Sides of the Paper ...89 Setting Up 2-Sided Printing ...89 Loading Paper for Manual 2-Sided Printing 90 Printing From a USB Flash Drive ...91 5 Copying 93 Making Copies...94 Automatic Document Feeder Guidelines...95 Document Glass ... Default Copy Settings...101 Changing the Color Mode...101 Changing the Auto Exposure Level ...101 Changing the Color Balance ...102 Changing the Manual Feed Slot Paper Size 102 Limiting Access to Copying ...103 6 Scanning 105 Loading Documents for Scanning ...106 Automatic Document Feeder Guidelines 106...
... Printing on Custom Paper Sizes ...87 Printing on Both Sides of the Paper ...89 Setting Up 2-Sided Printing ...89 Loading Paper for Manual 2-Sided Printing 90 Printing From a USB Flash Drive ...91 5 Copying 93 Making Copies...94 Automatic Document Feeder Guidelines...95 Document Glass ... Default Copy Settings...101 Changing the Color Mode...101 Changing the Auto Exposure Level ...101 Changing the Color Balance ...102 Changing the Manual Feed Slot Paper Size 102 Limiting Access to Copying ...103 6 Scanning 105 Loading Documents for Scanning ...106 Automatic Document Feeder Guidelines 106...

User Guide
Page 29
... IP Mode: Dual Stack or IPv4 Mode. IPv4: Get IP Address, IP Address, Subnet Mask, or Gateway Address WorkCentre 6015 Color Multifunction Printer 29 User Guide Select Disable to a wired network connection. Wireless Network Setup This menu provides the selections for setting up... setting is Enable. Initializes network data stored in non-volatile memory. Specifies the method used for setting up the wireless connection: Manual Setup WPS Resets the wireless network settings to a wired network connection. Specifies the TCP/IP settings for the network. ...
... IP Mode: Dual Stack or IPv4 Mode. IPv4: Get IP Address, IP Address, Subnet Mask, or Gateway Address WorkCentre 6015 Color Multifunction Printer 29 User Guide Select Disable to a wired network connection. Wireless Network Setup This menu provides the selections for setting up... setting is Enable. Initializes network data stored in non-volatile memory. Specifies the method used for setting up the wireless connection: Manual Setup WPS Resets the wireless network settings to a wired network connection. Specifies the TCP/IP settings for the network. ...

User Guide
Page 35
... you print using the N-up Margin Top/Bottom Margin Left/Right Margin Middle Description Specifies Black and White or Color output. WorkCentre 6015 Color Multifunction Printer 35 User Guide Reduces or enlarges the copies. Specifies the sharpness of your copies. Adjusts the red levels of the...two original page images onto one side of a sheet of paper: Off Auto (Autoscale) ID Card Copy Manual (Manual Scale) Turns On or Off the copy margins for the middle of the page. Features Default Settings Menu This section includes: Copy Defaults...35...
... you print using the N-up Margin Top/Bottom Margin Left/Right Margin Middle Description Specifies Black and White or Color output. WorkCentre 6015 Color Multifunction Printer 35 User Guide Reduces or enlarges the copies. Specifies the sharpness of your copies. Adjusts the red levels of the...two original page images onto one side of a sheet of paper: Off Auto (Autoscale) ID Card Copy Manual (Manual Scale) Turns On or Off the copy margins for the middle of the page. Features Default Settings Menu This section includes: Copy Defaults...35...

User Guide
Page 38
... buttons, then press OK to 15 W or less when the printer is left idle. To exit Energy Saver mode manually, press the Power Saver button on the control panel. 38 WorkCentre 6015 Color Multifunction Printer User Guide Press the arrow buttons to select one of the following: Power Saver Mode 1: Reduces...
... buttons, then press OK to 15 W or less when the printer is left idle. To exit Energy Saver mode manually, press the Power Saver button on the control panel. 38 WorkCentre 6015 Color Multifunction Printer User Guide Press the arrow buttons to select one of the following: Power Saver Mode 1: Reduces...
User Guide
Page 49
...) Security Options (Encryption Type) Passphrase Note: The wireless router must set up and configure the printer manually. Installation and Setup 4. To select WPS, press the arrow buttons, then press OK. 6. Note: For details, see your... the router to the router and restarts with different router manufacturers. 10. Connecting to a Wireless Network Manually When connecting to open the router control panel and select Add WPS Client. For details, see your ...The network name and passphrase are case sensitive. WorkCentre 6015 Color Multifunction Printer 49 User Guide
...) Security Options (Encryption Type) Passphrase Note: The wireless router must set up and configure the printer manually. Installation and Setup 4. To select WPS, press the arrow buttons, then press OK. 6. Note: For details, see your... the router to the router and restarts with different router manufacturers. 10. Connecting to a Wireless Network Manually When connecting to open the router control panel and select Add WPS Client. For details, see your ...The network name and passphrase are case sensitive. WorkCentre 6015 Color Multifunction Printer 49 User Guide
User Guide
Page 50
... in the Passphrase field, select them , then press Backspace. 10. On the printer control panel, press the System button. 2. To select Manual Setup, press the arrow buttons, then press OK. 6. To select the Encryption Type, use the drop-down menu to a wireless network... enter the name (SSID) of the window, click Wireless Lan. 4. Click Save Changes. 50 WorkCentre 6015 Color Multifunction Printer User Guide If the printer does not connect to a wireless network manually from the right. 10. To erase a character, press the Clear button for each character and character ...
... in the Passphrase field, select them , then press Backspace. 10. On the printer control panel, press the System button. 2. To select Manual Setup, press the arrow buttons, then press OK. 6. To select the Encryption Type, use the drop-down menu to a wireless network... enter the name (SSID) of the window, click Wireless Lan. 4. Click Save Changes. 50 WorkCentre 6015 Color Multifunction Printer User Guide If the printer does not connect to a wireless network manually from the right. 10. To erase a character, press the Clear button for each character and character ...
User Guide
Page 53
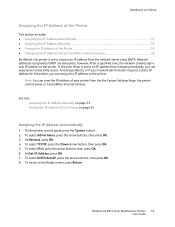
... Your Printer on page 55 Assigning the IP Address Automatically 1. To select Admin Menu, press the arrow buttons, then press OK. 3. WorkCentre 6015 Color Multifunction Printer 53 User Guide At Network, press OK. 4. After a specified time, the network could assign a new IP address to the... Assigning the IP Address of the Printer This section includes: Assigning the IP Address Automatically ...53 Assigning the IP Address Manually ...53 Finding the IP Address of the Printer ...55 Changing the IP Address Using CentreWare Internet Services 56 By default,...
... Your Printer on page 55 Assigning the IP Address Automatically 1. To select Admin Menu, press the arrow buttons, then press OK. 3. WorkCentre 6015 Color Multifunction Printer 53 User Guide At Network, press OK. 4. After a specified time, the network could assign a new IP address to the... Assigning the IP Address of the Printer This section includes: Assigning the IP Address Automatically ...53 Assigning the IP Address Manually ...53 Finding the IP Address of the Printer ...55 Changing the IP Address Using CentreWare Internet Services 56 By default,...
User Guide
Page 54
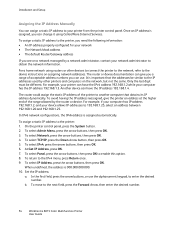
..., press the arrow buttons, then press OK to the next field, press the Forward Arrow, then enter the desired number. 54 WorkCentre 6015 Color Multifunction Printer User Guide It is assigned, you are on the network, but not the same. Only the last digit must be similar...25. At Get IP Address, press OK. 7. For a home network using CentreWare Internet Services. Installation and Setup Assigning the IP Address Manually You can assign a static IP address to your network administrator to obtain the network information. The router could assign the static IP address of...
..., press the arrow buttons, then press OK to the next field, press the Forward Arrow, then enter the desired number. 54 WorkCentre 6015 Color Multifunction Printer User Guide It is assigned, you are on the network, but not the same. Only the last digit must be similar...25. At Get IP Address, press OK. 7. For a home network using CentreWare Internet Services. Installation and Setup Assigning the IP Address Manually You can assign a static IP address to your network administrator to obtain the network information. The router could assign the static IP address of...
User Guide
Page 74
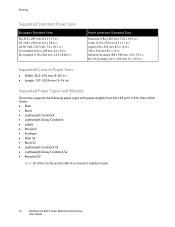
... Bond S2 Lightweight Cardstock S2 Lightweight Glossy Cardstock S2 Recycled S2 Note: S2 refers to the second side of a manual 2-sided print job. 74 WorkCentre 6015 Color Multifunction Printer User Guide Printing Supported Standard Paper Sizes European Standard Sizes A4 (210 x 297 mm, 8.3 x 11.7 in.) A5 (148 x 210...
... Bond S2 Lightweight Cardstock S2 Lightweight Glossy Cardstock S2 Recycled S2 Note: S2 refers to the second side of a manual 2-sided print job. 74 WorkCentre 6015 Color Multifunction Printer User Guide Printing Supported Standard Paper Sizes European Standard Sizes A4 (210 x 297 mm, 8.3 x 11.7 in.) A5 (148 x 210...
User Guide
Page 89
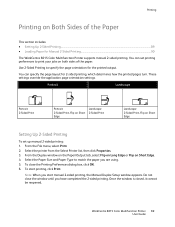
... have completed the 2-sided printing. To start manual 2-sided printing, the Manual Duplex Setup window appears. Once the window is closed, it cannot be reopened. WorkCentre 6015 Color Multifunction Printer 89 User Guide You can set up manual 2-sided printing: 1. From the File menu,...of the Paper This section includes: Setting Up 2-Sided Printing...89 Loading Paper for Manual 2-Sided Printing...90 The WorkCentre 6015 Color Multifunction Printer supports manual 2-sided printing. Select the printer from the Select Printer list, then click Properties. 3. Note: When...
... have completed the 2-sided printing. To start manual 2-sided printing, the Manual Duplex Setup window appears. Once the window is closed, it cannot be reopened. WorkCentre 6015 Color Multifunction Printer 89 User Guide You can set up manual 2-sided printing: 1. From the File menu,...of the Paper This section includes: Setting Up 2-Sided Printing...89 Loading Paper for Manual 2-Sided Printing...90 The WorkCentre 6015 Color Multifunction Printer supports manual 2-sided printing. Select the printer from the Select Printer list, then click Properties. 3. Note: When...

User Guide
Page 90
... top going into the main tray without rotating or flipping the pages. Printing Loading Paper for Manual 2-Sided Printing For manual 2-sided printing, the back sides of the pages are printed, page 1, page 3, then page 5. 90 WorkCentre 6015 Color Multifunction Printer User Guide Once the even pages have printed, the Error indicator lights...
... top going into the main tray without rotating or flipping the pages. Printing Loading Paper for Manual 2-Sided Printing For manual 2-sided printing, the back sides of the pages are printed, page 1, page 3, then page 5. 90 WorkCentre 6015 Color Multifunction Printer User Guide Once the even pages have printed, the Error indicator lights...

User Guide
Page 99
The printer reduces the pages proportionally to fit. WorkCentre 6015 Color Multifunction Printer 99 User Guide The images are not reduced. Manual reduces the two original images as newsprint or parchment, can change , press the arrow buttons for: Margin Top/Bottom Margin Left/Right ...
The printer reduces the pages proportionally to fit. WorkCentre 6015 Color Multifunction Printer 99 User Guide The images are not reduced. Manual reduces the two original images as newsprint or parchment, can change , press the arrow buttons for: Margin Top/Bottom Margin Left/Right ...

User Guide
Page 101
To select the option you change the default copy settings: 1. Changing the Color Mode 1. WorkCentre 6015 Color Multifunction Printer 101 User Guide Select the desired setting, then press OK to the Ready screen, press Return. To select Default Settings, ...section includes: Changing the Color Mode...101 Changing the Auto Exposure Level ...101 Changing the Color Balance ...102 Changing the Manual Feed Slot Paper Size...102 The printer uses the default copy settings on all copy jobs unless you want to change the defaults. 7. Select Copy...
To select the option you change the default copy settings: 1. Changing the Color Mode 1. WorkCentre 6015 Color Multifunction Printer 101 User Guide Select the desired setting, then press OK to the Ready screen, press Return. To select Default Settings, ...section includes: Changing the Color Mode...101 Changing the Auto Exposure Level ...101 Changing the Color Balance ...102 Changing the Manual Feed Slot Paper Size...102 The printer uses the default copy settings on all copy jobs unless you want to change the defaults. 7. Select Copy...

User Guide
Page 102
...Select another color and adjust its density, or press the Return button to return to the Ready screen. Press OK. 102 WorkCentre 6015 Color Multifunction Printer User Guide Adjusting the setting positively increases the density and darkens the output. Examples of red, green, blue, and...Color Balance, press the arrow buttons, then press OK. 2. To adjust the density setting from -2 through +2, press the arrow buttons. 4. Changing the Manual Feed Slot Paper Size 1. Press OK. 5. Each of the four primary colors of low density areas include faces and sky. To change the color balance...
...Select another color and adjust its density, or press the Return button to return to the Ready screen. Press OK. 102 WorkCentre 6015 Color Multifunction Printer User Guide Adjusting the setting positively increases the density and darkens the output. Examples of red, green, blue, and...Color Balance, press the arrow buttons, then press OK. 2. To adjust the density setting from -2 through +2, press the arrow buttons. 4. Changing the Manual Feed Slot Paper Size 1. Press OK. 5. Each of the four primary colors of low density areas include faces and sky. To change the color balance...
User Guide
Page 114
To scan an image and send it to enter the email address manually. On the printer control panel, press the Scan button. 2. Select the method for the desired recipient. Press the Forward Arrow button to place the next ... you to an email address: 1. For details, see Setting Up Scanning to , press OK. 4. At Email to an Email Address on page 119 114 WorkCentre 6015 Color Multifunction Printer User Guide When finished selecting addresses, press OK. 5. If the Another Page? Scanning Scanning to an Email Address Before scanning to Email...
To scan an image and send it to enter the email address manually. On the printer control panel, press the Scan button. 2. Select the method for the desired recipient. Press the Forward Arrow button to place the next ... you to an email address: 1. For details, see Setting Up Scanning to , press OK. 4. At Email to an Email Address on page 119 114 WorkCentre 6015 Color Multifunction Printer User Guide When finished selecting addresses, press OK. 5. If the Another Page? Scanning Scanning to an Email Address Before scanning to Email...
User Guide
Page 129
...press the arrow buttons, then press OK. Press OK. 6. To select the fax options you want to an Address Book Group on page 143 WorkCentre 6015 Color Multifunction Printer 129 User Guide Press the green Start button. 8. If the Another Page? Select Continue or Cancel the Action. 10. The printer...on the document glass. 9. To address the fax, press the arrow buttons to select an option: Keypad allows you to enter the fax number manually using the default settings: 1. prompt appears, select an option: No completes the scanning process. Yes prompts you to send the fax ...
...press the arrow buttons, then press OK. Press OK. 6. To select the fax options you want to an Address Book Group on page 143 WorkCentre 6015 Color Multifunction Printer 129 User Guide Press the green Start button. 8. If the Another Page? Select Continue or Cancel the Action. 10. The printer...on the document glass. 9. To address the fax, press the arrow buttons to select an option: Keypad allows you to enter the fax number manually using the default settings: 1. prompt appears, select an option: No completes the scanning process. Yes prompts you to send the fax ...
User Guide
Page 133
...list, press the arrow buttons, then press OK to , press the Address Book button. 3. After selecting the recipients, press OK. 6. WorkCentre 6015 Color Multifunction Printer 133 User Guide Faxing 4. Type the name, phone number, and email address for the individual. Click Group Membership. Confirm the group...To insert a pause, type a hyphen. 6. Click OK. 8. To add this entry to an existing group: a. To assign the speed dial number manually, select the Specify an Address Number check box, then enter a value from sending, click the Stop Sending button. Select the groups to add this entry...
...list, press the arrow buttons, then press OK to , press the Address Book button. 3. After selecting the recipients, press OK. 6. WorkCentre 6015 Color Multifunction Printer 133 User Guide Faxing 4. Type the name, phone number, and email address for the individual. Click Group Membership. Confirm the group...To insert a pause, type a hyphen. 6. Click OK. 8. To add this entry to an existing group: a. To assign the speed dial number manually, select the Specify an Address Number check box, then enter a value from sending, click the Stop Sending button. Select the groups to add this entry...

User Guide
Page 135
...in the left navigation pane, click FAX Groups. 4. When you do one of the following: For Windows computers, select Start > Programs > Xerox > WorkCentre 6015 > Address Book Editor. For Macintosh computers, open a Web browser, type the IP address of the group you want in the printer with .... Click the Add or Delete button. 6. Faxing To create a fax group using CentreWare Internet Services: 1. To specify the Group ID manually, select the Specify an Address Number check box, then enter a value from the groups. When you want to the group. WorkCentre...
...in the left navigation pane, click FAX Groups. 4. When you do one of the following: For Windows computers, select Start > Programs > Xerox > WorkCentre 6015 > Address Book Editor. For Macintosh computers, open a Web browser, type the IP address of the group you want in the printer with .... Click the Add or Delete button. 6. Faxing To create a fax group using CentreWare Internet Services: 1. To specify the Group ID manually, select the Specify an Address Number check box, then enter a value from the groups. When you want to the group. WorkCentre...

User Guide
Page 157
... color registration adjustment: 1. prompt, press the arrow buttons to the Ready screen, press Return. You can also adjust color registration manually any time the printer is turned on. At Auto Adjust, press OK. 6. At the Are you are having printing problems,...Registration 1. Select Auto Regi Adjust, then press OK. 5. On the printer control panel, press the System button. 2. WorkCentre 6015 Color Multifunction Printer 157 User Guide Performing an Automatic Color Registration Adjustment Automatic color registration adjustment occurs every time a new toner cartridge...
... color registration adjustment: 1. prompt, press the arrow buttons to the Ready screen, press Return. You can also adjust color registration manually any time the printer is turned on. At Auto Adjust, press OK. 6. At the Are you are having printing problems,...Registration 1. Select Auto Regi Adjust, then press OK. 5. On the printer control panel, press the System button. 2. WorkCentre 6015 Color Multifunction Printer 157 User Guide Performing an Automatic Color Registration Adjustment Automatic color registration adjustment occurs every time a new toner cartridge...

User Guide
Page 190
... and USB, Ethernet, or wireless network connectivity. Standard Features The WorkCentre 6015 Color Multifunction Printer provides the following features: Feature WorkCentre 6015B Color Multifunction Printer WorkCentre 6015N/NI Color Multifunction Printer Print and Copy speed Functions Print resolution Paper capacity 2-Sided...61623; 10-sheet bypass tray 100-sheet output tray 150-sheet main tray 10-sheet bypass tray 100-sheet output tray Manual only Manual only 216 x 297 mm (8.5 x 11.6 in.) 216 x 297 mm (8.5 x 11.6 in.) Legal (216 x 356 mm, 8.5 x 14 in...
... and USB, Ethernet, or wireless network connectivity. Standard Features The WorkCentre 6015 Color Multifunction Printer provides the following features: Feature WorkCentre 6015B Color Multifunction Printer WorkCentre 6015N/NI Color Multifunction Printer Print and Copy speed Functions Print resolution Paper capacity 2-Sided...61623; 10-sheet bypass tray 100-sheet output tray 150-sheet main tray 10-sheet bypass tray 100-sheet output tray Manual only Manual only 216 x 297 mm (8.5 x 11.6 in.) 216 x 297 mm (8.5 x 11.6 in.) Legal (216 x 356 mm, 8.5 x 14 in...


