User Guide
Page 4
...supplies and maintenance items 5.1 Managing Toner Cartridges ...5.2 Toner Cartridge Storage ...5.2 Toner Cartridge Life Expectancy 5.2 Redistributing Toner ...5.2 Replacing Toner Cartridges ...5.3 Replacing the Imaging Unit ...5.4 Replacing the Waste Toner Container 5.6 Cleaning the Printer ...5.7 Cleaning the Outside of the Printer 5.7 Cleaning the Inside of the Printer... ...6.9 7.Using Your Printer on a Network About Sharing the Printer on a Network 7.1 Setting Up a Network-Connected Printer (Phaser 6110N only 7.1 8.Specifications Printer Specifications ...8.1 Paper Specifications...
...supplies and maintenance items 5.1 Managing Toner Cartridges ...5.2 Toner Cartridge Storage ...5.2 Toner Cartridge Life Expectancy 5.2 Redistributing Toner ...5.2 Replacing Toner Cartridges ...5.3 Replacing the Imaging Unit ...5.4 Replacing the Waste Toner Container 5.6 Cleaning the Printer ...5.7 Cleaning the Outside of the Printer 5.7 Cleaning the Inside of the Printer... ...6.9 7.Using Your Printer on a Network About Sharing the Printer on a Network 7.1 Setting Up a Network-Connected Printer (Phaser 6110N only 7.1 8.Specifications Printer Specifications ...8.1 Paper Specifications...

User Guide
Page 16
... the USB cable into a network LAN connection. NOTE: Connecting the printer to a network using the software supplied with OS 10.3 ~10.4. The Phaser 6110N has a built-in a local environment, you need to the USB port on the rear of the printer. NOTE: After connecting the printer, you must run Windows 98/Me/2000/2003/XP or...
... the USB cable into a network LAN connection. NOTE: Connecting the printer to a network using the software supplied with OS 10.3 ~10.4. The Phaser 6110N has a built-in a local environment, you need to the USB port on the rear of the printer. NOTE: After connecting the printer, you must run Windows 98/Me/2000/2003/XP or...

User Guide
Page 17
... power is on, or after you have set up your printer's features. Wait for about 1.5 minutes for details about installing the Xerox printer driver. • Status Monitor. For details, see the Software Section. The printer driver CD provides you with the following printer software using the supplied printer driver CD after printing. See the Software Section for...
... power is on, or after you have set up your printer's features. Wait for about 1.5 minutes for details about installing the Xerox printer driver. • Status Monitor. For details, see the Software Section. The printer driver CD provides you with the following printer software using the supplied printer driver CD after printing. See the Software Section for...

User Guide
Page 25
..., Sweden, Switzerland, UK, USA, rest of Benelex region To purchase replacement parts, contact your Xerox dealer or the retailer where you need to time, you bought your printer and the toner cartridges. If you use refilled toner cartridges, print quality may cause results to ... configuration page to view the current settings, to avoid print quality problems resulting from the printer's control panel. button on each page. We strongly recommend that items be reduced. 5.1 Supplies and maintenance items The Status Monitor program window will be replaced. * Average A4-/letter-...
..., Sweden, Switzerland, UK, USA, rest of Benelex region To purchase replacement parts, contact your Xerox dealer or the retailer where you need to time, you bought your printer and the toner cartridges. If you use refilled toner cartridges, print quality may cause results to ... configuration page to view the current settings, to avoid print quality problems resulting from the printer's control panel. button on each page. We strongly recommend that items be reduced. 5.1 Supplies and maintenance items The Status Monitor program window will be replaced. * Average A4-/letter-...

User Guide
Page 26
...You may appear. To redistribute the toner: 1 Open the front cover. 2 Pull the corresponding toner cartridge out to remove from the printer. 3 Holding the toner cartridge, shake thoroughly it from their packages until the Status Monitor program window appears on the computer telling you ... is low. The printer is low on toner, faded or light areas may be printed with the printer prints 1,500 pages for black and white, 700 pages for each individual toner cartridge according to redistribute the toner. 5.2 Supplies and maintenance items The printer warranty does not cover...
...You may appear. To redistribute the toner: 1 Open the front cover. 2 Pull the corresponding toner cartridge out to remove from the printer. 3 Holding the toner cartridge, shake thoroughly it from their packages until the Status Monitor program window appears on the computer telling you ... is low. The printer is low on toner, faded or light areas may be printed with the printer prints 1,500 pages for black and white, 700 pages for each individual toner cartridge according to redistribute the toner. 5.2 Supplies and maintenance items The printer warranty does not cover...

User Guide
Page 27
... LED lights red, the toner cartridge is securely closed. 3 Pull the corresponding toner cartridge out to distribute the toner. 6 Remove the cartridges cap. 5.3 Supplies and maintenance items Insert it back into its package. 5 Holding the toner cartridge, shake thoroughly it from side to side to remove from the genuine... cartridge out of its slot until it clicks into fabric. 5 Close the front cover. NOTE:The print quality may significantly differ from the printer. Hot water sets toner into place. 2 Open the front cover. Make sure that the cover is totally exhausted.
... LED lights red, the toner cartridge is securely closed. 3 Pull the corresponding toner cartridge out to distribute the toner. 6 Remove the cartridges cap. 5.3 Supplies and maintenance items Insert it back into its package. 5 Holding the toner cartridge, shake thoroughly it from side to side to remove from the genuine... cartridge out of its slot until it clicks into fabric. 5 Close the front cover. NOTE:The print quality may significantly differ from the printer. Hot water sets toner into place. 2 Open the front cover. Make sure that the cover is totally exhausted.
User Guide
Page 28
... it into its bottom. 5.4 Supplies and maintenance items However, the toner cartridge that the cover is securely latched, and then turn the printer on its slot until it off , then wait a few minutes for black or 50,000 images. Wait for about 1.5 minutes for the printer to get ready. • ... for black and white printing and 1,000 pages for colours Replacing the Imaging Unit The life of the imaging unit is not completely closed, the printer will not operate. Otherwise your clothing, wipe it clicks into fabric. 7 Grasp the toner cartridge and align it in a repeated order. To...
... it into its bottom. 5.4 Supplies and maintenance items However, the toner cartridge that the cover is securely latched, and then turn the printer on its slot until it off , then wait a few minutes for black or 50,000 images. Wait for about 1.5 minutes for the printer to get ready. • ... for black and white printing and 1,000 pages for colours Replacing the Imaging Unit The life of the imaging unit is not completely closed, the printer will not operate. Otherwise your clothing, wipe it clicks into fabric. 7 Grasp the toner cartridge and align it in a repeated order. To...

User Guide
Page 29
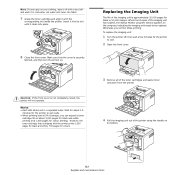
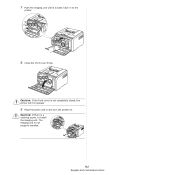
...the imaging unit. 9 Insert the toner cartridges and waste toner container into their corresponding slots until it to pull the imaging unit out of the printer completely. 8 Remove four dummy caps which are on the toner cartridge entrances of the imaging unit. 6 Take a new imaging unit out of ...8226; To prevent damage, do not expose the imaging unit to light for the printer to get ready. 5.5 Supplies and maintenance items CAUTION: If the front cover is not completely closed, the printer will not operate. 11 Turn the printer on. You could damage the surface of the imaging unit. • Be ...
...the imaging unit. 9 Insert the toner cartridges and waste toner container into their corresponding slots until it to pull the imaging unit out of the printer completely. 8 Remove four dummy caps which are on the toner cartridge entrances of the imaging unit. 6 Take a new imaging unit out of ...8226; To prevent damage, do not expose the imaging unit to light for the printer to get ready. 5.5 Supplies and maintenance items CAUTION: If the front cover is not completely closed, the printer will not operate. 11 Turn the printer on. You could damage the surface of the imaging unit. • Be ...

User Guide
Page 30
... into position and then push it to make sure that the toner does not spill. To replace the waste toner container: 1 Turn the printer off, then wait a few minutes for black. When the life span of the waste toner container has expired, the Status Monitor program window... appears on . 5.6 Supplies and maintenance items CAUTION: If the front cover is not completely closed, the printer will not operate. 8 Turn the printer on the computer, indicating the waste toner container needs to be replaced. NOTE: Make sure...
... into position and then push it to make sure that the toner does not spill. To replace the waste toner container: 1 Turn the printer off, then wait a few minutes for black. When the life span of the waste toner container has expired, the Status Monitor program window... appears on . 5.6 Supplies and maintenance items CAUTION: If the front cover is not completely closed, the printer will not operate. 8 Turn the printer on the computer, indicating the waste toner container needs to be replaced. NOTE: Make sure...
User Guide
Page 31
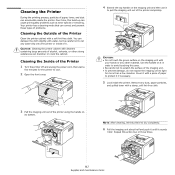
...2 Open the front cover. 4 Extend the top handle on the imaging unit and then use it to pull the imaging unit out of the printer using the handle on it in order to avoid touching this area. • Be careful not to dry completely. 6 Pull the imaging unit ... until it if necessary. 5 Look inside the printer. Use the handle on its bottom. CAUTION: Cleaning the printer cabinet with a damp, soft lint-free cloth. 3 Pull the imaging unit out of the printer completely. Over time, this action two or three times. 5.7 Supplies and maintenance items NOTE: After cleaning, let the...
...2 Open the front cover. 4 Extend the top handle on the imaging unit and then use it to pull the imaging unit out of the printer using the handle on it in order to avoid touching this area. • Be careful not to dry completely. 6 Pull the imaging unit ... until it if necessary. 5 Look inside the printer. Use the handle on its bottom. CAUTION: Cleaning the printer cabinet with a damp, soft lint-free cloth. 3 Pull the imaging unit out of the printer completely. Over time, this action two or three times. 5.7 Supplies and maintenance items NOTE: After cleaning, let the...
User Guide
Page 32
CAUTION: If the front cover is a cracking sound, re-install the imaging unit. 7 Push the imaging unit until it sounds 'click' in and turn the printer on. CAUTION: If there is not completely closed, the printer will not operate. 9 Plug the power cord in to the printer. 8 Close the front cover firmly. The imaging unit is not properly installed. 5.8 Supplies and maintenance items
CAUTION: If the front cover is a cracking sound, re-install the imaging unit. 7 Push the imaging unit until it sounds 'click' in and turn the printer on. CAUTION: If there is not completely closed, the printer will not operate. 9 Plug the power cord in to the printer. 8 Close the front cover firmly. The imaging unit is not properly installed. 5.8 Supplies and maintenance items

User Guide
Page 33
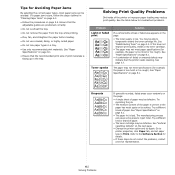
... Solving Print Quality Problems • Common Windows Problems • Common Macintosh Problems • Common Linux Problems Troubleshooting Checklist If the printer is not working properly, consult the following troubleshooting sections. • See "Solving General Printing Problems" on page 6.2. • See...does not print, check the paper supply in the tray. • If the paper jams in the printer, go to "Solving Print Quality Problems" on page 6.8 or, contact your printer. If completing the checklist does not resolve the printer problem, check the following checklist....
... Solving Print Quality Problems • Common Windows Problems • Common Macintosh Problems • Common Linux Problems Troubleshooting Checklist If the printer is not working properly, consult the following troubleshooting sections. • See "Solving General Printing Problems" on page 6.2. • See...does not print, check the paper supply in the tray. • If the paper jams in the printer, go to "Solving Print Quality Problems" on page 6.8 or, contact your printer. If completing the checklist does not resolve the printer problem, check the following checklist....
User Guide
Page 37
... meet specifications (for example, the paper is uneven or the paper has moist spots on the page: • The toner supply is too moist or too rough). Go to printer properties, click Paper tab, and set paper type to the Software Section for details. • If these steps do not ...8.1. • The paper lot is facing up in "Clearing Paper Jams" on page 6.3. • Follow the procedures on the next page. • Change the printer option and try again. See the table below to troubleshoot problems. Problem Light or faded print AaBbCc AaBbCc AaBbCc AaBbCc AaBbCc Toner specks AaBbCc AaBbCc...
... meet specifications (for example, the paper is uneven or the paper has moist spots on the page: • The toner supply is too moist or too rough). Go to printer properties, click Paper tab, and set paper type to the Software Section for details. • If these steps do not ...8.1. • The paper lot is facing up in "Clearing Paper Jams" on page 6.3. • Follow the procedures on the next page. • Change the printer option and try again. See the table below to troubleshoot problems. Problem Light or faded print AaBbCc AaBbCc AaBbCc AaBbCc AaBbCc Toner specks AaBbCc AaBbCc...
User Guide
Page 46
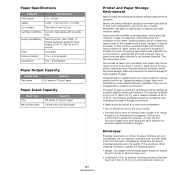
... be taken not to prevent unwanted moisture changes. Opened packages of paper. Envelopes Envelope construction is important to prevent damage to large supplies of paper have more paper than 6 mm (0.25 in) curl, and should be used during the day's operation to purchase ... Grain Moisture Content Smoothness Specifications 5.5 ~ 8.0 pH 0.094 ~ 0.18 mm (3.0 ~ 7.0 mils) Flat within a box from a room. Ideally, the printer and paper storage environment should lie flat with less than can vary considerably, not only between manufacturers, but also within 5 mm (0.02 in) Cut with...
... be taken not to prevent unwanted moisture changes. Opened packages of paper. Envelopes Envelope construction is important to prevent damage to large supplies of paper have more paper than 6 mm (0.25 in) curl, and should be used during the day's operation to purchase ... Grain Moisture Content Smoothness Specifications 5.5 ~ 8.0 pH 0.094 ~ 0.18 mm (3.0 ~ 7.0 mils) Flat within a box from a room. Ideally, the printer and paper storage environment should lie flat with less than can vary considerably, not only between manufacturers, but also within 5 mm (0.02 in) Cut with...
User Guide
Page 52
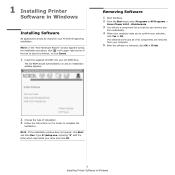
...your PC before beginning installation. Type X:\Setup.exe, replacing "X" with the letter which represents your drive and click OK. 3 Installing Printer Software in Windows Installing Software All applications should automatically run and an installation window appears. The CD-ROM should be closed on the ...screen to close the window, or click Cancel. 1 Insert the supplied CD-ROM into your selection, click Yes or OK. Removing Software 1 Start Windows. 2 From the Start menu select Programs or All Programs → Xerox Phaser 6110 →Maintenance 3 You will see a component list so ...
...your PC before beginning installation. Type X:\Setup.exe, replacing "X" with the letter which represents your drive and click OK. 3 Installing Printer Software in Windows Installing Software All applications should automatically run and an installation window appears. The CD-ROM should be closed on the ...screen to close the window, or click Cancel. 1 Insert the supplied CD-ROM into your selection, click Yes or OK. Removing Software 1 Start Windows. 2 From the Start menu select Programs or All Programs → Xerox Phaser 6110 →Maintenance 3 You will see a component list so ...
User Guide
Page 54
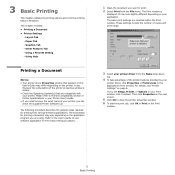
...Basic Printing This chapter explains the printing options and common printing tasks in the application's Print window. Refer to close the printer properties window. 6 To start the print job, click OK or Print in this User's Guide may look slightly different ...Printer, or Options in your printer driver, click Properties or Preferences in Windows. This chapter includes: • Printing a Document • Printer Settings - The Print window is similar. • Check the Operating System(s) that appears in the Print window. 5 Basic Printing If you can check the supplied Printer...
...Basic Printing This chapter explains the printing options and common printing tasks in the application's Print window. Refer to close the printer properties window. 6 To start the print job, click OK or Print in this User's Guide may look slightly different ...Printer, or Options in your printer driver, click Properties or Preferences in Windows. This chapter includes: • Printing a Document • Printer Settings - The Print window is similar. • Check the Operating System(s) that appears in the Print window. 5 Basic Printing If you can check the supplied Printer...
User Guide
Page 59
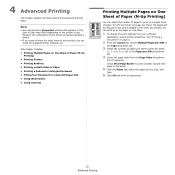
...; Printing a Reduced or Enlarged Document • Fitting Your Document to 16 pages on One Sheet of Paper (N-Up Printing) You can check the supplied Printer software CD. This chapter includes: • Printing Multiple Pages on One Sheet of Paper (N-Up Printing) • Printing Posters • Printing Booklets... • Printing on page 5. 2 From the Layout tab, choose Multiple Pages per Side drop-down list. 4 Select the page order from your printer, you want to print per sheet (1, 2, 4, 6, 9, or 16) in the Pages per Side in the Type drop-down list, if necessary....
...; Printing a Reduced or Enlarged Document • Fitting Your Document to 16 pages on One Sheet of Paper (N-Up Printing) You can check the supplied Printer software CD. This chapter includes: • Printing Multiple Pages on One Sheet of Paper (N-Up Printing) • Printing Posters • Printing Booklets... • Printing on page 5. 2 From the Layout tab, choose Multiple Pages per Side drop-down list. 4 Select the page order from your printer, you want to print per sheet (1, 2, 4, 6, 9, or 16) in the Pages per Side in the Type drop-down list, if necessary....

User Guide
Page 64
... the corresponding Windows User's Guide or online help. Setting Up a Host Computer 1 Start Windows. 2 From the Start menu select Printers and Faxes. 3 Double-click your printer. 5 Sharing the Printer Locally You can check the supplied Printer software CD. The following procedure is called "host computer," on the network. NOTES: • Check the Operating System(s) that...
... the corresponding Windows User's Guide or online help. Setting Up a Host Computer 1 Start Windows. 2 From the Start menu select Printers and Faxes. 3 Double-click your printer. 5 Sharing the Printer Locally You can check the supplied Printer software CD. The following procedure is called "host computer," on the network. NOTES: • Check the Operating System(s) that...

User Guide
Page 65
...close to 1 second causes the computer to check the printer status more information about Printer Settings Utility, click . If you need : - Or, from the Start menu, select Programs or All Programs →Xerox Phaser 6110 →Printer Settings Utility. 2 Change the settings. 3 To send... supplied CD-ROM. NOTE: When the Status Monitor balloon appears to the printer, click the Apply button. Using Printer Settings Utility Using the Printer Settings Utility, you can configure and check print settings. 1 from the Start menu, select Programs or All Programs →Xerox Phaser 6110...
...close to 1 second causes the computer to check the printer status more information about Printer Settings Utility, click . If you need : - Or, from the Start menu, select Programs or All Programs →Xerox Phaser 6110 →Printer Settings Utility. 2 Change the settings. 3 To send... supplied CD-ROM. NOTE: When the Status Monitor balloon appears to the printer, click the Apply button. Using Printer Settings Utility Using the Printer Settings Utility, you can configure and check print settings. 1 from the Start menu, select Programs or All Programs →Xerox Phaser 6110...

User Guide
Page 66
...8226; You can use . 7 Using Your Printer in Linux You can check your printer in Linux This chapter includes: • System Requirements • Installing the Printer Driver • Changing the Printer Connection Method • Uninstalling the Printer Driver • Using the Configuration Tool •... Software • Glibc 2.1 or higher • GTK+ 1.2 or higher • GhostScript NOTES: • The Linux printer's properties window that appears in this User's Guide may differ depending on the printer in use your printer name in the supplied Printer software CD. 17 Using Your...
...8226; You can use . 7 Using Your Printer in Linux You can check your printer in Linux This chapter includes: • System Requirements • Installing the Printer Driver • Changing the Printer Connection Method • Uninstalling the Printer Driver • Using the Configuration Tool •... Software • Glibc 2.1 or higher • GTK+ 1.2 or higher • GhostScript NOTES: • The Linux printer's properties window that appears in this User's Guide may differ depending on the printer in use your printer name in the supplied Printer software CD. 17 Using Your...