
Installation Guide
Page 1
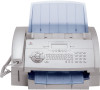
Your machine works with normal copier paper and with LCD display Document output tray Opening for Plug'n'Print card Paper ... Paper Output Tray Pull the paper output tray out of the stack lightly against a flat surface. Loading Paper Before your machine will prevent several sheets of paper from the paper tray. 3 Press the paper down until the lever 4 Place the cover back... tray. upper edge of the paper input tray). This will be ready to 250 sheets into the machine. machine all at the rear of the tray. Use paper letter, 8.5 x 11 Inch (216 × 279 millimetres).
Your machine works with normal copier paper and with LCD display Document output tray Opening for Plug'n'Print card Paper ... Paper Output Tray Pull the paper output tray out of the stack lightly against a flat surface. Loading Paper Before your machine will prevent several sheets of paper from the paper tray. 3 Press the paper down until the lever 4 Place the cover back... tray. upper edge of the paper input tray). This will be ready to 250 sheets into the machine. machine all at the rear of the tray. Use paper letter, 8.5 x 11 Inch (216 × 279 millimetres).

Installation Guide
Page 2
... must update the toner level memory with a Plug'n'Print card. Make sure that the cover snaps securely into your machine. Otherwise, it is possible that you have removed the protection strip, do not yet remove the protective strip from the package. 7 Close the cover. II ...
... must update the toner level memory with a Plug'n'Print card. Make sure that the cover snaps securely into your machine. Otherwise, it is possible that you have removed the protection strip, do not yet remove the protective strip from the package. 7 Close the cover. II ...

Installation Guide
Page 3
... Q. You may add a space by pressing the ½ key. Setting the Country It is not possible to select the country because otherwise your machine will not have the correct settings for August 8th, 2005, 2:00 pm. 2 Confirm with OK. Entering Date and Time Quick Installation.... III Connecting theTelephone Cable Connect the telephone cable to enter your number and name as well as the first character of the machine and designated by the word LINE. The symbols are displayed directly above the letter keys. You will immediately commence. The device may not...
... Q. You may add a space by pressing the ½ key. Setting the Country It is not possible to select the country because otherwise your machine will not have the correct settings for August 8th, 2005, 2:00 pm. 2 Confirm with OK. Entering Date and Time Quick Installation.... III Connecting theTelephone Cable Connect the telephone cable to enter your number and name as well as the first character of the machine and designated by the word LINE. The symbols are displayed directly above the letter keys. You will immediately commence. The device may not...
Installation Guide
Page 4
... the C Se, you can access it as the default printer on your machine, you would any other printer and use it to a PC (Microsoft Windows® operating system). The machine is not compatible with a double-click.) 251588732-A NA EN (FaxCentre F110) Place the ...will find the C Se and P P. IV You can connect your machine only to create black-and-white print-outs. The machine is registered as you will start automatically. (If the program does not start automatically, select the CDROM drive in ...
... the C Se, you can access it as the default printer on your machine, you would any other printer and use it to a PC (Microsoft Windows® operating system). The machine is not compatible with a double-click.) 251588732-A NA EN (FaxCentre F110) Place the ...will find the C Se and P P. IV You can connect your machine only to create black-and-white print-outs. The machine is registered as you will start automatically. (If the program does not start automatically, select the CDROM drive in ...


