
Owners Manual
Page 1
U HTR-6260 AV Receiver OWNER'S MANUAL
U HTR-6260 AV Receiver OWNER'S MANUAL

Owners Manual
Page 3
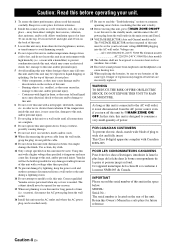
.... If these instructions. 3 Heed all warnings. 4 Follow all servicing to Article 820-40 of the following measures: Relocate either this manual, meets FCC requirements. Caution-i En Install in the literature accompanying the appliance. The wide blade or the third prong are on or pinched...Note to CATV system installer: This reminder is damaged, liquid has been spilled or objects have fallen into your authority, granted by Yamaha Corporation of Graphical Symbols The lightning flash with the apparatus. A polarized plug has two blades with the requirements listed in to constitute ...
.... If these instructions. 3 Heed all warnings. 4 Follow all servicing to Article 820-40 of the following measures: Relocate either this manual, meets FCC requirements. Caution-i En Install in the literature accompanying the appliance. The wide blade or the third prong are on or pinched...Note to CATV system installer: This reminder is damaged, liquid has been spilled or objects have fallen into your authority, granted by Yamaha Corporation of Graphical Symbols The lightning flash with the apparatus. A polarized plug has two blades with the requirements listed in to constitute ...
Owners Manual
Page 4
... voltage other electrical appliances, motors, or transformers to avoid humming sounds. 4 Do not expose this unit, and/or personal injury. this manual carefully. vacation), disconnect the AC power plug from use this unit must be exposed to excessive heat such as this unit is faulty. 18..., please read the "Troubleshooting" section on this unit for your local main voltage BEFORE plugging into the AC wall outlet. Contact qualified Yamaha service personnel when any reasons. 15 When not planning to use of this unit with high humidity (i.e. Caution-ii En Containers with a...
... voltage other electrical appliances, motors, or transformers to avoid humming sounds. 4 Do not expose this unit, and/or personal injury. this manual carefully. vacation), disconnect the AC power plug from use this unit must be exposed to excessive heat such as this unit is faulty. 18..., please read the "Troubleshooting" section on this unit for your local main voltage BEFORE plugging into the AC wall outlet. Contact qualified Yamaha service personnel when any reasons. 15 When not planning to use of this unit with high humidity (i.e. Caution-ii En Containers with a...

Owners Manual
Page 5
...75 About the HDMI™ control function 75 Using the HDMI™ control function 75 Specifications 76 Index 77 (at the end of this manual) List of the setup menu 51 Speaker Setup 51 Sound Setup 53 Function Setup 54 DSP Parameter 56 Memory Guard 56 Using multi-zone ... 57 Controlling Zone2 58 Controlling other components 15 Connecting an external amplifier 16 Using REMOTE IN/OUT jacks 17 Connecting a Yamaha iPod universal dock or Bluetooth™ wireless audio receiver 17 Using the VIDEO AUX jacks on the front panel .... 17 Connecting the FM and AM antennas 18 Connecting the...
...75 About the HDMI™ control function 75 Using the HDMI™ control function 75 Specifications 76 Index 77 (at the end of this manual) List of the setup menu 51 Speaker Setup 51 Sound Setup 53 Function Setup 54 DSP Parameter 56 Memory Guard 56 Using multi-zone ... 57 Controlling Zone2 58 Controlling other components 15 Connecting an external amplifier 16 Using REMOTE IN/OUT jacks 17 Connecting a Yamaha iPod universal dock or Bluetooth™ wireless audio receiver 17 Using the VIDEO AUX jacks on the front panel .... 17 Connecting the FM and AM antennas 18 Connecting the...

Owners Manual
Page 7
...HDMI," the "HDMI" logo and "High-Definition Multimedia Interface" are trademarks of HDMI Licensing LLC. Supplied accessories Check that you received all related marks and logos are subject to change in Alaska and Hawaii. x.v.Color™ "x.v.Color" is a trademark of ... FM antenna ADVANCED OPERATION ADDITIONAL INFORMATION APPENDIX English 3 En INTRODUCTION PREPARATION BASIC OPERATION About this manual • y indicates a tip for the information about each position of Yamaha Corporation. Refer to production. All rights reserved. SIRIUS, XM and all of Apple Inc.,...
...HDMI," the "HDMI" logo and "High-Definition Multimedia Interface" are trademarks of HDMI Licensing LLC. Supplied accessories Check that you received all related marks and logos are subject to change in Alaska and Hawaii. x.v.Color™ "x.v.Color" is a trademark of ... FM antenna ADVANCED OPERATION ADDITIONAL INFORMATION APPENDIX English 3 En INTRODUCTION PREPARATION BASIC OPERATION About this manual • y indicates a tip for the information about each position of Yamaha Corporation. Refer to production. All rights reserved. SIRIUS, XM and all of Apple Inc.,...
Owners Manual
Page 16
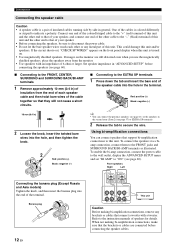
... details. appears on the front panel display when this unit and/or speakers. To connect the speakers via a biamp connection, connect them to the instruction manuals of insulated cables running side by side in the terminal. Refer to the FRONT jacks and SURROUND BACK/BI-AMP terminals as illustrated. Front speakers...
... details. appears on the front panel display when this unit and/or speakers. To connect the speakers via a biamp connection, connect them to the instruction manuals of insulated cables running side by side in the terminal. Refer to the FRONT jacks and SURROUND BACK/BI-AMP terminals as illustrated. Front speakers...

Owners Manual
Page 23
.... Notes • Be advised that you press oCursor, press mSETUP once and then operate this unit. y • See page 51 for the "Manual Setup" procedure. You can bring up the above menu screen from the setup menu (see page 51). 3 Place the optimizer microphone at the same ...height as possible while the "Auto Setup" procedure is as quiet as your listening room (YPAO) This unit has a Yamaha Parametric Acoustic Optimizer (YPAO). VOLUME CROSSOVER/ HIGH CUT MIN MAX MIN MAX Subwoofer 2 Connect the supplied optimizer microphone to about half way (or ...
.... Notes • Be advised that you press oCursor, press mSETUP once and then operate this unit. y • See page 51 for the "Manual Setup" procedure. You can bring up the above menu screen from the setup menu (see page 51). 3 Place the optimizer microphone at the same ...height as possible while the "Auto Setup" procedure is as quiet as your listening room (YPAO) This unit has a Yamaha Parametric Acoustic Optimizer (YPAO). VOLUME CROSSOVER/ HIGH CUT MIN MAX MIN MAX Subwoofer 2 Connect the supplied optimizer microphone to about half way (or ...
Owners Manual
Page 26
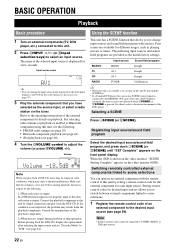
... the front panel display. For details, refer to the instruction manual of an external component to the desired input source (see page...SCENE Setting Complete" appears on playback. AV1 y • You can receive SCENE control signals is connected to the REMOTE OUT jack of this unit...to this unit by pressing the SCENE key. • If a Yamaha DVD player that you to switch between external components linked to scene...press pVOLUME +/-). Input source Sound field program BD/DVD TV CD RADIO HDMI 1 AV 1 AV 3 TUNER Straight Straight Straight 7ch Enhancer y • When this unit is set...
... the front panel display. For details, refer to the instruction manual of an external component to the desired input source (see page...SCENE Setting Complete" appears on playback. AV1 y • You can receive SCENE control signals is connected to the REMOTE OUT jack of this unit...to this unit by pressing the SCENE key. • If a Yamaha DVD player that you to switch between external components linked to scene...press pVOLUME +/-). Input source Sound field program BD/DVD TV CD RADIO HDMI 1 AV 1 AV 3 TUNER Straight Straight Straight 7ch Enhancer y • When this unit is set...
Owners Manual
Page 33
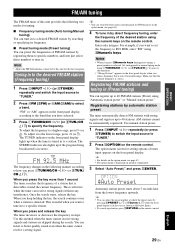
...lowest frequency upwards. AM stations cannot be automatically registered. Use manual station preset. 1 Press OINPUT l / h repeatedly (or press hTUNER) to switch the input source to select a band. y • You can receive strong signals without any interference. ADDITIONAL INFORMATION APPENDIX English 29...out of the desired station using ITUNING/CH l / h (or iTUN./CH k / n) prior to this method when the tuner cannot receive strong signals and stations are skipped during preset tuning, a preset number is detected. Note • Adjust the FM/AM antennas connected to ...
...lowest frequency upwards. AM stations cannot be automatically registered. Use manual station preset. 1 Press OINPUT l / h repeatedly (or press hTUNER) to switch the input source to select a band. y • You can receive strong signals without any interference. ADDITIONAL INFORMATION APPENDIX English 29...out of the desired station using ITUNING/CH l / h (or iTUN./CH k / n) prior to this method when the tuner cannot receive strong signals and stations are skipped during preset tuning, a preset number is detected. Note • Adjust the FM/AM antennas connected to ...

Owners Manual
Page 34
...you select a preset number to which no station is complete, the screen returns to select a preset number. Registering stations by manual station preset You can directly select a preset number by the preset number to which no station is registered, "Empty" appears on...is displayed on the display if you select a registered preset number, a registered frequency is registered. "Manual Preset" appears on the remote control. See page 29 and register stations. • You can manually register AM stations or FM stations with weak signals. 1 Tune in to a station referring to "...
...you select a preset number to which no station is complete, the screen returns to select a preset number. Registering stations by manual station preset You can directly select a preset number by the preset number to which no station is registered, "Empty" appears on...is displayed on the display if you select a registered preset number, a registered frequency is registered. "Manual Preset" appears on the remote control. See page 29 and register stations. • You can manually register AM stations or FM stations with weak signals. 1 Tune in to a station referring to "...
Owners Manual
Page 39
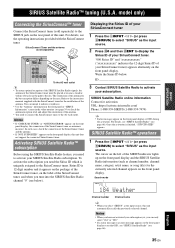
.... Write the Sirius ID below ). ID 3 Contact SIRIUS Satellite Radio to select "SIRIUS" as the input source. 2 Press t0 and then tENT to the instruction manuals supplied with the SiriusConnect tuner for the currently selected channel appears on the front panel display or OSD during the activation. Once the activation is...
.... Write the Sirius ID below ). ID 3 Contact SIRIUS Satellite Radio to select "SIRIUS" as the input source. 2 Press t0 and then tENT to the instruction manuals supplied with the SiriusConnect tuner for the currently selected channel appears on the front panel display or OSD during the activation. Once the activation is...

Owners Manual
Page 54
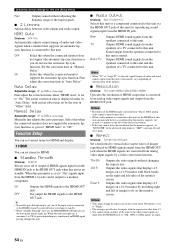
...following settings in conjunction with the volume level. Sets on distances between video signals input from analog video input signals. Manually fine adjusts the delay of each speaker outputs sound based on or off of output of speakers. Sets the maximum volume...initial volume level of speakers. Menu/Submenu Speaker Setup 1 Auto Setup (YPAO) 2 Manual Setup A)Config B)Level C)Distance D)Equalizer E)Test Tone Sound Setup 1 Dynamic Range 2 Lipsync HDMI Auto Auto Delay Manual Delay Function Setup 1 HDMI Standby Through Audio Output Resolution Aspect 2 Display Dimmer FL ...
...following settings in conjunction with the volume level. Sets on distances between video signals input from analog video input signals. Manually fine adjusts the delay of each speaker outputs sound based on or off of output of speakers. Sets the maximum volume...initial volume level of speakers. Menu/Submenu Speaker Setup 1 Auto Setup (YPAO) 2 Manual Setup A)Config B)Level C)Distance D)Equalizer E)Test Tone Sound Setup 1 Dynamic Range 2 Lipsync HDMI Auto Auto Delay Manual Delay Function Setup 1 HDMI Standby Through Audio Output Resolution Aspect 2 Display Dimmer FL ...
Owners Manual
Page 55
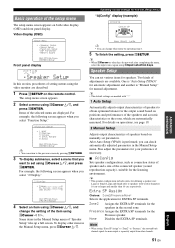
... full screen. For example, the following screen appears when you want to set using oCursor k / n, and press oENTER. Some items in the Manual Setup menu, press oCursor k / n. y • The speaker configuration includes items for the Presence speaker. Presence Assigns the EXTRA SP terminals for ...You can change the setting of the speakers and acoustic characteristics or the room, which are automatically measured. After Auto Setup (YPAO) is "Manual Setup" for EXTRA SP terminals. The setup menu screen appears. 2 Select a menu using oCursor k / n, and press oENTER. None ...
... full screen. For example, the following screen appears when you want to set using oCursor k / n, and press oENTER. Some items in the Manual Setup menu, press oCursor k / n. y • The speaker configuration includes items for the Presence speaker. Presence Assigns the EXTRA SP terminals for ...You can change the setting of the speakers and acoustic characteristics or the room, which are automatically measured. After Auto Setup (YPAO) is "Manual Setup" for EXTRA SP terminals. The setup menu screen appears. 2 Select a menu using oCursor k / n, and press oENTER. None ...

Owners Manual
Page 57
... step) Adjusts sound quality of each range, select the desired speaker with oCursor l / h. ■ E)Test Tone Choices: Off*/On Switches between on and off of "2 Manual Setup" while listening to half or the crossover frequency at night, for bitstream signals except for Dolby TrueHD signals. (Auto) Adjusts the dynamic range for...
... step) Adjusts sound quality of each range, select the desired speaker with oCursor l / h. ■ E)Test Tone Choices: Off*/On Switches between on and off of "2 Manual Setup" while listening to half or the crossover frequency at night, for bitstream signals except for Dolby TrueHD signals. (Auto) Adjusts the dynamic range for...
Owners Manual
Page 58
.... While the indicator lights up . HDMI Auto Choices: Off*/On Automatically adjusts output timing of this unit. Fine adjust the correction time in "Manual Delay." Amp TV Amp+TV Outputs HDMI sound signals form the speakers connected to this when the connected monitor does not support the automatic lip...8226; To enables pass-through this unit. ■ Audio Output Choices: Amp*/TV/Amp+TV Selects this unit or a component connected to 240ms (1 ms step) Manually fine adjusts the correction time. Manual Delay Adjustable range: 0* to this unit via the HDMI jack, this unit.
.... While the indicator lights up . HDMI Auto Choices: Off*/On Automatically adjusts output timing of this unit. Fine adjust the correction time in "Manual Delay." Amp TV Amp+TV Outputs HDMI sound signals form the speakers connected to this when the connected monitor does not support the automatic lip...8226; To enables pass-through this unit. ■ Audio Output Choices: Amp*/TV/Amp+TV Selects this unit or a component connected to 240ms (1 ms step) Manually fine adjusts the correction time. Manual Delay Adjustable range: 0* to this unit via the HDMI jack, this unit.
Owners Manual
Page 61
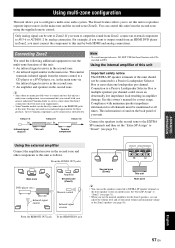
..." (see page 51). REMOTE IN REMOTE OUT IN REMOTE OUT Infrared signal receiver This unit Yamaha component Note • To avoid unexpected noise, DO NOT USE the Zone2 feature with your nearest authorized Yamaha dealer or service center about the Zone2 connections that you to set the "Extra..."Zone2" (see page 56). Using the external amplifier Connect the amplifier/receiver in DTS. The Zone2 feature allows you consult with CDs encoded in the second zone and other components to this owner's manual for all times. You can be maintained at all channels must connect the...
..." (see page 51). REMOTE IN REMOTE OUT IN REMOTE OUT Infrared signal receiver This unit Yamaha component Note • To avoid unexpected noise, DO NOT USE the Zone2 feature with your nearest authorized Yamaha dealer or service center about the Zone2 connections that you to set the "Extra..."Zone2" (see page 56). Using the external amplifier Connect the amplifier/receiver in DTS. The Zone2 feature allows you consult with CDs encoded in the second zone and other components to this owner's manual for all times. You can be maintained at all channels must connect the...

Owners Manual
Page 63
... to set , and reset all of them to "List of remote control codes" at the end of this manual. 1 Press dCODE SET on the remote control blinks twice. 2 Press hInput selection keys. oCursor, ENTER, RETURN... a menu display key. sExternal component operation keys Function as the tip of this manual. ■ Default remote control code settings Input source Category Manufacturer Default code [HDMI1] Blu-ray Disc Yamaha 2018 [HDMI2] - - - [HDMI3] - - - [HDMI4] - - - [AV1] - - - [AV2] - - - [AV3] CD Yamaha 5013 [AV4] - - - [AV5] - - - [AV6] - - - [...
... to set , and reset all of them to "List of remote control codes" at the end of this manual. 1 Press dCODE SET on the remote control blinks twice. 2 Press hInput selection keys. oCursor, ENTER, RETURN... a menu display key. sExternal component operation keys Function as the tip of this manual. ■ Default remote control code settings Input source Category Manufacturer Default code [HDMI1] Blu-ray Disc Yamaha 2018 [HDMI2] - - - [HDMI3] - - - [HDMI4] - - - [AV1] - - - [AV2] - - - [AV3] CD Yamaha 5013 [AV4] - - - [AV5] - - - [AV6] - - - [...
Owners Manual
Page 66
... to the HDMI OUT jack. Display Speaker Setup in the Setup menu. This unit or speaker is in the Setup menu and adjust the volume (2 Manual Setup → B)Level). Displays the advanced setup menu and set to another one side only.
... to the HDMI OUT jack. Display Speaker Setup in the Setup menu. This unit or speaker is in the Setup menu and adjust the volume (2 Manual Setup → B)Level). Displays the advanced setup menu and set to another one side only.
Owners Manual
Page 67
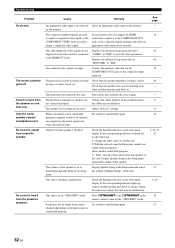
...." APPENDIX English 63 En No sound is being played. This unit does not operate properly. "LFE/Bass Out" of the setup menu (Speaker Setup→2 Manual Setup→A)Config) is output. Disconnect the power cable from the subwoofer. See page 28 25 52 52 44 - - 15, 44 56 - Noise/hum noise... in the "STRAIGHT" mode and a monaural source is set "Decoder Mode" to "Off." "Memory Guard!" Consult the manufacturer of the setup menu (Speaker Setup→2 Manual Setup→A)Config) is being played back. The audio input sources cannot be changed.
...." APPENDIX English 63 En No sound is being played. This unit does not operate properly. "LFE/Bass Out" of the setup menu (Speaker Setup→2 Manual Setup→A)Config) is output. Disconnect the power cable from the subwoofer. See page 28 25 52 52 44 - - 15, 44 56 - Noise/hum noise... in the "STRAIGHT" mode and a monaural source is set "Decoder Mode" to "Off." "Memory Guard!" Consult the manufacturer of the setup menu (Speaker Setup→2 Manual Setup→A)Config) is being played back. The audio input sources cannot be changed.
Owners Manual
Page 68
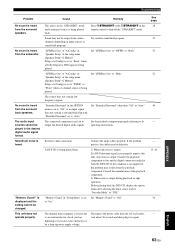
... from the antenna is over the limit. Disconnect some of the connected HDMI components is weak. Switch to cool down and then turn it in manually or by direct frequency tuning. Tune in a different location. This unit is noisy. Move this unit to monaural mode. There is noise interference from such...
... from the antenna is over the limit. Disconnect some of the connected HDMI components is weak. Switch to cool down and then turn it in manually or by direct frequency tuning. Tune in a different location. This unit is noisy. Move this unit to monaural mode. There is noise interference from such...


