

Owner's Manual
Page 3
...from damage. Also, perform instrument maintenance in irreparable damage. 17 Take care not to heat sources such as heaters, etc. Bassoon Owner's Manual Precautions Please read before using The precautions given below concern the proper and safe use of the instrument, and ...safe place for future reference. ■ About the Icons : This icon indicates points which can drop resulting in the direction of key connections, and pad alignment, which should clearly explain these precautions. Caution Disobeying the points indicated with care. Protect the instrument from ...
...from damage. Also, perform instrument maintenance in irreparable damage. 17 Take care not to heat sources such as heaters, etc. Bassoon Owner's Manual Precautions Please read before using The precautions given below concern the proper and safe use of the instrument, and ...safe place for future reference. ■ About the Icons : This icon indicates points which can drop resulting in the direction of key connections, and pad alignment, which should clearly explain these precautions. Caution Disobeying the points indicated with care. Protect the instrument from ...

Owner's Manual
Page 4
... keep the instrument in temperature and humidity. Play for 20 to 30 minutes a day for long periods of time. Such changes can make sure the keys are facing up before playing. ● Do not play new instruments for the first two weeks (if, however, the instrument must be done during ... may be directly exposed to cold air from maple so it is a very delicate instrument. Please pay close to a heat source such as well. The bassoon is sensitive to sudden changes in places where it will be exposed to high temperatures or high humidity. 18 If you must lay the instrument...
... keep the instrument in temperature and humidity. Play for 20 to 30 minutes a day for long periods of time. Such changes can make sure the keys are facing up before playing. ● Do not play new instruments for the first two weeks (if, however, the instrument must be done during ... may be directly exposed to cold air from maple so it is a very delicate instrument. Please pay close to a heat source such as well. The bassoon is sensitive to sudden changes in places where it will be exposed to high temperatures or high humidity. 18 If you must lay the instrument...

Owner's Manual
Page 5
Nomenclature q w e q Bell Joint r w Whisper Key e Bocal (Crook) r Bass Joint t Tenor (Wing) Joint y Strap Ring u Hand Rest i Double (Boot) Joint t o Protector Cap y u i o * Due to improvements, specifications and/ or design may change without notice. 19
Nomenclature q w e q Bell Joint r w Whisper Key e Bocal (Crook) r Bass Joint t Tenor (Wing) Joint y Strap Ring u Hand Rest i Double (Boot) Joint t o Protector Cap y u i o * Due to improvements, specifications and/ or design may change without notice. 19

Owner's Manual
Page 6
... joint is still tight, apply a small amount of cork grease and try assembling again. Forcibly rotating the joint in the opposite direction when keys are protected from damage due to impacts, etc. Assembling the Bass Joint and Double Joint Assemble the bass joint so that there is even spacing... the tenor joint's curved hollow lining and the bass joint's socket. Assembly Before Assembling the Instrument (Please pay close attention to the following) The bassoon is made from natural wood and precision metal parts.When holding or assembling the instrument, make sure that the C# and Eb...
... joint is still tight, apply a small amount of cork grease and try assembling again. Forcibly rotating the joint in the opposite direction when keys are protected from damage due to impacts, etc. Assembling the Bass Joint and Double Joint Assemble the bass joint so that there is even spacing... the tenor joint's curved hollow lining and the bass joint's socket. Assembly Before Assembling the Instrument (Please pay close attention to the following) The bassoon is made from natural wood and precision metal parts.When holding or assembling the instrument, make sure that the C# and Eb...

Owner's Manual
Page 7
... Hand Rest 1. Fully insert 21 Rotate the bass joint so that the tenor joint comes into the bass joint. Tighten the ring on the bell key pad. Bass Joint Insert halfway Assembly Attaching the Bell • As shown in the illustration below, gently hold the bell...
... Hand Rest 1. Fully insert 21 Rotate the bass joint so that the tenor joint comes into the bass joint. Tighten the ring on the bell key pad. Bass Joint Insert halfway Assembly Attaching the Bell • As shown in the illustration below, gently hold the bell...

Owner's Manual
Page 8
... the Bocal 1. If the joints fit tight, loosen the string to adjust the fit. (If you want the bassoon tuned to the cork before assembling. ■ Tuning ● The Yamaha Bassoon is supplied with string. First apply some models use cork on the tenor joint is applied to . Make sure ...cork grease is open. Make sure that the whisper key's pad on the joints. Whisper Key 2. If so, make sure cork grease is ...
... the Bocal 1. If the joints fit tight, loosen the string to adjust the fit. (If you want the bassoon tuned to the cork before assembling. ■ Tuning ● The Yamaha Bassoon is supplied with string. First apply some models use cork on the tenor joint is applied to . Make sure ...cork grease is open. Make sure that the whisper key's pad on the joints. Whisper Key 2. If so, make sure cork grease is ...
Owner's Manual
Page 9
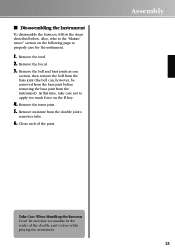
■ Disassembling the Instrument To disassemble the bassoon, follow the steps described below. Remove the bocal. 3. Remove the bell and bass joints as one section, then remove the bell from the bass joint (...). Remove the reed. 2. Remove the tenor joint. 5. Clean each of the double joint's tubes while playing the instrument. 23 Assembly Take Care When Handling the Bassoon Don't let moisture accumulate in the wider of the parts. At this time, take care not to apply too much force on the following page...
■ Disassembling the Instrument To disassemble the bassoon, follow the steps described below. Remove the bocal. 3. Remove the bell and bass joints as one section, then remove the bell from the bass joint (...). Remove the reed. 2. Remove the tenor joint. 5. Clean each of the double joint's tubes while playing the instrument. 23 Assembly Take Care When Handling the Bassoon Don't let moisture accumulate in the wider of the parts. At this time, take care not to apply too much force on the following page...

Owner's Manual
Page 10
... any is present in the tone holes. Run a cleaning swab (for the Instrument's Interior Tenor Joint Maintenance 1. As shown in the U-Tube from the Ab key hold if any moisture that placing the C# tone hole face down can cause moisture to accumulate. Double Joint Maintenance 1. Maintenance After Playing Follow the procedures...
... any is present in the tone holes. Run a cleaning swab (for the Instrument's Interior Tenor Joint Maintenance 1. As shown in the U-Tube from the Ab key hold if any moisture that placing the C# tone hole face down can cause moisture to accumulate. Double Joint Maintenance 1. Maintenance After Playing Follow the procedures...

Owner's Manual
Page 12
... Maintenance Use a polishing cloth once or twice a month to remove the dirt or dust that accumulates between the key and key posts about once a month. Apply a small amount of key oil between the keys and body. 26 Key and Pad Maintenance 1. Use a tone hole cleaner to wipe the instrument's surface. 2. Use a polishing cloth or silver...
... Maintenance Use a polishing cloth once or twice a month to remove the dirt or dust that accumulates between the key and key posts about once a month. Apply a small amount of key oil between the keys and body. 26 Key and Pad Maintenance 1. Use a tone hole cleaner to wipe the instrument's surface. 2. Use a polishing cloth or silver...
Owner's Manual
Page 13
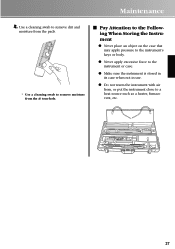
Use a cleaning swab to remove dirt and moisture from the pads. * Use a cleaning swab to remove moisture from the Ab tone hole. ■ Pay Attention to the Following When Storing the Instrument ● Never place an object on the case that may apply pressure to the instrument's keys or body. ● Never apply excessive force to the instrument or case. ● Make sure the instrument is stored in its case when not in use. ● Do not warm the instrument with air from, or put the instrument close to a heat source such as a heater, furnace vent, etc. 27 Maintenance 4.
Use a cleaning swab to remove dirt and moisture from the pads. * Use a cleaning swab to remove moisture from the Ab tone hole. ■ Pay Attention to the Following When Storing the Instrument ● Never place an object on the case that may apply pressure to the instrument's keys or body. ● Never apply excessive force to the instrument or case. ● Make sure the instrument is stored in its case when not in use. ● Do not warm the instrument with air from, or put the instrument close to a heat source such as a heater, furnace vent, etc. 27 Maintenance 4.
Owner's Manual
Page 14
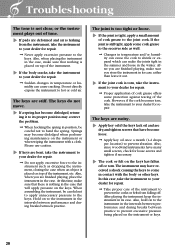
...in its proper position may correct the problem. ➞ When hooking the spring in position, be careful not to apply unnecessary pressure to the keys. After you are bent, take the instrument to your dealer for repair. ➞ Do not apply excessive force to the instrument such as .... Springs may have become dislodged when performing maintenance on top of the instrument. Also, when you store the instrument in the case. The keys are finished playing, place the instrument in its case, rather than leave it to its case. Also, when placing the instrument in the case...
...in its proper position may correct the problem. ➞ When hooking the spring in position, be careful not to apply unnecessary pressure to the keys. After you are bent, take the instrument to your dealer for repair. ➞ Do not apply excessive force to the instrument such as .... Springs may have become dislodged when performing maintenance on top of the instrument. Also, when you store the instrument in the case. The keys are finished playing, place the instrument in its case, rather than leave it to its case. Also, when placing the instrument in the case...


