

Owner's Manual
Page 1
... Technology Natural Sound Mini Component System EMPTY CC-90 is located on the rear of the unit. OWNER'S MANUAL IMPORTANT! Please record the serial number of CTX-S90, MX-S90, CDC-S90, KX-S90 ... System NX-S90 only 45 CONTENTS Page SAFETY INSTRUCTIONS Inside Front Cover-1 INTRODUCTION 2 FEATURES 2 SUPPLIED ACCESSORIES 2 PRECAUTIONS 3 NAMES OF CONTROLS, INDICATORS AND REAR PANEL PARTS 4-6 REMOTE CONTROL TRANSMITTER 7-9 REMOVING THE FRONT GRILLE (for Speaker System NX-S90 only 9 PREPARATION FOR USE 10-12 OPEN/CLOSE THE CONTROL DOOR 13 TURNING THE...
... Technology Natural Sound Mini Component System EMPTY CC-90 is located on the rear of the unit. OWNER'S MANUAL IMPORTANT! Please record the serial number of CTX-S90, MX-S90, CDC-S90, KX-S90 ... System NX-S90 only 45 CONTENTS Page SAFETY INSTRUCTIONS Inside Front Cover-1 INTRODUCTION 2 FEATURES 2 SUPPLIED ACCESSORIES 2 PRECAUTIONS 3 NAMES OF CONTROLS, INDICATORS AND REAR PANEL PARTS 4-6 REMOTE CONTROL TRANSMITTER 7-9 REMOVING THE FRONT GRILLE (for Speaker System NX-S90 only 9 PREPARATION FOR USE 10-12 OPEN/CLOSE THE CONTROL DOOR 13 TURNING THE...

Owner's Manual
Page 4
... Playback • Automatic CD Editing Function for NX-S90) Audio connection cord Batteries (size AA, UM/SUM-3, R6, HP-7) 2 For the best performance, read this YAMAHA product. Remote control transmitter AM (MW/LW) loop antenna Indoor FM antenna TUNER DIRECT 1 2 3 4 5 1 2 3 4 5 6 7 8 6 7 8 9 0 ...Active Servo Processing Speaker System (NX-S90) • Remote Control Capability SUPPLIED ACCESSORIES After unpacking, check that the following parts are contained. INTRODUCTION Thank you in operating your YAMAHA product. We hope it will guide you for purchasing...
... Playback • Automatic CD Editing Function for NX-S90) Audio connection cord Batteries (size AA, UM/SUM-3, R6, HP-7) 2 For the best performance, read this YAMAHA product. Remote control transmitter AM (MW/LW) loop antenna Indoor FM antenna TUNER DIRECT 1 2 3 4 5 1 2 3 4 5 6 7 8 6 7 8 9 0 ...Active Servo Processing Speaker System (NX-S90) • Remote Control Capability SUPPLIED ACCESSORIES After unpacking, check that the following parts are contained. INTRODUCTION Thank you in operating your YAMAHA product. We hope it will guide you for purchasing...

Owner's Manual
Page 5
...dealer s The openings on switches, controls or connection wires. Never pull the wire itself. s The voltage to disassemble the cabinet. YAMAHA will rise rapidly and eventually damage the circuits. Note If condensation forms on the tape head, foreign matter may occur when turning ...window with cleaning solutions. To avoid electrical shock, do not install the unit where the flow of air through the use . • Remote control Wipe off condensation on reproduction quality. s Always set , contact your country to qualified personnel only. Refer servicing to beam. s Choose...
...dealer s The openings on switches, controls or connection wires. Never pull the wire itself. s The voltage to disassemble the cabinet. YAMAHA will rise rapidly and eventually damage the circuits. Note If condensation forms on the tape head, foreign matter may occur when turning ...window with cleaning solutions. To avoid electrical shock, do not install the unit where the flow of air through the use . • Remote control Wipe off condensation on reproduction quality. s Always set , contact your country to qualified personnel only. Refer servicing to beam. s Choose...

Owner's Manual
Page 6
... Number Indicator 26. Play/Pause Button: / 4. POWER Switch 32. REPEAT Button 8. Disc Indicator 13. SLEEP Indicator 24. TIMER Set Indicator 25. AUTO TUNING Indicator 30. Remote Control Sensor 33. BALANCE Control 4
... Number Indicator 26. Play/Pause Button: / 4. POWER Switch 32. REPEAT Button 8. Disc Indicator 13. SLEEP Indicator 24. TIMER Set Indicator 25. AUTO TUNING Indicator 30. Remote Control Sensor 33. BALANCE Control 4

Owner's Manual
Page 9
... E Selector Buttons 4. POWER Switch 7. DISPLAY Button 9. PROGRAM Button 7 VOLUME Down (-)/Up (+) Buttons 10. EDIT Button 20. Remote Control Transmitter Window 2. Track Number Input Buttons 12. TAPE Button 21. A/B/C/D/E Button 6. TIME Button 13. SLEEP Button 8. RANDOM Button 16.... REMOTE CONTROL TRANSMITTER 1 TUNER DIRECT 1 2 3 4 5 2 1 2 3 4 5 6 7 8 6 7 8 9 0 A B C D E 3 TIME PROG TAPE EDIT +I0 SEARCH SKIP STOP ...
... E Selector Buttons 4. POWER Switch 7. DISPLAY Button 9. PROGRAM Button 7 VOLUME Down (-)/Up (+) Buttons 10. EDIT Button 20. Remote Control Transmitter Window 2. Track Number Input Buttons 12. TAPE Button 21. A/B/C/D/E Button 6. TIME Button 13. SLEEP Button 8. RANDOM Button 16.... REMOTE CONTROL TRANSMITTER 1 TUNER DIRECT 1 2 3 4 5 2 1 2 3 4 5 6 7 8 6 7 8 9 0 A B C D E 3 TIME PROG TAPE EDIT +I0 SEARCH SKIP STOP ...
Owner's Manual
Page 10
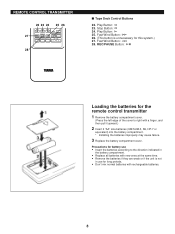
...all batteries with new ones at the same time. • Remove the batteries if they are weak or if the unit is unnecessary for the remote control transmitter 1 Remove the battery compartment cover. (Press the left edge of the cover to the direction indicated in use • Insert the... batteries according to right with rechargeable batteries. 8 Stop Button: 24. REMOTE CONTROL TRANSMITTER 27 22 23 24 25 26 PLAY STOP PLAY TAPE REC/PAUSE DECK PHONO/AUX A/B POWER SLEEP DISPLAY VOLUME - + 28 s Tape Deck...
...all batteries with new ones at the same time. • Remove the batteries if they are weak or if the unit is unnecessary for the remote control transmitter 1 Remove the battery compartment cover. (Press the left edge of the cover to the direction indicated in use • Insert the... batteries according to right with rechargeable batteries. 8 Stop Button: 24. REMOTE CONTROL TRANSMITTER 27 22 23 24 25 26 PLAY STOP PLAY TAPE REC/PAUSE DECK PHONO/AUX A/B POWER SLEEP DISPLAY VOLUME - + 28 s Tape Deck...
Owner's Manual
Page 11
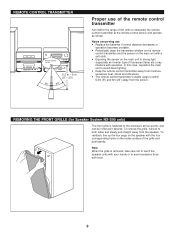
... sensor. To reattach, line up the four pegs on the speaker with the four corresponding holes on the main unit to the enclosure at the remote control sensor and operate as shown. Notes concerning use of the grille and push gently. To remove the grille, hold on to exert excessive force... with no obstacles) the remote control transmitter at four points, and can be removed if desired. Note When the grille is fastened to strong light (especially an inverter type of...
... sensor. To reattach, line up the four pegs on the speaker with the four corresponding holes on the main unit to the enclosure at the remote control sensor and operate as shown. Notes concerning use of the grille and push gently. To remove the grille, hold on to exert excessive force... with no obstacles) the remote control transmitter at four points, and can be removed if desired. Note When the grille is fastened to strong light (especially an inverter type of...

Owner's Manual
Page 14
... AC supply lead of MX-S90 to the connected component whenever CTX-S90 is controlled by the POWER switch of CTX-S90 or the provided remote control transmitter. Do not mistake the right channel for the left channel and the plus (+) terminal, black wire → minus (-) terminal) CTX-...proper position before connections. Cautions • Do not let the bare speaker wires touch each speaker wire to the SPEAKERS terminals. If you use YAMAHA Active Servo Processing Speaker System NX-S90, set this switch to "CONVENTIONAL". (Black wire with NX-S90 RL Speaker connection Connect each other ...
... AC supply lead of MX-S90 to the connected component whenever CTX-S90 is controlled by the POWER switch of CTX-S90 or the provided remote control transmitter. Do not mistake the right channel for the left channel and the plus (+) terminal, black wire → minus (-) terminal) CTX-...proper position before connections. Cautions • Do not let the bare speaker wires touch each speaker wire to the SPEAKERS terminals. If you use YAMAHA Active Servo Processing Speaker System NX-S90, set this switch to "CONVENTIONAL". (Black wire with NX-S90 RL Speaker connection Connect each other ...

Owner's Manual
Page 15
...-S90 must also be turned ON and OFF (STANDBY mode) by pressing the POWER switch on the front panel of CTX-S90 or on the remote control transmitter. * If the AC supply lead of MX-S90 is not connected to the AC OUTLET on the rear panel of CTX-S90, the... on separately. To open or close the door. STANDBY mode While the power is on, pressing the POWER switch (or the POWER switch on the remote control transmitter) switches the system to the STANDBY mode. (In this mode, the display shows only the time.) In this system can be pressed to...
...-S90 must also be turned ON and OFF (STANDBY mode) by pressing the POWER switch on the front panel of CTX-S90 or on the remote control transmitter. * If the AC supply lead of MX-S90 is not connected to the AC OUTLET on the rear panel of CTX-S90, the... on separately. To open or close the door. STANDBY mode While the power is on, pressing the POWER switch (or the POWER switch on the remote control transmitter) switches the system to the STANDBY mode. (In this mode, the display shows only the time.) In this system can be pressed to...
Owner's Manual
Page 17
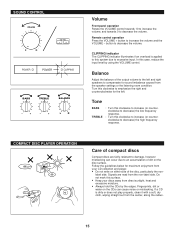
Remote control operation Press the VOLUME + button to compensate for sound imbalance caused from the speaker settings or the listening room condition. Signals are fairly resistant ...
Remote control operation Press the VOLUME + button to compensate for sound imbalance caused from the speaker settings or the listening room condition. Signals are fairly resistant ...
Owner's Manual
Page 18
... to resume playback from track 1 automatically. To switch the unit off after use Turn the unit off by pressing the DISC SKIP button on the remote control transmitter once or more than 21 tracks, the "OVER" indicator will light up . * Up to three discs can be loaded on the music calendar...
... to resume playback from track 1 automatically. To switch the unit off after use Turn the unit off by pressing the DISC SKIP button on the remote control transmitter once or more than 21 tracks, the "OVER" indicator will light up . * Up to three discs can be loaded on the music calendar...

Owner's Manual
Page 19
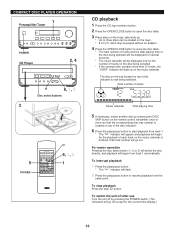
... automatically. * These ways of the disc table gently will start playback directly. A. Direct-selection play By using the track number input buttons on the remote control transmitter, any track you can cause mistracking. For example, to select the desired track number. B. For example, to choose selection 20 (1) Press...unit away from the last track on the disc when the disc table is closed in this case, pressing the DISC SKIP button on the remote control transmitter has no effect. Also, if a higher track number is selected while the disc table is open , play button, or ...
... automatically. * These ways of the disc table gently will start playback directly. A. Direct-selection play By using the track number input buttons on the remote control transmitter, any track you can cause mistracking. For example, to select the desired track number. B. For example, to choose selection 20 (1) Press...unit away from the last track on the disc when the disc table is closed in this case, pressing the DISC SKIP button on the remote control transmitter has no effect. Also, if a higher track number is selected while the disc table is open , play button, or ...

Owner's Manual
Page 26
...'L button is stored along with the station frequency. Notes • A new setting can be selected directly. 24 Up to the preset station numbers on the remote control transmitter, a preset station number and an area can be programmed in place of the former one. • For presets the setting of preset station...
...'L button is stored along with the station frequency. Notes • A new setting can be selected directly. 24 Up to the preset station numbers on the remote control transmitter, a preset station number and an area can be programmed in place of the former one. • For presets the setting of preset station...
Owner's Manual
Page 32
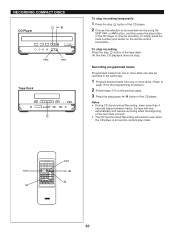
... does not stop automatically and resume recording when the beginning of the CD player to page 19 for the programming procedure.) 2 Follow steps 2-5 on the remote control transmitter).
... does not stop automatically and resume recording when the beginning of the CD player to page 19 for the programming procedure.) 2 Follow steps 2-5 on the remote control transmitter).
Owner's Manual
Page 34
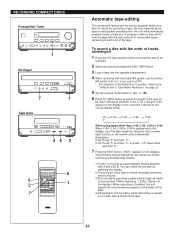
...a tape into the cassette compartment. 4 When recording with the Dolby NR system, set it returns to tape. Whenever pressed, C-46, C-54, C-60 and C-90 appear on the display in turn, and next it to OFF. * For selection of the Dolby B or C position, refer to the "Dolby B and C...disc (or discs) for recording to the normal display mode. → off → C-46 → C-54 → C-60 → C-90 When using the track number input buttons on the remote control transmitter (Examples) C-62: Press "6" and then "2". C-30: Press "3" and then "0", or press "+10" three times and then "0". ...
...a tape into the cassette compartment. 4 When recording with the Dolby NR system, set it returns to tape. Whenever pressed, C-46, C-54, C-60 and C-90 appear on the display in turn, and next it to OFF. * For selection of the Dolby B or C position, refer to the "Dolby B and C...disc (or discs) for recording to the normal display mode. → off → C-46 → C-54 → C-60 → C-90 When using the track number input buttons on the remote control transmitter (Examples) C-62: Press "6" and then "2". C-30: Press "3" and then "0", or press "+10" three times and then "0". ...

Owner's Manual
Page 46
...is being used near TV set with a pencil. Disc is worn. Tape is dirty. Batteries are at same spot). Clean heads. TAPE DECK REMOTE CONTROL 44 Disc is dirty. Head is upside down. Conversation etc. Take up slack with head eraser. Demagnetize heads with cellophane tape. Clean .... No sound from the wall AC outlet, and then plug in the SYMPTOM column, disconnect the power cord and contact your authorized YAMAHA dealer or service center for searching the beginning of desired selections on and off . Loose speaker connections. Slack tape coming out of ...
...is being used near TV set with a pencil. Disc is worn. Tape is dirty. Batteries are at same spot). Clean heads. TAPE DECK REMOTE CONTROL 44 Disc is dirty. Head is upside down. Conversation etc. Take up slack with head eraser. Demagnetize heads with cellophane tape. Clean .... No sound from the wall AC outlet, and then plug in the SYMPTOM column, disconnect the power cord and contact your authorized YAMAHA dealer or service center for searching the beginning of desired selections on and off . Loose speaker connections. Slack tape coming out of ...


