
Owner's Manual
Page 1
... number is intended to alert you to the presence of electric shock to persons. Please record the serial number of this YAMAHA Compact Disc Player. The exclamation point within an equilateral triangle is intended to alert you to the presence of uninsulated "dangerous ...a risk of important operating and maintenance (servicing) instructions in a safe place for selecting this unit in the space below. CDX-470 Natural Sound Compact Disc Player Random Access Programmable Play Random-Sequence Play Single Track/Entire Disc Repeat Play Automatic Tape-Programming Automatic Peak...
... number is intended to alert you to the presence of electric shock to persons. Please record the serial number of this YAMAHA Compact Disc Player. The exclamation point within an equilateral triangle is intended to alert you to the presence of uninsulated "dangerous ...a risk of important operating and maintenance (servicing) instructions in a safe place for selecting this unit in the space below. CDX-470 Natural Sound Compact Disc Player Random Access Programmable Play Random-Sequence Play Single Track/Entire Disc Repeat Play Automatic Tape-Programming Automatic Peak...

Owner's Manual
Page 2
All operating and other equipment. The unit should be situated so that may impede the flow of the unit should be unplugged from windows, heat sources, and too much vibration, dust, moisture or cold. or placed in a built-in the operating instructions or as a bookcase or cabinet that may block the ventilation openings; The power cord of air through the ventilation openings. 9 Heat - Care should be taken so that your unit is recommended by the manufacturer. 6A A unit and cart combination should be moved with a cart or stand that they exit from power lines. 18 Grounding ...
All operating and other equipment. The unit should be situated so that may impede the flow of the unit should be unplugged from windows, heat sources, and too much vibration, dust, moisture or cold. or placed in a built-in the operating instructions or as a bookcase or cabinet that may block the ventilation openings; The power cord of air through the ventilation openings. 9 Heat - Care should be taken so that your unit is recommended by the manufacturer. 6A A unit and cart combination should be moved with a cart or stand that they exit from power lines. 18 Grounding ...
Owner's Manual
Page 3
...installed and used . If this product MUST be the source of interference, which can not locate the appropriate retailer, please contact Yamaha Electronics Corp., U.S.A. 6660 Orangethorpe Ave, Buena Park, CA 90620. WARNING CAUTION Use of controls or adjustments or performance of procedures... other than those products distributed by Yamaha Corporation of America or its subsidiaries. DANGER: The use this product in this product in a residential environment will not result in...
...installed and used . If this product MUST be the source of interference, which can not locate the appropriate retailer, please contact Yamaha Electronics Corp., U.S.A. 6660 Orangethorpe Ave, Buena Park, CA 90620. WARNING CAUTION Use of controls or adjustments or performance of procedures... other than those products distributed by Yamaha Corporation of America or its subsidiaries. DANGER: The use this product in this product in a residential environment will not result in...
Owner's Manual
Page 4
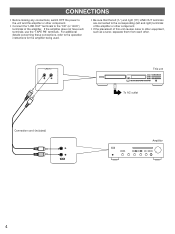
For additional details concerning these connections, refer to the operation instructions for the amplifier being used. • Be sure that the left ("L") and right ("R") LINE OUT terminals are connected to the corresponding (left and right) terminals of the amplifier or other component. • If the placement of this unit causes noise to other equipment, such as a tuner, separate them from each other component. • Connect the "LINE OUT" terminals to the unit and the amplifier or other . CONNECTIONS • Before making any connections, switch OFF the power to the "CD" (or "AUX") ...
For additional details concerning these connections, refer to the operation instructions for the amplifier being used. • Be sure that the left ("L") and right ("R") LINE OUT terminals are connected to the corresponding (left and right) terminals of the amplifier or other component. • If the placement of this unit causes noise to other equipment, such as a tuner, separate them from each other component. • Connect the "LINE OUT" terminals to the unit and the amplifier or other . CONNECTIONS • Before making any connections, switch OFF the power to the "CD" (or "AUX") ...
Owner's Manual
Page 5
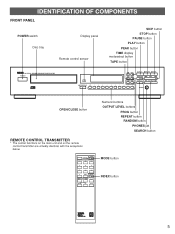
IDENTIFICATION OF COMPONENTS FRONT PANEL POWER switch Disc tray Display panel Remote control sensor SKIP button STOP button PAUSE button PLAY button PEAK button TIME display modeselect button TAPE button NATURAL SOUND COMPACT DISC PLAYER POWER OPEN/CLOSE +10 1 2 3 4 5 6 7 TIME PEAK PLAY PAUSE STOP TAPE PROG RANDOM SKIP OUTPUT LEVEL DOWN UP REPEAT SEARCH 8 9 0 PHONES OPEN/CLOSE button REMOTE CONTROL TRANSMITTER * The control functions on the main unit and on the remote control transmitter are virtually identical, with the exceptions below. OPEN/ CLOSE MODE 1 ...
IDENTIFICATION OF COMPONENTS FRONT PANEL POWER switch Disc tray Display panel Remote control sensor SKIP button STOP button PAUSE button PLAY button PEAK button TIME display modeselect button TAPE button NATURAL SOUND COMPACT DISC PLAYER POWER OPEN/CLOSE +10 1 2 3 4 5 6 7 TIME PEAK PLAY PAUSE STOP TAPE PROG RANDOM SKIP OUTPUT LEVEL DOWN UP REPEAT SEARCH 8 9 0 PHONES OPEN/CLOSE button REMOTE CONTROL TRANSMITTER * The control functions on the main unit and on the remote control transmitter are virtually identical, with the exceptions below. OPEN/ CLOSE MODE 1 ...
Owner's Manual
Page 6
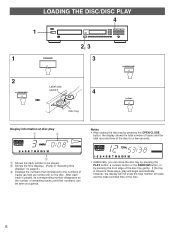
LOADING THE DISC/DISC PLAY 4 1 LOGODISK 2, 3 1 POWER 3 OPEN/CLOSE 2 Label side OPEN/CLOSE upward 4 PLAY Disc tray Display information at a glance. • Additionally, you can be played. Shows the time displays. (Refer to the numbers of the disc tray gently. After each track is closed in these ways, play 1 2 Notes • After closing the disc tray by pressing the front edge of tracks (as high as number 20) on page 8.) Ž Displays the numbers that correspond to "Selecting time displays" on the disc. If the tray is played, its corresponding number ...
LOADING THE DISC/DISC PLAY 4 1 LOGODISK 2, 3 1 POWER 3 OPEN/CLOSE 2 Label side OPEN/CLOSE upward 4 PLAY Disc tray Display information at a glance. • Additionally, you can be played. Shows the time displays. (Refer to the numbers of the disc tray gently. After each track is closed in these ways, play 1 2 Notes • After closing the disc tray by pressing the front edge of tracks (as high as number 20) on page 8.) Ž Displays the numbers that correspond to "Selecting time displays" on the disc. If the tray is played, its corresponding number ...
Owner's Manual
Page 7
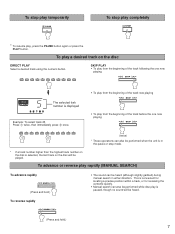
This is convenient for locating a precise position within a track, or for reviewing the contents quickly. • Manual search can also be performed while disc play from the beginning of the track now playing SKIP Example: To select track 25 Press Œ twice, then immediately press once. + 10 1 2 1 3 4 5 6 2 7 8 9 0 • To play is selected, the last track on the disc is paused, though no sound will be played. To play a desired track on the disc DIRECT PLAY Select a desired track using the numeric button. + 10 1 2 3 4 5 6 7 8 9 0 SKIP PLAY...
This is convenient for locating a precise position within a track, or for reviewing the contents quickly. • Manual search can also be performed while disc play from the beginning of the track now playing SKIP Example: To select track 25 Press Œ twice, then immediately press once. + 10 1 2 1 3 4 5 6 2 7 8 9 0 • To play is selected, the last track on the disc is paused, though no sound will be played. To play a desired track on the disc DIRECT PLAY Select a desired track using the numeric button. + 10 1 2 3 4 5 6 7 8 9 0 SKIP PLAY...
Owner's Manual
Page 8
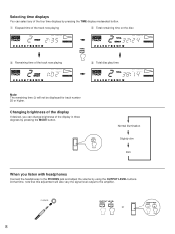
PHONES PHONES OUTPUT LEVEL DOWN UP or OUTPUT LEVEL DOWN UP 8 At that time, note that this adjustment will not be displayed for track number 25 or higher. MODE Normal illumination Slightly dim Dim When you can select any of the four time displays by using the OUTPUT LEVEL buttons. Selecting time displays You can change brightness of the display in three degrees by pressing the MODE button. Changing brightness of the display If desired, you listen with headphones Connect the headphones to the PHONES jack and adjust the volume by pressing the TIME display modeselect ...
PHONES PHONES OUTPUT LEVEL DOWN UP or OUTPUT LEVEL DOWN UP 8 At that time, note that this adjustment will not be displayed for track number 25 or higher. MODE Normal illumination Slightly dim Dim When you can select any of the four time displays by using the OUTPUT LEVEL buttons. Selecting time displays You can change brightness of the display in three degrees by pressing the MODE button. Changing brightness of the display If desired, you listen with headphones Connect the headphones to the PHONES jack and adjust the volume by pressing the TIME display modeselect ...
Owner's Manual
Page 9
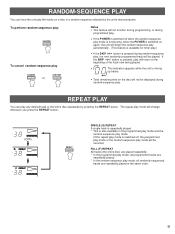
FULL (F) REPEAT All tracks (the entire disc) are played repeatedly. * In the programmed-play mode, all programmed tracks are repeatedly played. * In the random-sequence play mode, all randomly sequenced tracks are repeatedly played in a random sequence selected by pressing the REPEAT button. The repeat play mode will change whenever you press the REPEAT button. (OFF) REPEAT SINGLE (S) REPEAT A single track is repeatedly played. * This is also available in the programmed-play mode and the random-sequence play mode. (If the repeat play mode is switched off when the random-sequence ...
FULL (F) REPEAT All tracks (the entire disc) are played repeatedly. * In the programmed-play mode, all programmed tracks are repeatedly played. * In the random-sequence play mode, all randomly sequenced tracks are repeatedly played in a random sequence selected by pressing the REPEAT button. The repeat play mode will change whenever you press the REPEAT button. (OFF) REPEAT SINGLE (S) REPEAT A single track is repeatedly played. * This is also available in the programmed-play mode and the random-sequence play mode. (If the repeat play mode is switched off when the random-sequence ...

Owner's Manual
Page 10
STOP 3 Select the desired track. + 10 1 2 3 4 5 6 7 8 9 0 2 PROG * Repeat step 3 to set more , track number 25 or higher is programmed, the total time will disappear from the display. To return to display the total time of a numeric button. (In this case, " B" is illuminated in the display, press the TIME display mode-select button. • If, during playing to search through all tracks, including unprogrammed tracks. • The PAUSE mode can be changed to the previous display, press the TIME display mode-select button once again. • The SKIP ( and ) ...
STOP 3 Select the desired track. + 10 1 2 3 4 5 6 7 8 9 0 2 PROG * Repeat step 3 to set more , track number 25 or higher is programmed, the total time will disappear from the display. To return to display the total time of a numeric button. (In this case, " B" is illuminated in the display, press the TIME display mode-select button. • If, during playing to search through all tracks, including unprogrammed tracks. • The PAUSE mode can be changed to the previous display, press the TIME display mode-select button once again. • The SKIP ( and ) ...
Owner's Manual
Page 11
Each time the SKIP button is illuminated. 3 Select the desired index number. 5 11 To correct programmed data 1. The previously programmed track will be returned (sequentially in reverse order) by pressing the SKIP button. 3. To resume play Press the STOP button. The display of the selected track. • The index number can be checked one will be programmed. 4. The first track number programmed will be designated only while the INDEX number display is pressed, the track numbers and sequential order of the programmed tracks can be cleared from the memory and the new ...
Each time the SKIP button is illuminated. 3 Select the desired index number. 5 11 To correct programmed data 1. The previously programmed track will be returned (sequentially in reverse order) by pressing the SKIP button. 3. To resume play Press the STOP button. The display of the selected track. • The index number can be checked one will be programmed. 4. The first track number programmed will be designated only while the INDEX number display is pressed, the track numbers and sequential order of the programmed tracks can be cleared from the memory and the new ...
Owner's Manual
Page 12
Notes • All tracks may not be used to program tracks on a disc for recording to page 15.) 2 Enter the tape's total possible recording time. STOP * The peak level searching function of this unit. Turn the tape over to program tracks so they will automatically program tracks or help you can select any of the tape. Resume recording and, at the same time, press the PLAY button or the PAUSE button on the tape deck. (Refer to tape. Additionally, this unit at the same time. 6 The unit will insert sufficient time space between programmed tracks automatically so that the ...
Notes • All tracks may not be used to program tracks on a disc for recording to page 15.) 2 Enter the tape's total possible recording time. STOP * The peak level searching function of this unit. Turn the tape over to program tracks so they will automatically program tracks or help you can select any of the tape. Resume recording and, at the same time, press the PLAY button or the PAUSE button on the tape deck. (Refer to tape. Additionally, this unit at the same time. 6 The unit will insert sufficient time space between programmed tracks automatically so that the ...
Owner's Manual
Page 13
If the disc has more than 24 tracks, track number 25 and thereafter will not be programmed because there is not enough time remaining on the tape. Notes • If, in step 3 or 5, "E : rr" appears in the display, the track number just selected cannot be programmed. 13 However, at this unit. Notes on the display, but you can program it is counted as one . • In step 3 or 5, each time a selection is made, the track number and the tape's remaining time will be used to program up to track number 24. Resume recording and, at the end of side A of the next program. ...
If the disc has more than 24 tracks, track number 25 and thereafter will not be programmed because there is not enough time remaining on the tape. Notes • If, in step 3 or 5, "E : rr" appears in the display, the track number just selected cannot be programmed. 13 However, at this unit. Notes on the display, but you can program it is counted as one . • In step 3 or 5, each time a selection is made, the track number and the tape's remaining time will be used to program up to track number 24. Resume recording and, at the end of side A of the next program. ...
Owner's Manual
Page 14
Turn the tape over to tape. 3, 4 4 LOGODISK 1 Follow steps 1 - 3 on page 12. 2 RANDOM * The unit will pause at the end of side A of the tape. Resume recording and, at the same time, press the PLAY button or the PAUSE button on this unit. 2 Notes • Because the programmed data changes every time the RANDOM button is pressed, the amount of time remaining at the end of the tape also changes accordingly. • If the tape's length is not enough, all tracks cannot be programmed. Ⅲ Random sequential tape-programming The unit will automatically program tracks in random ...
Turn the tape over to tape. 3, 4 4 LOGODISK 1 Follow steps 1 - 3 on page 12. 2 RANDOM * The unit will pause at the end of side A of the tape. Resume recording and, at the same time, press the PLAY button or the PAUSE button on this unit. 2 Notes • Because the programmed data changes every time the RANDOM button is pressed, the amount of time remaining at the end of the tape also changes accordingly. • If the tape's length is not enough, all tracks cannot be programmed. Ⅲ Random sequential tape-programming The unit will automatically program tracks in random ...
Owner's Manual
Page 15
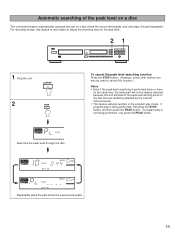
Searches the peak level through the disc. 10 11 12 10 11 12 Repeatedly plays the part where the source level peaks. 15 If program play is not being performed, first press the STOP button, and then press the PEAK button. If program play mode. For recording to tape, this feature is performed twice or more on the same disc, the same part will not be used to adjust the recording level on the tape deck. 21 LOGODISK 1 Stop the unit. Automatic searching of the peak level on a disc This convenient feature automatically searches the part on the disc that are randomly selected by the ...
Searches the peak level through the disc. 10 11 12 10 11 12 Repeatedly plays the part where the source level peaks. 15 If program play is not being performed, first press the STOP button, and then press the PEAK button. If program play mode. For recording to tape, this feature is performed twice or more on the same disc, the same part will not be used to adjust the recording level on the tape deck. 21 LOGODISK 1 Stop the unit. Automatic searching of the peak level on a disc This convenient feature automatically searches the part on the disc that are randomly selected by the ...
Owner's Manual
Page 16
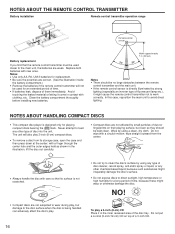
The unit will not be used for an extended period of time. • If batteries leak, dispose of them immediately. Wipe by using a clean, dry cloth. wipe straight outward from its surface is being handled can adversely affect the disc's play. 16 To play 3-inch (8-cm) compact discs. • To remove a disc from the center. ,,,,, • Always handle the disc with care so that the remote control transmitter must be used closer to the main unit, the batteries are not subjected to direct sunlight, high temperature or high humidity for replacement. • Be sure the ...
The unit will not be used for an extended period of time. • If batteries leak, dispose of them immediately. Wipe by using a clean, dry cloth. wipe straight outward from its surface is being handled can adversely affect the disc's play. 16 To play 3-inch (8-cm) compact discs. • To remove a disc from the center. ,,,,, • Always handle the disc with care so that the remote control transmitter must be used closer to the main unit, the batteries are not subjected to direct sunlight, high temperature or high humidity for replacement. • Be sure the ...
Owner's Manual
Page 17
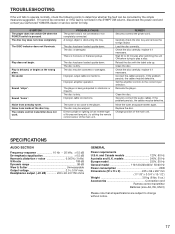
... whether the fault can be corrected, or if the fault is not listed in the SYMPTOM column, disconnect the power cord and contact your authorized YAMAHA dealer or service center for help. Sound "hums". The player is being subjected to play a disc. Wait 20 to 30 minutes after switching the unit...
... whether the fault can be corrected, or if the fault is not listed in the SYMPTOM column, disconnect the power cord and contact your authorized YAMAHA dealer or service center for help. Sound "hums". The player is being subjected to play a disc. Wait 20 to 30 minutes after switching the unit...

Owner's Manual
Page 18
... EUROPA G.m.b.H. RUE AMBROISE CROIZAT BP70 CROISSY-BEAUBOURG 77312 MARNE-LA-VALLEE CEDEX02, FRANCE YAMAHA ELECTRONICS (UK) LTD. YAMAHA HOUSE, 200 RICKMANSWORTH ROAD WATFORD, HERTS WD1 7JS, ENGLAND YAMAHA SCANDINAVIA A.B. J A WETTERGRENS GATA 1, BOX 30053, 400 43 VÄSTRA FRÖLUNDA, SWEDEN YAMAHA MUSIC AUSTRALIA PTY, LTD. 17-33 MARKET ST., SOUTH MELBOURNE, 3205 VIC...
... EUROPA G.m.b.H. RUE AMBROISE CROIZAT BP70 CROISSY-BEAUBOURG 77312 MARNE-LA-VALLEE CEDEX02, FRANCE YAMAHA ELECTRONICS (UK) LTD. YAMAHA HOUSE, 200 RICKMANSWORTH ROAD WATFORD, HERTS WD1 7JS, ENGLAND YAMAHA SCANDINAVIA A.B. J A WETTERGRENS GATA 1, BOX 30053, 400 43 VÄSTRA FRÖLUNDA, SWEDEN YAMAHA MUSIC AUSTRALIA PTY, LTD. 17-33 MARKET ST., SOUTH MELBOURNE, 3205 VIC...
