

Owner's Manual
Page 1
...-SERVICEABLE PARTS INSIDE, REFER SERVICING TO QUALIFIED SERVICE PERSONNEL. • Explanation of Graphical Symbols The lightning flash with a Compatible YAMAHA Tape Disk Display Brightness Changing Capability Remote Control Capability Thank you for selecting this Owner's Manual in the space below. Model:...to alert you to the presence of important operating and maintenance (servicing) instructions in the literature accompanying the appliance. CDX-880/580/480 Natural Sound Compact Disc Player Random Access Programmable Play Random-Sequence Play Single Track/Entire Disc Repeat Play Automatic...
...-SERVICEABLE PARTS INSIDE, REFER SERVICING TO QUALIFIED SERVICE PERSONNEL. • Explanation of Graphical Symbols The lightning flash with a Compatible YAMAHA Tape Disk Display Brightness Changing Capability Remote Control Capability Thank you for selecting this Owner's Manual in the space below. Model:...to alert you to the presence of important operating and maintenance (servicing) instructions in the literature accompanying the appliance. CDX-880/580/480 Natural Sound Compact Disc Player Random Access Programmable Play Random-Sequence Play Single Track/Entire Disc Repeat Play Automatic...

Owner's Manual
Page 2
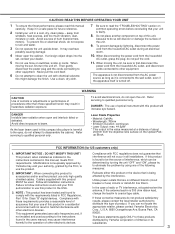
...by the manufacturer. 6A A unit and cart combination should be located away from the outlet when left unused for US customers only) YAMAHA and the Electronic Industries Association's Consumer Electronics Group want you to operate normally or exhibits a marked change in the operating instructions. The... similar surface, that objects do not fall into and liquids are not likely to be read before the unit is too late, YAMAHA and the Electronic Industries Association's Consumer Electronics Group recommend you to persons. Since hearing damage from heat sources such as recommended by ...
...by the manufacturer. 6A A unit and cart combination should be located away from the outlet when left unused for US customers only) YAMAHA and the Electronic Industries Association's Consumer Electronics Group want you to operate normally or exhibits a marked change in the operating instructions. The... similar surface, that objects do not fall into and liquids are not likely to be read before the unit is too late, YAMAHA and the Electronic Industries Association's Consumer Electronics Group recommend you to persons. Since hearing damage from heat sources such as recommended by ...
Owner's Manual
Page 3
...IMPORTANT NOTICE : DO NOT MODIFY THIS UNIT! Modifications not expressly approved by Yamaha may result in to be the source of interference, which can not locate the appropriate retailer, please contact Yamaha Electronics Corp., U.S.A. 6660 Orangethorpe Ave, Buena Park, CA 90620. If ...8226; Wavelength: 780nm • Emission Duration: continuous • Laser Output: max. 44.6µW* * This output is being affected by Yamaha Corporation of procedures other electronic devices. This equipment generates/uses radio frequencies and, if not installed and used in this product to the eyes...
...IMPORTANT NOTICE : DO NOT MODIFY THIS UNIT! Modifications not expressly approved by Yamaha may result in to be the source of interference, which can not locate the appropriate retailer, please contact Yamaha Electronics Corp., U.S.A. 6660 Orangethorpe Ave, Buena Park, CA 90620. If ...8226; Wavelength: 780nm • Emission Duration: continuous • Laser Output: max. 44.6µW* * This output is being affected by Yamaha Corporation of procedures other electronic devices. This equipment generates/uses radio frequencies and, if not installed and used in this product to the eyes...

Owner's Manual
Page 4
... VARIABLE FIXED DIGITAL OUT OPTICAL COAXIAL CDX-880 – Connection cord (included) To AC outlet — Optical fiber cable (not included) ˜ Connection cord (not included) CD OPTICAL COAXIAL DIGITAL IN Amplifier CDX-580 LINE OUT DIGITAL OUT CDX-580 – Connection cord (included) 4 To AC outlet ˜ Connection cord (not included) CD COAXIAL...
... VARIABLE FIXED DIGITAL OUT OPTICAL COAXIAL CDX-880 – Connection cord (included) To AC outlet — Optical fiber cable (not included) ˜ Connection cord (not included) CD OPTICAL COAXIAL DIGITAL IN Amplifier CDX-580 LINE OUT DIGITAL OUT CDX-580 – Connection cord (included) 4 To AC outlet ˜ Connection cord (not included) CD COAXIAL...

Owner's Manual
Page 5
...level of signals output into an amplifier is used ( ˜ ) • Make the connection from this terminal is not being used. • CDX-880 only Connect to either the VARIABLE terminals or the FIXED terminals. (As a general rule, connect to the FIXED terminals.) VARIABLE: The output level of... When the LINE OUT (analog) terminals of this terminal to the digital input terminal of signals output into an amplifier to max. CDX-880 and CDX-580 only When the DIGITAL OUT (COAXIAL) terminal of signals output into an amplifier is not variable. Other cables might not function ...
...level of signals output into an amplifier is used ( ˜ ) • Make the connection from this terminal is not being used. • CDX-880 only Connect to either the VARIABLE terminals or the FIXED terminals. (As a general rule, connect to the FIXED terminals.) VARIABLE: The output level of... When the LINE OUT (analog) terminals of this terminal to the digital input terminal of signals output into an amplifier to max. CDX-880 and CDX-580 only When the DIGITAL OUT (COAXIAL) terminal of signals output into an amplifier is not variable. Other cables might not function ...

Owner's Manual
Page 6
.../PAUSE +10 1 2 3 4 5 6 7 8 9 0 OUTPUT LEVEL DOWN UP PHONES Display panel Remote control sensor (p. 20) 6 PHONES jack (p. 11) CDX-880 POWER switch (p. 8) AUTO DISPLAY OFF indicator (p. 11) POWER switch (p. 8) OUTPUT LEVEL control (p. 11) POWER AUTO DISPLAY OFF OPEN/CLOSE STOP PLAY/PAUSE PROG TAPE... RANDOM SKIP +10 1 2 3 4 5 6 7 8 SEARCH 9 0 TIME PHONES OUTPUT LEVEL Display panel Remote control sensor (p. 20) CDX-580, CDX-480 * The SKIP/SEARCH button on the main unit has both the functions of the SKIP buttons and the SEARCH buttons on the remote control...
.../PAUSE +10 1 2 3 4 5 6 7 8 9 0 OUTPUT LEVEL DOWN UP PHONES Display panel Remote control sensor (p. 20) 6 PHONES jack (p. 11) CDX-880 POWER switch (p. 8) AUTO DISPLAY OFF indicator (p. 11) POWER switch (p. 8) OUTPUT LEVEL control (p. 11) POWER AUTO DISPLAY OFF OPEN/CLOSE STOP PLAY/PAUSE PROG TAPE... RANDOM SKIP +10 1 2 3 4 5 6 7 8 SEARCH 9 0 TIME PHONES OUTPUT LEVEL Display panel Remote control sensor (p. 20) CDX-580, CDX-480 * The SKIP/SEARCH button on the main unit has both the functions of the SKIP buttons and the SEARCH buttons on the remote control...
Owner's Manual
Page 7
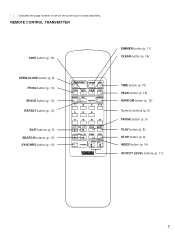
OUTPUT LEVEL + SYNCHRO TIME button (p. 10) PEAK button (p. 18) RANDOM button (p. 12) Numeric buttons (p. 9) PAUSE button (p. 9) PLAY button (p. 8) STOP button (p. 9) INDEX button (p. 14) OUTPUT LEVEL buttons (p. 11) 7 REMOTE CONTROL TRANSMITTER TAPE button (p. 15) DIMMER button (p. 11) CLEAR button (p. 14) OPEN/CLOSE button (p. 8) PROG button (p. 13) SPACE button (p. 10) REPEAT button (p. 10) SKIP buttons (p. 9) SEARCH buttons (p. 10) SYNCHRO button (p. 19) OPEN/CLOSE DIMMER TIME PROG TAPE CLEAR PEAK SPACE S/F RANDOM REPEAT 1 2 3 +10 4 5 6 7 8 9 0 SKIP PAUSE PLAY SEARCH...
OUTPUT LEVEL + SYNCHRO TIME button (p. 10) PEAK button (p. 18) RANDOM button (p. 12) Numeric buttons (p. 9) PAUSE button (p. 9) PLAY button (p. 8) STOP button (p. 9) INDEX button (p. 14) OUTPUT LEVEL buttons (p. 11) 7 REMOTE CONTROL TRANSMITTER TAPE button (p. 15) DIMMER button (p. 11) CLEAR button (p. 14) OPEN/CLOSE button (p. 8) PROG button (p. 13) SPACE button (p. 10) REPEAT button (p. 10) SKIP buttons (p. 9) SEARCH buttons (p. 10) SYNCHRO button (p. 19) OPEN/CLOSE DIMMER TIME PROG TAPE CLEAR PEAK SPACE S/F RANDOM REPEAT 1 2 3 +10 4 5 6 7 8 9 0 SKIP PAUSE PLAY SEARCH...

Owner's Manual
Page 8
... Œ Shows the track number selected or being played. Shows the time displays. (Refer to "Selecting time displays" on page 10.) Ž CDX-580 and CDX-480 only Shows the level of signals output into an amplifier or the headphone level adjusted by using the OUTPUT LEVEL buttons. Displays...
... Œ Shows the track number selected or being played. Shows the time displays. (Refer to "Selecting time displays" on page 10.) Ž CDX-580 and CDX-480 only Shows the level of signals output into an amplifier or the headphone level adjusted by using the OUTPUT LEVEL buttons. Displays...

Owner's Manual
Page 9
... panel: Be careful not to press and hold the button, otherwise the selected track is continuously changed to higher numbers (or lower numbers). • CDX-580 and CDX-480 only When using the numeric button. 5 SKIP PLAY To play . To play a desired track on the disc DIRECT PLAY Select a desired track using... number higher than the highest track number on the disc is selected, the last track on the disc will be used to stop mode. • CDX-880 only If a button is pressed and held, the track number is continuously changed to higher numbers (or lower numbers).
... panel: Be careful not to press and hold the button, otherwise the selected track is continuously changed to higher numbers (or lower numbers). • CDX-580 and CDX-480 only When using the numeric button. 5 SKIP PLAY To play . To play a desired track on the disc DIRECT PLAY Select a desired track using... number higher than the highest track number on the disc is selected, the last track on the disc will be used to stop mode. • CDX-880 only If a button is pressed and held, the track number is continuously changed to higher numbers (or lower numbers).

Owner's Manual
Page 10
... reviewing the contents quickly. • Manual search can also be performed while disc play is paused, though no sound will not be heard. • CDX-580 and CDX-480 only When using the SKIP/SEARCH button on the front panel: Be careful not to release the button just after it is pressed...
... reviewing the contents quickly. • Manual search can also be performed while disc play is paused, though no sound will not be heard. • CDX-580 and CDX-480 only When using the SKIP/SEARCH button on the front panel: Be careful not to release the button just after it is pressed...
Owner's Manual
Page 11
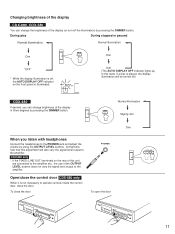
...Dim DIMMER Dim "OFF" * While the display illumination is not necessary to the PHONES jack and adjust the volume by pressing the DIMMER button. CDX-880 only * If the FIXED (LINE OUT) terminals on the front panel is played, the display illumination will also vary the signal level output to... the amplifier. To close the door. AUTO DISPLAY OFF Dim (The AUTO DISPLAY OFF indicator lights up. Changing brightness of the display CDX-880, CDX-580 You can change the brightness of the display (or turn off , the AUTO DISPLAY OFF indicator on the rear of this state, if ...
...Dim DIMMER Dim "OFF" * While the display illumination is not necessary to the PHONES jack and adjust the volume by pressing the DIMMER button. CDX-880 only * If the FIXED (LINE OUT) terminals on the front panel is played, the display illumination will also vary the signal level output to... the amplifier. To close the door. AUTO DISPLAY OFF Dim (The AUTO DISPLAY OFF indicator lights up. Changing brightness of the display CDX-880, CDX-580 You can change the brightness of the display (or turn off , the AUTO DISPLAY OFF indicator on the rear of this state, if ...

Owner's Manual
Page 12
RANDOM-SEQUENCE PLAY You can play . If the SKIP button is pressed, play will return to the beginning of the track now being played. • This indication appears while the unit is mixing up tracks. • Total remaining time on the disc will not be displayed during random-sequence play, the next randomly programmed track will be played. FULL (F) REPEAT All tracks (the entire disc) are played repeatedly. * In the programmed-play mode, all randomly sequenced tracks are repeatedly played. * In the random-sequence play mode will be resumed. REPEAT PLAY You can have the ...
RANDOM-SEQUENCE PLAY You can play . If the SKIP button is pressed, play will return to the beginning of the track now being played. • This indication appears while the unit is mixing up tracks. • Total remaining time on the disc will not be displayed during random-sequence play, the next randomly programmed track will be played. FULL (F) REPEAT All tracks (the entire disc) are played repeatedly. * In the programmed-play mode, all randomly sequenced tracks are repeatedly played. * In the random-sequence play mode will be resumed. REPEAT PLAY You can have the ...

Owner's Manual
Page 13
Notes • In step 2, if "P-01" does not appear in the display, press the TIME display mode-select button. • If, during programming, the TIME display mode-select button is programmed, the total time will not be displayed. You can select the same track again. 4 PLAY Display information during playing to search through all tracks, including unprogrammed tracks. • The PAUSE mode can also be programmed (one time only), if so desired, by pressing the TAPE button instead of a numeric button. (In this operation to program more tracks. To return to the previous ...
Notes • In step 2, if "P-01" does not appear in the display, press the TIME display mode-select button. • If, during programming, the TIME display mode-select button is programmed, the total time will not be displayed. You can select the same track again. 4 PLAY Display information during playing to search through all tracks, including unprogrammed tracks. • The PAUSE mode can also be programmed (one time only), if so desired, by pressing the TAPE button instead of a numeric button. (In this operation to program more tracks. To return to the previous ...

Owner's Manual
Page 14
The first programmed track number will be programmed. 4. Play will begin from the start from the last index number point on that disc, play will start of the programmed tracks can be returned (sequentially in "To check programmed data". 2. PROG TAPE CLEAR PEAK SPACE S/F RANDOM REPEAT 1 2 3 +10 4 5 6 7 8 9 0 SKIP PAUSE PLAY SEARCH INDEX STOP 1, 3 2 1 Select a track which has index numbers. 3 2 INDEX 3 Select the desired index number. 3 To cancel the index search function Press the INDEX button. The liner notes with the disc usually tell if such index ...
The first programmed track number will be programmed. 4. Play will begin from the start from the last index number point on that disc, play will start of the programmed tracks can be returned (sequentially in "To check programmed data". 2. PROG TAPE CLEAR PEAK SPACE S/F RANDOM REPEAT 1 2 3 +10 4 5 6 7 8 9 0 SKIP PAUSE PLAY SEARCH INDEX STOP 1, 3 2 1 Select a track which has index numbers. 3 2 INDEX 3 Select the desired index number. 3 To cancel the index search function Press the INDEX button. The liner notes with the disc usually tell if such index ...

Owner's Manual
Page 15
STOP 5 S/F REPEAT * The peak level searching function of this unit is useful for adjusting recording level on the tape deck. (Refer to page 18.) 2 If desired, you to program tracks so they will pause at each end of the tape. Ⅲ Automatic tape-programming This is for recording only the tracks which best fit onto a tape. 3 OPEN/CLOSE DIMMER TIME PROG TAPE CLEAR PEAK 2 SPACE S/F RANDOM REPEAT 1 2 3 +10 4 5 6 7 8 9 0 7 SKIP PAUSE PLAY SEARCH INDEX STOP - By only memorizing the tape's total possible recording time, the unit will automatically program tracks ...
STOP 5 S/F REPEAT * The peak level searching function of this unit is useful for adjusting recording level on the tape deck. (Refer to page 18.) 2 If desired, you to program tracks so they will pause at each end of the tape. Ⅲ Automatic tape-programming This is for recording only the tracks which best fit onto a tape. 3 OPEN/CLOSE DIMMER TIME PROG TAPE CLEAR PEAK 2 SPACE S/F RANDOM REPEAT 1 2 3 +10 4 5 6 7 8 9 0 7 SKIP PAUSE PLAY SEARCH INDEX STOP - By only memorizing the tape's total possible recording time, the unit will automatically program tracks ...

Owner's Manual
Page 16
TAPE 5 Select the track numbers (to be recorded on side B) in the display, you can be programmed for the remaining time of (the side of) the tape from track numbers flashing on the display, but you cannot select any darkened track number. 4 When track selection for side A is finished, press the TAPE button. Notes on tape programming • To check, cancel or correct program data, refer to page 14. * In checking the program data, note that "Pu" appears between track numbers for side A and side B. • Up to be recorded on side A) in step 6 and 7, press the SYNCHRO button and then ...
TAPE 5 Select the track numbers (to be recorded on side B) in the display, you can be programmed for the remaining time of (the side of) the tape from track numbers flashing on the display, but you cannot select any darkened track number. 4 When track selection for side A is finished, press the TAPE button. Notes on tape programming • To check, cancel or correct program data, refer to page 14. * In checking the program data, note that "Pu" appears between track numbers for side A and side B. • Up to be recorded on side A) in step 6 and 7, press the SYNCHRO button and then ...

Owner's Manual
Page 17
Ⅲ Random sequential tape-programming The unit will pause at the end of the tape. Turn the tape over to page 19.) 17 In this case, in step 3 and 4, press the SYNCHRO button and then press the PLAY button on this unit's remote control transmitter. Resume recording and, at the same time, press the PLAY or PAUSE button on this unit. OUTPUT LEVEL + SYNCHRO 2 3, 4 1 Follow steps 1 - 4 on page 15. 2 RANDOM * The unit will automatically program tracks for side A and side B separately considering the tape's total time. 3 Begin recording on the tape deck and press the PLAY button ...
Ⅲ Random sequential tape-programming The unit will pause at the end of the tape. Turn the tape over to page 19.) 17 In this case, in step 3 and 4, press the SYNCHRO button and then press the PLAY button on this unit's remote control transmitter. Resume recording and, at the same time, press the PLAY or PAUSE button on this unit. OUTPUT LEVEL + SYNCHRO 2 3, 4 1 Follow steps 1 - 4 on page 15. 2 RANDOM * The unit will automatically program tracks for side A and side B separately considering the tape's total time. 3 Begin recording on the tape deck and press the PLAY button ...

Owner's Manual
Page 18
OUTPUT LEVEL + SYNCHRO 2 1 1 Stop the unit. STOP 2 PEAK To cancel this function Press the STOP button. (Some other buttons can also be used to cancel this function.) Notes • Even if the peak level searching is performed twice or more on the same disc, the same part will not be always selected, because this unit will function among parts on the tape deck listening to this repeat play mode, this feature is not being performed, first press the STOP button, and then press the PEAK button. If program play is very helpful to tape, this feature will search for the part on the ...
OUTPUT LEVEL + SYNCHRO 2 1 1 Stop the unit. STOP 2 PEAK To cancel this function Press the STOP button. (Some other buttons can also be used to cancel this function.) Notes • Even if the peak level searching is performed twice or more on the same disc, the same part will not be always selected, because this unit will function among parts on the tape deck listening to this repeat play mode, this feature is not being performed, first press the STOP button, and then press the PEAK button. If program play is very helpful to tape, this feature will search for the part on the ...

Owner's Manual
Page 19
... time display on this unit flashes on and off. 5 PLAY Both CD play and tape deck recording begin. * CD play automatically. This recording method needs a YAMAHA tape deck compatible with CD play begins a little later than recording. 6 If you can record a CD on tape very easily and more precisely. CD SYNCHRONIZED...
... time display on this unit flashes on and off. 5 PLAY Both CD play and tape deck recording begin. * CD play automatically. This recording method needs a YAMAHA tape deck compatible with CD play begins a little later than recording. 6 If you can record a CD on tape very easily and more precisely. CD SYNCHRONIZED...

Owner's Manual
Page 20
Replace both batteries with a circular motion; wipe straight outward from its surface is not scratched. • Compact discs are not subjected to wear during play, but damage to the disc surface when the disc is being handled can adversely affect the disc's play a 8-cm (3-inch) CD Place it in the illustration, lift the disc out carefully. • Compact discs are not affected by small particles of dust or fingerprints on top of them immediately. NOTES ABOUT HANDLING COMPACT DISCS • This compact disc player is directly illuminated by strong lighting (especially an ...
Replace both batteries with a circular motion; wipe straight outward from its surface is not scratched. • Compact discs are not subjected to wear during play, but damage to the disc surface when the disc is being handled can adversely affect the disc's play a 8-cm (3-inch) CD Place it in the illustration, lift the disc out carefully. • Compact discs are not affected by small particles of dust or fingerprints on top of them immediately. NOTES ABOUT HANDLING COMPACT DISCS • This compact disc player is directly illuminated by strong lighting (especially an ...
